Showing posts with label C#. Show all posts

26 July 2016

HoloLens CubeBouncer application part 5-using gravity, adding more speech & sound, and app icons

Preface

imageIn the previous post I showed you how to integrate speech recognition. This post mostly builds upon stuff we now already know. It introduces actually one new concept. From the very first post you might recall I instructed you to turn off gravity in the rigid body component. Hence, the cubes float in the air. But they still have mass, so like any body a cube has inertia. You will notice that when you bounce two cubes – they keep on moving, although they slowly lose speed (because we also defined drag). If you were to set drag to zero, you get the effect as if the cubes move through vacuum – they just keep on moving, as Sir Isaac Newton described in the first of his three laws of motion. So if you were to suddenly switch on gravity, the floating cubes would drop to the floor. Of course, in real life you would not be able to switch gravity on and off at will, but in AR magic is just a matter of setting the right property. And that is exactly what we are going to do.

Down she goes!

We open the CubeManipulator script, and add a one line method:

public void OnDrop()
{
  _rigidBody.useGravity = true;
}

Did I mention using Unity feels a lot like cheating? I did, right? We also need to add a line to the top of the OnRevert method, or else the cube will move to it’s old position when we call “go to start”, but after that it will immediately drop to the floor again. That’s not what we want. when the cube returns, we turn on gravity off for that particular cube.

public IEnumerator OnRevert()
{
  _rigidBody.useGravity = false;
  //rest of method

And then it’s a matter of adding a new command to the SpeechManager:

if (cmd == DropCommand)
{
  if (GazeManager.Instance.Hit)
  {
    GazeManager.Instance.HitInfo.collider.gameObject.SendMessage("OnDrop");
  }
}

Of course you have to define “DropCommand” and add it to the the keyword recognizer like in the previous post, but that’s all. Rebuild the project from Unity, deploy the Visual Studio solution, look at a cube, say “drop” and it falls to the floor. And if you say “go to start” it will still go back to it’s old position and stay there. Easy, right?

Dropping and returning all cubes

By now I think you won’t find this very hard to understand anymore. First, we need actually implement the code in the MainStarter, as this is the object that knows which cubes are available:

public void RevertAll()
{
  foreach (var c in _cubes)
  {
    c.SendMessage("OnRevert");
  }
}

public void DropAll()
{
  foreach (var c in _cubes)
  {
    c.SendMessage("OnDrop");
  }
}

Every cube knows where it came from, so we only have to call “OnRevert” on every cube. In the same line, calling “OnDrop” for every cube will drop all cubes. And in the SpeechManager we just add two commands to recognize: “drop” and “total recall”, or whatever for phrases you choose for these commands. When the phrases are recognize, simply call the right method:

if (cmd == RevertCommand)
{
    _mainStarter.RevertAll();
}

if (cmd == DropAllCommand)
{
   _mainStarter.DropAll();
}

Of course you have to define the RevertCommand and the DropCommand fields again and add them to the KeywordRecognizer, but once again – very little code, powerful functionality. Clever use of and already very clever the SDK goes a long way.

Adding some missing sounds
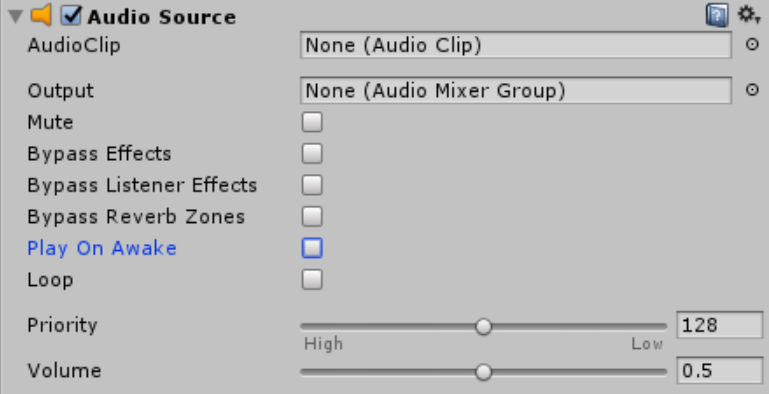
imageSo in the video I showed in the first post, “create new grid” gave a kind of ping-sound, a returning cube a whistling sound, and “total recall” made a kind of  “tadadaah” sound. I find these kind of affirmative sounds very useful for giving feedback to the user that the app understands you, although in practice you might go for a little less garish sounds than I did ;). 

I added three sounds to Assets/Custom/Audio in Unity, then added an audio source to the Managers game object. I only changed the settings “Play on awake” (to off) and Volume (to 0.5)

Then we proceed to MainStarter.cs, and we add two public AudioClips fields and a private AudioSource clip:

public AudioClip ReadyClip;

public AudioClip ReturnAllClip;

private AudioSource _audioSource;

The Audio source of course needs to be initialized in Start:

_audioSource = GetComponent();

At the top of the CreateGrid method we add one line:

private void CreateGrid(Vector3 hitPosition)
{
  _audioSource.PlayOneShot(ReadyClip);

And we do something similar at the top of the RevertAll method

public void RevertAll()
{
  _audioSource.PlayOneShot(ReturnAllClip);

Go back to Unity, drag the Audio assets “Ready” and “Return all” on top of the Main Starter Script in Managers. We have done that a couple of times already but the be sure, one more time a picture that shows what I mean here:
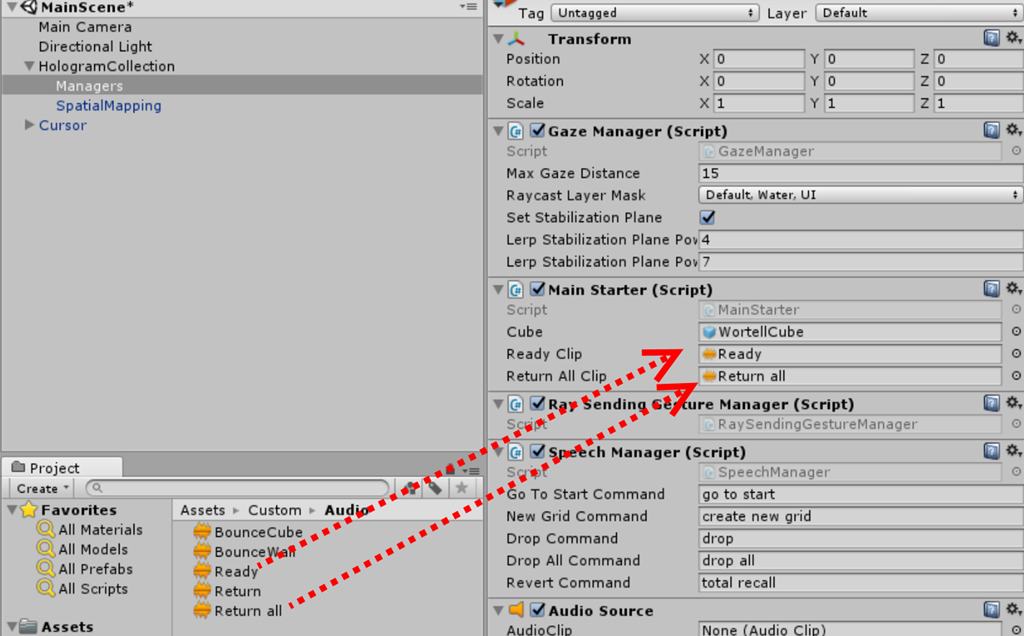
image

Then rebuild the project, re-deploy from Visual Studio, and sure enough you will hear the sounds the “pringgg!” sound when the grid is created (at app start-up, and when you say “create new grid”), and the “tadadaah” when you say “totall recall”

Then for the final sound – the whistling sound the cube makes when it returns. Well, that’s almost the same, only now we go to the CubeManipulator script, and add a field:

public AudioClip ComeBackClip;

And on top of the of the OnRevert method we just need this?

public IEnumerator OnRevert()
{
  _audioSource.PlayOneShot(ComeBackClip);

Go back to Unity, select the WortellCube prefab and drag the “Return” Audio assets on top of the field “Come Back Clip” that now has appeared on the CubeManipulator script component. Rebuild your project, deploy the Visual Studio solution and indeed, the cube now returns with a whistling sound. when your say “go to start”.

The problem now only is – when you say “total recall” now, the app will play the “tadadaah” sound and a lot of time the whistling sound simultaneously, resulting in quite a cacophony. After all, we are calling the OnRevert method for every single cube. This is not a good user experience. So we will have to change a few things.

Some tweaks to improve the sound experience

We need some way to tell the cubes not to play their sound on “total recall”. To that end, we first need to change the OnRevert method as follows:

public IEnumerator OnRevert(object doPlaySound)
{
  if ((bool) doPlaySound)
  {
    _audioSource.PlayOneShot(ComeBackClip);
  }

Then we go back to the SpeechManager, and in the method KeywordRecognizer_OnPhraseRecognized we add “true” to the OnRevert message that is fired when “go to start” is recognized

if (cmd == GoToStartCommand)
{
  if (GazeManager.Instance.Hit)
  {
    GazeManager.Instance.HitInfo.collider.gameObject.SendMessage("OnRevert", true);
  }
}

In contrast, in the MainStarter script we need to add false in OnRevert:

public void RevertAll()
{
  _audioSource.PlayOneShot(ReturnAllClip);
  foreach (var c in _cubes)
  {
    c.SendMessage("OnRevert", false);
  }
}
imageAnd now if you say “totall recall” you will once again only hear the “tadadaa”, while a “go to start” still lets one cube return with the whistling sound.

Tiles and naming

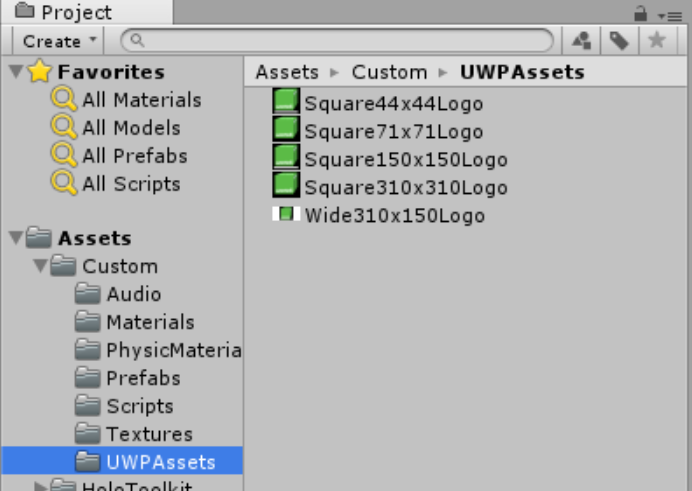
I have added 5 files to the “Assets/Custom/UWPAssets” folder in Unity (see right). These are all 200% assets. So what you need to do is:

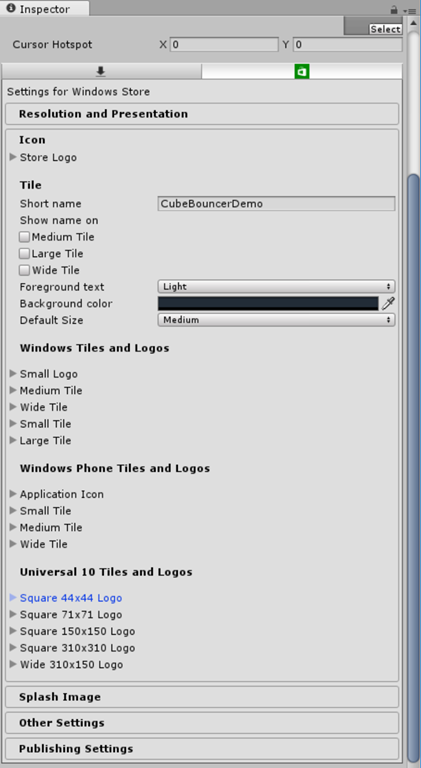
  • Hit File/Build settings/Player settings
  • Go to the right, to the inspector.
  • Expand the Icon pane
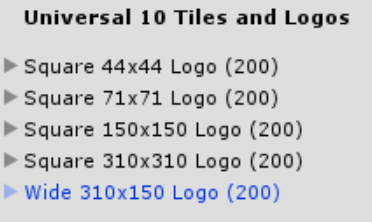
  • Scroll all the way down to “Universal 10 tiles and Logos”
image

  • Expand the Square 44x44 Logo pane
  • Scroll down to the “Scale 200%, (88x88 pixels)”
  • Hit the “select” button in the square on the right
  • Select “Square44x44Logo” from the popup

Your net result should be this.
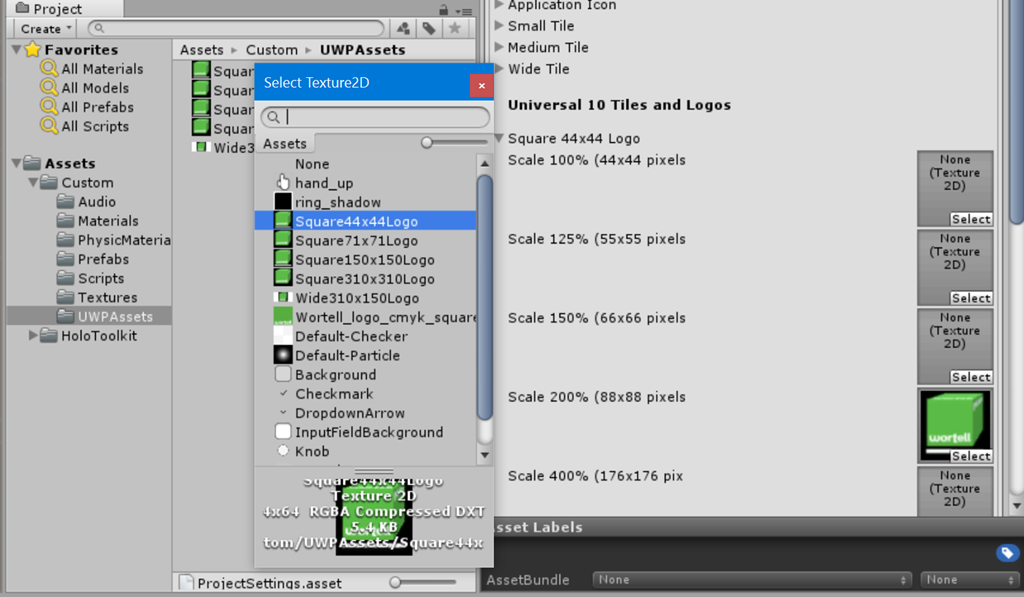
image

image

Repeat this for the other for logo formats. When you are done and you collapse all the image panes, they should all have the suffix”(200)” now.


Finally, we scroll all the way to the top again, and change the following settings:

  • Change the company name into whatever you like – I took “LocalJoost Ltd.” This not not mandatory
  • Change “Product name” to “CubeBouncer”
  • Hit the “Select” button on the “Default icon” square and once again select the 310x310 square logo
  • Under “Icon”, change short name into “CubeBouncer”
  • Check “Large tile” and “Wide tile” under “Show name on”.

Net result:
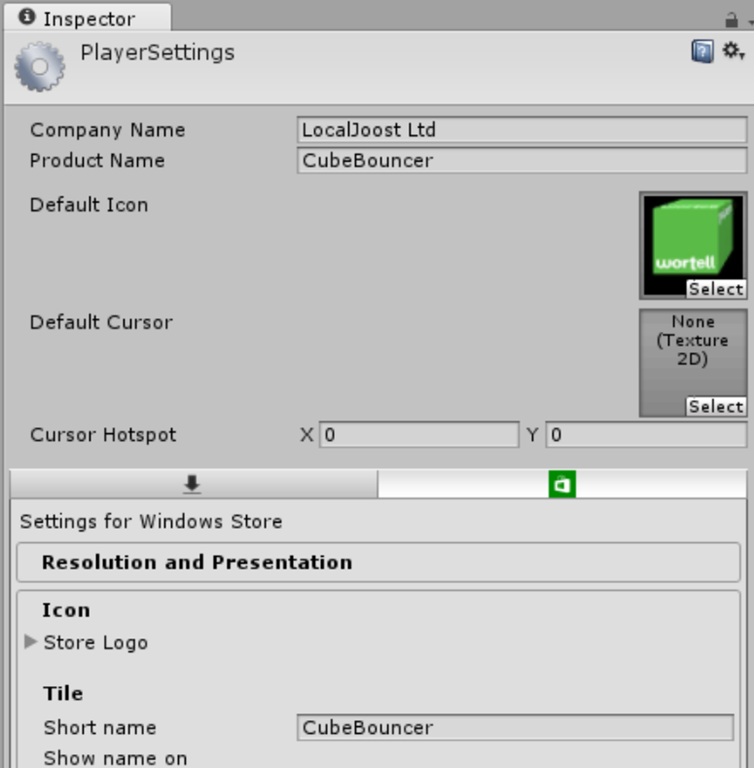
image

At this point it’s best to close Visual Studio, and delete the generated solution from the App folder. We have effectively changed the app title, yet you will notice that it does not have any effect if you keep the solution. If you generate the solution anew, you will see it’s name is different too – it’s now called CubeBouncer.sln, no longer CubeBouncerDemo.sln. If you deploy it to a HoloLens, you will see either this in the all apps menu
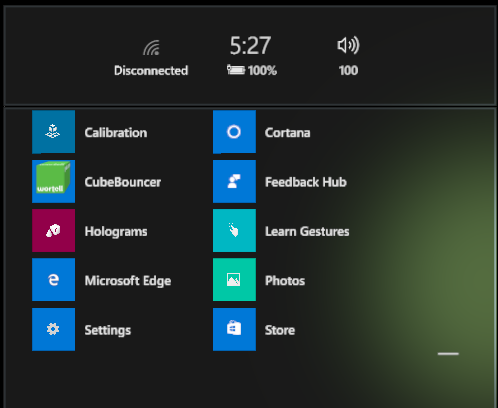
image

and this one when you have pinned it:
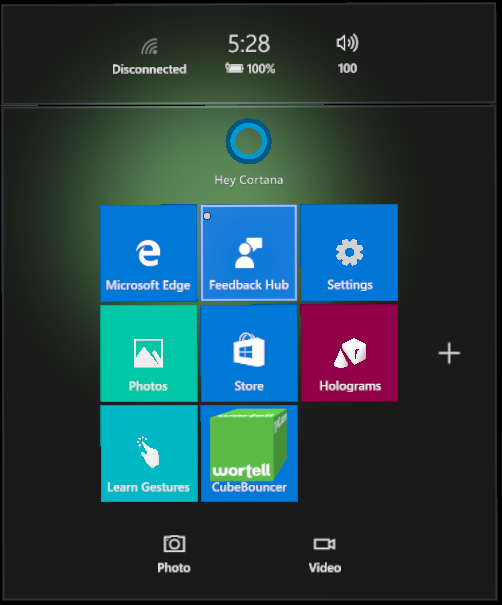
image

And that’s it! Were done!

Concluding remarks

After setting up Unity, adding air taps, force, spatial sound, voice recognition, gravity and some imagery we have a simple but functional HoloLens app that demonstrates a lot (but not nearly all) of the HoloLens interaction model. I hope you enjoyed this trip, I sure had a lot of fun building and documenting it. It was a very educating experience for me and I found it a very fitting subject for the 256th post on this blog ;). Should you have any remarks, questions or improvements, let me know.

The source code for the final project can be downloaded here.

Oh… There is still a very minor issue with it, though. I wonder if anyone actually finds it. András Velvárt is excluded from competition ;). Let me know if you find it. 

23 July 2016

HoloLens CubeBouncer application part 4-integrating speech commands and moving cubes by code

Preface

In the previous post I showed how you could interact with the cubes using air taps, utilizing the physics engine. In this blog post I am going to show how to move the cubes by code (bypassing the physics engine) – and doing so using speech commands.

But first…

The funny thing is - when retracing you steps and documenting them, you are found out things can be done in a smarter way. It’s like giving a code review to your slightly younger, slightly less knowledgeable self. In post 2, I state you should drag the MainStarter script onto the HologramCollection game object. Although that works, in hindsight it’s better to put that under the HologramCollection/Managers object. So please remove the script from the HologramCollection object, drag it anew from your assets on top of the Managers object, then drag the WortellCube prefab on top of the Cube field again.

HoloLens speech recognition 101

The speech recognition API for HoloLens in Unity3D is so simple that there’s basically not much else than 101. I had a look at Rene Schulte’s HoloWorld speech manager and was like… is that all? Well, apparently it is. So I created my own SpeechManager script, and added it to the Managers object. It’s basically a modified copy of Rene’s. Why re-invent the wheel when people smarter than yourself already have done so, right?

The speech manager at this point implements only two commands:

  • “create new grid”
  • “go to start”

and looks like this:

using UnityEngine;
using HoloToolkit.Unity;
using UnityEngine.Windows.Speech;

public class SpeechManager : MonoBehaviour
{
  public string GoToStartCommand = "go to start";

  public string NewGridCommand = "create new grid";

  private KeywordRecognizer _keywordRecognizer;

  private MainStarter _mainStarter;

  // Use this for initialization
  void Start()
  {
    _mainStarter = GetComponent<MainStarter>();
    _keywordRecognizer = new KeywordRecognizer(
      new[] { GoToStartCommand, NewGridCommand });
    _keywordRecognizer.OnPhraseRecognized += KeywordRecognizer_OnPhraseRecognized;
    _keywordRecognizer.Start();
  }

  private void KeywordRecognizer_OnPhraseRecognized(PhraseRecognizedEventArgs args)
  {
    var cmd = args.text;

    if (cmd == NewGridCommand)
    {
      _mainStarter.CreateNewGrid();
    }

    if (cmd == GoToStartCommand)
    {
      if (GazeManager.Instance.Hit)
      {
        GazeManager.Instance.HitInfo.collider.gameObject.SendMessage(
          "OnRevert");
      }
    }
  }

  private void OnDestroy()
  {
    if (_keywordRecognizer != null)
    {
      if (_keywordRecognizer.IsRunning)
      {
        _keywordRecognizer.Stop();
      }
      _keywordRecognizer.Dispose();
    }
  }
}

In short – when the keywords “go to start” are recognized, “OnRevert” is called on the game object that you are looking at. We have seen this kind of message sending in the previous post already.If you say “create new grid” the CreateNewGrid method is called. This tries to find the MainStarter class as a component (it being at the same level in the Managers game object, it fill find it) and call the method directly. But neither methods are implemented, you will even notice the squiggly lines under CreateNewGrid. So let’s tackle that first, because now our project does not even compile.

(Re)creating a grid.

Creating a new grid is, simply put, deleting the old cubes are creating a new set. This implies that we must know which cubes are present now, something we don’t know now. This actually requires very little extra code:

private readonly List<GameObject> _cubes = new List<GameObject>();

public void CreateNewGrid()
{
  foreach (var c in _cubes)
  {
      Destroy(c);
  }
  _cubes.Clear();

  _distanceMeasured = false;
  _lastInitTime = DateTimeOffset.Now;
}

Very simple – all cubes created are stored in a list. So we need to destroy them one by one, and then we set the _distanceMeasured and _lastInitTime back to their start value – and the Update method that is called once per frame will do the rest. We also have to add one extra line to the CreateCube method in order to collect the created cube, at the end:

private void CreateCube(int id, Vector3 location, Quaternion rotation)
{
  var c = Instantiate(Cube, location, rotation) as GameObject;
  //Rotate around it's own up axis so up points TO the camera
  c.transform.RotateAround(location, transform.up, 180f);
  var m = c.GetComponent<CubeManipulator>();
  m.Id = id;
  _cubes.Add(c);
}

imageSo now the only thing you need to do is drag the SpeechManager script on top of the Managers object too. When you are done, the Managers object should look like you see at the right.

Rebuild the UWP app from Unity, and deploy it using Visual Studio. And there we are. When you said “create new grid” the grid is immediately updated. Still without the ringing sound that shows in my initial video, but we will add that in a later stage.

Sending a cube back to where it came from

As we saw, we already implemented a call to an OnRevert method in the Speech Manager to recall the cube we are looking at to its original position, but we have not implemented it. To this intent, a cube needs to know where it came from and how it was rotated when it was created. So we add the following private fields to the cube:

private Vector3 _orginalPosition;

private Quaternion _originalRotation;

And we set those fields in Start by reading the information from the transform:

void Start()
{
  _rigidBody = GetComponent<Rigidbody>();
  _audioSource = GetComponent<AudioSource>();

  _orginalPosition = transform.position;
  _originalRotation = transform.rotation;
}

So now we need to implement the “OnRevert” method itself like this:

public IEnumerator OnRevert()
{
   var recallPosition = transform.position;
   var recallRotation = transform.rotation;

  _rigidBody.isKinematic = true;

  while (transform.position != _orginalPosition &&
         transform.rotation != _originalRotation)
  {
    yield return StartCoroutine(
      MoveObject(transform, recallPosition, _orginalPosition,
                 recallRotation, _originalRotation, 1.0f));
  }

  _rigidBody.isKinematic = false;
}

So first we we make sure we retain the current position and rotation. Then we set the isKinematic property of the rigid body to true. This effectively turns off the physics engine, so now we can move the cube ourselves. And then we loop over a so-called coroutine until the cube is back to it’s original position and rotation. I think of it as Unity’s equivalent of an async operation. Basically it says – animate the current transform smoothly from the current position to the original position, and at the same time rotate it from it’s current rotation to the original rotation, in 1.0 second. The coroutine itself is implemented like this:

// See http://answers.unity3d.com/questions/711309/movement-script-2.html
IEnumerator MoveObject(Transform thisTransform, Vector3 startPos, Vector3 endPos, 
  Quaternion startRot, Quaternion endRot, float time)
{
  var i = 0.0f;
  var rate = 1.0f / time;
  while (i < 1.0f)
  {
      i += Time.deltaTime * rate;
      thisTransform.position = Vector3.Lerp(startPos, endPos, Mathf.SmoothStep(0f, 1f, i));
      thisTransform.rotation = Quaternion.Lerp(startRot, endRot, Mathf.SmoothStep(0f, 1f, i));
      yield return null;
  }
}

How this works, is – as you can read in the source – is explained here. That sample only applies to moving an object - I have applied that knowledge to both moving and rotating. It basically is a way to smooth out the animation – if you  pay close attention, you will see that the cube starts slows, speeds up very fast, and then slows down again. I must admit that I am quite missing some of the finer points myself still, but this is how it can be done. Important, by the way, is that isKinematic gets set to false again once the cube is back on its place. Fun detail – if a cube that is moving back to it’s start position hits another cube, it is bumped out of the way, because for the cube that is hit, the physics engine is still working ;)

Finally, at the top of the OnCollision method we need to make sure returning objects don’t interfere with other cubes in terms of making sound and other stuff.

void OnCollisionEnter(Collision coll)
{
  // Ignore returning bodies
  if (_rigidBody.isKinematic) return;

And now, if you say “go to start” when you are looking at a specific cube, it will move to the location it came from.

Concluding remarks

In the previous post I have showed you how to move objects using the physics engine - this post has showed you have how to integrate speech commands and move objects via code – remarkably little code, yet again. Once again, you can see the code of the project so far here.

13 July 2016

HoloLens CubeBouncer application part 3-air tapping the cubes away and adding spatial sounds

Preface

In the previous post I showed you how to create a neatly arranged grid aligned to your view in your HoloLens app. Now, it’s time to make a mess of it – I am going to show you how to employ air tap on the cubes to move the them around, and gaze to determine which way they go. Plus, we are going to add some sound to them – when they bounce against each other, and against the wall.

Steal some sounds

image

First of all, we need two short sound clips. One for two cubes hitting each other, one for a cube hitting a wall. Any clip will do, as long as it’s short. I took two from the “Free Casual Sounds SFX Pack” that you can find in the Unity Asset Store (Click Windows/Assets Store or hit CTRL+9)


imageBeware: importing directly from the store can get you more than you have bargained for, bloating your project with unnecessary stuff. I tend to create a new Unity3d project and import the package there first, to see what happens. And in this case I just cherry picked two sounds, that I called BounceCubel.wav and BounceBall.wav. Then I dragged into the Assets/Audio folder in Unity, as displayed here to the left.

Now it’s time for coding again. That is to say …

Steal some scripts

Writing code is awesome – not having to write code is even better. In the HoloLens toolkit there’s a script that almost does what we want. It’s called “GestureManager” and it’s in Assets\HoloToolkit\Input\Scripts. It’s a script that handles the air tap and sends a kind of message to a selected object. That is almost what we want. We need to copy and adapt it a little.

The next few steps are best done when Unity3d is not running, as it starts to parse scripts as soon as they appear in the folder:

  • Copy Assets\HoloToolkit\Input\Scripts\GestureManager.cs to. Assets\Custom\Scripts
  • Rename the file to RaySendingGestureManager.cs
  • Open RaySendingGestureManager.cs and change the class name to RaySendingGestureManager
  • Change “Singleton<GestureManager>” into “Singleton<RaySendingGestureManager>”
  • Remove the namespace namespace HoloToolkit.Unity
  • Add “using HoloToolkit.Unity” on top.
  • Find the method GestureRecognizer_TappedEvent
  • Change it to the following:
private void GestureRecognizer_TappedEvent(
     InteractionSourceKind source, int tapCount, Ray headRay)
{
    if (focusedObject != null)
    {
        focusedObject.SendMessage("OnSelect", headRay);
    }
}

Basically, the only thing you do, is pass on the headRay “Ray” as extra parameter to the focusedObject.SendMessage method. This means that Unity3d should search for a Script component in the selected GameObject, find a method “OnSelect” in there with a a single parameter of type object - and invoke that. This feels a bit Javascripty, only even less typed, and there is no punishment, either: if the method is not found, nothing happens. No error – just nothing. It that sense it’s like sending a message indeed – if no-one is listening, we don’t care. Talk about loose coupling. You can’t get much looser than this ;)

Why do we need to send the headRay? Because we want the selected object to know from which direction it’s being looked at when you tap. If you want to know the details of air tap, have a look at the rest of the script. For now, we should be content that there is a method called on the selected object – i.e. the WortellCube – when there is an air tap while the cursor is on it.

One more thing – we need to apply the script. Select the HologramCollection/Managers object in the Hierarchy pane, then hit the “Add Component” button, Type “Ray Sending” in the search box and add the Ray Sending Manager component. Net result should be this:

image

Message sent – now catch it!

Okay, so whenever someone air taps while their gaze is at ‘something’, Unity3D tries to call on “OnSelect” method. Let’s make sure that if that something is a WortellCube, it listens to it. Start as follows:

  • Select the “Assets/Custom/Scripts folder
  • Right click, hit Create/C# script
  • Call it “CubeManipulator”
  • Select the WortellCube Prefab
  • Drag the new script on top Inspector tab, below the “Add Component” button.
  • Hit File/Build Settings/Build and build the solution
  • Open the Visual Studio solution (or reload it)

Open the CubeBouncer.cs script, and change it so it looks like this:

using HoloToolkit.Unity;
using System.Collections;
using UnityEngine;

public class CubeManipulator : MonoBehaviour
{
    private Rigidbody _rigidBody;

    public int ForceMultiplier = 100;


    // Use this for initialization
    void Start()
    {
        _rigidBody = GetComponent<Rigidbody>();
    }

public void OnSelect(object ray) { if (!(ray is Ray)) return; var rayData = (Ray)ray; _rigidBody.AddForceAtPosition( new Vector3( rayData.direction.x * ForceMultiplier, rayData.direction.y * ForceMultiplier, rayData.direction.z * ForceMultiplier), GazeManager.Instance.Position); } } }

Since the script is now part of a compound object, I can easily get a reference to other components in that objects. In this case, we can get a reference to the RigidBody component. For performance reasons (and because I find it more tidy looking), we store that in a private field that is initialized in the Start method.

And then there’s the OnSelect method. After first checking if we indeed get a Ray supplied in the ray parameter, we simply call the RigidBody’s AddForceAtPosition with a Vector3D made out of the direction of the Ray, times 100, and the position where the cursor is now. And that’s it. Unity gives the Cube a push in the direction you are looking on the place where your gaze is locked on the cube. And off it goes, spinning into the void, bouncing off other cubes and walls. Notice the cubes slowly slow down by themselves. That is all caused by the physical characteristics – the bouncyness of the Physic Material, the weight and drag of the Rigid Body. Having written software that calculates bouncing at angles myself, it almost feels like cheating. But this is the awesome power of a fleshed out physics engine.

To see this stage you actually have to rebuild the project from Unity first again or you will get an “[Position out of bounds!]” error when you try to run the app on a HoloLens or the emulator. This is because we have added a public field again, which translates into a property that can be filled by Unity. Every time you add public field to a script you will have to rebuild the project from Unity.

There is a still a thing missing. The cubes bounces off each other in dead silence. Time to fix that, and make the experience more immersive.

Let’s make some noise!

First, we need to add three public and one private field to the CubeManipulator script:

private AudioSource _audioSource;

public int Id;

public AudioClip BounceTogetherClip;

public AudioClip BounceOtherClip;

_audioSource gets initialized in Start as well:

void Start()
{
  _rigidBody = GetComponent<Rigidbody>();
  _audioSource = GetComponent<AudioSource>();
}

And then we have to act on a collision. That is just another simple private method that is automatically called by Unity. And wouldn’t you know it, it’s called “OnCollision” – duh ;). So let’s add that to the script:

void OnCollisionEnter(Collision coll)
{
  // Ignore hits by cursors
  if (coll.gameObject.GetComponent<CursorManager>() != null) return;

  // Play a click on hitting another cube, but only if the it has a higher Id
  // to prevent the same sound being played twice
  var othercube = coll.gameObject.GetComponent<CubeManipulator>();
  if (othercube != null && othercube.Id < Id)
  {
    _audioSource.PlayOneShot(BounceTogetherClip);
  }

  // No cursor, no cube - we hit a wall.
  if (othercube == null)
  {
    if (coll.relativeVelocity.magnitude > 0.1)
    {
      _audioSource.PlayOneShot(BounceOtherClip);
    }
  }
}

So if a cube collides with a GameObject that has a CursorManager – it’s a cursor, so ignore it. But if it has a CubeManipulator - it’s a cube too! Then play the BounceTogetherClip AudioClip. But only if the Id of this cube is lower than the cube we hit – to prevent double sounds. If it was not a cursor or another cube, it was most likely a wall – so play the BounceOtherClip, but only if the cube hit the wall ‘hard enough’.You do this by checking the collision magnitude. I took a quite arbitrary value. Once again – it feels like cheating. Unity takes care of mostly everything.

Aside – don’t try to be smart and change “if (othercube != null && othercube.Id < Id)” into
if (othercube?.Id < Id)”. It will compile, it will run, and it will also mess up Unity3d. Avoid C# 6 constructs.

We only need to do a couple of things more to not only see but also hear our app at work. too. Save the script, then go back to Unity. Open the WortellCube prefab again, scroll down to the CubeManipulator script component. You will see – like expected – the script has three extra properties now: Id, Bounce Together Clip and Bounce Other Clip. So drag the Audio asset “BounceCube” on top of the Bounce Together Clip field, and BounceWall on top of Bounce Other Clips. Net result should be this:

image

Build the project again, and go back to Visual Studio. There is that tiny thing about the Id we have to solve. Because now we have an Id, but nothing is set yet. Remember that in the previous post the method CreateCube in MainStarter.cs had an id parameter that was not used? Well, now we are going to use it. We change that method a little by adding two lines:

private void CreateCube(int id, Vector3 location, Quaternion rotation)
{
  var c = Instantiate(Cube, location, rotation) as GameObject;
  //Rotate around it's own up axis so up points TO the camera
  c.transform.RotateAround(location, transform.up, 180f);
  var m = c.GetComponent<CubeManipulator>();
  m.Id = id;
}

And thus we assign the Id we need to make only one cube play the bounce together sound when two cubes hit. Deploy the project to a HoloLens or an emulator, and the cubes click when they bounce together, or emit a kind of boom when they hit the wall:

Also, if you have an actual HoloLens, try turning your head after launching some cubes – you will hear the sound actually coming from the right direction. This is because we have included an AudioSource component configured for Spatial Sound in the WortellCube prefab - and that travels along with the cube. Once again – it feels like cheating, but it works.

Concluding remarks

We have learned to intercept air taps, and apply directed force to a rigid body – making cubes all bounce by themselves (or actually, by Unity. We have also learned to act on collisions, and play spatial sound. Still by writing very, very little code. Next time – speech command and moving stuff yourself!

You can find, as always, the completed project so far here.

09 July 2016

HoloLens CubeBouncer application part 2-create the gaze aligned cube grid

Preface

In the previous post, I have showed you how to setup a very basic HoloLens application that only shows one floating cube – exactly on the spot where your head is when you start the app. You actually had to get up and look backwards to where your head was to see it. In this post I will show you how to dynamically create a grid of cubes, aligned with your head, based upon the available space. This space is defined by the distance HoloLens measures between you and where your gaze hits a physical object. Or, failing to find such a object (because you are staring in empty space or an object too far away) it will make a small ‘fixed’ grid.

But first some spatial mapping

In order to find a wall, we first have to instruct HoloLens to actually start looking for it. It’s not turned on by default in an app – it’s a resource intensive process and it would not make sense to turn in on in an app that does not use it. You might have noticed that the gazing cursor, which we added in the previous post, actually never appeared unless you looked directly at the lonely cube. Now we will make it appear when you look at a wall or object. Turning spatial mapping on is actually very easy:

 image

First, type “spatial” in the search box. This will search through all your asset folders. Then, locate the SpatialMapping prefab. In Unity3D, a prefab is a reusable set of components that can be used over and over again, without having to build it up from it’s parts and set all the properties every time you want use it. If you did follow my advice and had a look at Rick Barraza’s awesome Creative Coding series you will have had the concept explained.

Hit File/Build/Build settings to re-create the Visual Studio Solution, the deploy the app using Visual Studio. First, you won’t see much difference. But then suddenly the “Spatial Mesh” will appear, and you will the ‘gaze cursor’ following your gaze where ever it hits a wall. (indicated by a red arrow I added later to make it easier to find on the photo).

image

You can decide to leave it on while developing – some people find it fascinating to see HoloLens actually doing it’s magic trick. I think it’s a great tool to check if the app is actually mapping, but I also have found it to be visually distracting after a while. So after I have ascertained my app is doing it’s spatial mapping, I change it’s ‘Surface Material’ property to ‘Occusion’:

image

Create a prefab from our cube

In order to be able to dynamically create an object, we need to turn it into a prefab as well. That is actually very easy. Just grab your Cube and drag it into your Assets/Custom/Prefabs folder

image[31]

And give it a name. I called it “WortellCube”. Then proceed to delete the thing that is now called “WortellCube from the HologramCollection. We won’t need the static cube anymore. And now, my friends, halfway the 2nd episode on this hard core coder’s blog, we are finally nearing the place where actual coding takes place. Just one more step.

Creating a ‘script’

Any code in Unity3D is called a “script”. It supports a lot of languages and one of them is, fortunately, C#. There are all kinds of ways to do this, but I find the easiest one the following:

  • Open the Assets/Custom/Scripts folder
  • Right-click it, hit “Create”, then “C# script”
  • Name it “MainStarter”
  • Select “HologramCollection”
  • Drag the MainStarter script on top of the Inspector pane, below the “Add Component” button.

Net result should be this

image

There are at least two other ways that I know of to to create a C# script – this in my work flow.

Hit File/Build settings/Build. Open the resulting project in Visual Studio (or reload the project). Assuming you indeed selected the “Unity C# project” option as I advised in my previous post, the solution will look like this:

image

And there’s our Script. Now a proper C# class in a Visual Studio Solution.

Adding a game object

All right. So the ‘script’, a C# class, looks initially like this

using UnityEngine;
using System.Collections;

public class MainStarter : MonoBehaviour
{

    // Use this for initialization
    void Start()
    {

    }

    // Update is called once per frame
    void Update()
    {

    }
}

Now imagine, just for a second, this here veteran XAML coder and behavior nut when he saw this. A Unity script is actually called a behaviour. Granted – it’s spelled in The Queen’s English, but it really made my day. Far from ‘home’, still writing things called ‘behaviour’.  Apart from the name, that’s about where the similarities end. 

To get started, we first add a public field to the top of the class:

public class MainStarter : MonoBehaviour
{
    public GameObject Cube;

    // Use this for initialization
    void Start()
    {

    }

Yes. A public field. If you want to do Unity3D, get ready to meet some things that might hurt your coder’s feelings, and do some things you have learned to avoid like the plague.

Hit Save, go back to the Unity Editor, and after a few seconds tops you will see this (assuming you still have the HologramCollection object selected:

image

The Cube fields shows up. Now that’s the GameObject we can instantiate. So from our Assets/Prefabs folder we drag the WortellCube on top of the field that now says “None”:

image

And this should be the result. Hit File/Build Settings/Build, reload the project in Visual Studio, and now it’s time for real coding.

Building the initial script

As the comment that’s added by default added shows, there are some methods that are called on events that happen in the Unity object lifecycle. Note that those methods are private, but apparently they can be called anyway. A proper C# way would be to make a base class with overrideable public methods but hey, like I said, things are a bit different here. There is a whole host of private methods that can be called on an equal host of events, but that’s for later. Let’s first fill the Start method:

private bool _distanceMeasured;
private DateTimeOffset _lastInitTime;

// Use this for initialization
void Start()
{
  _distanceMeasured = false;
  _lastInitTime = DateTimeOffset.Now;
}

and then the Update method:

void Update()
{
  if (!_distanceMeasured)
  {
    if (GazeManager.Instance.Hit)
    {
      _distanceMeasured = true;
      CreateGrid(GazeManager.Instance.Position);
    }
    else
    {
      // If we can't find a wall in 10 seconds, create a default grid 
      if((_lastInitTime - DateTimeOffset.Now).Duration() >
           TimeSpan.FromSeconds(10))
      {
        _distanceMeasured = true;
        CreateGrid(CalculatePositionDeadAhead());
      }
    }
  }
}

So this method is called, every ‘frame’. This is typically 60 times per seconds, as far as I understand it. The GazeManager is the object that tracks your gaze. If it hits something within 10 seconds, it sends the position of the hit to the method that creates the grid (CreateGrid). If not, if calculates a location 3.5 meters in front of you, following the direction of your gaze:

private Vector3 CalculatePositionDeadAhead()
{
  var gazeOrigin = Camera.main.transform.position;
  return gazeOrigin + Camera.main.transform.forward * 3.5f;
}

The position Camera.main.transform.position – that is where you are. And there is a transform.forward thingy. Now this was a point where I first met a TransForm, and that quite puzzled me.

Aside: Transform

At this point I don’t quite understand all the finesses of a TransForm, but one thing is key. A TransForm has amongst other, three very important properties. “forward”, “right” and “up”. What helped me understand was thinking of this image: imagine you are an astronaut floating in space next to Earth. Your nose is pointing to Earth. Which way is forward? Well, Earth of course. Which way is up? Whatever direction the top of your head is pointing. And right? Well, to your right of course. Next, you fire the jets of your MMV and it rotates you – so now your back is pointing to Earth and your nose is pointing towards the International Space Station, that was originally behind you. The cardinal question is now – which way is forward? Exactly. Although everything else stayed in place, forward is now IIS.

This is how you can use a TransForm. However an object is rotated in space, if you add 2 times it’s transform.forward to it’s position, it will move 2 meters forward – that is, the direction that is forward from it’s own perspective. If you rotate it in another reaction, it will go in the direction it then points to. If you want it to move backwards, simply subtract it’s transform.forward. Same goes for the rest. Want to move 2 meters up? Add 2 times transform.up. Want to move down? Subtract it. Want to go right? Add transform.right. Go left? Subtract the same. Unity will take care of in what absolute direction the object actually needs to be moved in.

So what the second line of CalculatePositionDeadAhead simply does it add 3.5 meters to your position in front of you, exactly in the direction where you are looking when the grid is created. This is a quite powerful concept. You don’t have to care how stuff is rotated. Transform properties will tell you which way to go.

Calculating the grid

So now that I have explained this, I can show you how to how the grid is calculated:

private void CreateGrid(Vector3 hitPosition)
{
  var gazeOrigin = Camera.main.transform.position;
  var rotation = Camera.main.transform.rotation;

  var maxDistance = Vector3.Distance(gazeOrigin, hitPosition);

  transform.position = hitPosition;
  transform.rotation = rotation;

  int id = 0;

  float size = 0.2f;
  float maxZ = maxDistance - 1f;
  float maxX = 0.35f;
  float maxY = 0.35f;
  float z = 1.5f;
  do
  {
    var x = -maxX;
    do
    {
      var y = -maxY;
      do
      {
        CreateCube(id++,
            gazeOrigin + transform.forward * z +
                         transform.right * x +
                         transform.up * y,
            rotation);
        y += size;
      }
      while (y <= maxY);
      x += size;
    }
    while (x <= maxX);
    z += size;
  }
  while (z <= maxZ);
}

Using the camera’s rotation and the hitPosition I calculate a location about 1 meter from the wall (or the calculated point). The grid will start 1.5 meters in front of you. So the space between 1.5 meters from you and 1 meter from the wall is filled with a 4 x 4 grid, using three loops (one for every dimension). I seem not te be able to new up a TransForm, but every behaviour has a transform property – and since this script is not part of a physically displayed GameObject I can use it for calculations. I do this to take a snapshot of the camera rotation, and prevent slight differences in rotation because the user does not keep his or her head still.The actual TransForm position does not seem to matter much in calculations – you can also take the gazeOrgin in stead of hitPosition. The vector containing forward, up and right is always normalized – values are always 1 or smaller and can therefore be used for this kind of tricks.

Oh, and finally there is this very simple method to actually create the cube:

private void CreateCube(int id, Vector3 location, Quaternion rotation)
{
  var c = Instantiate(Cube, location, rotation) as GameObject;
}

So why is this a method at all, does it have an id property that is not used at all? Because there is more to come, and we will need other parts in a future post.

If you run the project now, after a maximum of 10 seconds, you will see something like this:

20160709_184529_HoloLens

That's awesome, right? Except - why are the cubes upside down? In Unity it was displayed correctly!

image

Once again – think TransForm. If you walk around the cubes, you will see they are actually not upside down. Because we aligned them to the gaze – rotation and all - we are looking at their backside. So what we need to do is – rotate the cube 180 degrees around the axis that goes from top to bottom – in other words, the “up” axis – on it’s own location.

private void CreateCube(int id, Vector3 location, Quaternion rotation)
{
  var c = Instantiate(Cube, location, rotation) as GameObject;
  //Rotate around it's own up axis so up points TO the camera
  c.transform.RotateAround(location, transform.up, 180f);
}

and here we go. One grid of boxes, perfectly aligned to your view angle (notice I have tilted my head to the right now)

20160709_221350_HoloLens

Concluding remarks

I have shown you how to add and use Spatial Mapping, create a prefab from your cube, and how you can dynamically instantiate those prefabs. I also showed you how to align the grid with your view angle, using the GazeManager, that I also used to measure distance. Finally, I have showed you how to employ TransForm for calculating relative directions.

As usual, you can find a full working solution of the project so far here.

02 July 2016

Gotcha–”The associated script could not be loaded” on all C# scripts in a HoloLens Unity3D project

When I work on a HoloLens project, I alternate a lot between the Unity editor and Visual Studio, but I tend to spend a lot more time in the latter. I am a coder after all, and if you set the development checkmarks as I explained in an earlier post, you can directly edit (and more importantly, debug) your code from Visual Studio. After a particular fruitful day I closed off my PC (it’s a desktop PC so yes, it actually shuts down). Next morning I wanted to work on some assets, so I opened the Unity editor and was greeted by this:

image

On every bloody script in the project. Even the standard scripts in the HoloLens toolkit by Microsoft were broken. Quickly I opened Visual Studio. No syntax errors, nothing. App compiled as normal and deployed. The only clue was this all the way to the left bottom of the screen in Unity was this very vague error message:

image

Unexpected symbol ‘<internal>’? All that was on line 95 of CubeManipulator was a simple Debug statement in the OnCollisionEnter method:

void OnCollisionEnter(Collision coll)
{
    Debug.Log($"{coll.contacts.Length}");   
    

What can be wrong with that?

Well, it’s using string interpolation, and that’s C# 6, that’s what wrong with that. While this is perfectly valid in your UWP app compiled by Visual Studio, running on a Windows platform, Unity is built to be cross-platform. It’s particular interpretation of C# is based on Mono and it’s runtime is still a bit behind – at least to the extent that it’s not understanding this fancy string interpolation thingy.So all I had to do was remove this line – and restart the Unity editor, as changing the script alone does not do the trick.

Now I understand Unity is getting a new runtime in the future and this will all be moot in the end but until that moment – beware of fancy C# 6 constructs in your HoloLens apps. If you get any odd error messages in perfectly valid code from the Unity editor – this is your prime suspect.

13 June 2015

View model driven animations using behaviors and MVVMLight in Xamarin Forms

Intro
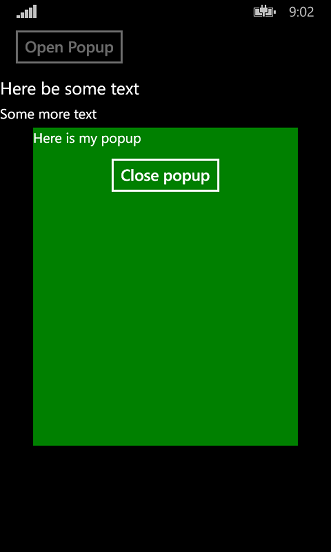
For some time now I have been making a number of behaviors implementing animations driven by view models for Windows and Windows Phone. Implementing animations in behaviors results into reusable animation building block without the need to copy and paste the functionality into code behind – or the need to remember how the internals exactly worked (you know they say a good programmer is a lazy programmer ;) ). I wanted to check if it would be possible to make animations for Xamarin Forms in a similar way, and it turns out to be possible. I have created a proof-of-concept that allows you to animate a kind of popup using a behavior, a view model and a little bit of code-behind plumbing. The popup folds open in a vertical direction from the center of the screen. It looks like this:

Setting the stage
I started out with a standard Xamarin Forms Portable project, and brought in my favorite MVVM framework MVVMLight. Then I added an empty StartPage.xaml to the portable project, and modified the constructor of the default App class to start with that page, in stead of with the default code:

public App()
{
  MainPage = new StartPage();
}

This is quite a standard way to set up a Xamarin Forms application using a XAML-based start page. I did not make it up myself ;) .

Passing startup events to the view model
A behavior in Xamarin.Forms has two events you can trap – OnAttachedTo and OnDetachingFrom – by basically overriding the methods with that name. But those are fired apparently before the visual element to which the behavior is attached to is loaded and made part of a layout: the attached object has no size, and no parent. To make matters more complicated, there is also no OnLoaded event on the attached object, like in WinRT XAML. So when do you know when the layout is ready?

It appears that on page level there is such an event: OnAppearing (and it’s counterpart OnDisppearing) which once again can be trapped by overriding those methods. What we need to do is pass the fact that these methods have been called to the view model. The more or less standard way to do that seems to be something like as follows. I first defined an interface:

namespace AnimationBehaviorDemo.ViewModels
{
  public interface IPageViewModelBase
  {
    void OnViewAppearing();
    void OnViewDisappearing();
  }
}

and then a base class implementing that interface. This is not strictly necessary, but I always feel compelled to make a base class for convenience, yet I don’t want to force myself or my fellow developers into always needing to use that base class. The interface allows me an escape route out of a possible undesirable inheritance kludge. I think that’s just good architecture.

using GalaSoft.MvvmLight;

namespace AnimationBehaviorDemo.ViewModels
{
  public class PageViewModelBase : 
     ViewModelBase, IPageViewModelBase
  {
    public virtual void OnViewAppearing()
    {
      ViewHasAppeared = true;
    }

    public virtual void OnViewDisappearing()
    {
      ViewHasAppeared = false;
    }

    private bool viewHasAppeared;
    public bool ViewHasAppeared
    {
      get { return viewHasAppeared; }
      set { Set(() => ViewHasAppeared, ref viewHasAppeared, value); }
    }
  }
}

And there we see the familiar MVVMLight syntax again. So great if you can use an awesome friend from the Windows ecosystem in a cross platform setting again (thanks Laurent!).

Anyway, now I can make a view model inheriting from PageViewModelBase (or at least implementing IPageViewModelBase), use it as binding context and pass the events to the view model using the code behind of the start page like this:

public partial class StartPage : ContentPage
{
  public StartPage()
  {
    InitializeComponent();
    BindingContext = new MyViewModel();
  }

  protected override void OnAppearing()
  {
    Context.OnViewAppearing();
    base.OnAppearing();
  }

  protected override void OnDisappearing()
  {
    Context.OnViewDisappearing();
    base.OnDisappearing();
  }

  private IPageViewModelBase Context
  {
    get { return (IPageViewModelBase)BindingContext; }
  }
}

In every page you make using this behavior then needs to have this kind of plumbing. Of course, you can define a nice base class for this as well, making the last three methods disappear again. Have a blast. I only have one page in this solution, so I leave it at this. The important thing is – we have now a way to pass the fact that the view is ready to the view model, a behavior can bind to this, and things can happen in the right order.

The view model
Using the PageViewModelBase as a starter, I add a simple command and a property for the behavior to bind to as well:

using System.Windows.Input;
using GalaSoft.MvvmLight.Command;

namespace AnimationBehaviorDemo.ViewModels
{
  public class AnimationViewModel : PageViewModelBase
  {
    public AnimationViewModel()
    {
      TogglePopup = new RelayCommand(DoTogglePopup);
    }
public ICommand TogglePopup { get; private set; } private void DoTogglePopup() { IsPopupVisible = !IsPopupVisible; } private bool isPopupVisible; public bool IsPopupVisible { get { return isPopupVisible; } set { Set(() => IsPopupVisible, ref isPopupVisible, value); } } } }

Nothing special here – standard MVVMLight view model and syntax.

The animation behavior
I will be going through this step by step, to hopefully convey what I am doing here. The basics are the two methods I already have mentioned by name: OnAttachedTo and OnDetachingFrom
using System;
using Xamarin.Forms;

namespace AnimationBehaviorDemo.Behaviors
{
  public class FoldingPaneBehavior: Behavior<View>
  {
    private View associatedObject;

    private double desiredHeight;

    protected override void OnAttachedTo(View bindable)
    {
      base.OnAttachedTo(bindable);
      associatedObject = bindable;
      bindable.BindingContextChanged += (sender, e) =>
          BindingContext = associatedObject.BindingContext;
    }

    protected override void OnDetachingFrom(View bindable)
    {
      associatedObject = null;
      base.OnDetachingFrom(bindable);
    }
  }   
}    

This basically sets up the behavior, keeping a reference to the object it’s bound to. In the OnAttachedTo there is an odd piece of code. Basically, if you don’t use this, binding to the Bindable Properties that I will show later on will not work. I have no idea why this is. It took me quite some nosing around in the Xamarin forums and eventually I found this solution here in this thread. I am not sure if this is a recommendable way. But it seems to work.

Then we get to Bindable Properties, and I think of those as the Attached Dependency Properties of WinRT XAML (in fact, they have been in XAML since WPF). In fact, we need two: one to get notified of the view having appeared, and one for the popup needing to displayed (and hidden again). For the sake of brevity, I show only the property for the popup toggle:

#region IsPopupVisible Attached Dependency Property
public static readonly BindableProperty IsPopupVisibleProperty =
   BindableProperty.Create<SlidingPaneBehavior, bool>(t => t.IsPopupVisible,
   default(bool), BindingMode.OneWay,
   propertyChanged: OnIsPopupVisibleChanged);

public bool IsPopupVisible
{
  get
  {
    return (bool)GetValue(IsPopupVisibleProperty);
  }
  set
  {
    SetValue(IsPopupVisibleProperty, value);
  }
}

private static void OnIsPopupVisibleChanged(BindableObject bindable, 
                                            bool oldValue, bool newValue)
{
  var thisObj = bindable as SlidingPaneBehavior;
  if (thisObj != null)
  {
    thisObj.AnimatePopup(newValue);
  }
}
#endregion

Like Attached Dependecy Properties in Windows this is quite some code, a lot hinges on connecting the dots in the right way, and a part of it depends on naming conventions. To make life easier, I made a Visual Studio snippet for that. The whole purpose of this construct is to make sure the AnimatePopup method gets called with the right parameter whenever the bound property changes.

But first – initialization
The first Bindable Property – that I did not even show – is called OnViewHasAppeared, is bound to the OnViewHasAppeared of the view model, and fires a method that is (very originally) called Init:

private double unfoldingHeight;
private const double HeightFraction = 0.6;
private const double WidthFraction = 0.8;

private void Init()
{
  var p = associatedObject.ParentView;
  unfoldingHeight = Math.Round(p.Height * HeightFraction, 2);
  associatedObject.WidthRequest = Math.Round(p.Width * WidthFraction , 2);
  associatedObject.HeightRequest = 0;
  associatedObject.IsVisible = false;
}

This sets the width of the popup to 0.8 times that of the parent view, it’s height to 0 and it’s visibility to false, effectively creating an invisible pane. It also calculates the height to which the panel should be unfolded, that is, when it is unfolded – 0.6 times the height of the parent. Mind you, these values are now constants, but could just as well be properties as well, with values you could set from XAML - thus creating a more customizable experience.

The actual animation is done by these two methods and some more constants:

private const int FoldOutTime = 750;
private const int FoldInTime = 500;

private void AnimatePopup(bool show)
{
  if (show)
  {
    associatedObject.IsVisible = true;
    Animate(0, unfoldingHeight, FoldOutTime);
  }
  else
  {
    Animate(unfoldingHeight, 0, FoldInTime);
  }
}

private void Animate(double start, double end, uint runningTime)
{
  var animation = new Animation(
    d => associatedObject.HeightRequest = d, start, end, Easing.SpringOut);

  animation.Commit(associatedObject, "Unfold", length: runningTime, 
    finished: (d, b) =>
  {
    if (associatedObject.Height.Equals(0))
    {
      associatedObject.IsVisible = false;
    }
  });
}

If the popup should be displayed (triggered by the change on the IsPopupDisplayed property) it first sets the popup’s visibility to true (although it’s still effectively invisible, as it has zero height) and then it launches an animation that goes from 0 to the unfoldingHeight in about 750ms. The Animate method then creates the actual animation, that animates the HeightRequest using and easing method (also a familiar friend from our good old Storyboards). By calling the Commit on it, you actually launch the animation, and you can apparently also make some kind of callback running when the animation is finished – in this case, when it determines the height is 0 (thus the popup has been folding in) – it should make it invisible again. Take note that the folding back goes a bit faster than the unfolding – 500ms in stead of 750ms. They could be the same, of course. It’s just a nice touch.

Putting it all together
In Xamarin Forms XAML, it then looks like this:

<Grid>

  <StackLayout HorizontalOptions="StartAndExpand" VerticalOptions="StartAndExpand">
    <Button Text="Open Popup" HorizontalOptions="Center" VerticalOptions="Start"
        IsEnabled="{Binding IsPopupVisible, Converter={StaticResource InverseBooleanConverter}}"
        Command="{Binding TogglePopup}"></Button>
    <Label Text="Here be some text" FontSize="25"></Label>
    <Label Text="Some more text" FontSize="20"></Label>
  </StackLayout>

  <ContentView BackgroundColor="Green" 
               HorizontalOptions="CenterAndExpand" 
               VerticalOptions="CenterAndExpand" >
    <ContentView.Behaviors >
      <behaviors:FoldingPaneBehavior 
        ViewHasAppeared ="{Binding ViewHasAppeared}" 
        IsPopupVisible="{Binding IsPopupVisible}"/>
    </ContentView.Behaviors>
    <StackLayout>
      <Label Text="Here is my popup" FontSize="20"></Label>
      <Button Text="Close popup" HorizontalOptions="Center"
     IsEnabled="{Binding IsPopupVisible}"
     Command="{Binding TogglePopup}"></Button>
    </StackLayout>
  </ContentView>
  
</Grid

imageimage

First you have the StackLayout containing the initial user interface, then the ContentView that contains the ugly green popup and the behavior. Notice the button on the initial UI gets disabled by binding to IsPopupVisible too, using a bog standard InverseBooleanConverter that I took from here. I think it’s actually the same as the WinRT value converter but I was too lazy to check ;)

Caveat emptor
Warning – you mileage may vary with this approach. I am not very versed in Xamarin Forms yet and I have no idea what amount of rules I am now violating. I find the hack in OnAttachedTo a bit worrisome, and I wonder if is has side effects. In addition, Xamarin Forms is a very rapidly evolving platform so anything I write today may be obsolete tomorrow. Also, this behavior does not yet take into account any changes in screen size (or rotation) that may occur after the behavior is initialized. I don’t doubt though this could be added.

Conclusion
With this article I hope I have given you some thought about how to write reusable x-plat animation blocks that can be wired together using behaviors. I still think it’s very important to keep such stuff from code behind as much as possible (although never loosing track of practicality – if some effect can be created using two lines of code behind, it’s not very smart to write a bazillion lines of code just to avoid that). What is sorely missed in this environment is my old friend Blend, which in a Windows environment can be used to drag behaviors on top of elements and wire some properties together in a simple UI. In Xamarin, it’s hand coding XAML all the way. Still, it’s an improvement over putting all this stuff in code behind.

As usual, a sample solution can be found on GitHub. This includes the snippet for creating Bindable Properties.

Credits and thanks
I want to thank two of my fellow developers colleagues at Wortell for being an inspiration to this blog post: Bruce Wilkins for showing me the two events that occur when a Xamarin Forms page loads and unloads, and Edwin van Manen for showing me the Xamarin Forms animation basics. They made me understand some parts that I needed to connect the dots and make this technique work.

25 February 2015

Displaying Microsoft Band heart rate via Raspberry PI2 using Mono, C#, OWIN and a Windows Phone

Intro – what? WHY?

As regular readers of my blog might have seen, I got myself a Raspberri PI 2 and a Sunfounders sensor kit, and was happily dabbling a little with it. And then suddenly, out of the blue, Microsoft dropped a development kit for the Microsoft Band – and Gerard Verbrugge (Microsoft DX Netherlands) challenged me to make something with it. So I thought to combine a number of gadgets: my Microsoft Band, my Windows Phone and  the Raspberry PI plus some of the stuff from the sensor kit.

I created an application that shows your heart rate with a blinking led connected to the Raspberry PI, with a connected buzzer making sound as well. The LED blinks at the heart rate as reported by the Band, and using the  buzzer, the PI also emits and audible tick-sound as the LED blinks. At low heart rate the LED blinks blue, at medium rate green, and at high rate red:

Raspberry PI2 controlled by Microsoft band at heart rate < 80
Raspberry PI2 controlled by Microsoft band at heart rate > 80

If you crank up the sound, you can hear the ticking of the buzzer at the heartbeat. I think this is one of the coolest stuff I ever made. So, Gerard, challenge accepted. And, IMHO, achievement unlocked ;)

Hardware used

  • 1 Microsoft Band
  • 1 Windows Phone running Windows Phone 8.1
  • 1 Raspberry PI 2
  • 1 4-pins RGB LED from the SunFounders kit
  • 1 3-pins Active buzzer from the Sunfounders kit
  • Breadboard, GPIO cable (connecting PI to breadboard), miscellaneous connecting wires

Don’t give up reading if you don’t have a Band – that part can be simulated and the technique to control hardware peripherals from a WebAPI endpoint is useful on it’s own.

Global setup

How this thing works is, in essence, pretty simple:

  • On the Raspberry PI2 runs a OWIN server hosting
    • a little WebAPI endpoint that accepts heart rate data
    • an endless running task making the LED blink in the right color and cadence, again using Daniel Riches’ wrapper around Gordon Henderson’s wiringPI C library. Once again, with some adaptions.
  • A Windows Phone 8.1 application listening to the paired Microsoft Band’s heartrRate sensor’s events, and posting those to the RaspBerry PI2’s OWIN server upon receiving those.

The demo solution contains 5 projects:

  • A Universal app (with only the Windows Phone project actually used)
  • An project holding the OWIN server
  • A PCL holding two simple classes: an object to post data with to the OWIN server, and a Settings object with some hard coded settings shared over several projects
  • A test project posting a single simulated hearth rate update to the server
  • The WiringPi project – the wrapper around the C library that I used before.

A little PCL

I started a with a little PCL library WebLinker.Pcl that contains only two classes: a simple payload class that I can post from my Windows Phone to my OWIN server:

namespace WebBlinker
{
  public class Pulse
  {
    public int HeartRate { get; set; }
  }
}

and a little class to host some settings

namespace WebBlinker
{
  public static class Settings
  {
    public const string ServiceUrl = "http://192.168.0.188:5001/api/singleblink";
    public const string BaseListenUrl = "http://*:5001/";
  }
}

Rather primitive, indeed. But I want the class that I post as JSON and deserialize from JSON to be shared over client and server, and I don't like magic strings (especially not repeated magic strings) so I tend to gather those in settings classes.

The OWIN server

OWIN is a self hosted web server inside a console app – more or less Microsoft’s answer to nodejs and the like. It’s pretty simple to get started: make a console app, then add the Microsoft.AspNet.WebApi.OwinSelfHost nuget package and that brings everything you need – it’s even simpler than I described in this post. Oh, and add a reference to the PCL while you are at it.

The server contains four parts:

  • A “Program” class with a static void Main – like every console app – kicking and keeping the OWIN server alive
  • A “Startup” class containing the configuration of the OWIN server
  • A “BlinkController” WebAPI controller hosting two methods (one for test, one for the real thing)
  • A “Blinker” class that hosts a thread that does the actual blinking.

The Program class is, well, not very complicated:

using System;
using System.Threading;
using Microsoft.Owin.Hosting;

namespace WebBlinker
{
  class Program
  {
    static void Main(string[] args)
    {
      // Start OWIN host and keep it running
      using (WebApp.Start<Startup>(url: Settings.BaseListenUrl))
      {
        while (true)
        {
          Console.WriteLine("Server still alive...");
          Thread.Sleep(60000);
        }
      }
    }
  }
}

The startup class does the actual configuration and is simple but noteworthy:

using System.Web.Http;
using Owin;

namespace WebBlinker
{
  public class Startup
  {
    public void Configuration(IAppBuilder appBuilder)
    {
      var config = new HttpConfiguration();

      //Use attribute routes!
      config.MapHttpAttributeRoutes();
      appBuilder.UseWebApi(config);
      Blinker.GetBlinker().Start();
    }
  }
}

Although in general I am a fan of Microsoft technology, there are some tiny parts I hate with a vengeance. One of those things is ASP.NET MVC / WebAPI default routing. So whenever I get the chance, I go for attribute based routing. I’d rather like to have the minor chore of having to define all my routes explicitly and know they will be there, in stead of having to deal with inferred routes that might just disappear because someone else adds a route that ‘steals’ or invalidates mine. Just a pet peeve. So I did not include the default routing – I just added a call to MapHttpAttributeRoutes. Now I can control my routes pretty easily in my BlinkController by adding attributes:

using System;
using System.Web.Http;

namespace WebBlinker
{
  public class BlinkController : ApiController
  {
    [HttpPost]
    [Route("api/singleblink")]
    public void PostBlink([FromBody] Pulse pulse)
    {
      Console.WriteLine( "Got update: {0}", pulse.HeartRate);
      Blinker.GetBlinker().HeartRate = pulse.HeartRate;
    }

    [HttpGet]
    [Route("api/helloworld")]
    public string HelloWorld()
    {
      Console.WriteLine("Hello world called");
      return "Hello world!";
    }
  }
}

So now I have an explicitly defined route “api/singleblink” where I can post a Pulse object containing a heart rate to, as well as a simple “api/helloworld” method whose URL I can enter in a browser to see if the WebAPI is up and running at all.

In the “PostBlink” method our Blinker’s HeartRate property is updated. And we come to the heart of the matter – pun intended – as far as the server is concerned. What is important to understand is that the Microsoft Band does not post an update per heartbeat. It posts at a quite regular interval what your current heartbeat is. So in order to let the LED blink at the rate of a heartbeat, we actually have to calculate how often the LED needs to flash. As a matter of fact – the LED does not show your actual heartbeat. It just blinks at the same rate. More or less.

The basic setup of the Blinker is:

using System;
using System.Threading;
using System.Threading.Tasks;
using WiringPi;

namespace WebBlinker
{
  public class Blinker
  {
    private DateTime lastReceivedUpdate = DateTime.MinValue;
    private int heartRate;
    private Task task;

    private Blinker()
    {
      if (Init.WiringPiSetup() != -1)
      {
        GPIO.pinMode(BluePin, (int)GPIO.GPIOpinmode.Output);
        GPIO.pinMode(GreenPin, (int)GPIO.GPIOpinmode.Output);
        GPIO.pinMode(RedPin, (int)GPIO.GPIOpinmode.Output);
        GPIO.pinMode(SoundPin, (int)GPIO.GPIOpinmode.Output);
      }
    }

    public void Start()
    {
      if (task == null)
      {
        cancellationTokenSource = new CancellationTokenSource();
        task = new Task(() => ShowHeartRateBlinking(cancellationTokenSource.Token), 
           cancellationTokenSource.Token);
        task.Start();
      }
    }

    public void Stop()
    {
      if (cancellationTokenSource != null)
      {
        cancellationTokenSource.Cancel();
        task = null;
      }
    }

    private CancellationTokenSource cancellationTokenSource = null;


    private static Blinker blinker;
    public static Blinker GetBlinker()
    {
      return blinker ?? (blinker = new Blinker());
    }

    public const int RedPin = 27;
    public const int GreenPin = 28;
    public const int BluePin = 29;
    public const int SoundPin = 0;
  }
}

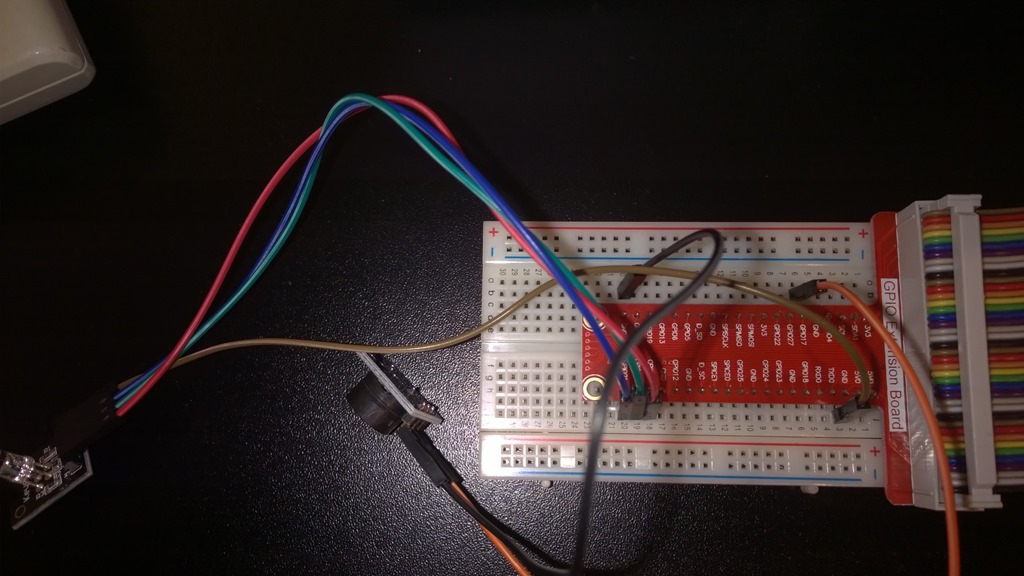
On creation, it initializes the pins we are going to use for output (these are GPIO16, GPIO20 and GPIO21 for RGB, and GPIO17 for sound). See picture for connection details. To make things easier for myself, I actually selected a blue wire for the blue pin, a red for the red ping, and green for the green pin ;):WP_20150225_21_02_33_Pro__highres

I am using a different API than before, for this one is – amongst other reasons reasons - a lot simpler to use and does not hinge on C threading. With a caveat I will come to a little later. Important to see is that’s a singleton – there’s only a private constructor and a static method GetBlinker() to create it. Normally you would not get away with this in a web environment, but as OWIN is not hosted in IIS, we actually can use statics here. Scalable? No. But who cares on a mini device like this. Usable? Yes!

So the Startup class initializes and starts the Blinker. That fires of a cancellable task. The Blinker actually has some more code, amongst other the implementation of said task:

private async Task ShowHeartRateBlinking(CancellationToken cancellationToken)
{
  while (!cancellationToken.IsCancellationRequested)
  {
    if (DateTime.Now - lastReceivedUpdate < TimeSpan.FromSeconds(5))
    {
      DoBlink();
      await Task.Delay(60000/HeartRate, cancellationToken);
    }
    else
    {
      await Task.Delay(10000, cancellationToken);
    }
  }
}

public int HeartRate
{
  get { return heartRate; }
  set
  {
    if (value >= 0 && value <= 200)
    {
      lastReceivedUpdate = DateTime.Now;
      Console.WriteLine("Got updated: {0}", value);
      heartRate = value;
    }
  }
}

private async Task DoBlink()
{
  var pin = GetPin();
  GPIO.digitalWrite(pin, 1);
  GPIO.digitalWrite(SoundPin, 1);
  await Task.Delay(50);
  GPIO.digitalWrite(pin, 0);
  GPIO.digitalWrite(SoundPin, 0);
}

private int GetPin()
{
  if( HeartRate < 80) return BluePin;
  return HeartRate < 130 ? GreenPin : RedPin;
}

The ShowHeartRateBlinking actually is an endless loop, that runs while no cancellation is given (or until the OWIN server is simply killed). If the last update was less than 5 seconds ago, it will blink the LED and give a sound pulse, wait for 60000ms divided by the beats per minute – and goes into the next blink. If it does not get updates after 5 seconds, it goes into a 10-seconds polling mode.

The HeartRate property is set by the BlinkController when new data from the Band is posted to the OWIN server’s endpoint, and it’s setter also keeps track of the last update time. The DoBlink method actually does the blinking and the activating of the buzzer (at pin 0). The GetPin method, by means of extra fun, determines what color the LED will flash based upon the posted heart rate: blue for below 80, green for below 130, and red for 130 and up.

In the demo solution there is actually a test project with a test method that posts a single update to the OWIN server. That should at least get you a “Got updated” line on the screen when you run the server. If you run the method multiple times, the LED should start to blink at 75bmp and the buzzer gives a ticking sound.

Adapting the WiringPi wrapper

I already warned about a caveat concerning the API I am using now. Unfortunately, if you compile and run the OWIN server in this stage on the Raspberry PI2, you will get an error. Apparently the WiringPi wrapper is a bit outdated or things have changed for the Raspberry PI2. In the WrapperClass.cs file there’s a class GPIO with on top the following part:

public class GPIO
{
  [DllImport("libwiringPi.so", EntryPoint = "pinModeGpio")] 
  public static extern void pinMode(int pin, int mode);

  [DllImport("libwiringPi.so", EntryPoint = "digitalWriteGpio")]
  public static extern void digitalWrite(int pin, int value);

Studying the original C code, I found that the entry points should be just “pinMode” and “digitalWrite”, not “pinModeGpio” and “digitalWriteGpio”. That was easily fixed:

public class GPIO
{
  [DllImport("libwiringPi.so", EntryPoint = "pinMode")] 
  public static extern void pinMode(int pin, int mode);

  [DllImport("libwiringPi.so", EntryPoint = "digitalWrite")]
  public static extern void digitalWrite(int pin, int value);

If you compile the OWIN server now, and copy the .EXE and all DLLs in the bin/debug directory to your Raspberry PI2, you should now be able to run the server (sudo mono WebBlinker.exe – since settings.BaseListenerUrl is set to “http://*:5001/” it listens to port 5001 on all hostnames assigned to your Raspberry PI, and this means you have to start the webserver as root). It should print “Server still alive…” every 60 seconds on the command line, as well as any heart beat postings coming by.

The Windows Phone app

I hope my Windows Phone friends will forgive me for skimping a little on this, because I really made quite a horrible and above all ugly app. I first installed the Microsoft ASP.NET WebAPI 2.2 Client libraries in it. Then I created this model to actually listen to the Band’s heart rate events and post them to the OWIN server:

using System;
using System.Diagnostics;
using System.Linq;
using System.Net.Http;
using Microsoft.Band;
using Microsoft.Band.Sensors;
using WebBlinker;

namespace BlinkerPhone
{
  public class BlinkerModel
  {
    public async void SendSimulatedPulse(int value)
    {
      var pulse = new Pulse { HeartRate = value };
      using (var client = new HttpClient())
      {
        await client.PostAsJsonAsync(new Uri(Settings.ServiceUrl), pulse);
      }
    }

    private IBandClient bandClient;

    public async void StartListening()
    {
      var pairedBands = await BandClientManager.Instance.GetBandsAsync();
      if (pairedBands.Any())
      {
        var band = pairedBands.First();
        bandClient = await BandClientManager.Instance.ConnectAsync(band);
        var sensor = bandClient.SensorManager.HeartRate;
        sensor.ReadingChanged += SensorReadingChanged;
        await sensor.StartReadingsAsync();
      }
    }

    public async void StopListening()
    {
      var sensor = bandClient.SensorManager.HeartRate;
      sensor.ReadingChanged -= SensorReadingChanged;
      await sensor.StopReadingsAsync();
      bandClient.Dispose();
    }

    async void SensorReadingChanged(object sender, 
      BandSensorReadingEventArgs<IBandHeartRateReading> e)
    {
      try
      {
        if (e.SensorReading != null)
        {
          var pulse = new Pulse { HeartRate = e.SensorReading.HeartRate };
          using (var client = new HttpClient())
          {
            await client.PostAsJsonAsync(new Uri(Settings.ServiceUrl), pulse);
            Debug.WriteLine("Sending update, pulserate = {0}", pulse.HeartRate);
          }
        }
      }
      catch (Exception ex)
      {
        Debug.WriteLine("Error reading/sending data: {0}", ex);
      }
    }
  }
}

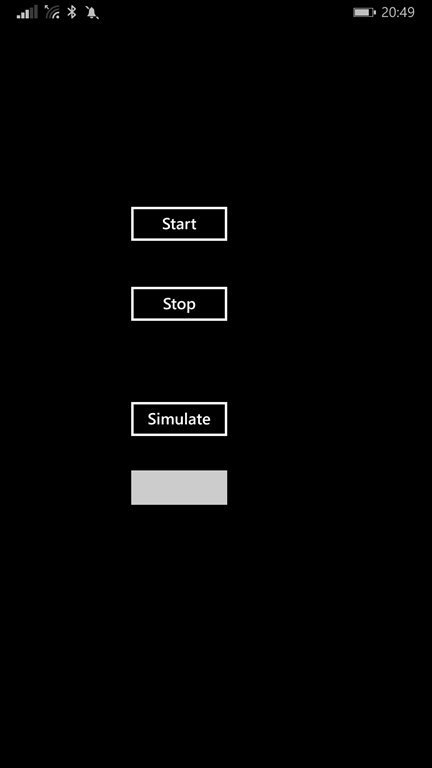
wp_ss_20150225_0001This is not exactly rocket science, and it’s mostly 1:1 nicked from the heart rate sensor sample in the Windows Phone Band SDK samples anyway. If there’s a heart rate event coming in, a new Pulse object is created and posted to the Raspberry PI2’s OWIN Web API endpoint and the LED starts blinking in the right rate.

To give the user the ability to start, stop and send test data I created this awesome UI with buttons to start and stop the phone sending band data to the OWIN server, as well as a button to send a simulated heart rate as typed in the textbox. Quite the pinnacle of minimalistic design I’d say, don’t you think? ;)

Conclusion

With a little imagination, out-of-the-box thinking and of course some kick *ss hardware and awesome SDKs it’s not that hard these days to let three devices dance together and make a single system – all C#, mostly Microsoft technology and mostly standard knowledge. The hardest part is now writing the C# code that runs on Mono, as it’s impossible to debug a running instance from Visual Studio. We are so spoiled by Visual Studio and the awesome tools it offers, it’s sometimes very hard to have to do without. Let’s hope Windows 10 for devices makes life as good for device developers as for all other Windows Platform developers.

For those who missed the link in between – a complete solution can be downloaded here.