Showing posts with label Unit Test. Show all posts

28 June 2013

x86/ARM configuration gotcha in Windows Phone 8 projects when adding unit test projects

BUILD 2013 may be all the rage at this moment, but between watching sessions online this here die-hard still is doing some Windows Phone development. Doing so, I ran into a particular side effect that occurs when including a unit test project – something I had not noticed before. But if you read my articles about unit testing, got inspired by it and want to try something - you might get confused, run into weird looking errors, or even submit an incorrect XAP, so I thought it best to make a short writeup.

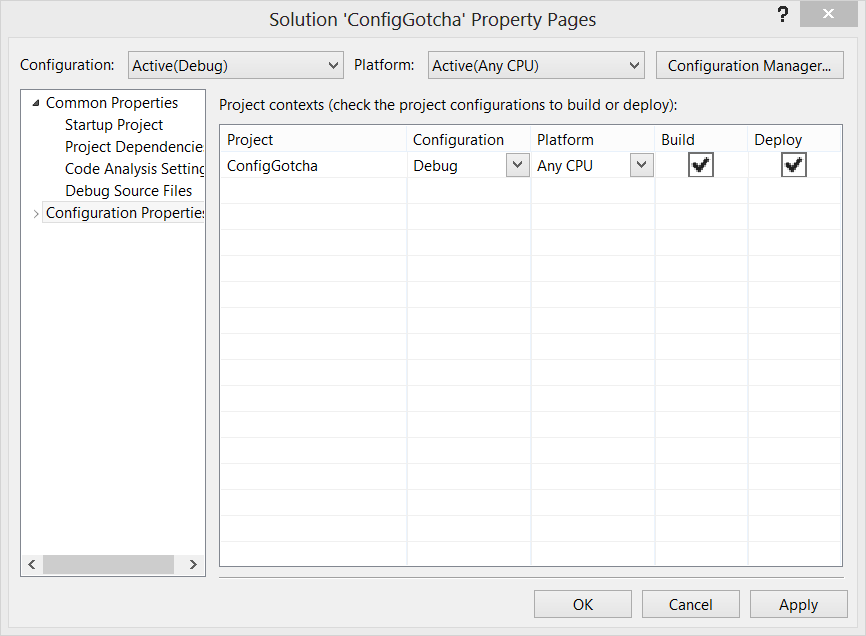
Create a single Windows Phone app, select your solution in the Solution Explorer and then right-click “Properties”, you will see the following dialog:

image
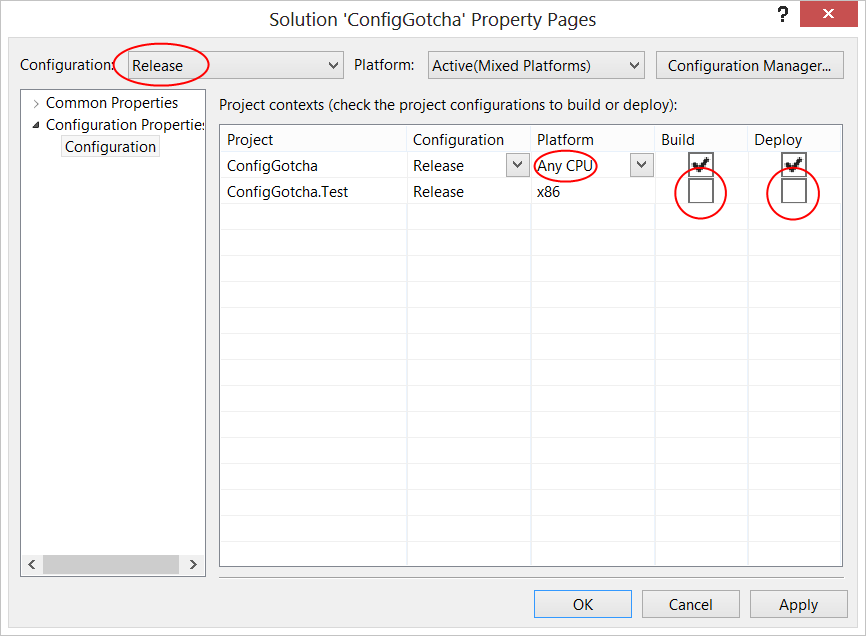
Nothing spectacular. But now add a unit test project, add a reference in the unit test project to the app, and get the solution properties again.

image

The unit test runner apparently is a program that does not so much run on the emulator as on your PC, and therefore is an x86 program. No sweat. Since the phone emulators run on your PC as well, they will run this flawlessly. But there are some potential issues you now have to take into account. Because if you compile your app now, in stead of ConfigGotcha.xap Visual Studio now makes ConfigGotcha_Debug_x86.xap. Which will not run on your phone because that hasn't got an x86 processor. You will see the following error:
”Deployment failed because an app with target platform x86 cannot be deployed to Device. If the target platform is win32/ x86, select an emulator. If the target platform is ARM, select Device.”

I don’t even want to contemplate what happens when you try to submit this XAP ;-)

But anyway, if you try to be smart like me and change the ConfigGotcha app to Any CPU again – it will run now on both your Windows Phone and the emulator, but when you try to run the tests you will get this error:

“Target platform x86 is incompatible with the selected device type. Make sure that they are compatible with each other and try again. Example: - X86 or Win32 platform is compatible with emulator and not compatible with arm device.  Similarly arm platform is compatible with arm device and not compatible with emulator.
Unit tests in source C:\projects\ConfigGotcha\ConfigGotcha.Test\Bin\x86\Debug\ConfigGotcha.Test.dll cannot be run. Please create a Windows Store or Windows Phone Unit Test project.”

So, the story is this:

  • When you want to unit test your app, both the tested and the test project apparently must have platform “x86”. The resulting XAP will be unit testable, and run on the emulator – but not on your phone.
  • When you want to deploy or submit an app, set the configuration to “Any CPU”. The resulting XAP will run on your emulator and your phone, and can be submitted.

The gotcha of course is that you fix an error, run the tests, forget to set “x86” back to “Any CPU”, select release configuration, build the app – which will not create a XAP in “release” but in x86, and you submit the release XAP, which is not recompiled and still contains the error.

This will of course happen – at 3am after a long debugging session - and to prevent that, I recommend the following: select the solution properties again, select “Release” from the configuration dropdown, set the platform of all your projects but the unit test projects to Any CPU, and disable Build and Deploy for the unit test projects, like this:

image

Net result: when you select release, Visual Studio will automatically build a XAP for Any CPU and app that runs both on the phone and your emulator, and can be submitted.

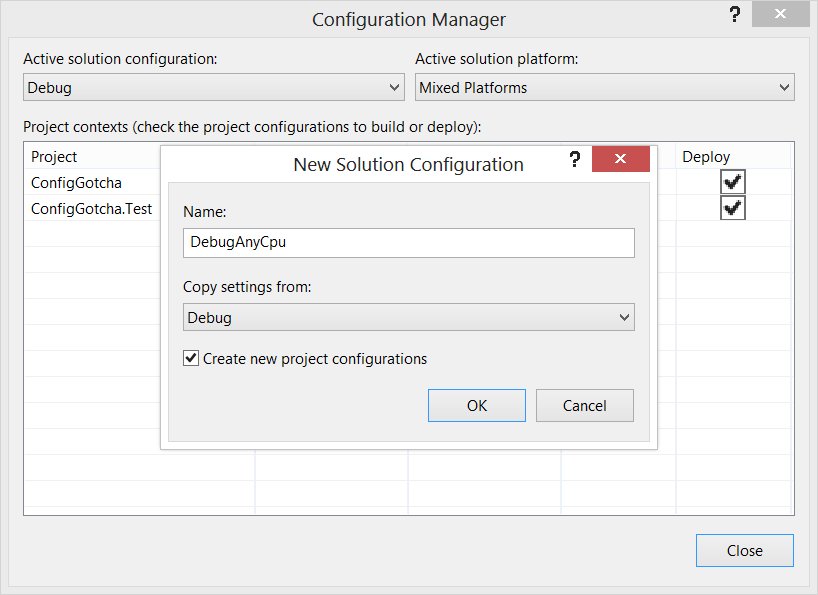
If you want have all debug functionality of the debug mode but still want to be able to run on the phone you can add a configuration, like this:

  • Hit the “Configuration Manager” button top-right of the dialog,
  • Select “New” under “Active solution configuration”,
  • Select “Debug” under “Copy settings from”
  • Enter some suitable name (I chose DebugAnyCpu)
  • Hit OK

image

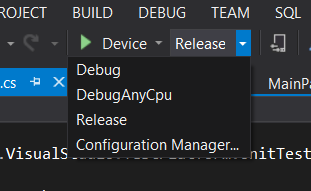
imageNow make sure the other settings of the new DebugAnyCPU configuration are the same as the release settings (so, everything Any CPU and make the unit tests not compile or deploy). If you now look in Visual Studio and click the configuration manager, you will see you have an extra configuration as displayed to the right.

  • Selecting Debug will make now a unit testable application that will run on your emulator, but not on your phone
  • Selecting DebugAnyCpu will make a debug application that can run on your phone and your emulator – but you cannot unit test
  • Selecting “Release” will make a proper release app that can run on emulator, device – and the resulting XAP can be submitted.

By creating this configuration you can have all the options you need, and protect yourself from accidentally uploading the wrong XAP after pushing through into the wee hours of the night finding a bug in your app.

Happy unit testing!

13 May 2013

Windows Phone 8 navigation part 4–updating the tests, fixing the final issues

Last time: so close, yet so far:

This series appears to have become a trilogy in four parts – at the end of the last episode everything worked, save for tombstoning, although we explicitly wrote test code for that. The app tombstoned, partially - two things were apparently missing:

  • The route
  • The locations to and from the route should run.

Making the tests fail

An important step when you have a bug in an app that passes all tests, is to make a test that fails because of the bug. In that case, you have reproduced the problem, and can start on fixing the bug. Logically, the bug is fixed when the test no longer fails – and should anyone start to mess around with your code an re-introduce the bug, the test will fail again, indicating something has gone wrong before you even ship. Your tests have become a smoke detector ;-)

Anyway, we observe there is no selected location, nor routes or waypoints after tombstoning. When we look at the comprehensive test for RoutingViewModel written in the 2nd post of this series, we see the following Assert statement with regard to the retrieved viewmodel:

Assert.IsTrue(vm.RouteCoordinates.Any());
Assert.IsTrue(vm.Maneuvers.Any());
Assert.IsTrue(retrievedVm.RouteCoordinates.Count == vm.RouteCoordinates.Count);
Assert.IsTrue(retrievedVm.FromViewModel.SearchText == "Springerstraat Amersfoort Netherlands");
Assert.IsTrue(retrievedVm.Maneuvers.Count == vm.Maneuvers.Count);

Shockingly, we learn two things:

  • We indeed don’t test the presence of either SelectedLocation or either FromViewModel and ToViewModel.
  • We do test the presence of both RouteCoordinates and Maneuvers. So our viewmodel works in that respect – so the error must have to do something with data binding.

First, we add test code for SelectedLocation

Assert.IsNotNull(retrievedVm.FromViewModel.SelectedLocation);
Assert.IsNotNull(retrievedVm.ToViewModel.SelectedLocation);

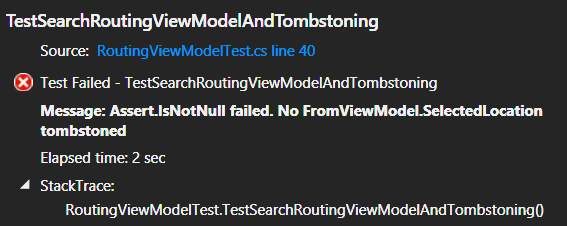
And sure enough:

image

Annoyingly, this does only say which test failed, but not what exactly failed in this test. You can of course follow the purist route and write a separate test method for every assert, or just be lazy like me and use the overload every Assert method has:

Assert.IsNotNull(retrievedVm.FromViewModel.SelectedLocation, 
  "No FromViewModel.SelectedLocation tombstoned");
Assert.IsNotNull(retrievedVm.ToViewModel.SelectedLocation, 
 "No ToViewModel.SelectedLocation tombstoned");

image

And there we are. A clear error message. There is no SelectedLocation after tombstoning

Fixing the SelectedLocation bug aka serialization under the hood

Let me introduce you to the wonderful world of serialization. Much as we move into the world of asynchronous and parallel programming, serialization is essentially a sequential process. First property A is written, then property B. When something is deserialized, things are also read from storage in a particular order, i.e. the order they are written.

Let’s get back to the RoutingViewModel. I’ve abbreviated the property implementation a bit, apart from the Model. There we see the following code:

public ManeuverViewModel SelectedManeuver

public GeocodeViewModel ToViewModel

public GeocodeViewModel FromViewModel

public ObservableCollection<RouteGeometryViewModel> RouteCoordinates { get; set; }

public ObservableCollection<ManeuverViewModel> Maneuvers { get; set; }

private NavigationModel model;
public NavigationModel Model
{
  get { return model; }
  set
  {
    model = value;
    if (model != null)
    {
      ToViewModel = new GeocodeViewModel(model.To) { Name = "To" };
      FromViewModel = new GeocodeViewModel(model.From) { Name = "From" };
    }
  }
}

Now let’s assume, for a moment, serialization simply reflects all public properties with both getter and setter, and writes them one by one to storage – and reads them in the same order. In no particular order – if this were a database that most probably means the order the in which records were put in. Could it be reflection works the same way? But then, deserializing would mean that first the SelectedManeuver would be deserialized, then ToViewModel and FromViewModeland, then the RouteCoordinates, then the Maneuvers, and finally the model. But smart Mr Me has implemented this clever method of initializing FromViewModel and ToViewModel upon calling of the setter. So whatever was deserialized into FromViewModel and ToViewModel  gets overwritten after Model is deserialized!

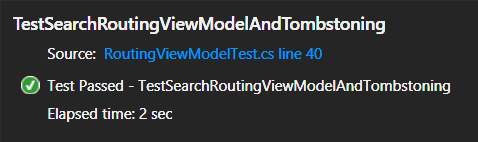
So let’s make the Model property the very first property of the viewmodel, right after the constructors, run the test and see what happens…

image

You can imagine with this kind of arcane stuff going on behind the curtains, (unit) test code can be a really great tool to track and fix this kind of obscure errors – and make sure they never, ever occur suddenly again, just because someone changed the order in the way things are implemented!

Fixing the MapShapeDrawBehavior bug

This is a bit of odd one – apparently the developer that made the MapShapeDrawBehavior – a knucklehead who names himself “LocalJoost” ;-) -  has made an error implementing data binding – while he implemented listening to all the collection events correctly, he never apparently anticipated the initial collection might have some values before data binding ensued. The advantage of open source is that we actually can see this. So, we either have to copy MapShapeDrawBehavior ‘s code and make a manual fix to make sure some event occurs that makes it go draw the stuff – or implement a band-aid that does not interfere with the existing code.

I pulled out the band, aid, and made the following class:

using System.Collections.Generic;
using System.Collections.ObjectModel;
using System.Collections.Specialized;

namespace Wp7nl.Utilities
{
  public class ResettableObservableCollection<T> : ObservableCollection<T>
  {
    public ResettableObservableCollection()
    {
    }

    public ResettableObservableCollection(List<T> list)
      : base(list)
    {
    }

    public ResettableObservableCollection(IEnumerable<T> list)
      : base(list)
    {
    }

    public void ForceReset()
    {
      OnCollectionChanged(
       new NotifyCollectionChangedEventArgs(NotifyCollectionChangedAction.Reset));
    }
  }
}

I changed both RouteCoordinates and Maneuvers in RoutingViewmodel into ResettableObservableCollection, added the following command to RoutingViewmodel:

[DoNotSerialize]
public ICommand MapLoadedCommand
{
  get
  {
    return new RelayCommand( ()=>
        {
          RouteCoordinates.ForceReset();
          Maneuvers.ForceReset();
        });
  }
}

and finally, the following piece of XAML to the map:

<i:Interaction.Triggers>
  <i:EventTrigger  EventName="Loaded">
    <Command:EventToCommand Command="{Binding MapLoadedCommand}"/>
  </i:EventTrigger>
</i:Interaction.Triggers

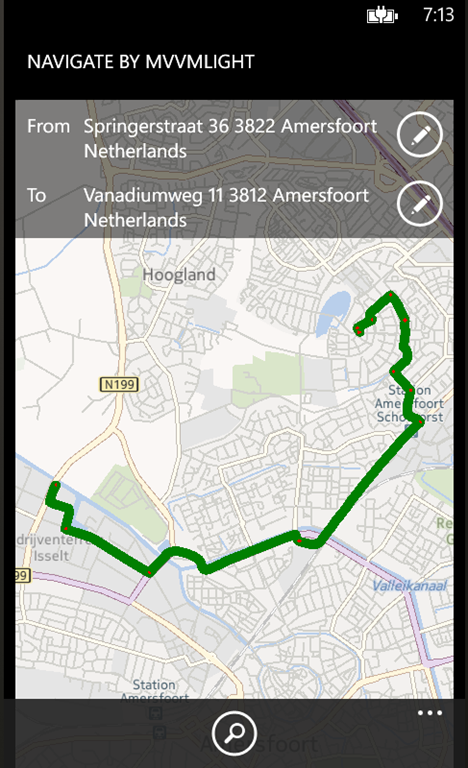
imageThis will fire the command directly after the map has loaded. Data binding has already occurred then. And sure enough, even after restarting the app, everything is reloaded from storage. The behavior is tricked into believing it should draw it’s stuff. Now I only need to publish my app, and inform this LocalJoost character that his library contains bugs and if he can fix them ASAP, thank you very much.

Concluding remarks

This series did not only show you the basics of Windows Phone 8 navigation, but also how to develop geo-applications on Windows Phone 8 using unit/integration test to explore and test functionality, as well as using test as a way to hunt down and fix bugs. It also showed that if your test are incomplete, you might get bitten. And finally it showed you that, in the end, you still need to test manually to catch bugs that are caused by dunderheads making errors in their published code ;-)

The final solution can be found here,

01 May 2013

Windows Phone 8 navigation part 2–routing, route details,tombstoning–and testing

What happened last time on this show

In the previous post I described to how to write the business logic to find a location by searching for an address by text, how to be able to tombstone the results, and how to make sure this all worked by using simple tests. Fine, but the purpose was routing, that is, actually making the app finding instructions to get from A to B. As a GIS buff, being used to complex algorithms and stuff, this is almost embarrassingly easy in Windows Phone 8. You basically need an object of type RouteQuery, plonk in any number of waypoints (at least two, of course, being the start and the end) and a method of transport (drive or walk). And that’s basically it.

But we still have to honor the other two requirements – in needs to be testable and serializable so we can support tombstoning

Find the route, Luke phone

So in the solution I created last time I add another business class that does the actual finding of the route:

using System.Collections.Generic;
using System.Device.Location;
using System.Threading.Tasks;
using Microsoft.Phone.Maps.Services;
using Wp7nl.Utilities;

namespace NavigationDemo.Logic.Models
{
  public class NavigationModel
  {
    public NavigationModel()
    {
      From = new GeocodeModel();
      To = new GeocodeModel();
    }

    public async Task DoRouting()
    {
      await DoRouting(From.SelectedLocation.GeoCoordinate, 
                      To.SelectedLocation.GeoCoordinate);
    }

    public async Task DoRouting(GeoCoordinate from, GeoCoordinate to)
    {
      var wayPoints = new List<GeoCoordinate>(new[] { from, to });
      var routeQuery = new RouteQuery 
        { TravelMode = TravelMode.Driving, Waypoints = wayPoints };
      FoundRoute = await routeQuery.GetRouteAsync();
    }

    public Route FoundRoute { get; set; }   

    public GeocodeModel From { get; set; }

    public GeocodeModel To { get; set; }
  }
}

This comes in the NavigationDemo.Logic project, in the Models folder, next to GeocodeModel. Here you can see what I just mentioned – the actual navigation logic is very simple. This whole model comes down to three lines (red, bold and underlined). But, does this work?

Testing the routing

In the unit test app I added a NavigationModelTest class. To ease testing, I created public overload method where I can directly supply the waypoints. We already know the GeocodeModel works. We have tested that before.

using System;
using System.Device.Location;
using System.Linq;
using System.Threading;
using System.Windows;
using Microsoft.VisualStudio.TestPlatform.UnitTestFramework;
using NavigationDemo.Logic.Models;

using Wp7nl.Utilities;
namespace NavigationDemo.Logic.Test { [TestClass] public class NavigationModelTest { [TestMethod] public void TestPointRouting() { var m = new NavigationModel(); var waitHandle = new AutoResetEvent(false); Deployment.Current.Dispatcher.BeginInvoke(async () => { await m.DoRouting( new GeoCoordinate(52.182679977268, 5.39752000942826), new GeoCoordinate(52.1061999723315, 5.03457002341747)); waitHandle.Set(); }); waitHandle.WaitOne(TimeSpan.FromSeconds(25)); Assert.IsTrue(m.FoundRoute.Geometry.Any()); } } }

Route finding is async as well and needs to run on the UI thread, hence the hoopla with the AutoResetEvent and the Dispatcher. Basically I ask the the RouteQuery to find some route from one place to another in the Netherlands. For those interested: it’s a road I drove for many a hackathon – from my street to the street where our former Dutch DPE Matthijs Hoekstra used to live before he decided to go upstream to Seattle to join the Windows Phone team. I actually seem to recall I wrote this very code in his house at the last ‘kitchen table’ hackathon :-)

There are two things to wonder at at this point:

  1. Will this serialize to support tombstoning? (remember from the previous post the MapLocation that came back from GeocodeQuery did not)
  2. What the hell is it that we find?

Does this serialize?

I added a second test to NavigationModelTest  which is basically an extended version of the first.

[TestMethod]
public void TestStoreNavigationModel()
{
  var m = new NavigationModel();

  var waitHandle = new AutoResetEvent(false);

  Deployment.Current.Dispatcher.BeginInvoke(async () =>
  {
    await m.DoRouting(
        new GeoCoordinate(52.182679977268, 5.39752000942826),
        new GeoCoordinate(52.1061999723315, 5.03457002341747));
    waitHandle.Set();
  });

  waitHandle.WaitOne(TimeSpan.FromSeconds(25));

  var h = new IsolatedStorageHelper<NavigationModel>();
  if (h.ExistsInStorage())
  {
    h.DeletedFromStorage();
  }
  h.SaveToStorage(m);

  var retrieved = h.RetrieveFromStorage();

  Assert.IsTrue(retrieved.FoundRoute.Geometry.Any());
}

And here we go again: the test fails with SilverlightSerializer complaining that “Could not construct an object of type 'Microsoft.Phone.Maps.Services.Route', it must be creatable in this scope and have a default parameterless constructor”. So we basically have the same problem we had in the previous post. The way to make this test work is to adorn FoundRoute in NavigationModel

[DoNotSerialize]
public Route FoundRoute { get; set; }
and change the last line of test a little
Assert.IsNotNull(retrieved);

The test now succeeds, but the route you found is now of course still not serialized. You can wonder (or gripe on twitter) why Microsoft have implemented it this way, but that won’t get your app any closer to shipping. It simply means we have to defer tombstoning of the found route to the viewmodel again, just like in the previous post.

What DO we get back?

Actually, quite a lot. The routing information is very detailed. The main Route class has the following properties and methods:

public class Route : IRoutePath
{
  public LocationRectangle BoundingBox { get; internal set; }
  public TimeSpan EstimatedDuration { get; internal set; }
  public ReadOnlyCollection<Device.Location.GeoCoordinate> Geometry 
{ get; internal set; } public ReadOnlyCollection<RouteLeg> Legs { get; internal set; } public int LengthInMeters { get; internal set; } }

A route can exist out of multiple RouteLeg objects (if you give the RouteQuery more than two waypoints. RouteLeg is defined as follows:

public class RouteLeg : IRoutePath
{
  public LocationRectangle BoundingBox { get; internal set; }
  public TimeSpan EstimatedDuration { get; internal set; }
  public ReadOnlyCollection<Device.Location.GeoCoordinate> Geometry 
        { get; internal set; }
  public int LengthInMeters { get; internal set; }
  public ReadOnlyCollection<RouteManeuver> Maneuvers 
       { get; internal set; }
}

Which makes me feel that a RouteLeg and a Route are nearly the same object and there might have been some code re-use possibilities, but I digress. A RouteLeg consists, apart from a geometry, out of various RouteManeuvers, which look like this:

public class RouteManeuver
{
  public RouteManeuverInstructionKind InstructionKind { get; internal set; }
  public string InstructionText { get; internal set; }
  public int LengthInMeters { get; internal set; }
  public GeoCoordinate StartGeoCoordinate { get; internal set; }
}

The InstructionText literally contains stuff like “Turn left on xyz street” and a location where this should happen. RouteManeuverInstructionKind is an enum describing the kind of instruction and really is so comprehensive it’s actually a bit hilarious, so go and have a look on it. But you can very much use this to depict what you the driver needs to do, and I am pretty sure this is what Nokia’s “Here Drive”  uses under the hood. So here we have a full fledged routing API under the hood – but there’s no way in Hades we are ever going to serialize that will all those internal sets, as we already ascertained.

In real life, at this point you really need to confer with the stakeholder and the designer – what is it what we are going to show and how we are going to show it? Since I am both and developer at this point, I decided I want to show the route on the map as a line, the maneuvers (being the point where you actually need to do something) as symbols you can tap on, and having a window with the InstructionText to pop up as you do. Basically we’ll end up with a simple routing system in stead of a full fledged navigation app, but we have to start somewhere. And being the lazy *** I am, I am going to re-use the map binding behavior I wrote last year for Windows 8 and Windows Phone 8. But that’s later. First the view models.

Enter the viewmodels – again

The first, and most simple viewmodel is for handling the maneuver we are going to show in the popup

using System.Windows.Input;
using GalaSoft.MvvmLight;
using GalaSoft.MvvmLight.Command;
using GalaSoft.MvvmLight.Messaging;
using Microsoft.Phone.Maps.Controls;
using Wp7nl.Utilities;

namespace NavigationDemo.Logic.ViewModels
{
  public class ManeuverViewModel: ViewModelBase
  {
    private GeoCoordinateCollection location;
    public GeoCoordinateCollection Location
    {
      get { return location; }
      set
      {
        if (location != value)
        {
          location = value;
          RaisePropertyChanged(() => Location);
        }
      }
    }

    private string description;
    public string Description
    {
      get { return description; }
      set
      {
        if (description != value)
        {
          description = value;
          RaisePropertyChanged(() => Description);
        }
      }
    }

    [DoNotSerialize]
    public ICommand SelectCommand
    {
      get
      {
        return new RelayCommand(
            () => Messenger.Default.Send(this),
            () => true);
      }
    }
  }
}

The command firing of the object itself over the Messenger is a time-tested and tried method I use – if a user selects an object from a list, let a viewmodel that has the actual list of these objects as a property – I call that the ‘parent’ - handle the select. This prevents a whole lot who messing around with data contexts. Be nice to your designer ;-). Also note the geometry in this class is a GeoCoordinateCollection – although the maneuver is a point, my MapShapeDrawBehavior needs a GeoCoordinateCollection, because it does not know in advance if it needs to draw a point or a shape.

The next one is a bit awkward and also direct result of the way my MapShapeDrawBehavior behavior works – it needs a list of objects with a property that’s a GeoCoordinateCollection – this being the geometry. But the RouteLeg gives me a ReadOnlyCollection<GeoCoordinate> and we have only one object – one route. So I write a simple wrapper viewmodel to make sure that it has:

using System.Collections.Generic;
using System.Device.Location;
using GalaSoft.MvvmLight;
using Microsoft.Phone.Maps.Controls;
using Wp7nl.Utilities;

namespace NavigationDemo.Logic.ViewModels
{
  public class RouteGeometryViewModel : ViewModelBase
  {
    public RouteGeometryViewModel()
    {
    }

    public RouteGeometryViewModel(IEnumerable<GeoCoordinate> coordinates)
    {
      Geometry = new GeoCoordinateCollection();
      Geometry.AddRange(coordinates);
    }

    private GeoCoordinateCollection geometry;
    public GeoCoordinateCollection Geometry
    {
      get { return geometry; }
      set
      {
        if (geometry != value)
        {
          geometry = value;
          RaisePropertyChanged(() => Geometry);
        }
      }
    }
  }
}

… and make sure the viewmodel holding this object has a list of these.

And finally, the RoutingViewModel itself, that starts like this:

using System.Collections.ObjectModel;
using System.Device.Location;
using System.Linq;
using System.Threading.Tasks;
using System.Windows.Input;
using GalaSoft.MvvmLight;
using GalaSoft.MvvmLight.Command;
using GalaSoft.MvvmLight.Messaging;
using Microsoft.Phone.Maps.Controls;
using NavigationDemo.Logic.Models;
using Wp7nl.Utilities;

namespace NavigationDemo.Logic.ViewModels
{
  public class RoutingViewmodel : ViewModelBase
  {
    public RoutingViewmodel()
    {
      Maneuvers = new ObservableCollection<ManeuverViewModel>();
      RouteCoordinates = new ObservableCollection<RouteGeometryViewModel>();

      Messenger.Default.Register<ManeuverViewModel>(this, 
                                                    p => SelectedManeuver = p);
    }

    public RoutingViewmodel(NavigationModel model)
      : this()
    {
      Model = model;
    }

    private ManeuverViewModel selectedManeuver;
    public ManeuverViewModel SelectedManeuver
    {
      get { return selectedManeuver; }
      set
      {
        selectedManeuver = value;
        RaisePropertyChanged(() => SelectedManeuver);
      }
    }

    public ObservableCollection<RouteGeometryViewModel> RouteCoordinates 
{ get; set; } public ObservableCollection<ManeuverViewModel> Maneuvers { get; set; } } }

In the default constructor sits the standard initialization of the ObservableCollection types, as well as the setup for ManeuverViewModel select interception. Further below another constructor to make initialization from code easier, and the SelectedManeuver property. Nothing special here yet. We add two viewmodels for both to and from searching:

private GeocodeViewModel toViewModel;
public GeocodeViewModel ToViewModel
{
  get { return toViewModel; }
  set
  {
    if (toViewModel != value)
    {
      toViewModel = value;
      RaisePropertyChanged(() => ToViewModel);
    }
  }
}

private GeocodeViewModel fromViewModel;
public GeocodeViewModel FromViewModel
{
  get { return fromViewModel; }
  set
  {
    if (fromViewModel != value)
    {
      fromViewModel = value;
      RaisePropertyChanged(() => FromViewModel);
    }
  }
}

And then the public model property as well, with some clever skullduggery here:

private NavigationModel model;
public NavigationModel Model
{
  get { return model; }
  set
  {
    model = value;
    if (model != null)
    {
      ToViewModel = new GeocodeViewModel(model.To) { Name = "To" };
      FromViewModel = new GeocodeViewModel(model.From) { Name = "From" };
    }
  }
}

The “Name” property has no function whatsoever in the code, but I assure you – if you have two identical viewmodels in your app, having them easily distinguishable by a simple property that you can see in a breakpoint helps a ton!

Finally, the piece that does the actual routing:

public async Task DoRouting()
{
  await DoRouting(
   FromViewModel.SelectedLocation.Location,
   ToViewModel.SelectedLocation.Location);
}

public async Task DoRouting(GeoCoordinate from, GeoCoordinate to)
{
  RouteCoordinates.Clear();
  Maneuvers.Clear();
  await Model.DoRouting(from, to);
  RouteCoordinates.Add(new RouteGeometryViewModel(Model.FoundRoute.Geometry));
  ViewArea = Model.FoundRoute.BoundingBox;
  Model.FoundRoute.Legs.ForEach(r =>
  Maneuvers.AddRange(
    r.Maneuvers.Select(
      p => new ManeuverViewModel { 
Description = p.InstructionText,
Location =
new GeoCoordinateCollection { p.StartGeoCoordinate }}))); } [DoNotSerialize] public ICommand DoRoutingCommand { get { return new RelayCommand( async () => { await DoRouting(); }); } }

Once again I have a public overload with just coordinates to make testing easier. The line with all the Lambdas basically iterates over all legs of the route, gets all maneuvers per leg, and creates ManeuverViewModel types of every maneuver, using the StartGeoCoordinate of said maneuver to create location. Also note I put the route’s bounding box into a ViewArea property of the RoutingViewModel (code omitted) to enable the designer to let the map zoom to the extent of the new-found route. In the RoutingViewModel are two more properties I omitted – ZoomLevel and MapCenter, they are with ViewArea taken from the map binding sample I wrote last year.

Well… that’s quite some code. And now the proof of the pudding…

Testing the RoutingViewModel

I added a class RoutingViewModelTest and a simple test method to see if coordinates and maneuvers are duly filled when I call the DoRouting method with coordinates

using System;
using System.Device.Location;
using System.Linq;
using System.Threading;
using System.Windows;
using Microsoft.VisualStudio.TestPlatform.UnitTestFramework;
using NavigationDemo.Logic.Models;
using NavigationDemo.Logic.ViewModels;
using Wp7nl.Utilities;


namespace NavigationDemo.Logic.Test
{
  [TestClass]
  public class RoutingViewModelTest
  {
    [TestMethod]
    public void TestSimpleRoutingViewModel()
    {
      var vm = new RoutingViewmodel(new NavigationModel());

      var waitHandle = new AutoResetEvent(false);

      Deployment.Current.Dispatcher.BeginInvoke(async () =>
      {
        await vm.DoRouting(
            new GeoCoordinate(52.182679977268, 5.39752000942826),
            new GeoCoordinate(52.1061999723315, 5.03457002341747));
        waitHandle.Set();
      });

      waitHandle.WaitOne(TimeSpan.FromSeconds(25));

      Assert.IsTrue(vm.RouteCoordinates.Any());
      Assert.IsTrue(vm.Maneuvers.Any());
    }
  }
}

Which, not entirely surprising, is the case. Now if you follow the TDD pattern correctly, you should add all kinds of mocks and interfaces between these classes and also test every method separately. I decided to go more for the integration test like route – so I made a big test which basically emulates a complete routing request, tombstones it and checks the result.

[TestMethod]
public void TestSearchRoutingViewModelAndTombstoning()
{
  var waitHandle = new AutoResetEvent(false);

  var vm = new RoutingViewmodel(new NavigationModel());
  vm.FromViewModel.SearchText = "Springerstraat Amersfoort Netherlands";
  vm.ToViewModel.SearchText = "Heinrich Bertestraat Utrecht";
  Deployment.Current.Dispatcher.BeginInvoke(async () =>
  {
    await vm.FromViewModel.SearchLocations();
    await vm.ToViewModel.SearchLocations();
    waitHandle.Set();
  });
  waitHandle.WaitOne(TimeSpan.FromSeconds(5));

  Assert.IsTrue(vm.FromViewModel.MapLocations.Any());
  Assert.IsTrue(vm.ToViewModel.MapLocations.Any());

  vm.FromViewModel.SelectedLocation = vm.FromViewModel.MapLocations[0];
  vm.ToViewModel.SelectedLocation = vm.ToViewModel.MapLocations[0];
  Deployment.Current.Dispatcher.BeginInvoke(async () =>
  {
    await vm.DoRouting();
    waitHandle.Set();
  });

  waitHandle.WaitOne(TimeSpan.FromSeconds(5));

  var h = new IsolatedStorageHelper();
  if (h.ExistsInStorage())
  {
    h.DeletedFromStorage();
  }
  h.SaveToStorage(vm);

  var retrievedVm = h.RetrieveFromStorage();

  Assert.IsTrue(vm.RouteCoordinates.Any());
  Assert.IsTrue(vm.Maneuvers.Any());
  Assert.IsTrue(retrievedVm.RouteCoordinates.Count == vm.RouteCoordinates.Count);
  Assert.IsTrue(retrievedVm.FromViewModel.SearchText == 
    "Springerstraat Amersfoort Netherlands");
  Assert.IsTrue(retrievedVm.Maneuvers.Count == vm.Maneuvers.Count);
}

So, I first setup a complete new RoutingViewModel with NavigationModel, simulate the user input two streets and let them search locations. Then I test if there are any locations found at all. I can safely assume they are, since the previous tests worked as well, but still. Then I actually let the app perform routing, ‘tombstone’ the whole viewmodel and retrieve it again.

And then I do a number of tests to check if anything is found at all, and if whatever comes back from storage matches what went into it. It will not surprise you – it does. This test is far from comprehensive – you could test all the properties one by one, but at least you now can have a reasonable confidence in the basic workings of your app. What’s more – if you start changing things and test start failing, you know your app will probably fail too somewhere down the line.

Conclusion (so far)

By using unit/integration testing we have been able to make and test a working model of the app, finding out how stuff work and tackling serialization problems head on before we actually made a user interface at all – therefore eliminating potential double work by both you and your designer. Next time we will actually start assembling the app, and we will learn that no amount of unit testing will eliminate you from the fact that you still need to test your app manually ;-)

Once again, before I get flamed: technically I showed you how to do integration tests, not unit tests, because I tested multiple classes interacting with each other, in stead of single methods and/or properties

As always, a finished solution (if you can call this finished) is available for download here.

19 April 2013

Windows Phone 8 navigation part 1–geocoding, tombstoning–and testing

After my post about reverse geocoding I set out to make a little app to demonstrate routing in Windows Phone 8. The demo app went quite out of hand, so I decided to split the post up in a few smaller posts. In the course of it I am going to build a basic navigation app that enables the user to determine two locations, find a route between those locations, and display them on a map – all using MVVMLight, of course.

And now the 2012.2 update to Visual Studio is released, we can finally build Windows Phone MVVM apps the way things are intended to be: by writing some unit test first, getting the basic functions right, before creating an all-out app. This makes it especially handy to test one important requirement that go for all my apps – all the models and viewmodels must be serializabe, so I can tombstone using SilverlightSerializer like I have been doing for over two years now.

At this point I am not really sure how much blog posts this will take me, but I guess at least three, maybe four.

What is unit testing and why should I do that?

Professional software developers are usually all in on this. What you basically do is write code that asserts that pieces of your code are behaving the way you expect them to do. I am sure everyone has had the episode that you change one little thing that should be inconsequential and suddenly, at some seemingly totally unrelated place, things start going South. Unit tests call little pieces of of your code and test if the result of calling a method, setting a property or whatever gives the result you expect. If you write unit tests, and then change something, and test start failing in unrelated places – it’s like a smoke detector going off. Your code starts detecting bugs for you. Nice, eh? I also gives you the a way to mess around with all kinds of APIs getting things right before you start wasting time on a complex GUI that you can’t get to work because the underlying code cannot work the way you want.

What is geocoding?

Geocoding is what we GIS buffs say when we mean ‘finding a location on earth by it’s name”. If I put “Boston  USA” in a geocoder I expect to get a coordinate that puts me somewhere on the east coast of the United States, if I enter “Springerstraat 36 Netherlands” I expect a coordinate that shows me my own house, or somewhere nearby. Some geocoders can take info that’s not tied to an address, but things like, like ‘town hall Little Rock USA”. In general – in goes a descriptive text, out come one or more matches with coordinates.

Enough introduction. Let’s code.

Setting the stage

I started out doing the following:

  • Create a new Windows Phone App “NavigationDemo”. Target framework 8.0
  • Add a Windows Phone Class Library “NavigationDemo.Logic”
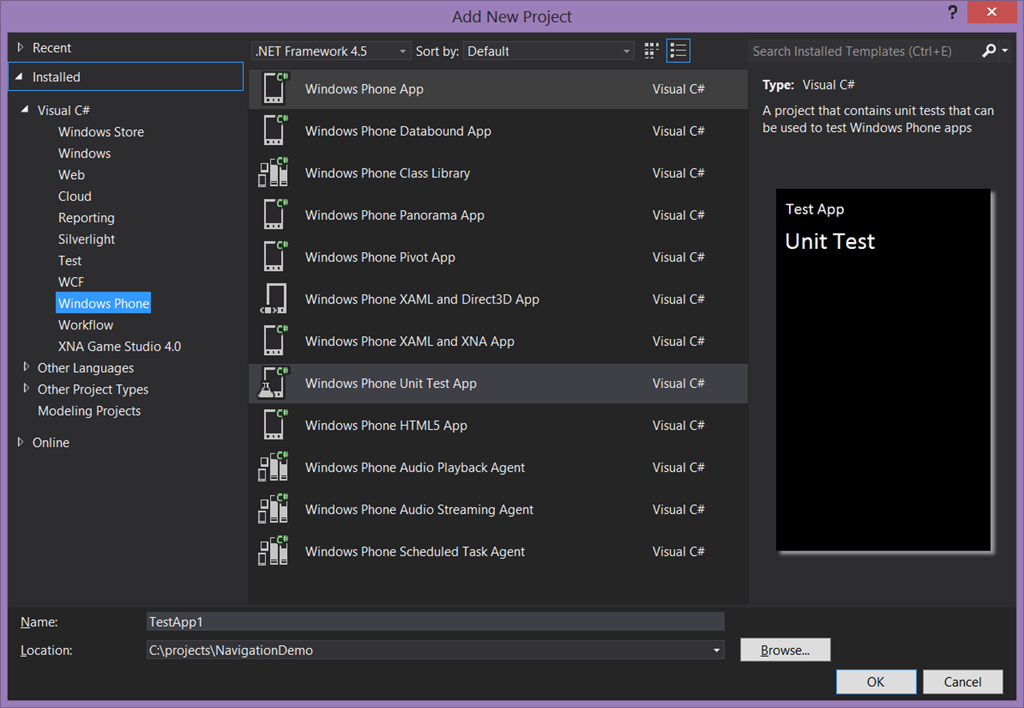
  • Add a Windows Phone Unit Test app “NavigationDemo.Logic.Test”
  • In NavigationDemo, create a reference to NavigationDemo.Logic
  • In NavigationDemo.Logic.Test, make a reference to NavigationDemo.Logic as well.
  • In both NavigationDemo and NavigationDemo.Logic.Test, select WMAppManifest.xml in Properties and enable the “ID_CAP_MAP” capbility

Now, because I am a lazy ******* and like to re-use I did things before, bring in the following nuget packages:

  • wp7nl (this will pull in MVVMLight Libraries-only version and the Windows Phone toolkit as well)
  • Microsoft.Bcl.Async

wp7nl also has a Windows Phone 8 version (it’s name is retained for historic reasons). Install both packages in all three projects.

GeocodeModel – take one

In “NavigationDemo.Logic”, add a folder “GeocodeModel” and put the following class in there:

using System;
using System.Collections.Generic;
using System.Device.Location;
using System.Linq;
using System.Threading.Tasks;
using Microsoft.Phone.Maps.Services;
using Wp7nl.Utilities;

namespace NavigationDemo.Logic.Models
{
  public class GeocodeModel
  {
    public GeocodeModel()
    {
      MapLocations = new List<MapLocation>();
      SearchLocation = new GeoCoordinate();
    }
    public string SearchText { get; set; }

    public GeoCoordinate SearchLocation { get; set; }

    public MapLocation SelectedLocation { get; set; }

    public List<MapLocation> MapLocations { get; set; }

    public async Task SearchLocations()
    {
      MapLocations.Clear();
      SelectedLocation = null;
      var geoCoder = new GeocodeQuery
      {
        SearchTerm = SearchText,
        GeoCoordinate = SearchLocation
      };
      MapLocations.AddRange(await geoCoder.GetMapLocationsAsync());
      SelectedLocation = MapLocations.FirstOrDefault();
    }
  }
}

To perform geocoding, we need the GeocodeQuery class. So we embed that into a class with a method to perform the actual geocoding, a search string to holds the user input, a list of MapLocation (the output of GeocodeQuery) and SelectedLocation to the user’s selection.

Note there is also a SearchLocation property of type GeoCoordinate. That’s because the GeocodeQuery also needs a location to start searching from. If the programmer using my model doesn’t set it, I choose a default value. But you can imagine this being useful if someone just enters ‘Amersfoort’ for SearchText and a coordinate somewhere in the Netherlands – that way the GeocodeQuery knows that you want to have Amersfoort in the Netherlands, and not the Amersfoort in South Africa. Anyway, it’s now time for

Writing the search test

Add a new class GeocodeModelTest to NavigationDemo.Logic.Test and let’s write our first test:

using System;
using System.Threading;
using System.Windows;
using Microsoft.VisualStudio.TestPlatform.UnitTestFramework;
using NavigationDemo.Logic.Models;

namespace NavigationDemo.Logic.Test
{
  [TestClass]
  public class GeocodeModelTest
  {
    [TestMethod]
    public void TestFindBoston()
    {
      var m = new GeocodeModel { SearchText = "Boston USA" };
      var waitHandle = new AutoResetEvent(false);

      Deployment.Current.Dispatcher.BeginInvoke(async () =>
      {
        await m.SearchLocations();
        waitHandle.Set();
       });
      waitHandle.WaitOne(TimeSpan.FromSeconds(5));

      Assert.AreEqual(m.SelectedLocation.GeoCoordinate.Latitude, 42, 1);
      Assert.AreEqual(m.SelectedLocation.GeoCoordinate.Longitude, -71, 1);
      Assert.AreEqual(m.SelectedLocation.Information.Address.City, 
         "Boston");
      Assert.AreEqual(m.SelectedLocation.Information.Address.State,
        "Massachusetts");
      Assert.AreEqual(m.SelectedLocation.Information.Address.Country, 
        "United States of America");
    }
  }
}

The GeocodeQuery runs async and needs to run on the UI thread as well. If you have no idea what I am fooling around here with the Dispatcher and the AutoResetEvent, please read this article first. Anyway, this test works. Boston is indeed on the east coast of the United States and still in Massachusetts. Most reassuring. Now let’s see if SilverlightSerializer will indeed serialize this.

Writing the serialization test – take one

The first part is basically a repeat of the first test – writing unit test sometimes involves a lot of boring copy & paste work – but the last part is different:
 [TestMethod]
 public void TestStoreAndRetrieveBoston()
 {
   var m = new GeocodeModel { SearchText = "Boston USA" };
   var waitHandle = new AutoResetEvent(false);

   Deployment.Current.Dispatcher.BeginInvoke(async () =>
   {
     await m.SearchLocations();
     waitHandle.Set();
   });
   waitHandle.WaitOne(TimeSpan.FromSeconds(5));
   Assert.IsNotNull(m.SelectedLocation);

   // Actual test
   var h = new IsolatedStorageHelper<GeocodeModel>();
   if (h.ExistsInStorage())
   {
     h.DeletedFromStorage();
   }
   h.SaveToStorage(m);

   var retrievedModel = h.RetrieveFromStorage();
   Assert.AreEqual(retrievedModel.SelectedLocation.Information.Address.City,
	"Boston");
 }
}

Adding this test to GeocodeModelTest will reveal a major bummer – a couple of the classes that are returned by GeocodeQuery – starting with MapLocation - have private constructors and cannot be serialized. Our model cannot be serialized. The usual approach to this kind of problem is to write a kind of wrapper class that can be serialized. But… using MVVMLight you are most of the time making wrapper classes anyway – that’s what a ViewModel is, after all, so let’s use that.

Writing the serialization test - take two

First, adorn the stuff that cannot be serialized in the GeocodeModel with the [DoNotSerialize] attribute, like this:

[DoNotSerialize]
public MapLocation SelectedLocation { get; set; }

[DoNotSerialize]
public List MapLocations { get; set; }
and the test is reduced to this:
[TestMethod]
public void TestStoreAndRetrieveBoston()
{
  var m = new GeocodeModel { SearchText = "Boston USA" };
  // Actual test
  var h = new IsolatedStorageHelper();
  if (h.ExistsInStorage())
  {
    h.DeletedFromStorage();
  }
  h.SaveToStorage(m);

  var retrievedModel = h.RetrieveFromStorage();
  Assert.AreEqual(retrievedModel.SearchText, "Boston USA");
}

Hurray, this works, but the model’s results are now no longer storing stuff. MapLocations is empty, so is SelectedLocation, if they are deserialized. Bascially we are now only testing if indeed the search test is retained after storage and retrieval. Well, it is.

Enter the viewmodels

So far I mainly showed what does not work. Now it’s time to show what does. First, we make a viewmodel around MapLocation:

using System.Device.Location;
using GalaSoft.MvvmLight;
using Microsoft.Phone.Maps.Services;

namespace NavigationDemo.Logic.ViewModels
{
  public class MapLocationViewModel : ViewModelBase
  {
    public MapLocationViewModel()
    {
    }

    public MapLocationViewModel(MapLocation model)
    {
      var a = model.Information.Address;

      Address = string.Format("{0} {1} {2} {3} {4}", 
            a.Street, a.HouseNumber, a.PostalCode,
            a.City,a.Country).Trim();
      Location = model.GeoCoordinate;
    }

    private string address;
    public string Address
    {
      get { return address; }
      set
      {
        if (address != value)
        {
          address = value;
          RaisePropertyChanged(() => Address);
        }
      }
    }

    private GeoCoordinate location;
    public GeoCoordinate Location
    {
      get { return location; }
      set
      {
        if (location != value)
        {
          location = value;
          RaisePropertyChanged(() => Location);
        }
      }
    }
  }
}

That takes care of the MapLocation not being serializable. Once it is initialized, it does no longer need the model anymore. Which is a good thing, since it cannot be serialized ;-). Next is the GeocodeViewModel itself:

using System.Collections.ObjectModel;
using System.Threading.Tasks;
using System.Windows.Input;
using GalaSoft.MvvmLight;
using GalaSoft.MvvmLight.Command;
using NavigationDemo.Logic.Models;
using Wp7nl.Utilities;
using System.Linq;

namespace NavigationDemo.Logic.ViewModels
{
  public class GeocodeViewModel : ViewModelBase
  {
    public GeocodeViewModel()
    {
      MapLocations = new ObservableCollection<MapLocationViewModel>();
    }

    public string Name { get; set; }

    public GeocodeViewModel( GeocodeModel model) : this()
    {
      Model = model;
    }

    public GeocodeModel Model{get;set;}

    public ObservableCollection<MapLocationViewModel> MapLocations { get; set; }

    [DoNotSerialize]
    public string SearchText
    {
      get { return Model.SearchText; }
      set
      {
        if (Model.SearchText != value)
        {
          Model.SearchText = value;
          RaisePropertyChanged(() => SearchText);
        }
      }
    }

    private MapLocationViewModel selectedLocation;
    public MapLocationViewModel SelectedLocation
    {
      get { return selectedLocation; }
      set
      {
        if (selectedLocation != value)
        {
          selectedLocation = value;
          RaisePropertyChanged(() => SelectedLocation);
        }
      }
    }
    
    public async Task SearchLocations()
    {
      MapLocations.Clear();
      SelectedLocation = null;
      await Model.SearchLocations();
      MapLocations.AddRange(Model.MapLocations.Select( 
        p=> new MapLocationViewModel(p)));
      SelectedLocation = MapLocations.FirstOrDefault();
    }
    
    [DoNotSerialize]
    public ICommand SearchLocationCommand
    {
      get
      {
        return new RelayCommand(async () => await SearchLocation());
      }
    }
  }
}

Notice that the only attribute that is serialized by the model, is now marked [DoNotSerialize]. This is really important – since the model may not be around yet when deserializing takes place, it would result in a null reference. If you pass things to the model, let the model serialize it. If you don’t let the viewmodel take care of it.

Writing the search test for the viewmodel

So since we are now no longer testing the model but the viewmodel, I added a new class “GeocodeViewModeTest” to, well, test the viewmodel.

using System;
using System.Threading;
using System.Windows;
using Microsoft.VisualStudio.TestPlatform.UnitTestFramework;
using NavigationDemo.Logic.Models;
using NavigationDemo.Logic.ViewModels;
using Wp7nl.Utilities;
namespace NavigationDemo.Logic.Test { [TestClass] public class GeocodeViewModelTest { [TestMethod] public void TestFindBostonWithViewModel() { var vm = new GeocodeViewModel( new GeocodeModel { SearchText = "Boston USA" }); var waitHandle = new AutoResetEvent(false); Deployment.Current.Dispatcher.BeginInvoke(async () => { await vm.SearchLocations(); waitHandle.Set(); }); waitHandle.WaitOne(TimeSpan.FromSeconds(5)); Assert.AreEqual(vm.SelectedLocation.Address, "Boston United States of America"); Assert.AreEqual(vm.SelectedLocation.Location.Latitude, 42, 1); Assert.AreEqual(vm.SelectedLocation.Location.Longitude, -71, 1); } } }

Lo and behold, this test succeeds as well. Now the second test is actually a lot more interesting:

[TestMethod]
public void TestStoreAndRetrieveBostonWithViewModel()
{
  var vm = new GeocodeViewModel(
    new GeocodeModel { SearchText = "Boston USA" });
  var waitHandle = new AutoResetEvent(false);

  Deployment.Current.Dispatcher.BeginInvoke(async () =>
  {
    await vm.SearchLocations();
    waitHandle.Set();
  });
  waitHandle.WaitOne(TimeSpan.FromSeconds(5));
  Assert.IsNotNull(vm.SelectedLocation);

  var h = new IsolatedStorageHelper<GeocodeViewModel>();
  if (h.ExistsInStorage())
  {
    h.DeletedFromStorage();
  }
  h.SaveToStorage(vm);

  var retrievedViewModel = h.RetrieveFromStorage();
  Assert.AreEqual(retrievedViewModel.SelectedLocation.Address,
    "Boston United States of America");
  Assert.AreEqual(
    retrievedViewModel.SelectedLocation.Location.Latitude, 42, 1);
  Assert.AreEqual(
    retrievedViewModel.SelectedLocation.Location.Longitude, -71, 1);
}

And indeed, after retrieving the viewmodel from storage, the same asserts are fired and the test passes. Success: we can now find location and tombstone

Conclusion

I showed you some basic geocoding – how to find a location using a text input. I hope I have showed you also that unit tests are not only a way to assure some basic code quality and behavior, but are also a way to determine ahead if things are going to work the way you envisioned. Unit test make scaffolding and proof-of-concept approach of development a lot easier – you need a lot less starting up an app, clicking the right things and then finding breakpoint-by-breakpoint what goes wrong. Quite early in my development stage I ran into the fact that some things were not serializable. Imagine finding that out when the whole app was already mostly done, and then somewhere deep down something goes wrong with the tombstoning. Not fun.

Complete code – that is, complete for such an incomplete app – can be found here. Next time, we will do some actual navigation.

To prevent flames from Test Driven Design (TDD) purists: a variant of unit tests are integration test. Technically a unit test tests only tiny things that have no relation to another, like one object, method or property. Integration tests test the workings of larger pieces of code. So technically I am mostly writing integration tests. There, I’ve said it.

21 March 2013

Unit testing async Windows Phone 8 code on the UI thread with VS 2012.2 CTP4

imageThis may be the most cryptic acronym-laden title I ever used for a blog post, but it quite exactly describes what I was trying to do yesterday.

The Visual Studio 2012 CTP4 makes it possible to write real Windows Phone 8 unit tests that run in the Visual Studio Unit Test runner (in stead of only on the emulator). So when I wanted to investigate the Routing API that is new in Windows Phone 8, I decided not to write an application outright, but start out with unit test.

I set up a new solution with two projects, as I usually do: one with the actual app - and one class library with the view models, models and other logic in it that isnot directly related to the user interface. And then I added a Windows Phone 8 Unit Test App.

First things first: when I want to test routing, I first need to give the user an option to select a location to go to. I decided to use the Geocoding API. I decided the view model should contain the following:

  • A string property SearchText to be filled by the user
  • An ObservableCollection of MapLocation called MapLocations to be filled by the Geocoder, intended to be bound to a list control of some kind to enable the user to select on of the founds locations.
  • A MapLocation property SelectedLocation to hold the MapLocation selected by the user
  • A little method to actually perform the geocoding
  • A command wrapping this method.

My good and very smart friend - and fellow Phone development MVP - Matteo Pagani has already covered some ground in this direction by writing this article and inspired by it I decided to pull in the Microsoft.Bcl.Async library as well so I could use async/await, on the premises that you can never have too much beta software in your project ;-)

The method I wanted to test was pretty simple:

public async Task SearchLocation()
{
  MapLocations.Clear();
  SelectedLocation = null;
  var geoCoder = new GeocodeQuery { 
SearchTerm = SearchText, GeoCoordinate = new GeoCoordinate() }; MapLocations.AddRange(await geoCoder.GetMapLocationsAsync()); }

And so was the test method – I let it search for the street I live in.

[TestMethod]
public async Task TestLocationWrong1()
{
  var testVm = new GeocodeViewModel
    {SearchText = "Springerstraat Amersfoort Netherlands"};
  await testVm.SearchLocation();
  Assert.IsTrue(testVm.MapLocations.Any());
}

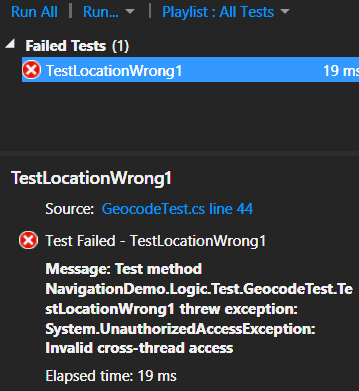
imageI ran the test…. and was quite surprised by the result. “Invalid cross thread access"??? I don’t even have a UI. Very interesting. Apparently the GeocodeQuery needs to be run on the UI thread. As to why this is, I have no idea. Some people (hi Morten ;-) ) say that if you have to unit test on the UI thread, you are doing it wrong. That may be the case, but it seems I have little choice here and  I still want to test my view model.

According to this page there is a UITestMethodAttribute for Windows Store applications to solve this kind of problems – but not for Windows Phone 8 (yet) so obviously I had to pull in the Dispatcher. Since calling stuff from the Dispatcher runs asynchronously as well take 2 didn’t work of course…

[TestMethod]
public void TestLocationWrong2()
{
  var testVm = new GeocodeViewModel 
  { SearchText = "Springerstraat Amersfoort Netherlands" };
  Deployment.Current.Dispatcher.BeginInvoke(async () => await testVm.SearchLocation());
  Assert.IsTrue(testVm.MapLocations.Any());
}

…for the simple reason that the although testVM.SearchLocation is now fired on the UI thread, the Assert is not, and it is executed directly after the BeginInvoke is called and MapLocations still is empty when the Assert is evaluated.

I don’t know if there’s a smarter way to do this, but I used an AutoResetEvent to solve it. I used that to block the test thread until the UI thread is done, like this:

[TestMethod]
public void TestLocationSearchHasResult()
{
  var waitHandle = new AutoResetEvent(false);
  var testVm = new GeocodeViewModel { SearchText = "Springerstraat Amersfoort Netherlands" };
  Deployment.Current.Dispatcher.BeginInvoke(async () =>
    {
      await testVm.SearchLocation();
      waitHandle.Set();
    });
  waitHandle.WaitOne(TimeSpan.FromSeconds(5));
  Assert.IsTrue(testVm.MapLocations.Any());
}

image

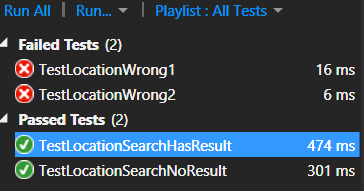
The test thread waits until waitHandle.Set() is called – or five seconds, whatever happens first – and then it performs the Assert. And that works.

As usual, you can download a demo solution here. It was actually meant to be a solution demoing the Route API, as stated earlier, but I thought this subject deserved a blog post on its own.

As stated, this project requires installation of the Visual Studio 2012 CTP4. This has a GoLive license, but it’s still preview software. Install it on your own risk.

Update: Pedro Lamas, a Windows Phone Development specialist working for Nokia, has posted about his port of UITestMethodAttribute to Windows Phone. That runs the whole test on the UI thread in stead of only the the mandatory part. This brute-force method may not be desirable for all cases, but it sure is pretty easy to use.

11 June 2010

Making internals unit testable

When creating - or attempting to create ;-) - reusable components, it’s common practice to hide the gory details of your implementation – not only on class level, but also on assembly level. The drawback of this approach is that you cannot write unit tests to test low-level operations of your component – invisible to the world means invisible to your assembly with unit tests as well.

One approach is to make the component that is to be tested public after all – I admit I did it a couple of times in my wee days before I learned of this trick that actually dates back to .NET 2.0 if I am correct.

Let us assume you have a library MyCompany.GreatObjects.dll, in which you have a component MyCompany.GreatObjects.Internals.MyInternalComponent, and a test library in MyCompany.GreatObjects.Test.dll.

1. Strongly name your test project

Say what? No, I am getting older but I am still not senile (or at least no-one dared to tell me yet). If you don’t know what I mean with strong naming, follow the procedure described here. You might want to strongly name your project to be tested as well, when you are at it ;-) And then build your solution again.

2. Open a Visual Studio Command Prompt

Open the command prompt belonging to the version of Visual Studio you are currently using to develop and test your components. Navigate to the bin/debug subdirectory of your MyCompany.GreatObjects project.

3. Retrieve the public key of your component

Enter the following command:
sn –Tp MyCompany.GreatObjects.dll

This will give two answers – the first one, preceded by the text “Public key is” is the one you are after. It will span something like four and a bit lines and look like this:
0024000004800000940000000602000000240000525341310004000001000100dfb0f05568ca56
3e3ae7449a48d8060be86bc091a88e915a29270a43417aa82c73dea3184beab7e4dfdfca865380
dcda1d8ca2c472b5bd7f889a0f5e77d5ec0b9990a4ca03fb71c881a51585416b1e58be6da0875b
42a2d754911fbfa1daa60884c6a6ff14f636530e197c61310f622794b0f4fbd36ade16b9ea6fa3
b850febd

Copy that code into a text file and carefully remove all line breaks, so that all these characters end up in one line. Take care not to remove any other character or your name is mud.

4. Edit the AssemblyInfo.cs of the component project

This file sits in the “Properties” application folder of your MyCompany.GreatObjects project.  Add the following line (where does not matter, but the end is a logical place):
[assembly: InternalsVisibleTo("MyCompany.GreatObjects.Test, PublicKey=****")]
replace the **** by the actual value for the public key you retrieved – on one line.
Rebuild the MyCompany.GreatObjects project, and you are done. You can now test MyCompany.GreatObjects.Internals.MyInternalComponent and other objects marked as internal, of course - from MyCompany.GreatObjects.Test. But only from MyCompany.GreatObjects.Test. For the rest of the world the internals are still safely invisible.

Purists might say that you only need to test external behavior of your component, but I can think of plenty of scenarios in which you want to change the working of an internal piece of code and still want to be able to verify its behavior – internal or not.

Credits go to my colleague Valentijn Makkenze for pointing this out to me first

18 November 2009

A simple Unity helper for making class decoupling easier

Unity, a part of the Enterprise Library, is a great way of decoupling interfaces and implementation, and for opening a road into unit testing with mock objects. Unfortunately, using it can be a bit cumbersome. You have to create a container, configure it from code or from configuration, and have to decide when to do what. I thought it could do with some help, so I created some helper classes. I must admit this inspired by The Common Service Locator and some code for that I got from Dennis van der Stelt, but it is a little simpler to use. And it works only with Unity ;-) The idea is to define a factory and a resolver, that know of each other only trough an interface:
namespace LocalJoost.Utilities.Unity
{
  public interface IUnityResolver
  {
    Resolve<T>();
  }
}
Then, I define a UnityResolver, which is basically a wrapping around a UnityContainer class:
using System;
using System.Configuration;
using Microsoft.Practices.Unity;
using Microsoft.Practices.Unity.Configuration;

namespace LocalJoost.Utilities.Unity
{
  /// <summary>
  /// Base class for unity resolvers
  /// </summary>
  [Serializable]
  public class UnityResolver : IUnityResolver
  {
    protected static string _defaultContainer = "Default";
    protected IUnityContainer Container{get; set;}

    /// <summary>
    /// Initializes a new instance of the UnityResolver
    /// Override this constructor if you want to write your own default
/// behaviour. /// Register in code by adding lines like: /// Container.RegisterType(Type.GetType("NameSpace.IMyClass",true), /// Type.GetType("NameSpace.MyClass",true)); /// </summary> public UnityResolver() : this(_defaultContainer) { } /// <summary> /// Initializes a new instance of the UnityResolver class. /// </summary> /// <param name="containerName">Name of the container.</param> public UnityResolver(string containerName) { Container = new UnityContainer(); var section = ConfigurationManager.GetSection("unity") as UnityConfigurationSection; if (section != null) { var containerConfiguration = section.Containers[containerName]; if (containerConfiguration != null) { section.Containers[containerName].Configure(Container); } } } /// <summary> /// Resolves an instance of T /// </summary> /// <typeparam name="T"></typeparam> /// <returns></returns> public T Resolve<T>() { return Container.Resolve<T>(); } } }

You can use this class directly, by calling new UnityResolver(“MyContainer”).Resolve<IMyType>(). The UnityResolver looks for a Unity container named “Default” in your configuration file. If that is not present, it creates an empty container. Use of the latter feature is described below.

This is not very efficient when all your classes are sitting into one and the same container, and you may want to have some consistent behavior of your classes during unit testing with mockups. So I created the UnityFactory class that can accept a resolver and hold it:

using System;
using System.Configuration;
using System.Reflection;
using System.Web;

namespace LocalJoost.Utilities.Unity
{
  /// <summary>
  /// Static helper class for shortcutting Unity instantiated 
  /// classes
  /// </summary>
  public class UnityFactory
  {
    /// <summary>
    /// Method to set the resolver manually - use this for unit testing
    /// </summary>
    /// <param name="resolver">The resolver.</param>
    public static void SetResolver( IUnityResolver resolver)
    {
      Resolver = resolver;
    }

    /// <summary>
    /// Gets a resolver from configuration.
    /// </summary>
    /// <returns></returns>
    private static IUnityResolver GetResolverFromConfiguration()
    {
      var configuredDefaultResolver = 
	    ConfigurationManager.AppSettings["UnityResolver"];
      if (!string.IsNullOrEmpty(configuredDefaultResolver))
      {
        var specParts = configuredDefaultResolver.Split(',');
        var ass = Assembly.Load(specParts[1]);
        var objType = ass.GetType(specParts[0]);
        return Activator.CreateInstance(objType) as IUnityResolver;
      }
      return null;
    }

    /// <summary>
    /// Gets the instance of an object via an interface
    /// </summary>
    /// <typeparam name="T"></typeparam>
    /// <returns></returns>
    public static T GetInstance<T>()
    {
      // First, make sure there is a resolver. 
      // If none is defined, try to load one from configuration
      // If that fails too, use the default resolver
      if (Resolver == null)
      {
        Resolver = GetResolverFromConfiguration() ?? new UnityResolver();
      }

      // Then, resolve the interface to an object instance
      return Resolver.Resolve<T>();
    }

    #region Properties
    /// <summary>
    /// Gets or sets the resolver. Uses Http context or static variable
    /// to store a created resolver
    /// </summary>
    /// <value>The resolver.</value>
    private static IUnityResolver Resolver
    {
      get
      {
        if (HttpContext.Current == null)
        {
          return _resolver;
        }
        return HttpContext.Current.Application["__UnityResolver"]
          as IUnityResolver;
      }

      set
      {
        if (HttpContext.Current == null)
        {
          _resolver = value;
        }
        else
        {
          HttpContext.Current.Application["__UnityResolver"] = value;
        }
      }
    }

    private static IUnityResolver _resolver;
    #endregion
  }
}

Usage of this class is UnityFactory.Resolve<IMyType>(). And presto, you have got a reference to your implementation class. That’s all there is. Except for some configuration, of course ;-).

Another feature of this class is that it looks for a config setting “UnityResolver”. If that is present, it tries to load that class for a resolver in stead of the default UnityResolver. For instance, you can subclass UnityResolver, override the default constructor and define your interface-to-implementation mapping in code. Now this may look strange, because what is the point of decoupling classes and then make the mappings in code again? Well, for a scenario in which you want to use Unity for unit testing with mockups, this makes sense – when you want to deliver your production application without the necessity for a (possible very large) unity mapping section in your configuration file. If you want to register objects from code, you can do it for instance like this in the constructor of your UnityResolver override:

Container.RegisterType(
 Type.GetType("SomeNamespace.IMyInterface,SomeNamespace", true),
 Type.GetType("SomeOtherNamespace.MyImplementation,SomeOtherNamespace", true));

where "SomeNamespace" and "SomeOtherNamespace" after the comma are assembly names. If you use this construct, because it looks nice in NDepend and you don't have to make references, make sure your set the second parameter of Type.GetType, throwOnError, to true or it will fail silently and you might spend an uncomfortable long time debugging (I am talking from experience here). Personally I would go for typeof in stead of using Type.GetType but that is a matter of taste.

As a last feature, in unit testing scenarios, you can make another subclass of UnityResolver, call UnityFactory.SetResolver(myResolver) and the UnityFactory will store your resolver in a static variable (or the application context). Subsequently, all your classes will use the mapping logic defined in your own resolver, which makes a great starting point for mockup testing.

I hope this little sample will make decoupling, unit testing and mockup objects using Unity a bit more accessible.

25 July 2008

Shared code development and easy unit testing with Compact Framework

Microsoft made developing for the Compact Framework relatively easy. Everyone with experience in .NET development can easily take the plunge into mobile development by downloading the Windows Mobile SDK 6.x and go on as if you are just working in the full framework. You will notice some restrictions, not everything you might want to use is available, programs running on mobile device face some very specific challenges, but then again, the development experience is quite seamless.

Some things remain a bit cumbersome. Unit testing can be a real PITA, and you cannot binary reuse code, so if your shop (like mine) uses some utilities that are distributed as binary components, they will have to be recompiled specifically for the Compact Framework and someone has to keep the CF and Full version in sync.

Fortunately Visual Studio sports an almost hidden feature that can make life a lot easier for Mobile developers. The following procedure assumes that you have Visual Studio 2008 professional edition and the Windows mobile 6 SDK installed. For unit testing I use NUnit and Testdriven.NET to launch it from Visual Studio, but you can of course use anything you like

1. Make a new empty solution
Let's call it "SharedCode"

2. Add a new Smart Device application
Select Add/new project/Smart Device
Use "MyMobileApp" as name
Select Smart Device, Windows Mobile 6.0 professional SDK, and Compact Framework 3.5 although for this sample only the first option is really important.

3. Add another Smart Device application
Select Add/new project/Smart Device
Use "MyMobileLib" as name
Select Class Library, Windows Mobile 6.0 professional SDK, and Compact Framework 3.5

4. Add two Windows Class library projects
These must be full framework projects, not mobile projects.
Call the first one "MyLib" and the second one "MyLib.Test". Select .NET framework 3.5 as target framework

5. Add a new class to the MyMobileLib assembly
For this example, we will use a trivial calculator class:
namespace MyMobileLib
{
public class Calculator
{
private int Num1;
private int Num2;

public Calculator(int num1, int num2)
{
Num1 = num1;
Num2 = num2;
}

public int Add()
{
return Num1 + Num2;
}

public int Subtract()
{
return Num1 - Num2;
}
}
}

6. Add as link to the MyLib library
Go to the MyLib library and remove the default generated "Class1.cs" file.
Then right-click the project and select "Add/Existing Item".
And now for the piece the resistance:
Browse one directory up, then down into the MyMobileLib directory, and select the Calculator.cs file.
Now look carefully to the "Add" button down right. It will sport a hard-to-spot small arrow pointing downwards:
If you click that, you will get two options: Add and Add as link. That is what I mean by "an almost hidden feature". Select "Add as link" and you will see that "Calculator.cs" is added to the MyLib project, but that the document icon has a shortcut arrow overlay:


7. Add references
Right-click the MyMobileApp project
Select "Add Reference", click Tab "projects" and select the "MyMobileLib" project

Right-click the MyLib.Test project
Select "Add Reference", click Tab "projects" and select the "MyLib" project

8. Define unit test in de MyLib.Test project
Rename the default Class.cs file in MyLib.Test to "TestCalculator.cs".
Since I use NUnit, I have to make a reference to the nunit.framework.dll which sits somewhere on my system. Then I can create the world shocking ;-) test
using MyMobileLib;
using NUnit.Framework;

namespace MyLib.Test
{
[TestFixture]
public class TestCalculator
{
[Test]
public void TestCalc1()
{
Calculator c = new Calculator(3,2);
Assert.AreEqual(5, c.Add());
Assert.AreEqual(1, c.Subtract());
}
}
}
which will undoubtly work. But my point is: you can simply run units tests out of the Windows Mobile scope, inside Visual Studio

9. Test the library on the mobile device
For the sake of brevity: drag a label onto the form.
Open the Form1.cs, and add to the code on the form:
using System.Windows.Forms;
using MyMobileLib;

namespace MyMobileApp
{
public partial class Form1 : Form
{
public Form1()
{
InitializeComponent();
Calculator c = new Calculator(3, 2);
label1.Text = "3 + 2 = " + c.Add()
;
}
}
}
If you run this, open pops the Windows Mobile emulator and the form will show the 'surprising' message "3 + 2 = 5".

Conclusion
While the sample was trivial, it showed two things:
  • For general purpose classes, you can develop code and generate binaries for both Compact and full framework using a single code file

  • Unit testing of general purposes classes can be done outside a Windows Mobile emulator and becomes a lot easier this way


Complete code downloadable here.