Showing posts with label UWP. Show all posts

11 March 2019

Debugging C# code with Unity IL2CPP projects running on HoloLens or immersive headsets

Intro

My relation with Unity is a complex one. I adore the development environment. It allows me to weave magic and create awesome HoloLens and Windows Mixed Reality apps with it with an ease that defies imagination for someone who never tried it. I also have cursed them to the seventh ring of hell for the way the move (too) fast and break things. Some time ago Unity announced they would do away with the .NET backend. This does not mean you can't develop in C# anymore - you still do, but debugging becomes quite a bit more complicated. You can find how you can do it in various articles, forum posts, etc. They all have part of the story but not everything. I hope this fills the gap and shows the whole road to IL2CPP debugging in an easy to find article.

Context

Typically, when you build an app for Mixed Reality, you have a solution with C# code that you use while working inside the Unity Editor. You use this for typing code and trying things out. I tend to call this "the Unity solution" or "the editor solution". It is not a runnable or deployable app, but you can attach the Visual Studio debugger to the Unity editor by pressing Start in Visual Studio, and the the play button in Unity. Breakpoints will be hit, you can set watches, all of it. Very neat.

When you are done or want to test with a device, you build the app. This generates another solution (I call that the deployment solution) that actually is an UWP app. You can deploy that to a HoloLens or to your PC with Mixed Reality headset attached. This is essentially the same code but in a different solution. The nice part of that is that if you compile it for debug, you can also put in breakpoints and analyze code on a running device. Bonus: if you change just some code you don't have to rebuild the deployment solution over and over again to do another test on the device.

Enter IL2CPP (and bit of a rant, feel free to skip)

Unity, in their wisdom, have decided the deployment solutions in C# are too slow, they have deprecated the .NET 'backend', and so in stead of generating a C# UWP solution, they generate a C++ UWP solution. If you build, your C# code will be rewritten in C++, you will need to compile that C++ and deploy the resulting app to your device. Compilation takes a whole lot longer, if you change as much as a comma you need to build the whole deployment solution again, and the actual running code (C++) no longer resembles any code you have written yourself. And when they released this, you could also forget about debugging your C# code in a running app. Unity did not only move the cheese, they actually blew up part of the whole cheese storehouse.

With Unity 2018.2.x - they've basically sent over some carpenters to cover up the hole with plywood at plaster. And now you can sort-of debug your C# code again. But it's a complicated and rather cumbersome process.

Brave new world - requirements

I installed all of Desktop and UWP C++ development bits, probably a bit over the top.
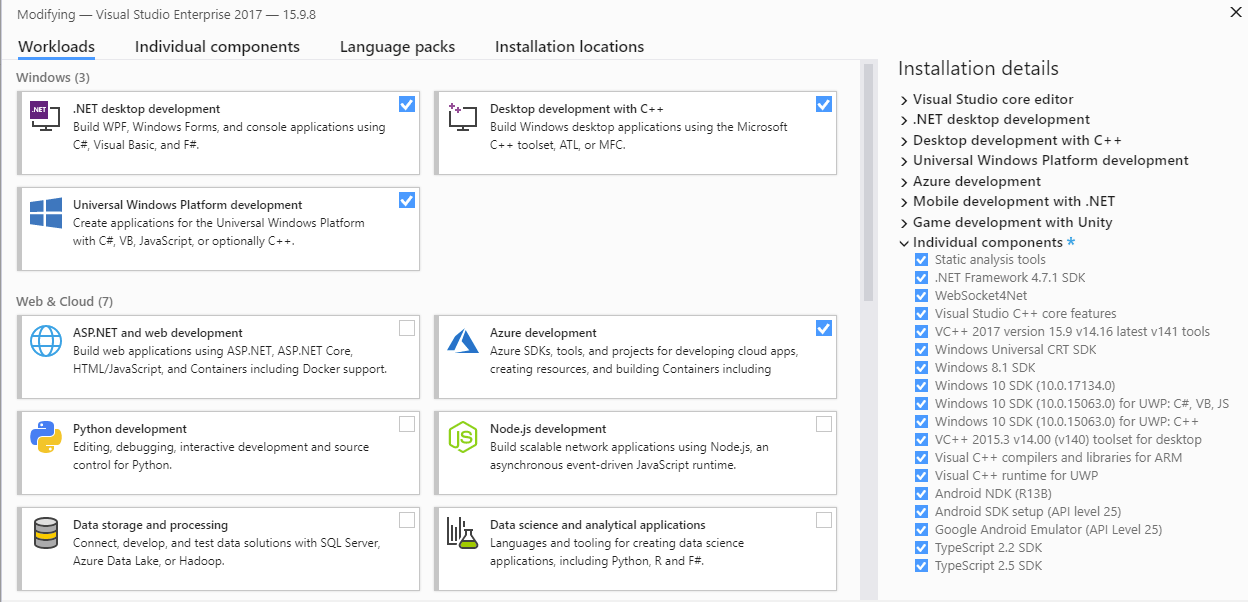
At one point I got complaints about the "VC++ 2015 (140) toolset" missing while compiling so I added that too. This is apparently something the Unity toolchain needs. Maybe this can be more efficient, needing less of this stuff, but this works on my machine. I really don't know anything about C++ development. I tried somewhere in the mid 90s and failed miserably.

Also crucial: install the Visual Studio tools for Unity, but chances are you already have, because we needed this too met .NET backends:
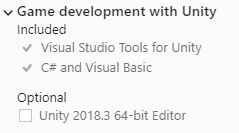
I did uncheck the Unity Editor option, as I used Unity 2018.3.6f1 in stead of the one Visual Studio tries to install. I tend to manage my Unity installs via the Unity Hub.

Build settings

In Unity, I use this settings for building the debuggable C++ app
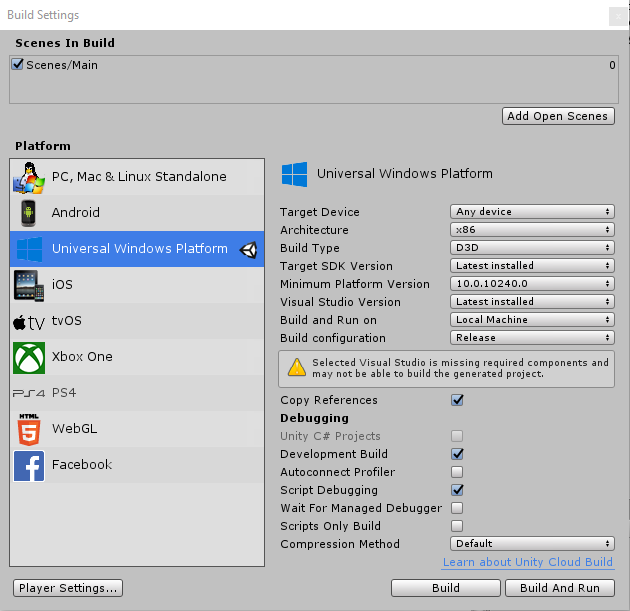
I am not entirely sure if the "Copy References" is really necessary but I have added it anyway. The warning about missing components is another nice Unity touch - apparently something is missing, but they don't tell you what. My app is building, so I suppose it's not that important for my setup.

App capability settings

Now this one is crucial. To enable debugging, Unity builds a specialized player with some kind of little server in it that enables debuggers to attach to it. This means, it needs to have network access. The resulting app is still a UWP app, so it's network capabilities need to be set. You can do that in either the resulting C++ solution's manifest or in the Unity editor, using the "Player Settings" button. Under "Publishing Settings" you will find this box where you can set capabilities

I just added all network related stuff for good measure. The advantage of doing it here is that it will be added back even if you need to rebuild the deployment solution from scratch. The drawback is that you might forget to remove capabilities you don't need and you will end up with an app asking for a lot of capabilities it doesn't use. For you to decide what works best.

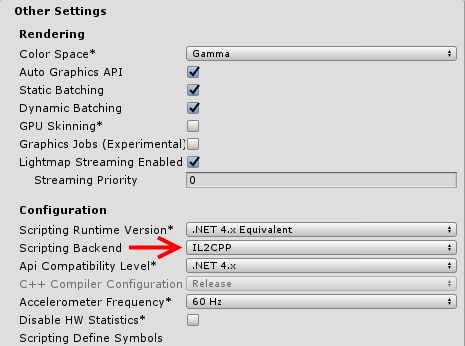
Selecting the IL2CPP backend

In case Unity or the MRTK2 does not do this for you automatically, you can find this setting by pressing the Player Settings button as well. In "Other settings" you can find the "Scripting Backend". Set this to IL2CPP.
Building and deploying the UWP C++ app.

A C++ UWP app generated by Unity looks like this:
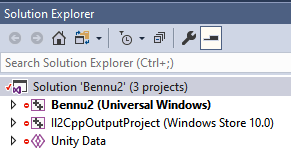
Now maybe this is obvious for C++ developers but make sure the app that is labeled "Universal Windows" is the startup project. I was initially thrown off kilter by the "Windows Store 10.0" link and assumed that was the startup project.

Important is to build and deploy the app for Debug, that has not changed since the .NET backend days. Choose target and processor architecture as required by your device or PC

Make sure the app actually gets deployed to wherever you want to debug it. Use deploy, not build (from the Build menu in Visual Studio)

And now for the actual debugging

First, start the app on the machine - be it a PC or a HoloLens, that does not matter - where it needs to be debugged

Go back to your Unity C# ('editor' ) solution. Set breakpoints as desired. And now comes the part that really confused me for quite some time. I am used to debug targets showing up here.
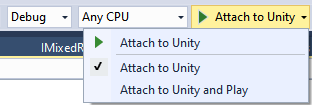
But they never do. So don't go there. This is only useful when you are debugging inside the Unity Editor. In stead, what you need to do is go to the Debug menu of the main Visual Studio Window and select "Attach Unity Debugger"
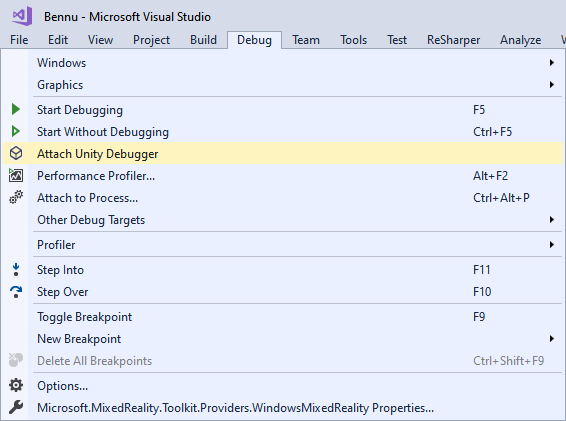
I've started the app on both my HoloLens and as a Mixed Reality app on my PC, and I can choose of no less than three debug targets now: the Unity editor on my PC, the app running on the HoloLens and the app running on the PC
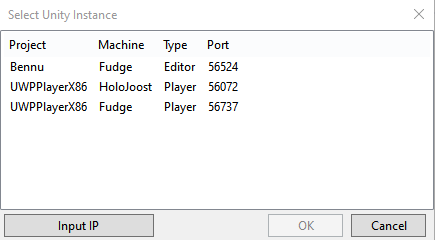
"Fudge" is the name of the gaming quality rig kindly built by a colleague a bit over a year ago, "HoloJoost" is my HoloLens. I selected the "Fudge" player. If you select a player, you will get an UAC prompt for the "AppContainer Network Isolation Diagnostics Tool". Accept that, and then this pops open:

Leave this alone. Don't close it, don't press CTRL-C.

Now just go over to your Mixed Reality app, be it on your HoloLens or your Immersive Headset, and trigger an action that will touch code with a breakpoint in it. In my case, that happens when I tap the asteroid
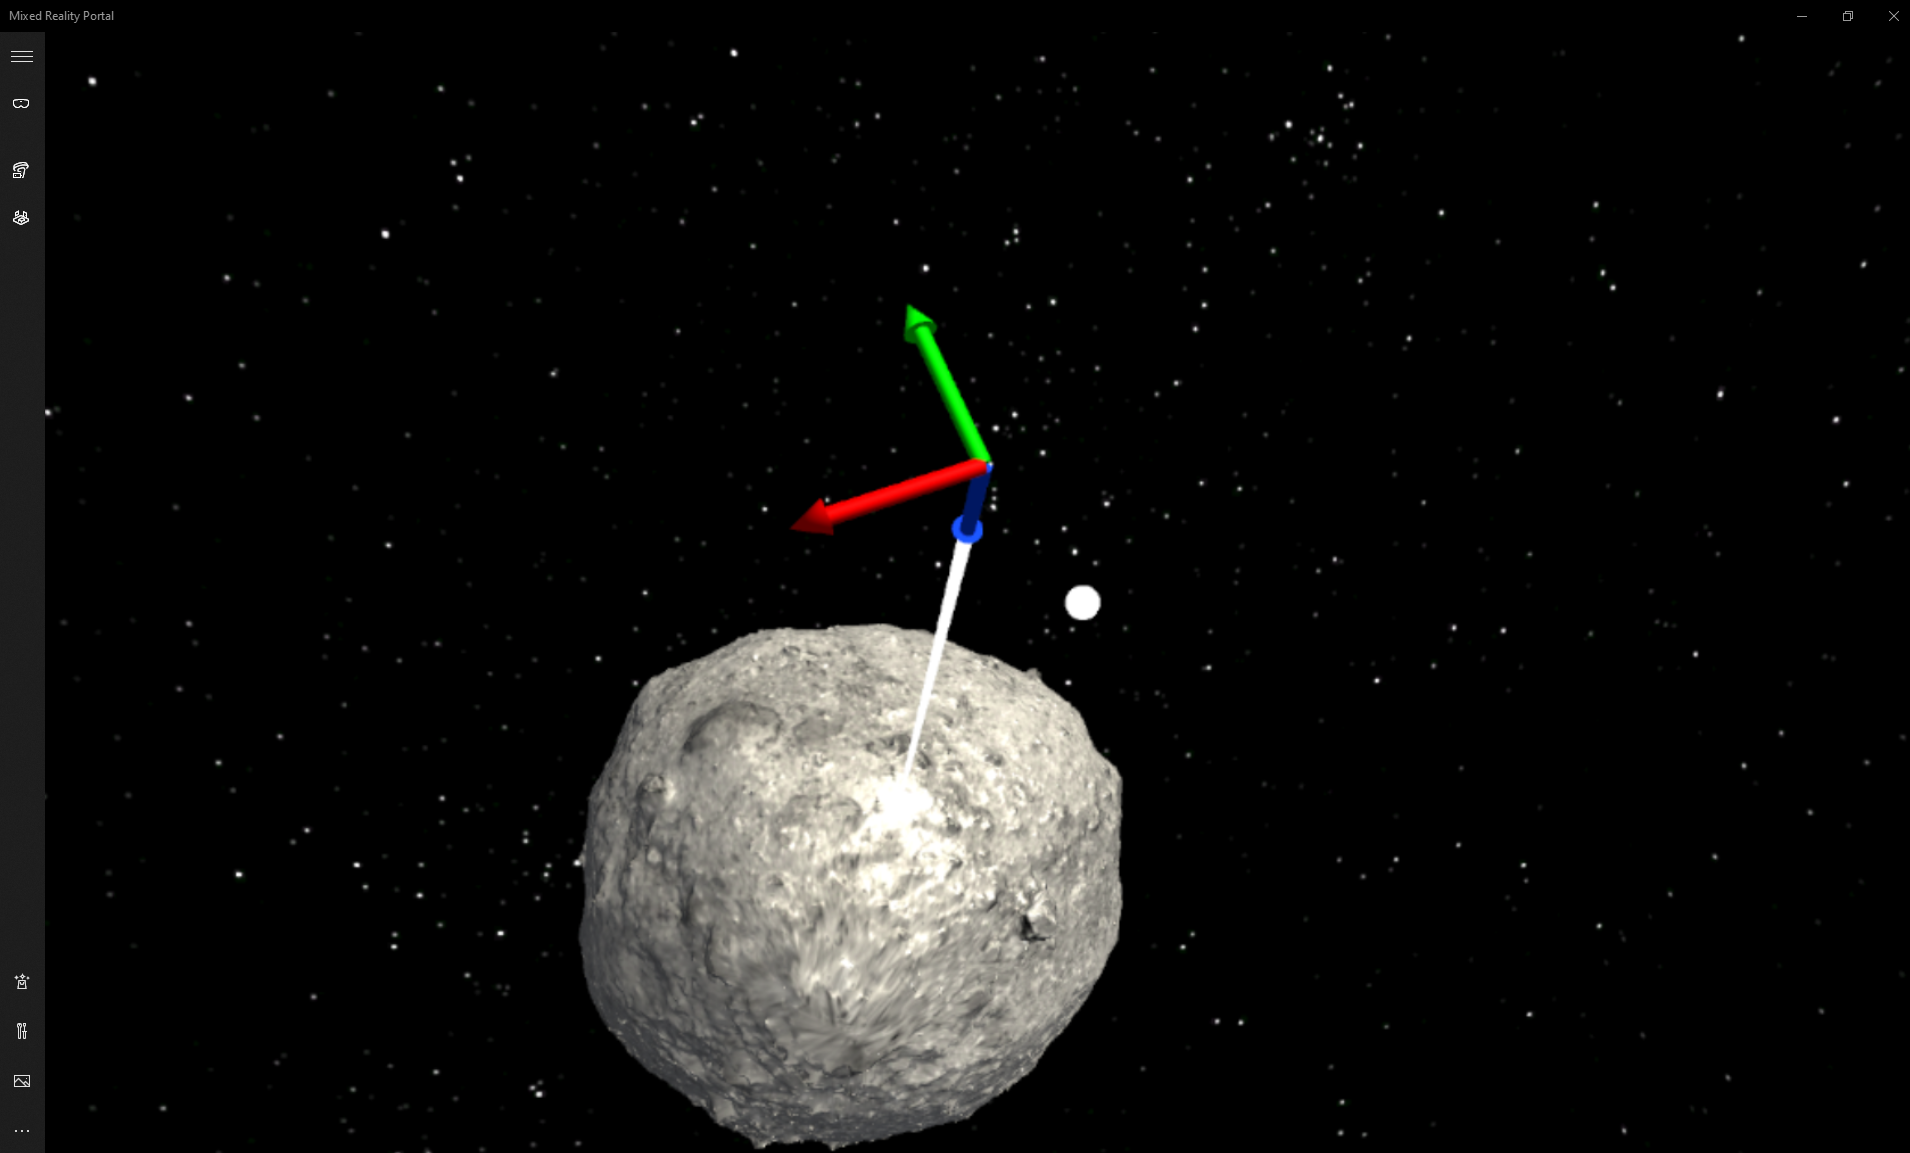
And then finally, Hopper be praised:
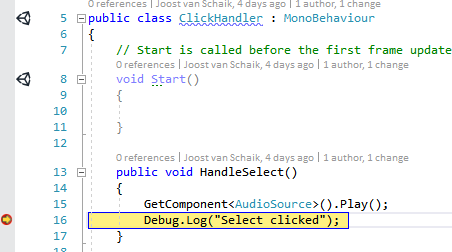
The debugger is back in da house.

Conclusions

This is not something I get overly happy about, but at least we are about three-quarters of where we were before. We can again debug C# code in a running app, but with a more convoluted build process, less development flexibility, and the need to install the whole C++ toolchain. But as usual, in IT, the only way is forward. The Mixed Reality Toolkit 2, that is used to built this asteroid project, requires Unity 2018.2.x. HoloLens 2 apps will be built with MRTK2 and thus we will have deal with it, move forward and say goodbye to the .NET backend. Unless we don't want to build for HoloLens 2 - which is no option at all for me ;)

No test project this time, as this is not about code but mere configuration. I will start blogging MRTK2 tidbits soon, though.

Credits

There is a host of people who gave me pieces of the puzzle that made it possible for to piece the whole thing together. In order of appearance:

14 May 2018

Fixing the "...Unity\Tools\AssemblyConverter.exe exited with code 1" error when you are building your Mixed Reality app

It's not easy being green - I mean, a Mixed Reality developer

This is one that has annoyed me for quite some time. When developing your Mixed Reality app, I usually go like this:

  • Change something in Unity
  • Build your Mixed Reality app from Unity
  • Open Visual Studio
  • Build your app and run in your HoloLens or Immersive headset
  • Be not entirely satisfied with the result
  • Change something more in Unity
  • Build your Mixed Reality app again

And then something like this happens:

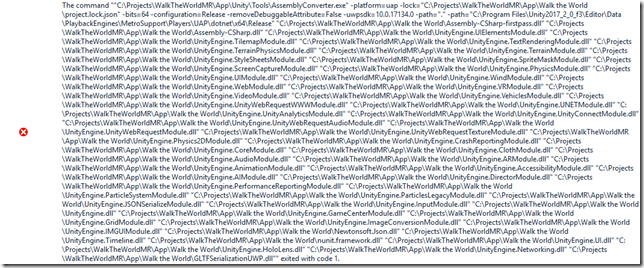
image

An extremely unhelpful error message. If you copy the whole command in a command line and run the command yourself, you get a little more info

System.Exception: Unclean directory. Some assemblies are already converted, others are not.
    at Unity.SanityCheckStep.Execute()
    at Unity.Step.Execute(OperationContext operationContext, IStepContext previousStepContext)
    at Unity.Operation.Execute()
    at Unity.Program.Main(String[] args)

So here's a clue. Apparently some cruft stays behind preventing Unity from rebuilding the app the second time around. This is because Unity does not always overwrite all the files, presumably to to speed up the build process that second time. Only apparently they mess up sometimes.

UntitledSo then you go delete your generated app, but don't forget to retain some files you might want to keep (like your manifest file). You might add those to your repo - but then don't forget to revert after deleting, and oh yes, if you are testing on your local machine (and not your HoloLens or a different machine) you might find you can't even delete everything because it's locked. So you need to uninstall the app first. And this happens every second time you compile the app. And yes, this also happens when you use the Build Window.

Meh indeed

I never thought I would ever write this sentence, but here it goes:

PowerShell to the rescue

This first step you only need to do when you are testing on your development machine, and not on a HoloLens.

We  need to find out what the actual package name of your app is. The are two ways to do this. The simplest one is going over to your package.appxmanifest, double click it, select tab "packaging"

Untitled

Or you can just run a PowerShell Command like this:

Find name : Get-AppxPackage | Where-Object {$_ -like "*Walk*"}

Anyway, then you can make a script, call it "CleanApp.ps1" (or whatever you want to call it) and add the following commands:

Get-AppxPackage 99999LocalJoost.ThisIsMyApp | Remove-AppxPackage

$PSScriptRoot = Split-Path -Parent -Path $MyInvocation.MyCommand.Definition `
Get-ChildItem -Path ${PSScriptRoot}\App\ ` -include *.dll,*.pdb,*.winmd,*.pri,*.resw,Appx -Recurse | ` Remove-Item -Force -Recurse

This assumes your generated app is sitting in a directory "App" that is a sub directory of the directory that the actual script is sitting in. It typically place this in the root of my (Unity) project, while the App folder is a sub directory from that.

So your typical workflow becomes now:

  • Change something in Unity
  • Run this script
  • And then continue building the Mixed Reality app as you see fit (either from Unity to Visual Studio, or directly from the Build Window)

I deem you all capable of copying these lines of code from this blog post, so won't put any code online to go with this article.

05 May 2018

Running Mixed Reality apps on Windows 10 on ARM PCs–get ready for a surprise

Intro

I was planning to write a step-by-step procedure of the things you would need to do to get the Mixed Reality app I created in my previous post to work on a Windows 10 on ARM PC. After all, when I tried to do that on a Raspberry PI2 quite some time ago, there was some creative slashing necessary.

Life is what happens while you are busy making other plans

Turns that what I needed to do was exactly nothing. Well, I had to compile and deploy it for ARM. And that worked. Just like that, just like on a intel-based PC as I described in my previous post. When I deployed Walk the World to the Windows 10 on ARM PC some posts ago, I still had to remove some parts of the Mixed Reality Toolkit to make the ARM tools swallow the sources. Apparently, that’s no longer necessary.

And then I tested it. And I learned I had to make some changes to my code after all. I think Microsoft likes to hear that you can run code on Windows 10 on ARM PCs unchanged, but in this case I don’t think they will mind me saying this I actually needed to make some changes because it was running too bloody fast on a Windows 10 on ARM PC. Yeah, you read that right. The code I wrote for controlling the app via an Xbox One Controller replied so fast it was actually nearly impossible to control the view point, especially when rotating. Even when I compiled it for x86 and CHPE had to do the translation, it still ran too fast for reasonable control.

It actually ran faster than on my i7 Surface Pro 4. That was one serious WTF, I can tell you that.

One trigger, two triggers

You might remember that in the previous post I used the right trigger to make moving and rotating go faster. Well we sure don’t need to go faster, so I adapted the code to calculate the speed up factor:

var speed = 1.0f + TriggerAccerationFactor * eventData.XboxRightTriggerAxis;

To use the right trigger to slow down the speed.

var speed = (1.0f + TriggerAccerationFactor * eventData.XboxRightTriggerAxis) - 
            (eventData.XboxLeftTriggerAxis * 0.9f);

And that works reasonably well.

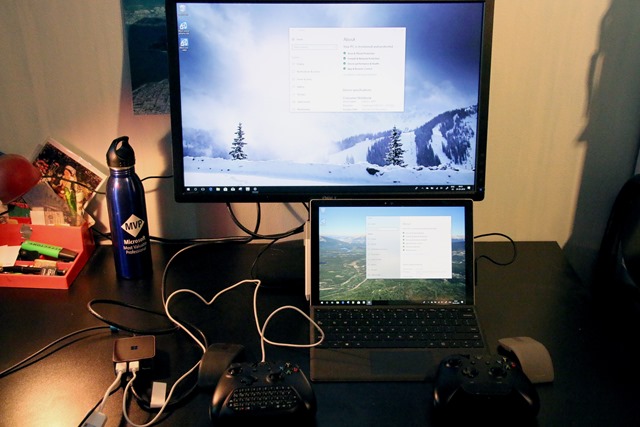
Now I made a setup quite comparable to my previous post on Windows 10 on ARM, only now the x86/ARM versions are not only compared with each other, but also with an x64 version running on my Surface Pro 4.IMG_6845_2

The Surface Pro 4 for is running on his own screen and is connected to the right Xbox Controller and the gray ArcMouse, the Windows 10 on ARM PC, once again missing from this picture, is connected to the black ArcMouse, and Dell monitor and the left Xbox Controller via the Continuum dock that you can see just in front of the MVP thermos.

So here’s a little video of the three versions:

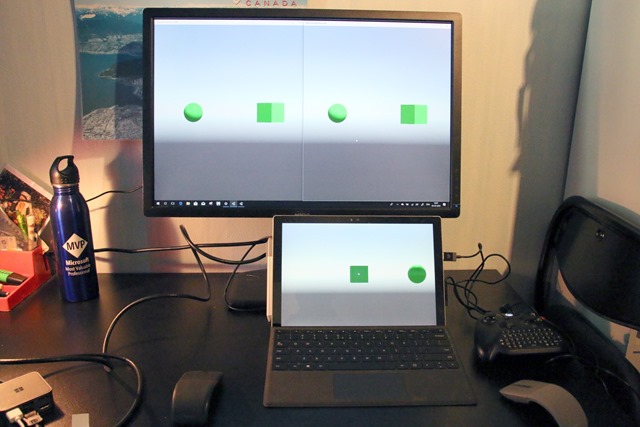
You can clearly see the the Windows on ARM10 PC is quite a bit faster than the Surface Pro 4 and that even the x86 CHPE-fied version is faster, so that rotating indeed needs the left trigger to slow it down, to get some resemblance of control. At the end, you can actually seen them all three together

IMG_6852_3

The difference between the x86 and the ARM version is mainly in startup time here and a wee bit of general performance (although you mainly notice that when you actually operate the app – if you just watch it’s less obvious). Last time I wrote about Windows 10 on ARM I already concluded that CHPE does an amazing job as far as graphics performance goes, and it shows here again.

[image%5B22%5D]Interesting detail – the Windows 10 on ARM PC does not show this popup a the end, while the Surface Pro 4 does. Now this may be because Windows x64 actually has the optional “Windows Mixed Reality” component (although this particular hardware doesn’t support that), and Windows 10 on ARM does not have that particular component. Also, the latter still runs the Fall Creators Update, while the Surface Pro 4 runs the April 2018 update. Both may be a factor. I have no way to test this now.

Two versions of the same app?

You might have noticed this before - I sometimes run two versions of the same app together on one PC. That's normally not possible - if you deploy one version it gets overwritten by the other, even when you change target architecture in Visual Studio. To get two version of the same app to run of one computer, you will need to fiddle somewhat in the Package.appmanifest. Open it as XML file (not via the beautiful GUI editor provided by Visual Studio). Change the Name in Identity (3rd line in the file)

<?xml version="1.0" encoding="utf-8"?>
<Package xmlns:....
   <Identity Name="XBoxControllerDemo" Publisher="CN=DefaultCompany" Version="1.0.0.0" />

and change XBoxControllerDemo for instance to XBoxControllerDemoARM

Then look a bit lower for the VisualElements tag

<uap:VisualElements DisplayName="XBoxControllerDemo"

And change that to for instance "XBoxController ARM Version" - to make sure the app also have separate icon labels.

Do not ever do this on production apps but if you want to you your own kind of crazy A-B testing like me it can be useful.

Conclusion

This article is quite a bit shorter than I anticipated, but that it’s because Mixed Reality apps seem to run amazingly well on Windows 10 on ARM PCs with very little work. This platform is a serious candidate for Unity generated UWP apps.

I am now seriously considering rebuilding my Mixed Reality apps with this new MRTK and the newest applicable version of Unity, and including an ARM package in the store. Why not. It runs fine. Let's see if users like it.

No (new) project this time. You can find the project with the updated XBoxControllerAppControl.cs (still) here.

02 May 2018

Running your Mixed Reality app on an ‘ordinary’ PC–using an Xbox One Controller

Intro

Let’s face it – although Windows Mixed Reality has a steady uptick (at least I think I can draw that conclusion from the increasing download numbers of my two Mixed Reality apps in the Windows Store) – not everyone has a Mixed Reality headset, or even has a PC capable of supporting that. Time will take care of that soon enough. In the mean time, as a Mixed Reality developer, you might want to show all 700 million Windows 10 users a glimpse of your app, in stead of ‘only’ the HoloLens and Mixed Reality headset owners out there. Even in a reduced state, it gives you eyeballs, and maybe entice them to get themselves a headset after all. It’s not like they are expensive these days.

This sounds familiar?

Well it should. This is far from original. I have been down this road before, describing how to run a HoloLens app on a Raspberry PI2. That’s the U in UWP for you. Only now we are going to run on a full PC – in my case, a Surface Pro 4. That’s a sufficiently high end device for a nice experience, but it predates the Windows Mixed Reality era by almost two years and does not support it. But you can’t walk around without a headset, so we will need another means to change our view point.

Parts list

  • One reasonably nice performing PC not capable of supporting Mixed Reality – or at least with the Mixed Reality portal not installed
  • Unity 2017.2.1p2
  • The Mixed Reality Toolkit 
  • One XBox One controller

The first point is important – for if you have the portal installed, your PC will launch it like a good boy trying to do the logical thing - and you won’t see the effect I am trying to show you.

Setting up the project

I created a new project in Unity, copied in the latest Mixed Reality Toolkit, then clicked the three menu options under Mixed Reality Toolkit/Configure.

Then I added my standard empty game objects “Managers” (with nothing in it)  and “HologramCollection” with a cube and a sphere, to have something to see:

image

There is more to that two objects that meets the eye but we will get to that later.

Control the view point using an XBox Controller

There’s a simple class for that, in my ever growing HolotoolkitExtensions, that starts like this

using HoloToolkit.Unity.InputModule;
using UnityEngine;

namespace HoloToolkitExtensions.Utilities
{
    public class XBoxControllerAppControl : MonoBehaviour, IXboxControllerHandler
    {
        public float Rotatespeed = 0.6f;
        public float MoveSpeed = 0.05f;
        public float TriggerAccerationFactor = 2f;

        private Quaternion _initialRotation;
        private Vector3 _initialPosition;

        private readonly DoubleClickPreventer _doubleClickPreventer = 
                                                new DoubleClickPreventer();
        void Start()
        {
            _initialRotation = gameObject.transform.rotation;
            _initialPosition = gameObject.transform.position;
        }
    }
}

I tend to offer settings to the Unity editor as much as possible - to make it easy to reuse this class and adapt its behavior without code changes. Here I offer some speed settings. You can set the maximal rotation speed and the maximal speed the camera moves, and the ‘speed up factor’ that is applied to all values when the right trigger is pressed. Be advised these are all analog values between 0 and 1, so you can control the speed anyway by varying the amount of pressure you apply to the sticks, the D-pad. But sometimes you just wanna go fast, hence the trigger. Also notice how initial rotation and position are retained.

The main routine is of course OnXboxInputUpdate, as the IXboxControllerHandler mandates its presence.

public void OnXboxInputUpdate(XboxControllerEventData eventData)
{
    if (!UnityEngine.XR.XRDevice.isPresent)
    {
        var speed = 1.0f + TriggerAccerationFactor * eventData.XboxRightTriggerAxis;

        gameObject.transform.position += eventData.XboxLeftStickHorizontalAxis * 
                                         gameObject.transform.right * MoveSpeed * speed;
        gameObject.transform.position += eventData.XboxLeftStickVerticalAxis * 
                                         gameObject.transform.forward * MoveSpeed * speed;

        gameObject.transform.RotateAround(gameObject.transform.position, 
            gameObject.transform.up, 
            eventData.XboxRightStickHorizontalAxis * Rotatespeed * speed);
        gameObject.transform.RotateAround(gameObject.transform.position, 
            gameObject.transform.right, 
            -eventData.XboxRightStickVerticalAxis * Rotatespeed * speed);

        gameObject.transform.RotateAround(gameObject.transform.position, 
            gameObject.transform.forward, 
            eventData.XboxDpadHorizontalAxis * Rotatespeed * speed);

        var delta = Mathf.Sign(eventData.XboxDpadVerticalAxis) * 
                    gameObject.transform.up * MoveSpeed * speed;
        if (Mathf.Abs(eventData.XboxDpadVerticalAxis) > 0.0001f)
        {
            gameObject.transform.position += delta;
        }

        if (eventData.XboxB_Pressed)
        {
            if (!_doubleClickPreventer.CanClick()) return;
            gameObject.transform.position = _initialPosition;
            gameObject.transform.rotation = _initialRotation;
        }

        HandleCustomAction(eventData);
    }
}

Let’s unpack that a little.

Important is the if (!UnityEngine.XR.XRDevice.isPresent). We only want this behaviour to do it’s work when there is no headset present whatsoever – no Mixed Reality head set, no HoloLens.

  • First we calculate a possible ‘speed up factor’ to be applied when the trigger is used. If it is not, it’s simply 1 and has no effect to the actual movement or rotation.
  • The left stick is used for movement in the ‘horizontal’ plane – forward, backward, left, right. Be aware the axes are relative. So if you are rotated 45 degrees left and you move left, you will move 45 degrees left. It’s actually logical – your frame of reference is always yourself, not some random rotation that happened to be in place when you got somewhere.
  • The right stick is used for rotation around your top and horizontal axis (left to right). Moving it to right will make you spin to the right (I negate the actual value coming from the stick as you can only rotate a game object around it’s left axis), pushing it forward will make you look at the floor.
  • That leaves moving up and down, and rotating left and right. The D-pad fills the voids: pushing it left or right will make you rotate sideways (like you are falling to the left or right), pushing it up or down will make your viewpoint move up or down.

This is exactly the way it works when you use an Xbox Controller to steer the Unity editor in play mode. The D-pad feels a bit counter-intuitive to me, but when you try to move in three dimensions using sticks that move both in only two dimensions, you will need something extra, and the D-pad is the only thing left. It feels odd to me, but it works.

Then finally the B button – when you press that, you get back to your initial position. This is very useful for if you have messed around a bit too much and completely lost track of where you are. And that is mostly all of it.

A tiny bit of SOLID

protected virtual void HandleCustomAction(XboxControllerEventData eventData)
{
}

Hardly worth mentioning, but should you want to add your own logic handling controller buttons or triggers, you can make a child class of this XBoxControllerAppControl  and override this method. It’s a hook that makes it open for extension, but keeps it own logic intact. That’s better than making OnXboxInputUpdate virtual, because that enables you to interfere with the existing logic by not calling the base OnXboxInputUpdate. It’s the O of SOLID. image

How to use it

Simply drag it to the the MixedRealityCameraParent, change the settings to your liking and your are done. I think I took some reasonable default settings.

But wait, there’s more!

I have found the Xbox Controller buttons tend to stutter – that is, they sometimes fire repeatedly and rapid fire events can give a bit of a mess.

So I created this little helper DoubleClickPreventer that is not exactly rocket science, but very useful

using UnityEngine;

namespace HoloToolkitExtensions.Utilities
{
    public class DoubleClickPreventer
    {
        private readonly float _clickTimeOut;

        private float _lastClick;

        public DoubleClickPreventer(float clickTimeOut = 0.1f)
        {
            _clickTimeOut = clickTimeOut;
        }

        public bool CanClick()
        {
            if (!(Time.time - _lastClick > _clickTimeOut))
            {
                return false;
            }
            _lastClick = Time.time;
            return true;
        }
    }
}

It’s rather simple: whenever the method CanClick is called, a time is set. If the method is called twice within 0.1 seconds it returns false, otherwise it returns true. It’s actually used twice within this sample: it’s also on on the little helper class “SelectorDemo” that makes the sphere and the cube go “plonk” and flash blue when you click them using the Xbox “A” button. I won’t go into that – you can find it in the demo project, and it’s inner workings are left as exercise to the reader.

And it looks like…

There are a few things you might notice. First of all, I apparently am able to select something, but I never coded for it. That’s courtesy of the Mixed Reality Toolkit – your Xbox Controller’s “A” button is acting the same as saying “Select” in a Mixed Reality app while you are gazing at something, air tapping while using a HoloLens, or pointing your Mixed Reality controller to an object and pressing the trigger.

Also, you might notice this at the end of the video:

image

A clear sign Windows is not really content with this. It figures – because if nothing prevents you from downloading an app that simply does not work on your machine it might disgruntle users. But still – the app launches and seems to work.

Some other things to notice and take into consideration

  • Use the right Unity version: 2017.2.1p2. That’s the one that goes with this release of the Mixed Reality Toolkit. Using newer versions of Unity or the toolkit (like the development branch) I got results varying from the app not wanting to compile, crashing or simply not starting. I also got just this “Can’t open app” dialog and nothing else
  • You can also see (very small) “Development build” in the lower right corner. There’s a check box in Unity that everyone tells you to use, and then that text will go away. The trouble is, that does not work. What will make it go away, is building the app with the Master configuration. That and only that. For Mixed Reality apps, this check box apparently only is there for show. At least as far as this text is concerned, and as far as I can see ;).

buildmaster

  • And finally, when making these apps run on an ordinary PC, you might want to rethink the UI a bit at places. Floating menu’s, which are very cool in real Mixed Reality environments, can be really hard to use on a flat screen, for instance. Also, placing things on top of the ‘floor’ might be a bit of a challenge without a floor – even a virtual one.

Concluding words

I am not sure if this will continue working going forward with the MRTK and Unity, how useful this will be in the real word, or if that the Mixed Reality team even appreciates this approach. I am simply showing you what’s possible and a possible way to tackle this. Your mileage may vary, very much in fact. Have fun!

Once again – demo project here

04 April 2018

For crying out loud, compile for native ARM!

CHPE works its magic…

Let me get this straight first: Microsoft did and amazing job with CHPE and x86 emulation, that allows x86 to run without any conversion on the new Windows 10 on ARM PCs. Considering what happens under the hood, the performance and reliability x86 apps get is nothing short of stunning. And you still get the amazing battery life we are used to from ARM – but now on full fledged PCs.

Yet, there are still some things to consider. If you are an UWP developer, you by now probably have stopped providing ARM packages for your UWP apps. After all, Windows 10 Mobile is, alas, fading away, and these ARM PCs run x86 apps, so why bother?

… but magic comes at a price

Well this is why. UWP can compile to native ARM code, and now we have these ARM based PCs. Native ARM code can run on the Windows 10 on ARM PCs without using CHPE. Although CHPE is awesome, it still comes at a price – it uses CPU cycles to convert x86 instructions to ARM instructions and then executes those. Skip one step, you gain performance. And depending on what you do, you can gain a lot of performance.

To show you I am not talking nonsense, I actually compiled my HoloLens/Mixed Reality app “Walk the World” not only for x86 (which I need to do for HoloLens anyway) but also for native ARM. I made two videos, of the app running as x86 UWP, and native ARM UWP. Since I don’t use a head set in this demo, I created a special Unity behaviour to control the viewpoint using an Xbox One Controller. I keep the actual PC out of the videos again, but you can clearly see the Continuum dock I wrote about before – I connected the Dell monitor using a DisplayPort, the Xbox One controller using USB, and a USB-to-ethernet dongle to rule out any variations in Wi-Fi signal.

First, watch the x86 version

Then, the ARM version.

You can clearly see: although the x86 version works really well, the native ARM version starts faster, and also downloads the map faster – considerably so. Still, CHPE amazed me again by the fact that the graphics performance was nearly identical – once the map was loaded, panning over it happened at nearly identical speeds. But apparently startup and network code take more time. So there’s your win!

Note: any flickering or artifact you see are the results of the external camera I used, to prevent any suggestion of this being faked. I also did not want to use a screen capture program as this might interfere with the app’s performance.

Message clear? CHPE is to be used for either x86 apps from the Store that are converted using the Desktop Bridge, or none-Store apps that are downloaded ‘elsewhere’ – think of Chrome, Notepad++ – anything that has not been converted yet to UWP or processed via the Desktop Bridge.

One extra checkbox to rule them all

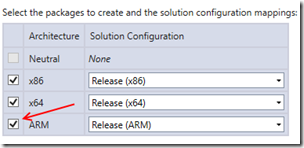
I did not have to change anything to my code just to add the native ARM version. Basically all I had to do was tick a check box:

image

…and the store will do the rest, selecting the optimal package for you user. That one little checkbox gives your app a significant performance boost on these Windows 10 on ARM PCs.

Now one might wonder – why on Earth would you convert an app that started on HoloLens to an UWP desktop app to run on an Windows 10 on ARM PC and how you make it work? Well, stay tuned.

And incidentally, this was the 300th post on this blog since I started in October 2007. And rest assured – I am far from done ;)

06 December 2017

Getting your logos and splash screens right for Mixed Reality apps

Intro

Way too often I still see Mixed Reality apps with default (white) splash screens, app windows, or even worse – the default Unity Icon. When Mixed Reality was HoloLens-only and brand new, you kinda got away with that, as the WOW factor of the actual app eclipsed almost everything else, and the iconography did not matter much as there was only the Holographic Start menu. Also, although judging from my download numbers a fair number of HoloLenses are in use worldwide, the number is pretty limited compared to, say, PCs.

These days of leeway are over. With the advent of the Fall Creators Update, Mixed Reality apps can run on PCs with the right hardware – and in stead of a $3000+ device, a $400 headset will do. And as soon as I made an app available for immersive headsets, my download numbers exploded. Much more eyeballs so much more visibility, and in Windows, the flexible start menu and it’s different tile sizes makes omissions in the iconography glaringly visible. I also notice ‘ordinary’ users are a lot less forgiving. So, time to step up your game.

Note: I am currently using Unity 2017.2.0p2 MRTP5. Things may change. They tend to do that very much in this very new and exiting field :)

So what do you need?

At the very minimum, and icon of size 620x620 and a 1240x600 splash screen. 620x620 is the 310x310 icon at 200% scale. I tend to used 200% icons as they are the default sizes that are created by the Unity editor. I give the start 620x620 file the default name “Square310x310Logo.scale-200.png” and go from there.

In my Unity Assets folder I create a folder “UWPassets” and I drag the “Square310x310Logo.scale-200.png” in imagethere. I then proceed to make the following file from the first one

  • Wide310x150Logo.scale-200.png (620x310 pixels)
  • Square150x150Logo.scale-200.png (300x300 pixels)
  • Square71x71Logo.scale-200.png (142x142 pixels)
  • Square44x44Logo.scale-200.png (88x88 pixels)
  • StoreLogo.scale-100.png (50x50 pixels)

Do pay attention to the last one – that‘s 100% scale, so it’s actual size. To the right you see my actual icon.

These are just the standard sizes for UWP apps, if you are coming in from a Unity perspective you may not be familiar with them.

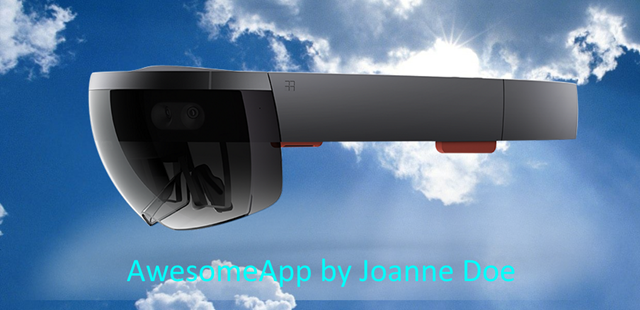
And then, as I said, you need the splash screen. This needs to be 1240x600. I have created this ‘awesome’ splash screen:

image

I suggest you take something that says something more about your app, but this will to for an example.

The result in the Unity editor:

image

Putting icons in the right place in Unity

This is not rocket science: Hit File/Build Settings and then the button “Player Settings”. This will open the “PlayerSettings” pane on the right side of your editor. First, you open the pane “Icon” and then the section “Store logo”. From the UWPAssets folder, drag the “StoreLogo.scale-100” into the top box.


image

You can leave the rest empty. Then skip all the other sections, scroll all the way down to the section “Universal 10 tiles and logos”. Open “Square 44x44 Logo”

image

Drag the “Square44x44Logo.scale-200.png” into the 4th box from the top, marked 200%. Then open section “Square 71x71 Logo” and drag  “Square71x71Logo.scale-200.png” in. Proceed similarly with the remaining three sizes till all the 200% boxes are filled.

Splash screen, splash screen and splash screen

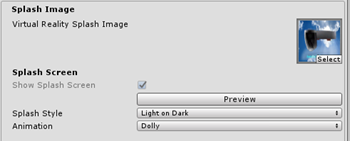
Now dig this – there are actually three places to put splash screens in. Potentially you can have different splash images - I tend to use the same one everywhere. So scroll further down to the Splash Screen section. First up, on top, is the “Virtual Reality Splash Image”. You can drag your splash screen in there if you want.

image

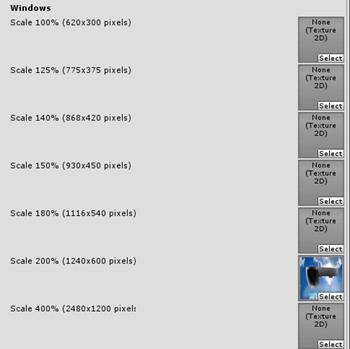
Next up, a bit further down, is the Windows splash screen:

image

This is the most important one. This appears on your desktop when the app starts, it also is shown in a rectangle in Immersive Headsets during the app ‘transition scene’ (when your Cliff House is replaced by the app), and it’s displayed on your default app screen:

imageimage


And finally, there’s Windows Holographic Splash screen:

image

This is actually important in a HoloLens. As this does not have a ‘transition scene’, it shows a floating splash screen for a few seconds. You can see it in an immersive headset too, but usually for a very short time – most of the time you see it flash by in a split second before the actual app appears.

So where is the very first splash screen for? To be honest, I have no idea. Possibly it’s for other, non Windows Mixed Reality based apps.

Just tiny thing left

I tend to generate the app in a subfolder “App” in the root of the project. Typically, I place a .gitignore in there that, look like this:

*.*
*

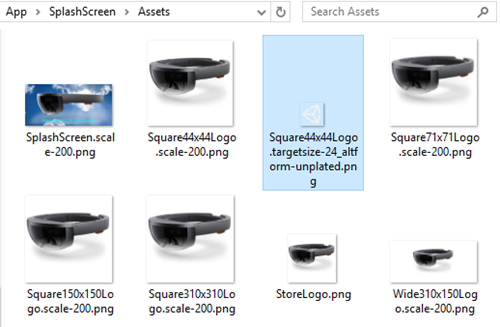
true to it’s name, it ignores – everything. Because, well, it’s a generated app, right? But if you go into the generated app’s assets (App\SplashScreen\Assets) you will notice something odd:image

Although we nicely created an icon for every size, there’s still this pesky “Square44x44Logo.targetsize-24_altform-unplated.png” icon with the default logo that – interestingly, is 24x24 pixels big. So where is this used? Apparently in the task bar and – as I have noticed – in the developer portal. So although your customers won’t see it in the Store (I think), you will, it will clutter op your app list in the developer portal, and that’s annoying. I have found no way to actually create this from Unity, so I take the easy approach: I create yet another icon, now 24x24, overwrite that “Square44x44Logo.targetsize-24_altform-unplated.png” in  App\SplashScreen\Assets and add it to Git manually there. Unity won’t overwrite it, and if it get’s deleted or overwritten, I can always revert. You just need to remember to check the icon before actually submitting.

Conclusion

So now you know how to properly assign the minimum iconography and splash screens, and I let’s agree on no longer publishing stuff with default icons or empty splash screens to the store, right? ;)

Project code – although it does not actually do anything – can be found here. But it’s useful reference material.

04 November 2017

Build for both from one source–Hololens and Immersive Apps

Intro

The time has come. As I predicted in my previous blog post, it’s now possible to build a HoloLens app and an Immersive Apps (targeted toward the new immersive headsets) from once source, thanks to the awesome work done by the folks working on the Mixed Reality Toolkit. No need to keep two branches anymore. There is still some fiddling to do, but that is merely following a script when you create and submit the final apps. And script - that is exactly what I am going to describe.

Stuff you will need

Build the HoloLens app

  • Open the project in Unity 2017.1.x
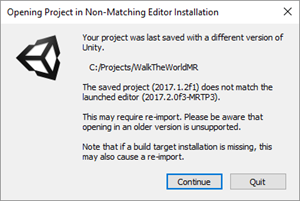
  • You may get the following popup if the project was last opened in Unit 2017.2.x:

image

  • Just click “Continue”
  • You may get a popup like this:

image

  • Click “Cancel”
  • Open the Build Settings (File/Build settings)
  • Select SDK 15063

image

  • I always create Unity C# projects, but that checkbox is not mandatory
  • Click “Player Settings”
  • Expand Panel “Other settings”

image

  • Make sure Windows Holographic is available. I always remove the “WindowsMR (missing from build)” if it says so. You will only see this if you previously have built a Immersive app using Unity 2017.2.x
  • Build the Visual Studio solution by clicking the Build button on the Build settings Window
  • Open the resulting solution
  • Open the Package.appmanifest in an XML editor (not the default editor – you will have to make manual changes).
  • Find the text “TargetDeviceFamily Name="Windows.Universal"  and change that to TargetDeviceFamily Name="Windows.Holographic"
  • While you are at it, check if MinVersion in that line is set to 10240 and MaxVersionTested is set to 10586
  • Build the store packages as usual. Don’t forget to set the configuration to Master and build only x86 packages, as those are the only one required (and supported) by HoloLens.
  • Run the WACK to see if nothing odd has happened.
  • Upload the packages to the store. The store should automatically select Holographic as only target. Don’t submit it yet. There’s more to add to it.

Build the Immersive App

  • Open the Unity project with Unity 2017.2.0f3-MRTP3
  • You might once again get a popup complaining about the non-matching editor. Just click “Continue” again
  • Likewise, press “Cancel” again if the editor complains about not being able to open library files
  • Open the Build Settings (File/Build settings)
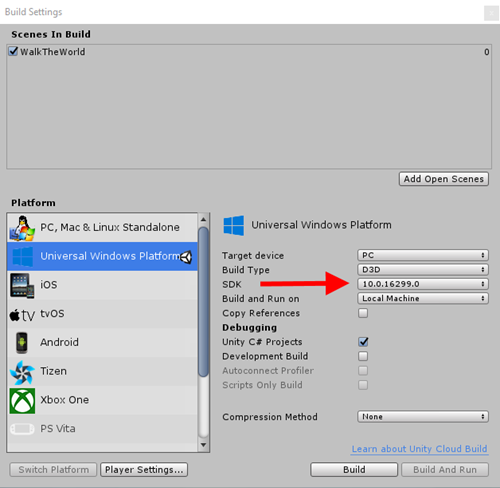
  • Select SDK 16299

image

  • Click “Player Settings”
  • Expand the bottom panel, XR Settings
  • Verify Windows Mixed Reality is selected.

image

  • Build the Visual Studio solution by clicking the Build button on the Build settings Window
  • Open the resulting solution
  • Open the Package.appmanifest in an XML editor again
  • Find the text “TargetDeviceFamily Name="Windows.Universal"  and change that to  “TargetDeviceFamily Name="Windows.Desktop"
  • While you are at it, check if MinVersion and MaxVersionTested in that line are both set to 16299
  • For all projects in the solution, change the Min version to 16299. We don’t want this app to land on anything older than the Fall Creators Update, since only the FCU supports Windows Mixed Reality

image 

  • Build the store packages (configuration Master again).
    • Don’t forget to set the configuration to Master but this time build x86 and x64 packages, as those are the platforms supported for desktop PCs (although in reality, I think most if not all Mixed Reality capable PCs will be x64)
    • Make sure you don’t overwrite the HoloLens app you created earlier – choose a different folder or copy the generated packages.
    • Make sure – and this is important – the version numbers of both app are different. The store won’t accept two packages with the same number. As you can see I have created the HoloLens app with version 3.2.8.0 and the Immerse app with 3.2.9.0

image

  • Upload the package to the same submission.

If you have done everything right, it should kind of look like this, as I showed in my previous post:

image

This is an actual screenshot from the version I submitted successfully to the store last week and has just been rolled out (I got it on my HoloLens and my MR PC yesterday,and just got the mail processing has been completed). Make sure to check out all the other checkmarks you need to check – see once again my previous post - to prevent from disappointing your users.

Some little tricks I used

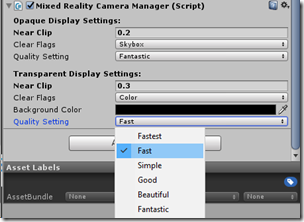
The Mixed Reality Toolkit has now reached a maturity level that you don’t have to do much in your app to support both scenarios. The most dramatic change is using a Mixed Reality Camera in stead of the good old HoloLensCamera. The new camera has separate quality settings for HoloLens and Immersive apps. For HoloLens, this is default set to fastest, the “Opaque Display Settings” (those are for Immersive apps) is set to “Fantastic”. I tend to crank up the HoloLens setting notch one or two (in this case one)

image

This results in considerably better graphics, but be very careful with that – you might hose your HoloLens app’s performance. So test thoroughly before messing with this setting.

Some little piece of code I use, stolen from inspired by Mike Taulty, to check if I am on a HoloLens or not:

public static class OpaqueDetector
{
    public static bool IsOpaque
    {
        get
        {
#if !UNITY_EDITOR
            if (Windows.Foundation.Metadata.ApiInformation.IsTypePresent(
                "Windows.Graphics.Holographic.HolographicDisplay"))
            {
               return Windows.Graphics.Holographic.HolographicDisplay.GetDefault()?.IsOpaque == true;
            }
#endif
            return false;
        }
    }
}

Turns out I could call HolographicDisplay in the newest SDK, but not in the old one. Using Mike’s trick allowed it to work. Which allows me do to do simple things as

SomeObject.SetActive(OpaqueDetector.IsOpaque)

This, for instance, I use to disable the MotionControllers prefab inside the MixedRealityCameraParent because I don’t want all that stuff to be initialized. I

image

I also use it to skip the first phase of the HoloLens app – where the user has to detect the floor.

Conclusion

If you are writing a HoloLens app now, especially if you think general market, it’s almost a no-brainer to support Immersive headsets now as well. Although HoloLens seems to do pretty well worldwide judging from my download numbers, adding an Immersive app has added a serious spike to those download numbers, and opened my app to a considerable wider audience.

Disclaimer: as with everything in this super fast moving space, this is how it works now. I think the plan is for Unity to release a unified editor that can generate both apps in the near future. But it’s now already so easy that you would be crazy not to go forward already.
One final tip: be sure to regularly test on both types of devices if you are serious about expanding to Immersive. A bit of code that works fine on one type may not work so hot on another – or sometimes not even compile. You still have to watch your step, but it’s magnitudes easier now than it was in era running up to the Fall Creators Update release.

Enjoy! I hope you build something awesome!

02 August 2017

Creating a 3D topographical map in your HoloLens / Windows MR app with the Bing Maps Elevation API

Intro

All right, my friends. It's time for the real deal, the blog post I have been anticipating to write since I first published the 3D version of Walk the World like two months ago. It took me a while to extract the minimal understandable code from my rather convoluted app. Everyone who has ever embarked on a trip of 'exploratory programming' (meaning you have an idea what you want to do, but only some vague clues how) knows how you end up with a repo (and code) full of failed experiments, side tracks, etc. So I had to clean that up a little first. Also, my app does a lot more than just show the map, and those features would obscure the general idea. As a bonus - after creating this blog post I finally actually understand myself how and most importantly why the app works :).

So, without further ado, I am going to show you how to display a 3D map in your HoloLens or Windows MR headset. Just like in Walk the World. I will build upon my previous post, in which I showed you how to make a flat slippy map. This time, we are going 3D.

The general idea

As you can read in the previous post, I 'paste' the actual map tiles - mere images - on a Unity3D Plane. A Plane is a so-called mesh that exists out of a grid of 11x11 points, that form the vertices. If I somehow would be able to ascertain actual elevation on those locations, I can move those points up and down and actually get a 3D map. The tile itself will be stretched up and down.The idea of manipulating the insides of a mesh, which turns out to be very simple, is explained by the awesome Rick Bazarra in the first episode of his must-see "Unity Strikes Back" explanatory video series on YouTube, a follow-up to his Creative Coding with Unity series on Channel 9, that I consider a standard starting point for everyone who wants to get off the ground with Unity3D.

So where do we get those elevations? Enter the awesome Microsoft service called the Bing Maps Elevation API. It seems to be built-to-order for this task. Your first order of business - get yourself a Basic Bing Maps key.

Adding some geo-intelligence to the tile

The Bing Maps Elevation API documentation describes an endpoint GetElevations that allows you to get altitudes in several ways. One of them is a grid of altitudes in a bounding box. That is what we want - our tiles are square. The documentation says the bounding box should be specified as follows:

"A bounding box defined as a set of WGS84 latitudes and longitudes in the following order:
south latitude, west longitude, north latitude, east longitude"

If you envision a tile positioned so that north is up, we are required to calculate the geographical location of the top-right and bottom-left of the tile. The Open Street Maps Wiki provides code for the north-west corner of the tile, i.e. top left. I translated the code to C#...

//http://wiki.openstreetmap.org/wiki/Slippy_map_tilenames#C.23
private WorldCoordinate GetNorthWestLocation(int tileX, int tileY, int zoomLevel)
{
    var p = new WorldCoordinate();
    var n = Math.Pow(2.0, zoomLevel);
    p.Lon = (float)(tileX / n * 360.0 - 180.0);
    var latRad = Math.Atan(Math.Sinh(Math.PI * (1 - 2 * tileY / n)));
    p.Lat = (float) (latRad * 180.0 / Math.PI);
    return p;
}

image... and it works fine, but we need the south west and the north east points. Well, if you consider how the tiles are stacked, you can easily see how the north east point is the north-west point of the tile right of our current tile, and the south-west point is the north west point of the tile below our tile. Therefore we can use the north-west points of those adjacent tiles to find the values we actually need - like this:

public WorldCoordinate GetNorthEast()
{
    return GetNorthWestLocation(X+1, Y, ZoomLevel);
}

public WorldCoordinate GetSouthWest()
{
    return GetNorthWestLocation(X, Y+1, ZoomLevel);
}

That was easy, right?

Size matters

Although Microsoft is a USA company, it fortunately has an international orientation so the Bing Maps Elevation API returns no yards, feet, inches, miles, furlongs, stadia, or any other deprecated distance unit – it returns plain old meters. Which is very fortunate, as the Windows Mixed Reality distance unit is – oh joy – meters too. But it returns elevation in real world values, and while it might be fun to show Kilimanjaro in real height, it will be a bit too big to fit in my room (or any room, for what matters). Open Street Map is shown at a definite scale per zoom level – and as a GIS guy, I like to be the height correctly scaled - to get for this real life feeling. Once again, referring to the Open Street Map Wiki – there is a nice table that shows how many meters a pixel is at any given zoom level. We will need the size per tile (which is 256 pixels, as I explained in the previous post), so we add the following code that will give you a scale factor for the available zoom levels for Open Street Map:

//http://wiki.openstreetmap.org/wiki/Zoom_levels
private static readonly float[] _zoomScales =
{
    156412f, 78206f, 39103f, 19551f, 9776f, 4888f, 2444f,
    1222f, 610.984f, 305.492f, 152.746f, 76.373f, 38.187f,
    19.093f, 9.547f, 4.773f, 2.387f, 1.193f, 0.596f, 0.298f
};

private const int MapPixelSize = 256;

public float ScaleFactor
{
    get { return _zoomScales[ZoomLevel] * MapPixelSize; }
}

Creating the request

Now we move to MapTile. We add the following code to download the Bing Maps Elevation API values

private string _mapToken = "your-map-token-here";

public bool IsDownloading { get; private set; }

private WWW _downloader;

private void StartLoadElevationDataFromWeb()
{
    if (_tileData == null)
    {
        return;
    }
    var northEast = _tileData.GetNorthEast();
    var southWest = _tileData.GetSouthWest();

    var urlData = string.Format(
    "http://dev.virtualearth.net/REST/v1/Elevation/Bounds?bounds={0},{1},{2},{3}&rows=11&cols=11&key={4}",
     southWest.Lat, southWest.Lon, northEast.Lat, northEast.Lon, _mapToken);
    _downloader = new WWW(urlData);
    IsDownloading = true;
}

This simply queries the TileInfo structure for the new methods we have just created. Notice it then builds the URL, containing the bounds, the hard coded 11x11 points that are in a Unity Plane, and the key. Then it calls a piece of Unity3D code called “WWW”  which is a sort of HttpClient named by someone with a lot of fantasy (NOT). And that’s it. We add a call to the existing SetTileData method like this:

public void SetTileData(TileInfo tiledata, bool forceReload = false)
{
    if (_tileData == null || !_tileData.Equals(tiledata) || forceReload)
    {
        TileData = tiledata;
        StartLoadElevationDataFromWeb();
    }
}

so that whenever tile data is supplied, it does not only initiate the downloading of the tile, but also the downloading of the 3D data.

Processing the 3D data

Next up is a method ProcessElevationDataFromWeb, that is called from Update (so about 60 times a second). In this method we check if a the MapTile is downloading – and if it’s ready, we process the data

protected override void OnUpdate()
{
    ProcessElevationDataFromWeb();
}

private void ProcessElevationDataFromWeb()
{
    if (TileData == null || _downloader == null)
    {
        return;
    }

    if (IsDownloading && _downloader.isDone)
    {
        IsDownloading = false;
        var elevationData = JsonUtility.FromJson<ElevationResult>(_downloader.text);
        if (elevationData == null)
        {
            return;
        }

        ApplyElevationData(elevationData);
    }
}

An ElevationResult is a class to deserialize a result from a call to the Bing Maps Elevation API in. I entered the result of a manual call in Json2CSharp and got a class structure back – only I changed all properties into public fields so the rather stupid limited Unity JsonUtility, that does not seem to understand the concept of properties, can handle it. I also initialized lists in the objects from the constructors. It’s not very interesting but if you want a look go here in the demo project.

Applying the 3D data.

So now it’s time to actually move the mesh points up an down. Mostly using code I stole from Rick Bazarra, with a few adaptions from me:

private void ApplyElevationData(ElevationResult elevationData)
{
    var threeDScale = TileData.ScaleFactor;

    var resource = elevationData.resourceSets[0].resources[0];

    var verts = new List<Vector3>();
    var mesh = GetComponent<MeshFilter>().mesh;
    for (var i = 0; i < mesh.vertexCount; i++)
    {
        var newPos = mesh.vertices[i];
        newPos.y = resource.elevations[i] / threeDScale;
        verts.Add(newPos);
    }
    RebuildMesh(mesh, verts);
}

private void RebuildMesh(Mesh mesh, List<Vector3> verts)
{
    mesh.SetVertices(verts);
    mesh.RecalculateNormals();
    mesh.RecalculateBounds();
    DestroyImmediate(gameObject.GetComponent<MeshCollider>());
    var meshCollider = gameObject.AddComponent<MeshCollider>();
    meshCollider.sharedMesh = mesh;
}

First we get the scale factor – that’s simply the value by which elevation data must be divided to make it match the current zoom level. Next, we get the elevation data itself, that is two levels down in de ElevationData. And then we go modify the elevation of the mesh points to match those of the elevation we got. For some reason - and that's why I said it looks like the Bing Maps Elevation API looks to be like built-to-order for this task - the points come in at exactly the right order for Unity to process in the mesh.

As I learned from Rick, you cannot modify the points of a mesh, you have to replace them. So we loop through the mesh points and fill a list with points that have their y – so the vertical direction – changed to a scaled value of the elevation. Then we call RebuildMesh, that simply replaces the entire mesh with new vertices, does some recalculation and rebuilds the collider, so your gaze cursor will actually play nice with the new mesh. I also noticed that it you don’t do the recalculate stuff, you will end up looking partly through tiles. I am sure people with a deeper understanding of Unity3D will understand why. I just found out that it needs to be done.

Don't press play yet! There a few tiny things left to do, to make the result look good.

Setting the right location and material

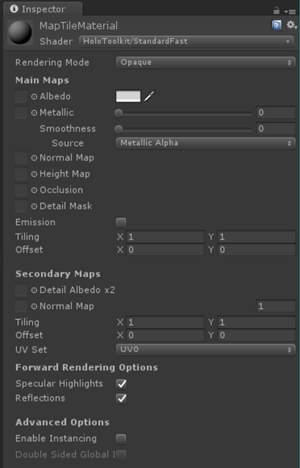
First of all, the map is kind of shiny, which was more or less okay-ish for the flat map, but if you turn the map into 3D you will get this over bright effect. So open up the project in Unity, create a new material “MapMaterial” and apply the properties as displayed here below left. The color of the material should be #BABABAFF. See left image. When it is done, drag it on top of the MapTile (see right image).

imageimage

Then, the app is still looking at Redmond. While that’s an awesome place, there isn’t much spectacular to see as far as geography is concerned. So we mosey over to the MapBuilder script. There we change the zoom level to 14, the Latitude to 46.78403 and the Longitude to -121.7543

image

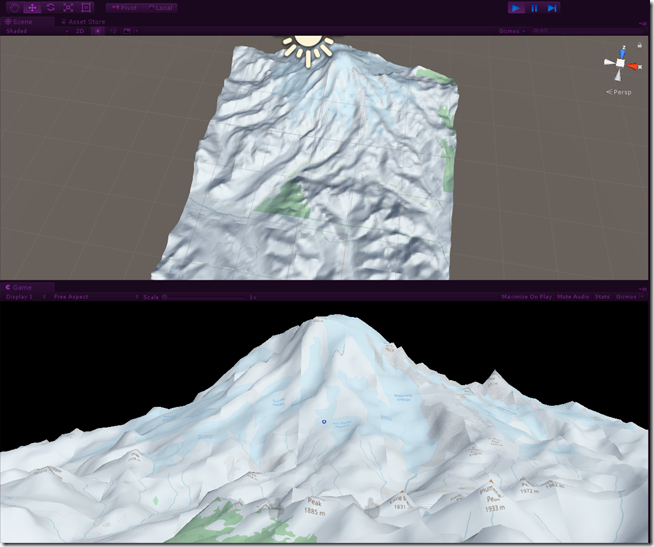
It's a little east and quite a bit more south from Redmond. In fact, when you press play, you will see a landmark that is very familiar if you live anywhere near the Seattle area or visited it:

image

famous Mount Rainier, the volcano sitting about 100 km from Seattle, very prominently visible from aircraft - weather permitting. To get this view, I had to fiddle with the view control keys a little after pressing play - if you press play initially you will see Rainier from a lot more close up.

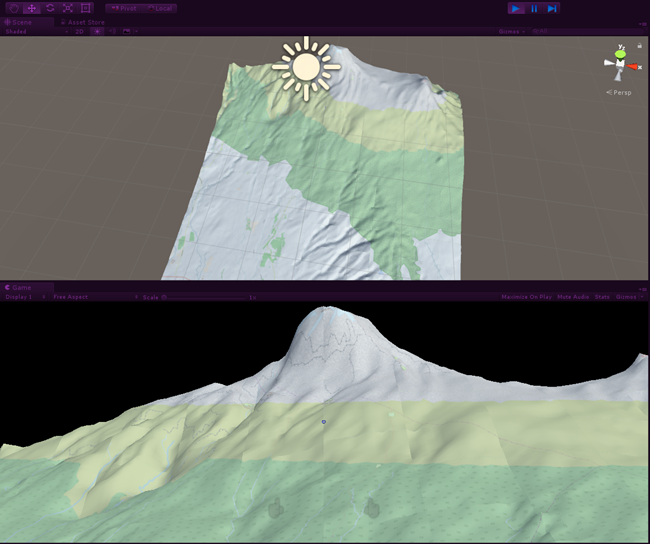
And that, my friends, is how you make a 3D map in your HoloLens. Of almost any place in the world. Want to see Kilimanjaro? Change Latitude to -3.21508 and Longitude to 37.37316. Press play.

image

Niagra falls? Latitude 43.07306, Longitude -79.07561 and change zoom level to 17. Rotate the view forward a little with your mouse and pull back. You have to look down. But then, here you go.

image

GIS is cool, 3D GIS is ultra-cool! All that is left is to generate the UWP app and deploy it into your HoloLens or view it in your new Windows Mixed Reality device.

Caveat emptor

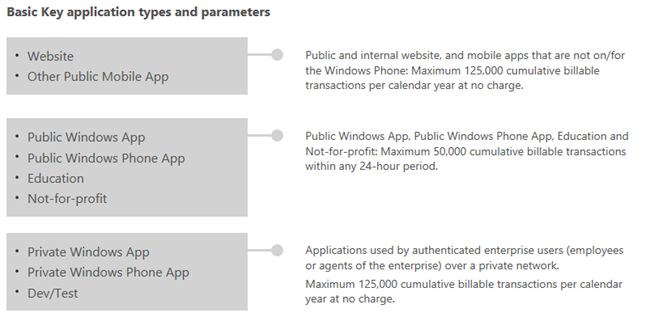
Awesome right?  Now there are a few things to consider. In my previous post I said this app was a bandwidth hog, as it downloads 169 tiles per map. In addition, it now also fires 169 requests per map to the Bing Maps Elevation API. For. Every. Single. Map. Every time. Apart from the bandwidth and power consequences, there's another thing to consider. If you go to this page and click "Basic Key", you will see something like this:

image

What is boils down to is - if your app is anywhere near successful, it will eat your allotted request limit very fast, you will get a mail from the Bing Team kindly informing you of this (been there, got that) - and then suddenly you will have a 2D app again. You will have to buy and enterprise key and those are not cheap. So I advise you to do some caching - both in the app and if possible on an Azure service. I employed a Redis cache to that extent.

Furthermore, I explained I calculate the north east and south west points of a tile using the north west points of the tiles left of and below the current tile. If those tiles are not present, because you are at the edge of the map, I have no idea what will happen - but presumably it won't work as expected. You can run into this when you are zoomed out sufficiently in the very south or east of the map. But then you are either at the International Date Line (that runs from the North Pole to the South Pole exactly on the side of Earth that is exactly opposite of the Greenwich Meridian) or at Antarctica. On the first spot, there’s mostly ocean (why else do you think they’ve put it there) and thus no (visible) geography to speak of. As far as Antarctica goes, you’ll hit another limitation, for it clearly says in the Bing Maps Elevation API documentation:

"There is a limitation in that latitude coordinates outside of the range of -85 and 85 are not supported."

So beware. Stay away from the Earth's edges. Your app might fall off :).

Some assembly required, batteries not included

Indeed, it does not look exactly like in the videos I showed. Walk the World employs a different map tile sets (plural indeed), and there's also all kinds of other stuff my app does - like sticking the map to the floor so that even at high elevations you have a nice overview, reverse geocoding so you can click on the map to see what's there, tracking the user's moves so it can make a new map appear where the user is walking off it  - connecting to the old one, zoom in/out centered on the user's location in the map, showing a map of the physical surroundings... there's a lot of math in there. I only showed you the basics. If you need a HoloDeveloper who knows and understand GIS to the core, you know who to contact now :)

Conclusion

Once you know the basics, it's actually pretty easy to create a 3D scaled map of about anywhere in the world, that is - anywhere where the Bing Maps Elevation API is supported. The 3D stuff is actually the easy part - knowing how to calculate tiles and build a slippy map is harder. But in the end, it is always easy when you know what to do. Like I said, I think GIS is a premier field in which Mixed Reality will shine. I am ready for it: I hope you are too. Innovate or die - there are certainly companies I know that could take that advice and get moving.

Get the demo project and get inspired!

Credits

Thanks to René Schulte, the wise man from 51.050409, 13.737262 ;)  for pointing me to the Bing Maps Elevation API. And of course to Rick Bazarra, who inspired me so often and actually provided some crucial code in his YouTube training video series.