24 April 2020

Migrating to MRTK2 - configuring, understanding and using Windows Mixed Reality controllers

Intro

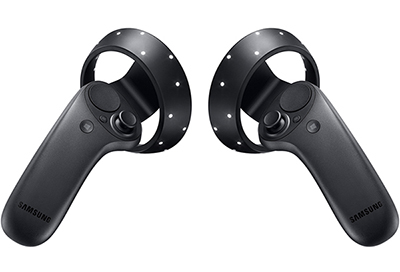
Although the focus for Mixed Reality Toolkit 2 now understandably is on Microsoft's big Mixed Reality business player - HoloLens 2 - it's still perfectly doable - and viable, IMHO - to develop Windows Mixed Reality apps for WMR immersive headsets. Case in point: most of the downloads I get for my three Mixed Reality apps in the store come from people using immersive headsets - which is actually not that strange as immersive headsets are readily available for individuals whereas HoloLens (either 1 or 2) is not - and they cost 10-15% of an actual HoloLens to boot.

And the fun thing is, if you do this correctly, you can even make apps that run on both - with only minor device specific code. Using MRTK2, though, there are some minor problems to overcome:

  1. The standard MRTK2 configuration allows for only limited use of all the controller's options
  2. There are no samples - or at least none I could find - that easily shows how actually extend the configurations to leverage the controller's full potential
  3. Ditto for samples on how to intercept the events and use those from code.

I intend to fix all of the above in this article. Once and for all ;)

Configuration

If you have worked a bit with the MRTK2 before, you know what's going to follow: cloning profiles, cloning profiles and more cloning profiles. We are going some four levels deep. Don't shoot the messenger ;)

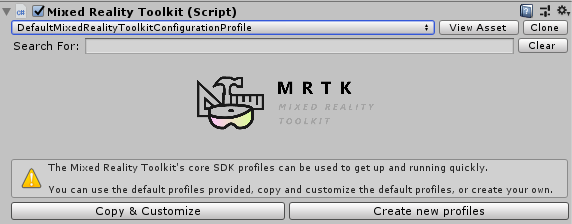
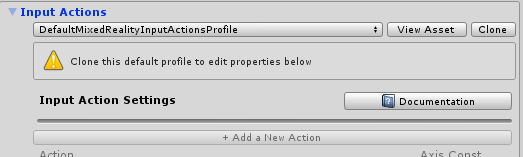
Assuming you start with a blank Unity app with the MRTK2 imported, first step is of course to clone the Default profile - or whatever profile you wish to start with, by clicking Copy & customize.

While you are at it, turn off the diagnostics

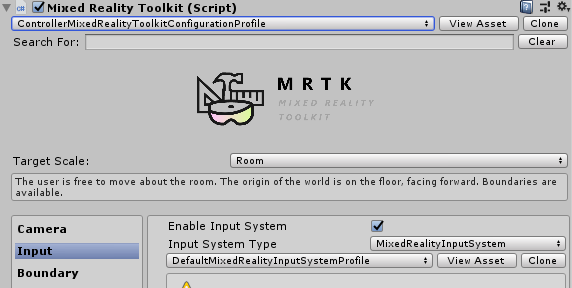
Next step is to clone the Input System Profile. You might need to drag the inspector a bit wider or you won't see the Clone button

Step 3 is to clone the Controller Mapping Profile:

Expand the "Controller Definitions" section. If you then select Windows Mixed Reality Left Hand Controller, you will notice a lot of events are filled in for the various controls - but also that a couple are not:

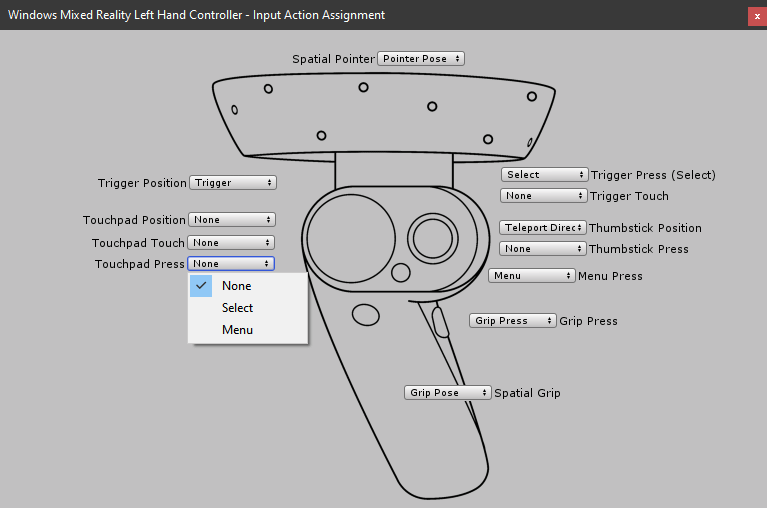
You can select something, but it's not applicable or already assigned to something else. The missing events are:

  • Touchpad Press
  • Touchpad Position
  • Touchpad Touch
  • Trigger Touch
  • Thumbstick Press

So we have to add these events. To achieve this, we have to do one final clone: the Default Input Actions Profile.

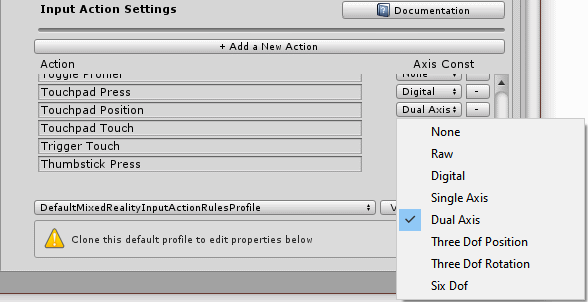
And then you simply can add the five missing events (or input actions, as they are called in MRKT2 lingo).

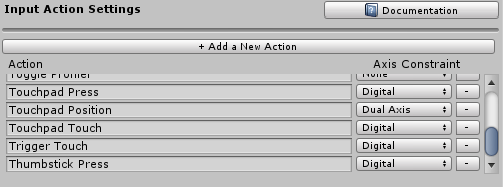
Mind to select "Digital" for all new actions except for Touchpad position. Make that a "Dual Axis". That last one will be explained later.

Now you can once again go back to Input/Controller/Input Mappings settings, and, assign the proper (new) events to the controller buttons. Don't forget to do this for both the right and the left hand controller.

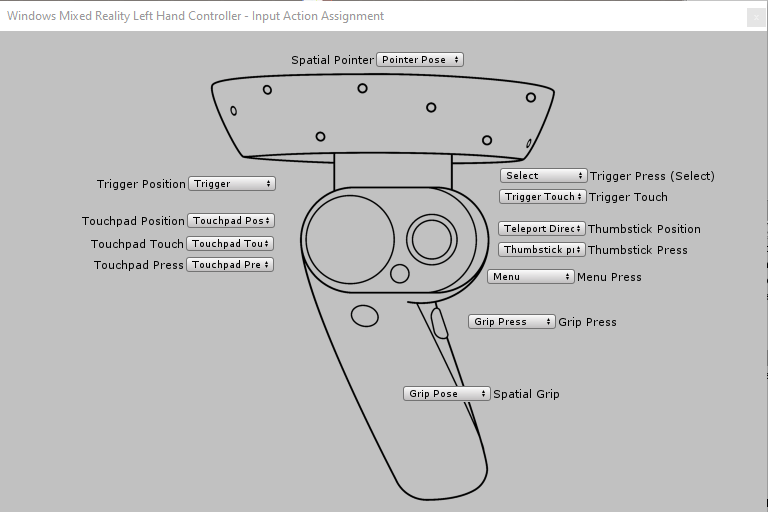
And now finally there are events attached to all the buttons to the controllers. Now it's time to show how to trap them.

Understanding and using the events

The important thing to understand is that there are different kind of events, that all need to be trapped in a specific way. When I showed you to add the event types, all but one of them were digital types. Only one was "Dual Axis". There actually are a lot of different types of events:

I am not sure if I got all the details right, but this is what I found out:

  • a digital event, that's basically a click. You need to have a behaviour that implements IMixedRealityInputHandler to intercept this. Example: a click on the menu button
  • a single axis event is an event that gives you a single value. The only application for WMR controllers I have found is a way to determine how far the trigger is pushed inwards (on a scale of 0-1). You will need to implement IMixedRealityInputHandler<float>
  • a dual axis event gives you two values. The only application I found was the touchpad - it gives to the X,Y coordinates where the touchpad was touched. Range for both is -1 to 1. 0,0 is the touchpad's center. You will need to implement IMixedRealityInputHandler<Vector2>
  • a six dof (degrees of freedom) event will give you a MixedRealityPose. This enables you to determine the current grip and pointer pose of the controller. You will need to implement IMixedRealityInputHandler<MixedRealityPose>

Demo application

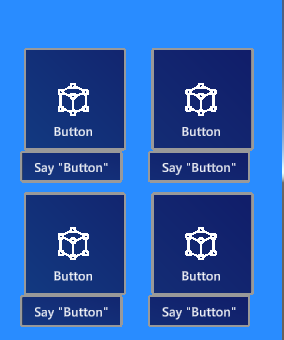
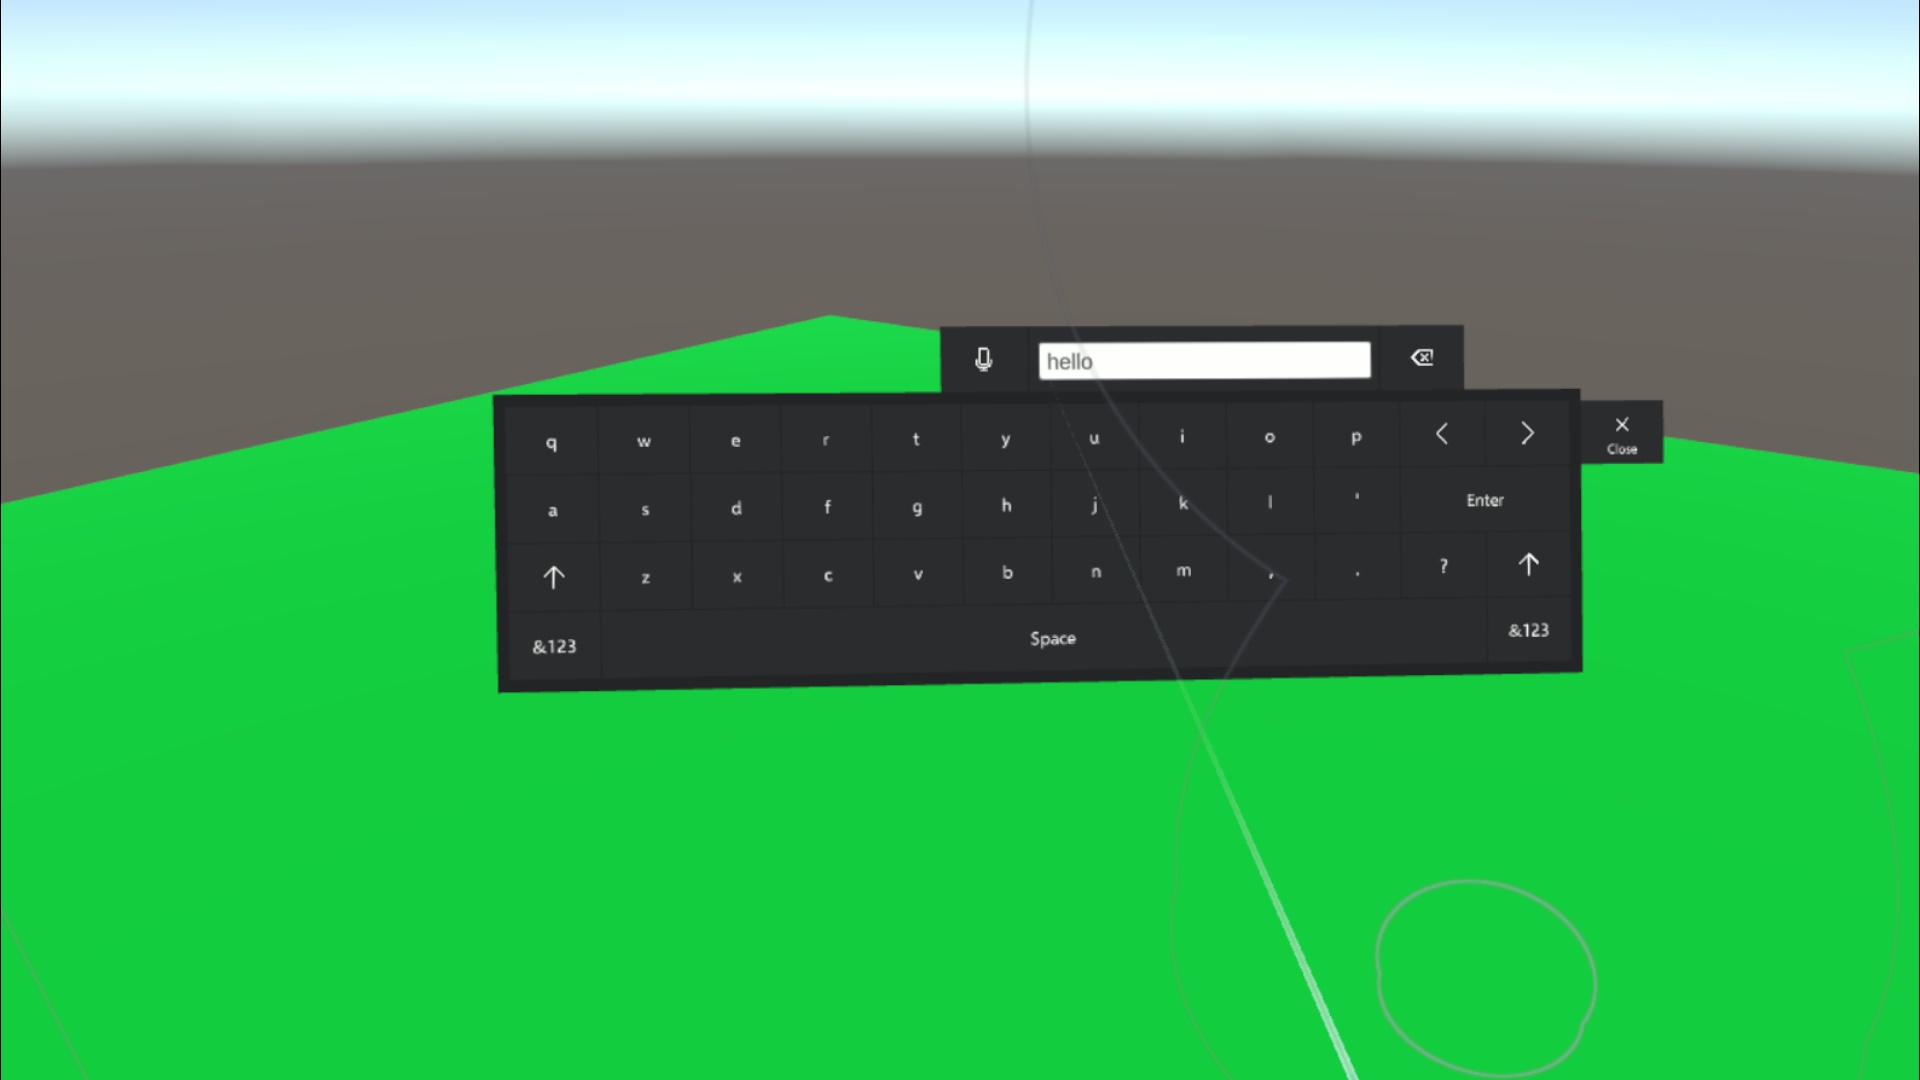
I created an application that demonstrates the events you will get and what type they are. If available, it will also display the values associated with the event. It looks like this:

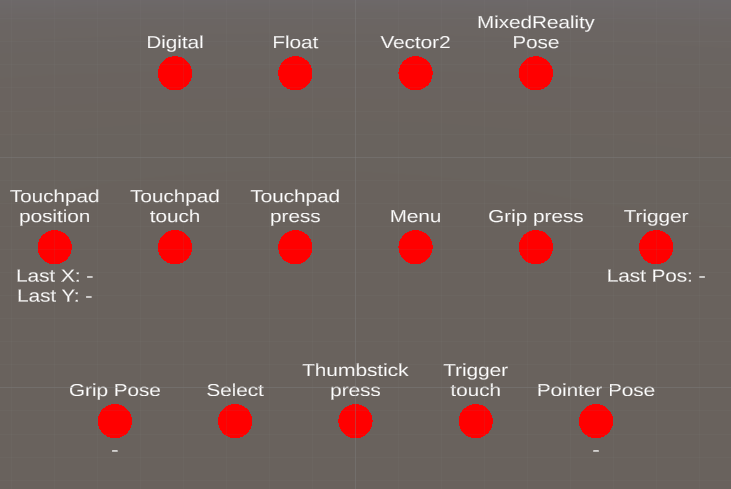
Not very spectacular, I'll admit, but it does the trick. On the top row it displays the type of event intercepted, the bottom two rows show actual events with - in four cases - information associated with the events. When activated: the red circle will turn green.

Observations using the demo app

  • You will notice you'll get a constant stream of Grip Pose and Pointer Pose events - hence these two events and the MixedRealityPose type events indicator are always green
  • You will also get a constants stream of "Teleport Direction" events (of type Vector2) from the thumbstick even if you don't touch it. I have no idea why this is so. I had to filter those out, or else the fact Touchpad position is a Vector2 element got hidden in the noise.
  • Grip press is supposed to be a SingleAxis event, but only fires Digital events
  • If you touch the touchpad, it actually fires two events simultaneously - the Digital Touchpad Touch and the Vector2 Touchpad position.
  • Consequently, if you press the touchpad, you get three events - Touchpad touch, Touchpad Position and Touchpad Press.
  • The trigger button also is an interesting story as that fires three events as well. As soon start to press it ever so slightly, it fires the SingleAxis event "Trigger" that tells you how far the trigger is depressed. But at the lowest scale where "Trigger" registers, it will also fire the Digital "Trigger Touch" event. However, you will usually get a lot more "Trigger" events as it's very hard to keep the trigger perfectly still while it's halfway depressed.
  • And finally, when you fully press it, the Digital "Select" event will be fired.
  • Menu and Thumbstick press are simple Digital events as you would expect.

Key things to learn from the demo app

Registering global handlers

On top you will see the the ControllerInputHandler implementing being derived from BaseInputHandler and the four interfaces mentioned.

public class ControllerInputHandler : BaseInputHandler, 
    IMixedRealityInputHandler, IMixedRealityInputHandler<Vector2>, 
    IMixedRealityInputHandler<float>,
    IMixedRealityInputHandler<MixedRealityPose>

The important thing to realize is that this behaviour needs to handle global events. This implicates two things, first, you will have to register global handlers

protected override void RegisterHandlers()
{
    CoreServices.InputSystem?.RegisterHandler<IMixedRealityInputHandler>(this);
    CoreServices.InputSystem?.RegisterHandler<IMixedRealityInputHandler<Vector2>>(this);
    CoreServices.InputSystem?.RegisterHandler<IMixedRealityInputHandler<float>>(this);
    CoreServices.InputSystem?.RegisterHandler<IMixedRealityInputHandler<MixedRealityPose>>(this);
};

(and unregister them of course in UnregisterHandlers)

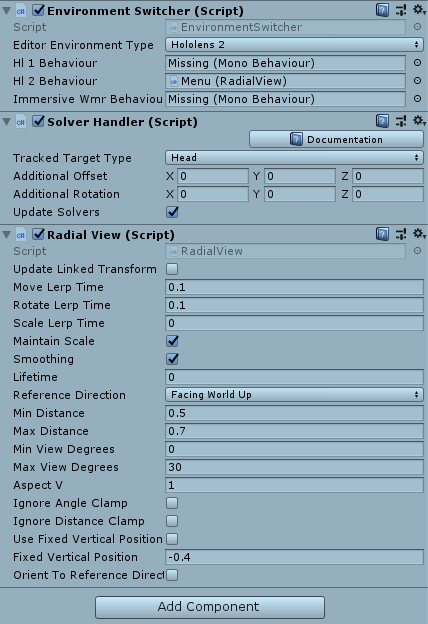
but second, if you use this in Unity, uncheck the "Is Focus Required" checkbox

This will ensure the global handlers being registered properly and being intercepted by this controller.

Discriminating between events of same type

It might not be immediately clear, but the only way I have been able to determine what exact event I get is to check it's MixedRealityInputAction.Description property. In the code you will seen things like

var eventName = eventData.MixedRealityInputAction.Description.ToLower();
if (eventName == "touchpad position")

In fact, you will see that the names of the event displayers in Scene hierachy are bascially the names of the events without spaces. I simply find them by name

After I simply load them in a dictionary in Start by looking for children in the "Events" object

foreach (var controller in _eventDisplayParent.GetComponentsInChildren<SingleShotController>())
{
    _eventDisplayers.Add(controller.gameObject.name.ToLower(), controller);
}
I simply find the back by looking in that dictionary and activating the SingleShot Controller. This class is part of a prefab that I used and explained in an earlier post.
private void ShowEvent(string eventName)
{
    var controller = GetControllerForEvent(eventName);
    if (controller != null)
    {
        controller.ShowActivated();
    }
}
private SingleShotController GetControllerForEvent(string controllerEvent)
{
    return _eventDisplayers[controllerEvent.ToLower().Replace(" ", "")];
}

I must say I feel a bit awkward about having to use strings to determine events by name. I guess it's inevitable if you want to be able to support multiple platforms and be able to add and modify events without actually having to change code and introduce types. This flexibility is what the MRTK2 intends to support, but it still feels weird.

Combining events

In the Immersive headset version of Walk the World you can zoom in or out by pressing on top of at the bottom at of the touch pad. But as we have seem, it's not even possible to detect where the user has pressed, only that he has pressed. But we can detect where he last touched, which most likely is at or very near where he last touched. How you can combine these the touch and press events to deserve and effect like I just described, is showed in the relevant pieces of the demo project code that copied below:

Vector2 _lastpressPosition;

public void OnInputChanged(InputEventData<Vector2> eventData)
{
    var eventName = eventData.MixedRealityInputAction.Description.ToLower();
    if (eventName == "touchpad position")
    {
        _lastpressPosition = eventData.InputData;
    }
}

public void OnInputDown(InputEventData eventData)
{
    var eventName = eventData.MixedRealityInputAction.Description.ToLower();
    if (eventName == "touchpad press")
    {
        // Limit event capture to only when more or less the top or bottom 
        // of the touch pad is pressed
        if (_lastpressPosition.y < -0.7 || _lastpressPosition.y > 0.7)
        {
            ShowEvent(eventName);
        }
    }
}

First, the touchpad position event keeps the last position into a member variable, then when the touchpad is pressed, we check where it last was touched. The event is only fired when the front 30% or back 30% was last touched before it was pressed. If you press the sides (or actually, touch the side before you press) nothing happens.

Conclusion

Interacting with the controller has changed quite a bit since ye olde days of the HoloToolkit, but it still is pretty much doable and usable if you follow the rules and patterns above. I still find it odd I have to determine what event is fired by checking it's description, but I may just be missing something. However, this method works for me, at least in my application.

Also, I am a bit puzzled by the almost-the-same-but-not-quite-so events around trigger and touchpad. No doubt some serious considerations have been made implementing it like this, but not having been around while that happens, it leaves confused about the why.

Finally, bear in mind you usually don't have to trap Select manually, and neither is the Thumbstick ('Teleport Direction') usually very interesting as those events are handled by the environment by default - the only reason I showed they them here was to demonstrate you could actually intercept them.

Demo project, as always, here on GitHub.

13 April 2020

Migrating to MRKT2 - multi-device behaviour switching and scaling

Intro

The MRTK2 allows for development for both HoloLens 1, HoloLens 2 and Windows Mixed Reality immersive headsets with nearly identical code. And a growing number of other platforms, but the focus is now understandably on HoloLens 2. Yet, if you want to make apps with a broad range, you might as well use the capabilities the toolkit offers to run one app on all platforms.

Rule-of-thumb device observations

  • On HoloLens 2, you typically want interactive stuff to be close by and relatively small, so you can leverage the touch functionality
  • On HoloLens 1 interactive stuff needs to be further away since the only control option you basically have is the air tap. But because it's further away, it needs to be bigger
  • On Windows Mixed Reality immersive headsets you want it also further away but even bigger still, as I have observed things seems to appear smaller on an immersive headset compared to HoloLens, and lower resolution headsets makes things harder to see things like small print compared to HoloLenses.

Basically this boils down to scaling and distance. Scaling usually is pretty simple to fix, but distance behavior is a bit more difficult, especially since the MRTK2 contains so much awesome behaviours for keeping for instance a menu in view, but it does not support different behavior for different devices.

I have come up with a rather unusual solution for this, and it works pretty well.

Meet the twins

I made two behaviours that work in tandem. The first one is pretty simple enough and is called EnvironmentScaler.

This simply scales the current game object to the value entered for the specific device type. Notice also there is a drop down that will enable you to select view how platform specific sizes will appear inside the Unity Editor.

The second one is a bit more odd. You see, for determining the right distance, I would like to use the standard Solver and RadialView combo. Of course I could have written a behaviour that changes the RadialView values based upon the detected platform. But then it would only have worked for RadialView. So I took a more radical and generic approach

As you can see, there is one Solver but no less that three RadialViews on the menu. They all have slightly different values for things like distance and Max view degrees. An if you start Play mode:

It simply destroys and removes the behaviors for the other platforms. Crude, but very effective. And no coding required. The only thing is - there is no way to distinguish those three RadialViews, so it's best to add them to your game object in the same order as they are listed in the EnvironmentSwitcher: for HoloLens 1, HoloLens 2 and WMR headsets.

The nuts and bolts

Both the switcher and the scaler have the same generic base class:

public abstract class EnvironmentHelperBase<T> : MonoBehaviour
{
    [SerializeField]
    private EditorEnvironmentType _editorEnvironmentType = EditorEnvironmentType.Hololens2;

    protected T GetPlatformValue(T hl1Value, T hl2Value, T wmrHeadsetValue)
    {
#if !UNITY_EDITOR
        if (CoreServices.CameraSystem.IsOpaque)
        {
            return wmrHeadsetValue;
        }

        var capabilityChecker = CoreServices.InputSystem as IMixedRealityCapabilityCheck;

        return capabilityChecker.CheckCapability(MixedRealityCapability.ArticulatedHand) ?
hl2Value : hl1Value; #else return GetTestPlatformValue(hl1Value, hl2Value, wmrHeadsetValue); #endif } private T GetTestPlatformValue(T hl1Value, T hl2Value, T wmrHeadsetValue) { switch (_editorEnvironmentType) { case EditorEnvironmentType.Hololens2: return hl2Value; case EditorEnvironmentType.Hololens1: return hl1Value; default: return wmrHeadsetValue; } } }

The GetPlatformValue method accepts three values - one for every platform supported - and returns the right one for the current platform based upon this simple rules:

  • If the headset is opaque, it's a WMR headset
  • If it's not opaque and it supports articulated hands, it's a HoloLens 2
  • Otherwise it's a HoloLens 1

And there's also the GetTestPlatformValue that returns a platform based upon what's selected in the _editorEnvironmentType field, that can be used for testing in the editor. I have noticed that the editor returns false for opaque and true for the articulated hand support, so by default the code acts like it's in running in a HoloLens 2. Hence my 'manual switch' in editorEnvironmentType so you can see what happens for the various devices inside your editor. For runtime code, whatever you selected in editorEnvironmentType in either behaviour is of no consequence.

EnvironmentScaler implementation

This is the very simple, as all the heavy lifting has already been done in the base class:

public class EnvironmentScaler : EnvironmentHelperBase<float>
{
    [SerializeField]
    private float _hl1Scale = 1.0f;

    [SerializeField]
    private float _hl2Scale = 0.7f;

    [SerializeField]
    private float _immersiveWmrScale = 1.8f;

    void Start()
    {
        gameObject.transform.localScale *= GetPlatformValue(_hl1Scale, _hl2Scale,
_immersiveWmrScale); } }

Simply scale the object to the value selected by GetPlatformValue. Easy as cake.

EnvironmentSwitcher implementation

public class EnvironmentSwitcher : EnvironmentHelperBase
{
    [SerializeField]
    private MonoBehaviour _hl1Behaviour;

    [SerializeField]
    private MonoBehaviour _hl2Behaviour;

    [SerializeField]
    private MonoBehaviour _immersiveWmrBehaviour;

    void Start()
    {
        var selectedBehaviour = GetPlatformValue(_hl1Behaviour, _hl2Behaviour, 
                                                        _immersiveWmrBehaviour);
        foreach (var behaviour in new[] {_hl1Behaviour, _hl2Behaviour,
_immersiveWmrBehaviour}) { if (behaviour != selectedBehaviour) { Destroy(behaviour); } } } }

Very much like the previous one, but now the values are not floats (for scale) but actual behaviors. It find the behaviour for the current device, the destroy all others.

The fun thing is - in this I used this specifically for three identical behaviours (that is, they are all RadialView behaviours) - one for every device. But it's just as easily possible to use three completely different behaviours, one for each device, and have the 'wrong' ones be rendered inoperative by this behaviour as well. This makes this approach very generically applicable.

Conclusion

Multi device strategy does not have to be complex. With these two behaviours you can make your app appear more or less the same on different devices, and still adhere to the device's unique capabilities.

Complete project, as always, here. Enjoy

01 April 2020

Migrating to MRTK2 - using the non-native keyboard in touch scenarios

Prelude

With apologies for the uncharacteristic hiatus in my blog - last month I had a HoloLens 2 available for development and test purposes, and utilizing that opportunity to the max had a bit more priority than actually blogging about it. Then the world got hit head-on by the Corona madness and I had other things on my mind. Now, in self-isolation, hoping to avoid the virus (as no doubt most of you are right now), I have finally started to crank out the backed up blog posts I had chalked up 'for later' while I was converting apps for HoloLens 2.

Intro

In the Mixed Reality Toolkit 2 you can use the beautiful system keyboard for text input and that works amazingly well - in HoloLens 2. Since MRKT2 development prioritizes HL2 development, and for good reason, this is not surprising. But in Immersive Headsets it works not so very well, and in HoloLens 1 it has the same problem.
Now since MRTK2.3 there's a new keyboard available - although actually it's an old keyboard - the Keyboard prefab, that used to reside in HoloToolkit\UX\Prefabs, has been renamed to the NonNativeKeyboard prefab and now sits in MixedRealityToolkit.SDK\Experimental. It has a few advantages over the native keyboard:
  • It is a Unity object, not a native object, so you can control size, rotation and position just like any other Unity object
  • It has basically the same API and usage as the old keyboard, which makes it attractive to use in existing applications.
  • It has a built-in button for speech recognition
  • It gives a consistent look & feel for your apps.
It also has a few quite distinct disadvantages:
  • It does not support touch events for HoloLens 2
  • It does not take into account the differences in apparent size in WMR headsets and HoloLenses
  • It should act different in various environments, (like being close when in HL2, and further away and bigger in other cases) which it does not
Now this, my friends, can be mitigated with a pretty simple add-on behaviour that I created. It takes care of positioning, platform dependent scaling and distance - but above all, it adds touch to the nonnative keyboard in a very simple way.

How it works

The start is simple enough: just some settings for each platform:
public class KeyboardAdapter : MonoBehaviour
{
    [SerializeField]
    private float Hl1Distance = 1.0f;
    [SerializeField]
    private float Hl1Scale = 1.0f;
    
    [SerializeField]
    private float Hl2Distance = 0.3f;
    [SerializeField]
    private float Hl2Scale = 0.3f;

    [SerializeField]
    private float WmrHeadSetDistance = 0.6f;

    [SerializeField]
    private float WmrHeadSetScale = 0.6f;

    [SerializeField] 
    private AudioClip _clickSound;

    private AudioSource _clickSoundPlayer;
}
Basically a couple of settings. For every platform support (HoloLens 1, HoloLens 2 and Mixed Reality headsets there is a distance from the user it will appear, and an apparent scale it will have. Also, you can assign a click sound for when a key is hit.
Almost all the heavy lifting happens in Start:
private void Start()
{
    _clickSoundPlayer = gameObject.AddComponent<AudioSource>();
    _clickSoundPlayer.playOnAwake = false;
    _clickSoundPlayer.spatialize = true;
    _clickSoundPlayer.clip = _clickSound;
    var buttons = GetComponentsInChildren<Button>();
    foreach (var button in buttons)
    {
        var ni = button.gameObject.AddComponent<NearInteractionTouchableUnityUI>();
        ni.EventsToReceive = TouchableEventType.Pointer;
        button.onClick.AddListener(PlayClick);
    }
}
The first four lines simply add and initialize the sound that is played when you tap a button. The next ones do the real work: they find every Button object in the keyboard, add a NearInteractionTouchableUnityUI to it, set the events to receive to "pointer" and add an event listener to the Button - that basically only serves to play the sound
The keyboard is built of Unity UI components, and adding a NearInteractionTouchableUnityUI and setting the EventToReceive to Pointer is all the is necessary to make the button 'think' it's clicked when it's actually touched. And if you have set the ClickSound to an audio file in the editor, it plays a sound now when you tap our touch it, too.
Then we have these two properties who return the right value depending on the platform the app is running on:
private float Scale => GetPlatformValue(Hl1Scale, Hl2Scale, WmrHeadSetScale);
private float Distance => GetPlatformValue(Hl1Distance, Hl2Distance, WmrHeadSetDistance);
Which is done by this little method:
private float GetPlatformValue(float hl1Value, float hl2Value, float wmrHeadsetValue)
{
    if (CoreServices.CameraSystem.IsOpaque)
    {
        return wmrHeadsetValue;
    }

    var capabilityChecker = CoreServices.InputSystem as IMixedRealityCapabilityCheck;

    return capabilityChecker.CheckCapability(MixedRealityCapability.ArticulatedHand) ? 
            hl2Value : hl1Value;
}
If the headset is opaque, then it's a Windows Mixed Reality headset (or at least not a HoloLens), and otherwise we determine based upon the capability of tracking hands whether it's a HoloLens 1 or 2.
This is used to determine to show the keyboard on the desired place and at the desired scale.
public void ShowKeyboard()
{
    NonNativeKeyboard.Instance.PresentKeyboard();
    NonNativeKeyboard.Instance.RepositionKeyboard(CameraCache.Main.transform.position + 
                                                  CameraCache.Main.transform.forward * 
                                                  Distance, 0f);
    NonNativeKeyboard.Instance.gameObject.transform.localScale *= Scale;
}
And that is really all. Some creative use of components already in the MRTK2.

Usage

Just drop a NonNativeKeyboard prefab from the MRTK2 in your scene, and drop this behavior on it. You then only have to take care of two things. First, set Min and Max scale both to 1, otherwise this will interfere with the way the keyboard is scaled by this behavior:

And of course, you have to set some parameters for the behavior itself. I have chosen what I like to think are reasonable settings for every platform:

And of course the sound that appears when you tap or touch the keyboard

How it looks

On a HoloLens 2( in my app Walk the World for HoloLens 2) it looks like this:

It is pretty close, as you are supposed to be able to touch it
On HoloLens 1 it looks like this:

Pretty much the same - bigger, but further away and thus easier to control with the air tap. Since this is a 2D picture, the differences between HoloLens 1 and 2 are actually hard to spot. And on Mixed Reality it looks like this - it look smaller, but that's because in a headset everything looks smaller. It's apparent size is the same as in HoloLens 1.

And finally, and action movie of touch enabled non native keyboard on a HoloLens 2. You can actually touch the buttons and they respond with a button press sound, as you see

Why no solvers?

You might have noticed I did not use any MRTK2 solvers to keep the keyboard floating in view when you when you move your head, our keep a dynamical distance. I did initially, but I found out that a keyboard that actually moves is very annoying when you are trying to type, especially when using touch type. Then the keyboard is close, and a move is easily triggered when you want to do things like first type the A (left), then the P (totally right). So I decided just to let it appear right in front of the user, and keep it there. If you don't use it, it automatically disappears after a configurable timeout. This is built into the keyboard, that is not my doing.

Conclusion

It's quite remarkable how you can make 'old' components interplay with the new HoloLens 2 interaction possibilities using the new components and a bit of imagination. Also, the MRTK2 made making apps that run on both HoloLens 1, HoloLens 2 and Windows Mixed Reality headsets a lot easier. Although it's clear MRTK2 prioritizes HoloLens 2 above all - and that's logical, because there's where the action and the business is. I fear the venerable trailblazing HoloLens 1, will quickly lose mindshare and disappear from the radar when HoloLens 2 becomes more widely available. I am not quite sure what to do with mine, but time will tell.
As usual, you can find the code of the little project here. If you want to run the app and see the keyboard, just say "Open Keyboard".

Post scriptum

I put the part that makes the NonNativeKeyboard touchable in a pull request to the MRTK2 that was merged at April 14, and will be part of the MRTK 2.4.0 release.