Showing posts with label Xamarin Forms. Show all posts

15 July 2017

Styles in Xamarin Forms don't work properly in UWP .NET Native - here is how to fix it

Intro

Xamarin Forms is awesome. If you have learned XAML from WPF, Silverlight, Windows Phone, Universal Windows Apps or UWP, you can jump right in using the XAML you know (or at least something that looks remarkably familiar) and start to make apps that will run cross platform on iOS, Android and UWP. So potentially your app cannot only run on phones but also on XBox, HoloLens and PCs.

OnPlatform FTW!

One of the coolest thing is the OnPlatform construct. For instance, you can have something this:

<Style TargetType="Label" x:Key="OtherTextStyle" >
    <Setter Property="FontSize">
        <OnPlatform x:Key="FontSize" x:TypeArguments="x:Double" >
            <On Platform="Windows" Value="100"></On>
            <On Platform="Android" Value="30"></On>
            <On Platform="iOS" Value="30"></On>
        </OnPlatform>
    </Setter>
</Style

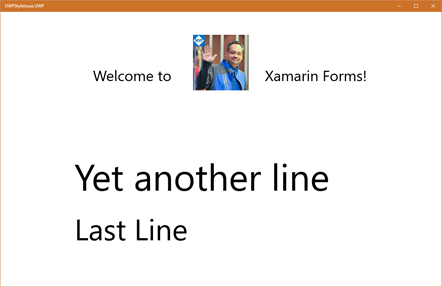
This indicates the label that has this style applied to it, should have a font size of 100 on Windows, 30 on Android, and 30 on iOS. In the demo project I have defined some styles in the App.xaml, and the net result is that is looks like this on Android (left), iOS(right) and Windows (below).

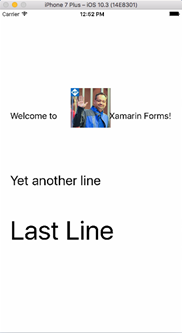
imageimage

image

The result is not necessarily very beautiful, but if you look in the MainPage.xaml you will see everything has a style and no values are hard coded. You can also see that although the Android and iOS apps are mobile apps and the Windows app is essentially an app running on a tablet or a PC (the demarcation line between these is becoming hazier with the day) it will still work out using OnPlatform.

I have used various constructs. Apart from the inline construct as I showed above, there's also this one

<OnPlatform x:Key="ImageSize" x:TypeArguments="x:Double" >
    <On Platform="Windows" Value="150"></On>
    <On Platform="Android" Value="100"></On>
    <On Platform="iOS" Value="90"></On>
</OnPlatform>

<Style TargetType="Image" x:Key="ImageStyle" >
    <Setter Property="HeightRequest" Value="{StaticResource ImageSize}" />
    <Setter Property="WidthRequest" Value="{StaticResource ImageSize}" />
    <Setter Property="VerticalOptions" Value="Center" />
    <Setter Property="HorizontalOptions" Value="Center" />
</Style

A construct I would very much recommend, as it enables you to re-use the ImageSize value for other things, for instance the height of button, in another style. You can also use these doubles directly in Xaml, like I did with SomeOtherTextFontSize in the last label in MainPage.xaml

<?xml version="1.0" encoding="utf-8" ?>
<ContentPage xmlns="http://xamarin.com/schemas/2014/forms"
             xmlns:x="http://schemas.microsoft.com/winfx/2009/xaml"
             x:Class="UWPStyleIssue.MainPage">
    <Grid VerticalOptions="Center" HorizontalOptions="Center" >
        <Grid.RowDefinitions>
            <RowDefinition Height="*"></RowDefinition>
            <RowDefinition Height="*"></RowDefinition>
            <RowDefinition Height="*"></RowDefinition>
            <RowDefinition Height="*"></RowDefinition>
        </Grid.RowDefinitions>
        <Image Grid.Row="0"
            Source=
               "https://media.licdn.com/mpr/mpr/shrinknp_400_400/[abbreviated]jpg"
           Style="{StaticResource ImageStyle}"></Image>
        <Label Text="Welcome to                       Xamarin Forms!" Grid.Row="1"
Style="{StaticResource TextStyle}"/> <Label Text="Yet another line" Grid.Row="2" Style="{StaticResource OtherTextStyle}"/> <Label Text="Last Line" Grid.Row="3" FontSize="{StaticResource SomeOtherTextFontSize}"/> </Grid> </ContentPage

Although I do not recommend this practice - styles are much cleaner - sometimes needs must and this can be handy.

I can hear you think by now: "your point please, kind sir?" (or most likely something less friendly). Well... it works great on Android, as you have seen. It also works great on iOS. And yes, on Windows too...

OnPlatform WTF?

... until you think "let's get this puppy into the Windows Store". As every Windows Developer knows, if you compile for the Store, you compile for Release, which kicks off the .NET Native toolchain. This is very easy to spot as the compilation process takes much longer. The result is not Intermediary Language (IL),  but binary code - an exe - which makes UWP apps so much faster than their predecessors. Unfortunately, it also means the release build is an entirely different beast than a debug build, which can have some unexpected side effects. In our application, if you run the Release build, you will end up with this.
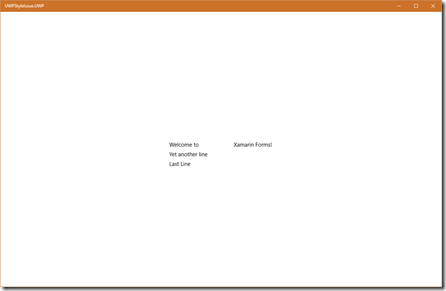
image

That is quite some 'side effect'. No margin to pull the first text up, no font size (just default), no image... WTF indeed.

Analysis

Unfortunately I had some issues with another library (FFImageLoading) which took me on the wrong track for quite a while, but after I had fixed that I noticed that when I changed the styles from Onplatform to hard coded values the styling started to work again - even in .NET Native. So if I did this

<x:Double x:Key="ImageSize">150</x:Double>
<!--<OnPlatform x:Key="ImageSize" x:TypeArguments="x:Double"  >
    <On Platform="Windows" Value="150"></On>
    <On Platform="Android" Value="100"></On>
    <On Platform="iOS" Value="90"></On>
</OnPlatform>-->

at least my image showed up again:

image

With a deadline looming and an ginormous style sheet in my app I really had no time to make a branch with separate styles for Windows. We had to go to the store and we had to go now. Time for a cunning plan. I came up with this:

A solution/workaround/hack/fix ... sort of

So it works when the styles do contain direct values, not OnPlatform, right... ? If you look at App.xaml.cs in the portable project you will see a line in the constructor that's usually not there, and it's commented out

public App()
{
    InitializeComponent();
    //this.FixUWPStyling();

    MainPage = new UWPStyleIssue.MainPage();
}

If you remove the slashes and run the app again in Release....

image

magic happens. All styles seem to work again. This is because of an extension method that's in the file ApplicationExtensions, that you will find in the Portable project in de Extensions folder

public static void FixUWPStyling(this Application app)
{
    if (Device.RuntimePlatform == Device.Windows)
    {
        app.ConvertAllOnPlatformToExplict();
        app.ConvertAllOnDoubleToPlainDouble();
    }
}

The first method, ConvertAllOnPlatformToExplict, does the following:

  • Loop trough all the styles
  • Loop through all the setters in a style
  • Check if the setters 's property name is either "HeightRequest", "WidthRequest", or "FontSize"
  • If so, extract the Windows value from the OnPlatform struct
  • Set the setter's value to a plain double with as value the extracted Windows value

It's crude, it requires about everything to be in OnPlatform, but it does the trick. I am not going to write it all out here, it's not very great code, and you can see it all on GitHub anyway.

Then, for good measure it calls ConvertAllOnDoubleToPlainDouble, which loops trough the all the doubles, like

<OnPlatform x:Key="ImageSize" x:TypeArguments="x:Double" >...</OnPlatform>

It extracts the Windows value, removes the OnPlatform from the resource dictionary and adds a new plain double with the Windows style only to the resource dictionary. For some reason, replacement is not possible.

Conclusion

There is apparently a bug in the Xamarin Forms .NET Native UWP tooling, which causes OnPlatform values being totally ignored. With my dirty little trick, you can at least get your styles to work without having to rewrite the whole shebang for Windows or have a separate style file for it. Note this does not fix everything, if you have other value types (like GridHeights) you will need to add your own conversion to ConvertAllOnPlatformToExplict  What I have given you was enough to fix my problems, but not all potential issues that may arise from this bug.

I hope this drives the Xamarin for UWP adoption forward, and I also hopes this helps the good folks in Redmond fix the bug. I've pretty much identified what goes wrong, now they 'only' have to take are of the how ;)

Demo project with fix can be found here.

11 June 2016

Floating ‘text balloons’ for context relevant information in Xamarin Forms

Picking the challenge apart

An Italian proverb says that a fool can ask more questions than seven wise men can answer – a modern variant could be that a designer can think up more things than a developer can build. I don’t pretend to be the proverbial wise man, and neither do I want to call my designer colleague a fool, and when he came up with the idea of introducing text balloons with context relevant information, floating on top on the rest of the UI, cross-platform, and preferably appearing with a nice animation, I indeed had to do some head scratching.

What he meant was this, and this is exactly how I created it

The issues I had to tackle, were:

  1. How do I create a text balloon in the first place, with a kind of pointy bit pointing to the UI element it belongs to?
  2. How do I get the absolute position of a UI element - that is, the one the user taps?
  3. How do I show the text balloon in situ?

Text balloon 101

tekstballon

This text balloon consists of a translucent grid that ties the components together. It contains two grids, one of them containing the label. The first grid is the bit that points up. This actually is a 15 by 15 square, rotated 45⁰, and moved a little bit to the left using the new Margins property that has finally made it to Xamarin Forms. The second and biggest grid is the green rectangle actually containing the text you want to show. Because it’s in XAML after the square, drawing precedence rules make that it be drawn on top of the first one. You would not see it at all, if is wasn’t for the fact this grid also has a margin - of 7 on the top so about half of the rotated square. The net result, as you can see, is a triangle sticking out of the rectangle, making the optical illusion of a kind of text balloon. In XAML, this looks like this

<Grid x:Name="MessageGridContainer" xmlns="http://xamarin.com/schemas/2014/forms"
           xmlns:x="http://schemas.microsoft.com/winfx/2009/xaml"
           x:Class="XamarinFormsDemos.Views.Controls.FloatingPopupControl" 
           BackgroundColor="#01000000">
  <Grid.ColumnDefinitions>
    <ColumnDefinition Width="75*"></ColumnDefinition>
    <ColumnDefinition Width="25*"></ColumnDefinition>
  </Grid.ColumnDefinitions>
  <Grid x:Name="MessageGrid" HorizontalOptions="Start" VerticalOptions="Start" >
    <Grid BackgroundColor="{StaticResource  AccentColor}" HeightRequest="15" WidthRequest="15" 
          HorizontalOptions="End" VerticalOptions="Start" Rotation="45" 
          Margin="0,0,4,0" InputTransparent="True"/>
    <Grid Padding="10,10,10,10" BackgroundColor="{StaticResource AccentColor}" Margin="0,7,0,0" 
          HorizontalOptions="FillAndExpand" InputTransparent="True">
      <Label  x:Name="InfoText" TextColor="{StaticResource ContrastColor}" 
             HorizontalOptions="Center" VerticalOptions="Center" 
             InputTransparent="True"/> 
    </Grid>
  </Grid>
</Grid>

The complete text balloon is contained in the “MessageGrid” grid; the pointy bit upward is emphasized using red and underlining. The complete control is contained within yet another grid “MessageGridContainer”, that fills the whole screen – or at least the part in which the text balloons appear. Is has three functions:

  • It provides a canvas to place the actual text balloons on
  • It is an event catcher – as the user taps ‘anywhere on the screen’ the text balloon disappears
  • It makes sure the text balloon never gets wider than 75% of the screen (this was a designer requirement) – hence the columns.

Some important details to take note of:

  • A few elements have set the property “InputTransparent”  to true. This means they will never receive any events (like tap) but those will be received by the elements lying ‘below’ them. In other words, they don’t block events. This makes the text balloon disappear even when you tap on the text balloon itself, as the events goes downwards and is processed by MessageGridContainer
  • MessageGridContainer itself is not opaque but has BackgroundColor "#01000000", that is, 1% black. For all intents and purposes it is opaque in the sense that you don’t see it, but if you leave it totally opaque is will also be opaque to events - on Windows 10 UWP. A little concession to a cross platform issue.
  • This whole contraption is called “FloatingPopupControl” – this is the control that handles showing, displaying and eventually removing the text balloon. ‘Something’ has to call it’s ShowMessageFor method to tell it what the balloon should contain, and under which control it should appear.We will come to that later

Determining absolute position of the ‘anchor element’

The anchor-element is the element under which the text balloon appear should appear when it’s tapped – in this sample, the i-symbol. It is actually pretty to simple to find the absolute position of a relatively placed element: this is achieved by going recursively upwards via the “Parent” propertie and get the sum of all X values and the sum of all Y values. You can actually find hints to this in the Xamarin developer forumsin the Xamarin developer forums, and I have put this into the following extension method:

using Xamarin.Forms;

namespace Wortell.XamarinForms.Extensions
{
  public static class ElementExtensions
  {
    public static Point GetAbsoluteLocation(this VisualElement e)
    {
      var result = new Point();
      var parent = e.Parent;
      while (parent != null)
      {
        var view = parent as VisualElement;
        if (view != null)
        {
          result.X += view.X;
          result.Y += view.Y;
        }
        parent = parent.Parent;
      }
      return result;
    }
  }
}

Positioning, showing, animating and removing text balloons

If you look at the code in the ShowMessageFor method - in the FloatingPopupControl code behind – you’ll see the code is only deferring to FloatingPopupDisplayStrategy. This is done because it’s not wise to put much code into a user control if you want to re-use part of that intelligence easily. It also makes adapting and changing animations easier. FloatingPopupDisplayStrategy has the following constructor:

public class FloatingPopupDisplayStrategy
{
  private readonly Label _infoText;
  private readonly View _overallView;
  private readonly View _messageView;

  public FloatingPopupDisplayStrategy(Label infoText, View overallView, View messageView)
  {
    _infoText = infoText;
    _overallView = overallView;
    _messageView = messageView;

    _overallView.GestureRecognizers.Add(new TapGestureRecognizer
    { Command = new Command(ResetControl) });
    _overallView.SizeChanged += (sender, args) => { ResetControl(); };
  }
}
  • infoText the text balloon name 
  • overallView is the canvas in which the text ballon is placed; it also receives the tap to remove the text balloon again
  • messageView is het containing grid of the text balloon itself

ShowMessageFor, and it’s little helper ExecuteAnimation, are implemented like this:

public virtual async Task ShowMessageFor(
  VisualElement parentElement, string text, Point? delta = null)
{
  _infoText.Text = text;
  _overallView.IsVisible = true;

  // IOS apparently needs to have some time to layout the grid first
  // Windows needs the size of the message to update first
  if (Device.OS == TargetPlatform.iOS || 
      Device.OS == TargetPlatform.Windows) await Task.Delay(25);
  _messageView.Scale = 0;

  var gridLocation = _messageView.GetAbsoluteLocation();
  var parentLocation = parentElement.GetAbsoluteLocation();

  _messageView.TranslationX = parentLocation.X - gridLocation.X -
                              _messageView.Width + parentElement.Width +
                              delta?.X ?? 0;
  _messageView.TranslationY = parentLocation.Y - gridLocation.Y +
                              parentElement.Height + delta?.Y ?? 0;

  _messageView.Opacity = 1;
  ExecuteAnimation(0, 1, 250);
}

private void ExecuteAnimation(double start, double end, uint runningTime)
{
  var animation = new Animation(
    d => _messageView.Scale = d, start, end, Easing.SpringOut);

  animation.Commit(_messageView, "Unfold", length: runningTime);
}
  • First the text that should be displayed in the text balloon is set
  • Next, the canvas in which the text balloon is placed is made visible. As stated before, it’s nearly invisible, but effectively it intercepts a tap
  • Windows and iOS now need a short timeout for some layout events. This feels a bit VB6’ey, doevents, right?
  • The text balloon is scaled to 0, effectively making it infinitely small (and invisible) 
  • Next, we calculate the text balloon’s current absolute location, as well as the anchor element’s(‘parentElement’) absolute location.
  • X and Y translation of the text balloon are calculated to position the text balloon at a location that will make the pointy bit end up just under the blue i-symbol
  • De message grid’s opacity is set to 1, so now the text balloon is visible (but still infinitely small)
  • A 250 ms bouncy animation (Easing.SpringOut) blows up the text balloon to scale 1 – it’s normal size.

Note: the delta uses in the calculation is a value intended to use as a correction value, in case the standard calculation does not yield the desired result (i.e. location). This will be explained later on.

And finally, the user must be able to dismiss the text balloon. This is done using the ResetControl methods. As we have seen in de constructor, this method gets called in case the user types at the invisible canvas, or if the canvas’ size changes.

private void ResetControl()
{
    if (_messageView.Opacity != 0)
    {
      _messageView.Opacity = 0;
      _overallView.IsVisible = false;
    }
}

This method does not need to be called explicitly at initialization, since he invisible grid changes size at the start of the app (because it gets child elements – the MessageGrid and its children), and the event wiring makes this call happen anyway. Another important reason to attach this method to the SizeChanged event is that in Windows 10 UWP apps windows sizes actually can be changed by the user. This may cause text balloons ending up in what is no longer being the right place, so they need to be removed as well. After all, as long as the text balloon is visible, the invisible background blocks any input, so as soon as the user starts working with the app, in any way, the text balloon needs to disappear and the app needs to be ready again.

Behavior intercepting tap event and relay to control

The only thing missing now is something to get the whole process going – respond to the tap on the i-symbol, providing the text balloon contents, and provide some optional positioning correcting for the text balloon. This is done by FloatingPopupBehavior:

using Wortell.XamarinForms.Behaviors.Base;
using Wortell.XamarinForms.Controls;
using Xamarin.Forms;

namespace Wortell.XamarinForms.Behaviors
{
  public class FloatingPopupBehavior : BindableBehaviorBase<View>
  {
    private IGestureRecognizer _gestureRecognizer;

    protected override void OnAttachedTo(View bindable)
    {
      base.OnAttachedTo(bindable);
      _gestureRecognizer = new TapGestureRecognizer {Command = new Command(ShowControl)};
      AssociatedObject.GestureRecognizers.Add(_gestureRecognizer);
    }

    protected override void OnDetachingFrom(View bindable)
    {
      base.OnDetachingFrom(bindable);
      AssociatedObject.GestureRecognizers.Remove(_gestureRecognizer);
    }

    private void ShowControl()
    {
      if (AssociatedObject.IsVisible && AssociatedObject.Opacity > 0.01)
      {
        PopupControl?.ShowMessageFor(AssociatedObject, MessageText, new Point(Dx, Dy));
      }
    }

    #region PopupControl Attached Dependency Property      
    public static readonly BindableProperty PopupControlProperty =
      BindableProperty.Create(nameof(PopupControl), 
      typeof (IFloatingPopup), typeof (FloatingPopupBehavior),
        default(IFloatingPopup));


    public IFloatingPopup PopupControl
    {
      get { return (IFloatingPopup) GetValue(PopupControlProperty); }
      set { SetValue(PopupControlProperty, value); }
    }
    #endregion

    //MessageText Attached Dependency Property omitted

    //region Dx Attached Dependency Property omitted     

    //region Dy Attached Dependency Property omitted     

  }
}

This behavior is actually rather simple – as soon as the control tot which is attached is tapped, it calls the ShowMessageFor method of the control referenced in de PopupControl property. There are three additional property for determining which text is actually displayed, and two optional properties for a delta X and delta Y which, as we have seen, are included by the control when it actually places the text balloon on the right place.

Bringing it together in XAML

A simplified excerpt from FloatingPopupPage :

<ScrollView Grid.Row="1"  VerticalOptions="Fill" 
   HorizontalOptions="Fill" Margin="10,0,10,0" >
  <Grid>
    <Grid VerticalOptions="Start">
      <Grid.RowDefinitions>
        <RowDefinition Height="Auto"></RowDefinition>
        <RowDefinition Height="Auto"></RowDefinition>
        <RowDefinition Height="*"></RowDefinition>
      </Grid.RowDefinitions>
      <StackLayout Orientation="Horizontal" HorizontalOptions="Fill" >
        <ContentView  HorizontalOptions="FillAndExpand" VerticalOptions="Start">
          <Entry x:Name="NameEntry" Placeholder="Name" 
                  TextColor="{StaticResource AccentColor}" 
                  PlaceholderColor="{StaticResource SoftAccentColor}" />
        </ContentView>
        <ContentView>
          <Image Source="{extensions:ImageResource info.png}" VerticalOptions="Center"
                 HorizontalOptions="End" 
                 HeightRequest="{Binding Height, Source={x:Reference NameEntry}}">
            <Image.Behaviors>
              <behaviors:FloatingPopupBehavior MessageText="Fill in your name here"
                                               PopupControl="{x:Reference PopupControl}" 
                                               Dx="-6" Dy="4"/>
            </Image.Behaviors>
          </Image>
        </ContentView>
      </StackLayout>

    </Grid>
    <controls:FloatingPopupControl x:Name="PopupControl" VerticalOptions="Fill" 
                                   HorizontalOptions="Fill" />
  </Grid>
</ScrollView>

In red the actual i-symbol with the behavior attached to it, in green the popup control (including the label) itself. In the behavior’s properties we actually specify the text to be displayed as well the PopupControl reference, indicating this is the UI control that should actually handle the displaying of the text balloon. In addition it sports an optional extra delta x and delta y. Of course this could be hard coded into the control, but to have this extra flexibility in design time makes for an easier ‘constructable ’UI. As you can see, as soon as the parts are in place, actually using and re-using the components is pretty easy, making adding floating text balloons with contextual relevant information very easy indeed.

Also notice a neat trick to make sure that especially nice in Android, that sports a great rage of resolutions. I took an intentionally too big picture for the i-symbol, which is automatically sized to the height of the entry by using  HeightRequest="{Binding Height, Source={x:Reference NameEntry}}"

Some consequences of this approach

As stated repeatedly, a (nearly) invisible grid covers the whole screen, or at least part of the screen, while a text balloon is displayed – to give the text balloon space to be placed in, and to intercept a tap so it will be removed as soon as the user starts interacting with the app. The flip side is that the app is effectively blocked until the user taps, and this tap will not do anything but removing the text balloon. A plainly visible button will not respond while the text balloon is visible – that requires yet another tap. This may seem annoying, but I don’t think this will put off the user in any significant amount, as it;s likely he will stop using this functionality pretty soon as he/she has gotten the hang of the app. This is only an onboarding/adopting thing. You read the car’s manual only once (if you do it at all, and then never again unless in very extraordinary circustances)

Conclusion

Using only some pretty basic means, a few nifty tricks and a clear architectural approach it appears to be pretty simple to build a kind of re-usable infrastructure enabling the fast and flexible addition of context relevant information, which is displayed in a visually attractive way. It’s very easy to add text balloons this way, and it’s a useful tool to make onboarding and adoption of an app easier.

As usual, a sample project containing this (and previous code) can be found on GitHub

25 April 2016

Behavior for view model driven animated popups in Xamarin Forms

Preface

popupIn my previous post I showed the basics for animation behaviors in Xamarin Forms. Here’s another one I made, that in conjunction with some nifty element binding makes for a pretty fluid popup appearing from the middle. Of course, you can use the native alert box but I’d rather want to see is something as displayed to the right, especially with a nice animation. The advantage of such a custom made popup is that is looks much more consistent across platforms, which is a huge win especially for LOB apps.

You can see the behavior in action below:

... and all there is to it...

The actual code is pretty small now all the heavy lifting has been done by the base classes from the previous post:

using Wortell.XamarinForms.Behaviors.Base;
using Xamarin.Forms;

namespace Wortell.XamarinForms.Behaviors
{
  public class AnimateScaleBehavior : AnimateFoldBehaviorBase
  {
    protected override void Init(bool newValue)
    {
      if (newValue)
      {
        FoldOutPosition = 1;
        FoldInPosition = 0;
        AssociatedObject.Scale = FoldInPosition;
      }
    }

    protected override void ExecuteAnimation(double start, double end, 
                                             uint runningTime)
    {
      var animation = new Animation(
        d => AssociatedObject.Scale = d, start, end, Easing.SinOut);

      animation.Commit(AssociatedObject, "Unfold", length: runningTime,
        finished: (d, b) =>
        {
          if (AssociatedObject.Scale.Equals(FoldInPosition))
          {
            AssociatedObject.IsVisible = false;
          }
        });
    }
  }
}

In stead of animating TranslationX and TranslationY, like in the previous post, now the Scale property is animated from 0 to 1 and back. Attentive readers may have seen something else though - as soon as the animation starts, a grey haze appears over the underlying screen, that only disappears when the animation is done. This is entirely done in XAML - using element binding.

The whole popup sits in MenuControl.xaml – this is a user control

<?xml version="1.0" encoding="utf-8" ?>
<Grid xmlns="http://xamarin.com/schemas/2014/forms"
      //Rest of namespace stuff omitted
      IsVisible="{Binding IsVisible, Source={x:Reference AnimatedGrid}}">
  <ContentView BackgroundColor="{StaticResource SeeThrough}"
               HorizontalOptions="Fill" VerticalOptions="Fill" >

    <ContentView Padding="20,0,20,0" x:Name="AnimatedGrid" IsVisible="False">
      <ContentView.Behaviors>
        <behaviors:AnimateScaleBehavior IsVisible="{Binding IsMenuVisible}" 
           ViewIsInitialized="{Binding ViewIsInitialized}"/>
      </ContentView.Behaviors>
      <ContentView Style="{StaticResource MenuStyle}" HorizontalOptions="Fill"
                    VerticalOptions="CenterAndExpand" Padding="0,0,0,10">
        <Grid>
          <Grid.RowDefinitions>
            <RowDefinition Height="40"></RowDefinition>
            <RowDefinition Height="Auto"></RowDefinition>
          </Grid.RowDefinitions>

          <ContentView  Grid.Row="0" Style="{StaticResource PopupHeaderStyle}">
            <Label Style="{StaticResource PopupHeaderTextStyle}" Text="Popup header" 
                VerticalOptions="Center"/>
          </ContentView>

          <StackLayout Orientation="Vertical" Grid.Row="1">

            <StackLayout Style="{StaticResource ContentStyle}"  Orientation="Vertical">
              <Label Style="{StaticResource MenuTextStyle}" Text="Here be text" />  
              <Label Style="{StaticResource MenuTextStyle}" Text="Here be more text"
                  VerticalOptions="Center"/>
            </StackLayout>

            <ContentView Style="{StaticResource Separator}"></ContentView>

            <StackLayout Style="{StaticResource ContentStyle}"  Orientation="Vertical">
              <Label Style="{StaticResource MenuTextStyle}" Text="Here be text" />
              <Label Style="{StaticResource MenuTextStyle}" Text="Here be more text" />
              <Label Style="{StaticResource MenuTextStyle}" 
                  Text="Here be more whatever UI elements you want" />
            </StackLayout>

            <Grid HeightRequest="10"></Grid>

            <Grid Style="{StaticResource ContentStyle}">
              <Grid.ColumnDefinitions>
                <ColumnDefinition Width="*"></ColumnDefinition>
                <ColumnDefinition Width="10"></ColumnDefinition>
                <ColumnDefinition Width="*"></ColumnDefinition>
              </Grid.ColumnDefinitions>
                 <Button Text="Ok" Command="{Binding CloseMenuCommand}"></Button>
              <Button Text="Cancel" Grid.Column="2" 
                  Command="{Binding CloseMenuCommand}"></Button>
            </Grid>
          </StackLayout>
        </Grid>
      </ContentView>
    </ContentView>

    <ContentView.GestureRecognizers>
      <TapGestureRecognizer Command="{Binding CloseMenuCommand}"></TapGestureRecognizer>
    </ContentView.GestureRecognizers>
  </ContentView>

</Grid>

I have marked the interesting parts in red and bold. On top you see that the visibility of the control itself is bound to the visibility of the grid called “AnimatedGrid”. This grid is inside a ContentView which has a background color defined by the resource “SeeTrough. This you can find in app.xaml defined as being color #B2000000, aka "70% black" in designer lingo (i.e. black that is 30% transparent). AnimatedGrid is the top level element of the actual popup – it’s visibility is controlled by the AnimateScaleBehavior. As soon as the animation starts by IsVisible flipping value, the AnimatedGrid is first made visible, and it’s parent – and the SeeThrough ContentView – popup into view, only to disappear when the animation is completely finished. This is exactly what I wanted to achieve – the 70% haze turns the focus of the user to the little task at hand now, and also blocks tapping access to whatever UI elements are still visible below it.

Note, there no values supplied for FoldInTime and FoldOutTime so the default values of 150 and 250ms are used. But you can easily change that by adding them to the behavior in XAML.

As a final thing, I have added a TapGestureRecognizer that calls the popup closing command to the 70% gray area as well. This dismisses the popup when you tap outside it, which is exactly what one expects in a mobile app. It’s effectively the same thing as hitting Cancel (and in this case, Ok, as that does nothing but closing the popup as well).

Viewmodel

Hardly worth mentioning, but to make the picture complete:

using Xamarin.Forms;

namespace XamarinFormsDemos.ViewModels
{
  public class PopupViewModel : MenuViewModelBase
  {
    public Command CloseMenuCommand { get; private set; }

    public PopupViewModel() : base()
    {
      CloseMenuCommand = new Command(() => IsMenuVisible = false);
    }
  }
}
Command makes boolean false. So menu disappears again. Doh ;)

Usage

<?xml version="1.0" encoding="utf-8" ?>
<demoViewFramework:BaseContentPage xmlns="http://xamarin.com/schemas/2014/forms"
    // stuff omitted
  <Grid>
    <!-- Page content -->
    <Grid.RowDefinitions>
      <RowDefinition Height="25*"></RowDefinition>
      <RowDefinition Height="75*"></RowDefinition>
    </Grid.RowDefinitions>
    <Grid Row="0" Style="{StaticResource HeaderOutsideStyle}">
      <ContentView Style="{StaticResource ContentStyle}">
        <Label Text="Popup menu" Style="{StaticResource HeaderStyle}"  
        VerticalOptions="CenterAndExpand"></Label>
      </ContentView>
    </Grid>

    <ContentView Grid.Row="1" Style="{StaticResource ContentStyle}" 
        HorizontalOptions="Fill">
      <Label Text="Here be page content" 
        Style="{StaticResource ContentTextStyle}"></Label>

      <ContentView  VerticalOptions="Start" Style="{StaticResource ContentStyle}" >
          <Button Text="Open popup menu" Command="{Binding ToggleMenuCommand}" 
                  HorizontalOptions="Fill" VerticalOptions="Start"></Button>
      </ContentView>
    </ContentView>

    <!-- Menu -->
    <controls:PopupControl Grid.Row="0" Grid.RowSpan="2"></controls:PopupControl>

  </Grid>
</demoViewFramework:BaseContentPage;/Grid>

Once again, the control is added last and convers the whole screen, as to appear over the existing UI.

Some final words

When you are developing cross-platform apps, UI testing is crucial. For instance, while I was making this app, I noticed that when you change this

<Grid 
      //Namespaces omitted
      IsVisible="{Binding IsVisible, Source={x:Reference AnimatedGrid}}">
  <ContentView BackgroundColor="{StaticResource SeeThrough}"
               HorizontalOptions="Fill" VerticalOptions="Fill">

in this:

       
<Grid 
      //Namespaces omitted
      >
  <ContentView IsVisible="{Binding IsVisible, Source={x:Reference AnimatedGrid}}"
               BackgroundColor="{StaticResource SeeThrough}"
               HorizontalOptions="Fill" VerticalOptions="Fill">

you get a visually a identical result on all three platforms covered in the test project. On Android and Windows 10 it even works the same. But if you try to run on iOS, you will notice the “Open popup menu” is not clickable. This is because the outer grid covers the whole screen and is always visible - and although it’s empty, it apparently blocks all user input. As usual, Apple does things different ;)

The demo project – with updated code – can be found here

This article appeared earlier – in Dutch – on the Wortell company blog

13 April 2016

Behaviors for animated scroll-down and slide-in menus in Xamarin Forms

Preface

Some time ago I wrote about a proof-of-concept for viewmodel driven animations using behaviors in Xamarin Forms. In the mean time, time has moved on, so has Xamarin Forms, and the idea I had back then made it into a kind of framework solution I now used professionally. And it’s time to show how it’s done now in detail.

This article is about building animated scroll-into-view menu’s in Xamarin Forms, and to make sure we all understand what that means, I made this little video showing the code in action on an Android emulator, a Windows 10 Universal Windows Platform app, and an iPhone simulator:

Framework

The demo app contains a simple framework (project DemoViewFramework) that supports a number of things crucial to an app sporting viewmodel driven behaviors, that is:

  • facilitation of  MVVM (using MVVMLight)
  • registration of which view belongs to what viewmodel
  • navigation from viewmode to viewmodel (in stead of from page to page)
  • exposing essential events in the life cycle of the page to it’s accompanying viewmodel.

I won’t go into very much detail about the framework – it’s a pretty naïve implementation anyway – but there are two key things to take away. The first one is the class BaseContentPage

using Xamarin.Forms;

namespace DemoViewFramework
{
  public class BaseContentPage : ContentPage
  {
    protected override void OnAppearing()
    {
      base.OnAppearing();
      Context?.OnViewAppearing();
    }

    protected override void OnSizeAllocated(double width, double height)
    {
      base.OnSizeAllocated(width, height);
      Context?.OnViewInitialized(true);
    }

    protected override void OnDisappearing()
    {
      base.OnDisappearing();
      Context?.OnViewInitialized(false);
      Context?.OnViewDisappearing();
    }

    private IPageViewModelBase Context => (IPageViewModelBase)BindingContext;
  }
}
This class is intended to be a base class for your pages, and it's sole purpose is to channel the OnAppearing, OnSizeAllocated and OnViewDisappearing events to the object in the Page's BindingContext - that is, the view model. To this intent, every view model should implement the interface IPageViewModelBase so the corresponding methods can be called:
namespace DemoViewFramework
{
  public interface IPageViewModelBase
  {
    void OnViewInitialized(bool value);

    void OnViewAppearing(object state = null );

    void OnViewDisappearing();

    INavigationService NavigationService { get; set; }
  }
}
If you are using your own Navigation framework, you can forget about the NavigationService property. To make implementation easier, there's a base class for view models – which is the second key takeaway. In the demo project is a child class from MVVMLight's ViewModelBase, but of course you are very free to implement your own INotifyPropertyChanged base class as well.
using GalaSoft.MvvmLight;

namespace DemoViewFramework
{
  public class PageViewModelBase : ViewModelBase, IPageViewModelBase
  {
    public virtual void OnViewInitialized(bool value)
    {
      ViewIsInitialized = value;
    }

    private bool _viewIsInitialized;
    public bool ViewIsInitialized
    {
      get { return _viewIsInitialized; }
      set { Set(() => ViewIsInitialized, ref _viewIsInitialized, value); }
    }

    public virtual void OnViewAppearing(object state = null)
    {
      ViewHasAppeared = true;
    }

    public virtual void OnViewDisappearing()
    {
      ViewHasAppeared = false;
    }

    private bool _viewHasAppeared;
    public bool ViewHasAppeared
    {
      get { return _viewHasAppeared; }
      set { Set(() => ViewHasAppeared, ref _viewHasAppeared, value); }
    }

    public INavigationService NavigationService { get; set; }
  }
}
Key thing here is that there are two properties - ViewHasAppeared and ViewIsInitialized - available in every view model and they are set automatically by the framework. Behaviors handling animations need to know when they actually can start doing stuff and they can bind to one of these properties. As I explained in a previous blog post, from Xamarin 2.1 apparently you can only start after OnSizeAllocated, which translates to ViewIsInitialized in the view model, so the initialization code needs to be fired when that property is set to true. The actual activation of the behavior (that is, the animation), needs to come from another property. That may sound complicated, but I assure you it's not that bad. Just read on.

The (base) view model for driving animations

Basically, we need something to kick off the animations. To this extent, we are using this very simple view model

using DemoViewFramework;
using Xamarin.Forms;

namespace XamarinFormsDemos.ViewModels
{
  public class MenuViewModelBase : PageViewModelBase
  {
    private bool _isMenuVisible;

    public MenuViewModelBase()
    {
      ToggleMenuCommand = new Command(() => IsMenuVisible = !IsMenuVisible);
    }

    public bool IsMenuVisible
    {
      get { return _isMenuVisible; }
      set { Set(() => IsMenuVisible, ref _isMenuVisible, value); }
    }

    public Command ToggleMenuCommand { get; private set; }
  }
}

A command that toggles a simple boolean property. I mean, how hard can it be, right?

Leveling the playing field

If you are coming from Windows behaviors, like I do, you are in for a surprise. Xamarin behaviors are a prime example of something that quacks like a duck and walks like a duck, can be a goose after all. Some things are a bit different and – like a goose – can bite you pretty badly. First of all, there is no standard binding context, and there is no AssociatedObject property to easily refer to. This can make things a bit complex when 'translating' behaviors from Windows to Xamarin and back, hence this base class to make sure we have the same - or at least a more similar - base

using System;
using Xamarin.Forms;

namespace Wortell.XamarinForms.Behaviors.Base
{
  public abstract class BindableBehaviorBase<T> : Behavior<T> 
    where T : VisualElement
  {
    protected T AssociatedObject { get; private set; }

    protected override void OnAttachedTo(T bindable)
    {
      AssociatedObject = bindable;
      bindable.BindingContextChanged += Bindable_BindingContextChanged;
      base.OnAttachedTo(bindable);
    }

    protected override void OnDetachingFrom(T bindable)
    {
      bindable.BindingContextChanged -= Bindable_BindingContextChanged;
      base.OnDetachingFrom(bindable);
      AssociatedObject = null;
    }

    private void Bindable_BindingContextChanged(object sender, EventArgs e)
    {
      if (AssociatedObject != null)
      {
        BindingContext = AssociatedObject.BindingContext;
      }
    }
  }
}
It's a bit of an oddball class, but it's purpose is simple - after this has run, you can bind to any of the behavior's dependency properties, and in your code you can refer to a typed AssociatedObject, just like you would in Windows XAML behaviors.

Getting a bit animated

Now earlier in this blog post I mentioned the fact that behaviors doing animations probably need to know when a view is ready initializing, so they can initialize themselves. To get to this point, there is this base class on top of  BindableBehaviorBase, with a similar ‘original name:

using Xamarin.Forms;

namespace Wortell.XamarinForms.Behaviors.Base
{
  public abstract class ViewInitializedBehaviorBase<T> : BindableBehaviorBase<T> 
    where T : VisualElement
  {
    #region ViewIsInitialized Attached Dependency Property      
    public static readonly BindableProperty ViewIsInitializedProperty =
       BindableProperty.Create(nameof(ViewIsInitialized), typeof(bool), 
       typeof(ViewInitializedBehaviorBase<T>),
       default(bool), BindingMode.TwoWay,
       propertyChanged: OnViewIsInitializedChanged);

    public bool ViewIsInitialized
    {
      get { return (bool)GetValue(ViewIsInitializedProperty); }
      set { SetValue(ViewIsInitializedProperty, value); }
    }

    private static void OnViewIsInitializedChanged(BindableObject bindable, 
            object oldValue, object newValue)
    {
      var thisObj = bindable as ViewInitializedBehaviorBase<T>;
      thisObj?.Init((bool)newValue);
    }

    #endregion

    protected abstract void Init(bool viewIsInitialized);
  }
}

When you bind the behavior’s ViewIsInitialized property to the viewmodel’s ViewIsInitialized property, the behavior knows ‘when the view is ready (or not anymore). Whatever, if the property in the view model changes, the behavior calls its (now abstract) method Init.

So what happens is

BaseContentPage –> PageViewModelBase –> (property binding) ViewInitializedBehaviorBase.Init –>
  Concrete Implementation.Init

And finally - menu animations

One more base class to go. I noticed pretty soon that animations handling the folding or scrolling of things almost always consider one property to be animated. So I created a yet another base class

using Xamarin.Forms;

namespace Wortell.XamarinForms.Behaviors.Base
{
  public abstract class AnimateFoldBehaviorBase : 
    ViewInitializedBehaviorBase<View>
  {
    protected double FoldInPosition;
    protected double FoldOutPosition;

    protected VisualElement GetParentView()
    {
      var parent = AssociatedObject as Element;
      VisualElement parentView = null;
      if (parent != null)
      {
        do
        {
          parent = parent.Parent;
          parentView = parent as VisualElement;
        } while (parentView?.Width <= 0 && parent.Parent != null);
      }

      return parentView;
    }

    protected override void OnAttachedTo(View bindable)
    {
      base.OnAttachedTo(bindable);
      bindable.IsVisible = false;
    }

    private void ExecuteAnimation(bool show)
    {
      if (show)
      {
        AssociatedObject.IsVisible = true;
        ExecuteAnimation(FoldInPosition, FoldOutPosition, (uint)FoldOutTime);
      }
      else
      {
        ExecuteAnimation(FoldOutPosition, FoldInPosition, (uint)FoldInTime);
      }
    }

    protected abstract void ExecuteAnimation(double start, double end, 
      uint runningTime);

    public static readonly BindableProperty IsVisibleProperty =
       BindableProperty.Create(nameof(IsVisible), typeof(bool), 
       typeof(AnimateFoldBehaviorBase),
       false, BindingMode.OneWay,
       propertyChanged: OnIsVisibleChanged);

    public bool IsVisible
    {
      get { return (bool)GetValue(IsVisibleProperty); }
      set {SetValue(IsVisibleProperty, value); }
    }

    private static void OnIsVisibleChanged(BindableObject bindable, 
       object oldValue, object newValue)
    {
      var thisObj = bindable as AnimateFoldBehaviorBase;
      thisObj?.ExecuteAnimation((bool)newValue);
    }   

    // FoldInTime Attached Dependency Property      
 
    // FoldOutTime Attached Dependency Property      
  }
}

This class handles a few important things. First of all, it gets the parent view – in a menu’s case the page. In fact, it finds the first object that has a width, thus a size. This is the behavior’s ‘playing field’. Then there is the ExecuteAnimation method, that actually starts the animation – or reverses it. Note also that the behavior actually hides the element that it’s animating – this whole setup assumes you will move something into view, while it’s not in view initially. You might notice that the Init method which is abstract in it's parent class is still not implemented. That happens only in the concrete class - that is actually pretty small, now all the ground work has been laid:

using Wortell.XamarinForms.Behaviors.Base;
using Xamarin.Forms;

namespace Wortell.XamarinForms.Behaviors
{
  public class AnimateSlideDownBehavior : AnimateFoldBehaviorBase
  {
    protected override void Init(bool newValue)
    {
      if (newValue)
      {
        var parentView = GetParentView();
        if (parentView != null)
        {
          FoldInPosition = -parentView.Height;
          AssociatedObject.TranslationY = FoldInPosition;
        }
      }
    }

    protected override void ExecuteAnimation(double start, 
       double end, uint runningTime)
    {
      var animation = new Animation(
        d => AssociatedObject.TranslationY = d, start, end, Easing.SinOut);

      animation.Commit(AssociatedObject, "Unfold", length: runningTime,
        finished: (d, b) =>
        {
          if (AssociatedObject.TranslationY.Equals(FoldInPosition))
          {
            AssociatedObject.IsVisible = false;
          }
        });
    }
  }
}

So on Init, the menu is moved up exactly it’s own height and - assuming it’s on top of the page - it will appear just outside the view. The actual animation code itself is laughably simple – it just animates over TranslationY, and when it find it’s ending at the FoldInPosition, it will make the animated object invisible

All that’s left now is defining the menu in XAML and then adding the behavior to it. It’s important to add the menu after the actual page content so it will be drawn over it. Otherwise it will just slide behind it, and that’s not very useful.

<!-- Menu -->
<ContentView Grid.Row="0" Grid.RowSpan="2">
  <ContentView.Behaviors>
    <behaviors:AnimateSlideDownBehavior
      IsVisible="{Binding IsMenuVisible}"
      ViewIsInitialized="{Binding ViewIsInitialized}"
      FoldOutTime="400" FoldInTime="300"/>
  </ContentView.Behaviors>
  <Grid>
    <Grid.RowDefinitions>
      <RowDefinition Height="75*"></RowDefinition>
      <RowDefinition Height="25*"></RowDefinition>
    </Grid.RowDefinitions>
    <ContentView Style="{StaticResource MenuStyle}">
      <StackLayout Style="{StaticResource ContentStyle}" 
        Orientation="Vertical" VerticalOptions="Start">
        <Image Source="chevronup.png" HeightRequest="40" 
          VerticalOptions="Start" HorizontalOptions="Start">
          <Image.GestureRecognizers>
            <TapGestureRecognizer Command="{Binding ToggleMenuCommand}"/>
          </Image.GestureRecognizers>
        </Image>
        <Label Text="Menu" Style="{StaticResource HeaderStyle}"
          VerticalOptions="Start"/>
        <Label Text="Here be menu content" 
         Style="{StaticResource MenuTextStyle}"></Label>
      </StackLayout>
    </ContentView>

    <!-- Leftover space -->
    <ContentView Grid.Row="1"  HorizontalOptions="Fill" VerticalOptions="Fill">
      <ContentView.GestureRecognizers>
        <TapGestureRecognizer Command="{Binding ToggleMenuCommand}"/>
      </ContentView.GestureRecognizers>
    </ContentView>
  </Grid>
</ContentView>

Note the binding of ViewIsInitialized to ViewIsInitialized for the initialization, and of IsVisible to IsMenuVisible for the actual execution of the animation. Also notice the FoldOutTime and FoldInTime – the menu will fold out in 400, and fold in in 300ms. These are optional values – if you don’t specify them, the behavior will use default values. Finally, note the fact that the menu actually covers the whole screen, but the lower part is empty. Yet, if you tap that part, the menu will move away as well, as you would expect in an app.

The AnimateSlideInBehavior is nearly the same but animates TranslateX – just have a look at the sample code, it’s yours for the taking

Some concluding remarks

Of course you can also code these animations into code behind or in a control’s code behind, but that way you will need to copy and paste code into your views time and time again, and potentially you will need to fix the same bugs on multiple places. What I usually do is indeed make a control, but use the behavior in that and then re-use the control over multiple pages. Using a behavior decouples the code from a specific control or page, and you can re-use the dynamic behavior everywhere.

One final bit – the Xamarin iOS linker is still sometimes ‘optimizing’ away code, just like .NET Native, something that already bit me last year. So in the Wortell.XamarinForms there is this extremely odd class Initializer:

namespace Wortell.XamarinForms
{
  public static class Initializer
  {
    public static void Init()
    {
    }
  }
}
that indeed does completely nothing, except for being called from the iOS project's AppDelegate
public override bool FinishedLaunching(UIApplication app, NSDictionary options)
{
    global::Xamarin.Forms.Forms.Init();
    global::Wortell.XamarinForms.Initializer.Init();
    LoadApplication(new App());

    return base.FinishedLaunching(app, options);
}
Which still does nothing, but  tricks the compiler into thinking the code is actually used (which is true) so the assembly actually gets packaged with the app.

I hope this blog will inspire you to try your hand at animations with Xamarin Forms as well. It’s actually pretty easy when you get the hang of it. And there is more to come on this blog.

Parts of this text appeared earlier on the Wortell company blog, in Dutch

30 March 2016

Xamarin Forms 2.1 upgrade–some surprises (and how to get around it)

Back in June I wrote about a proof-of-concept for view model driven animations using behaviors in Xamarin Forms. This concept made it into my employer’s standard Xamarin library (more about that soon) but after an upgrade I noticed the animation behaviors did not work anymore – at least on Android. I have no idea what happened along the way, but fact is that the the behavior no longer worked after upgrading to Xamarin Forms 2.1. A prolonged debugging session learned me the following:

  1. At the ViewAppearing stage user interface elements don’t have a size allocated yet – whereas they used to have that.
  2. A parent object - especially something a grid – does not does not necessarily has to have it’s size set yet (width and height are still –1)

I will write about this soon in more detail, but what needs to be done to get this working again is:

  1. We need to initialize the behavior on the page’s OnSizeAllocated, not the OnViewAppearing method
  2. We need to go up recursively until we find an element that does not have a size of –1 in stead of blindly taking the parent.

So, in StartPage.xaml.cs:

protected override void OnAppearing()
{
  Context.OnViewAppearing();
  base.OnAppearing();
}

protected override void OnSizeAllocated(double width, double height)
{
  Context.OnViewAppearing();
  base.OnSizeAllocated(width, height);
}

It is a bit of a kludge, but it will do for now. In FoldingPaneBehavior we will first need to add a method to recursively find a parent with a size:

protected VisualElement GetParentView()
{
  var parent = associatedObject as Element;
  VisualElement parentView = null;
  if (parent != null)
  {
    do
    {
      parent = parent.Parent;
      parentView = parent as VisualElement;
    } 
    while (parentView?.Width <= 0 && parent.Parent != null);
  }

  return parentView;
}
And the first line of the Init method neededs to be changed from
var p = associatedObject.ParentView;
to
var p = GetParentView();

And then the behavior will work again.

A second surprise when upgrading to Xamarin Forms 2.1 is that the declaration of Dependency properties using generics is deprecated. It will still work, but not for long. So in stead of

public static readonly BindableProperty IsPopupVisibleProperty =
       BindableProperty.Create<FoldingPaneBehavior, bool>(t => t.IsPopupVisible,
       default(bool), BindingMode.OneWay,
       propertyChanged: OnIsPopupVisibleChanged);
You will know have to use
public static readonly BindableProperty IsPopupVisibleProperty =
       BindableProperty.Create(nameof(IsPopupVisible), typeof(bool), 
       typeof(FoldingPaneBehavior),
       default(bool), BindingMode.OneWay,
       propertyChanged: OnIsPopupVisibleChanged);
And the callback loses its type safety because that becomes
private static void OnIsPopupVisibleChanged(BindableObject bindable, object oldValue, object newValue)
in stead of
private static void OnIsPopupVisibleChanged(BindableObject bindable, bool oldValue, object bool)

and thus you have to cast oldValue and newValue to bool. This makes the code inherently more brittle and harder to read, but I assume there is a good reason for this. I have updated the xadp snippet for creating these properties accordingly.

A typical case of moved cheese, but fortunately not too far. The updated demo solution is still on GitHub

20 February 2016

Fix for “could not connect to the debugger” while deploying Xamarin Forms apps to the Visual Studio Android Emulator

While I was busy developing a cross-platform application for Windows Phone, Android and iOS I wanted to test the Android implementation and ran into a snare – I could no longer debug on the emulator. This kept me puzzled for a while, and only with the combined help of my fellow MVPs Mayur Tendelkar and Tom Verhoeff, who both had pieces of the puzzle, I was able to finally get this working.

As you try to deploy an app to the Visual Studio Android emulator, symptoms are as follows:

  • The app is deployed
  • The app starts on the emulator
  • It immediately stops
  • You get one or more of the following messages in your output window:

AOT module 'mscorlib.dll.so' not found: dlopen failed: library "/data/app/<your app name>.Droid-1/lib/x86/libaot-mscorlib.dll.so" not found

Android application is debugging.
Could not connect to the debugger.

This actually even happens when you do File/New Project and run, which is very frustrating. Oddly enough, when you start the deployed app on the emulator by clicking on it, it runs fine. The issue is solely the debugger not being able to connect.

The first error – the missing libaot-mscorlib.dll.so, which is usually hidden in a plethora of messages - is easy to fix: disable Android fast deployment. Go to the properties of the Android project, hit tab “Android options”, and unselect “Use Fast Deployment”

image

That will usually take care of the libaot-mscorlib.dll.so issue. Not an obvious thing to do, but hey, that’s almost nothing in our field. But still my debugger would not connect. The solution to that takes the following steps, which are even less obvious:

  • Start the Hyper-V manager
  • Select the emulator you are trying to use
  • Right-click, hit settings

image

  • Click processor
  • Click Compatibility
  • Click checkbox “Migrate to a physical computer with a different processor version”

image

And of course, once you know that, you can find people have encountered this problem before, like here in the MSDN forums, on Stackoverflow or even here in comments on the release notes of the emulator. The fact that the solution is hard to find with only the error message made me decide to write a blog post about it anyway.

This issue only seems to be occurring on the newer generation of processors, which explains why I never saw it before – I ran this on a brand new Surface Pro 4, where I used to run the emulators on my big *ss desktop PC, whose i7 processor dates back to 2011. It’s one of ye good olden 970 3.20 Ghz monsters, from the time power efficiency was not quite very high on the Intel agenda yet ;) It’s the 1939 Buick Hot Rod of the i7’s, but as a bonus, I never have to turn on the heating in the study on cold winter days :)

By the way, if the android emulator seems to be stuck in  the “preparing” phase, you might want to check if you have internet connection sharing enabled – it does not seem to like that either.

Thanks Mayur and Tom, you have been a great help, as always.

16 October 2015

Borders on Xamarin Forms user interface elements

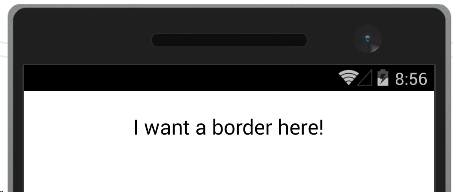
This is one of those blog posts, born out of utter frustration because looking for this yielded no usable results - while you would expect a lot of people would be wanting to do, as it's quite elementary IMHO. Maybe it's just my inexperience with Xamarin Forms, but for the life of me I could not find how to place borders around panel-like structures like a grid. Sure, there is Frame, but that places a meager 1 pixel hardly visible line around it.

Suppose I had this code

<?xml version="1.0" encoding="utf-8" ?>
<ContentPage xmlns="http://xamarin.com/schemas/2014/forms"
             xmlns:x="http://schemas.microsoft.com/winfx/2009/xaml"
             x:Class="XamBorders.MainPage" BackgroundColor="White">
  <ContentView Padding = "20" VerticalOptions="Start" >
    <Label Text="I want a border here!" 
           FontSize="20" TextColor="Black" 
           HorizontalOptions="Center"></Label>
  </ContentView>
</ContentPage>

Result in in the UI below (on the Visual Studio Android Emulator) image

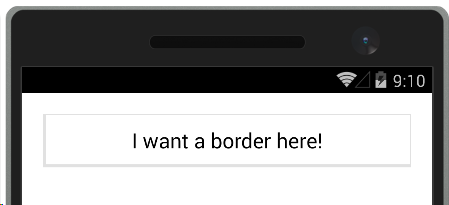
How on Earth do you get something like this?

image

Turns out you need a couple of ContentViews inside each other like a bunch of Matryoshka dolls - one with the border color as background color, and inside that a slightly smaller ContentView with the same background color as the page. Like this:

<?xml version="1.0" encoding="utf-8" ?>
<ContentPage xmlns="http://xamarin.com/schemas/2014/forms"
             xmlns:x="http://schemas.microsoft.com/winfx/2009/xaml"
             x:Class="XamBorders.MainPage" 
  BackgroundColor="{StaticResource BackgroundColor}">
  <ContentPage.Resources>
    <ResourceDictionary x:Name="AppDictionary">

      <Color x:Key="BackgroundColor">#FFFFFF</Color>
      <Color x:Key="BorderColor">#E1E1E1</Color>

      <Style x:Key="InternalViewStyle" TargetType="ContentView">
        <Setter Property="BackgroundColor" 
Value="{StaticResource BackgroundColor}"/> <Setter Property="VerticalOptions" Value="Fill"/> <Setter Property="Padding" Value="10,10,10,10"></Setter> </Style> <Style x:Key="BorderStyle" TargetType="ContentView"> <Setter Property="BackgroundColor" Value="{StaticResource BorderColor}"/> <Setter Property="Padding" Value="3,1,1,3"></Setter> </Style> </ResourceDictionary> </ContentPage.Resources> <ContentView Padding="20" VerticalOptions="Start" > <ContentView Style="{StaticResource BorderStyle}" > <ContentView Style="{StaticResource InternalViewStyle}"> <Label Text="I want a border here!" FontSize="20" TextColor="Black" HorizontalOptions="Center"></Label> </ContentView> </ContentView> </ContentView> </ContentPage>

So we have the internal view that has the same background color as the page, as well as a padding of 10 on every side to make the border not too tight around the text. Then the 'border contentview' around that has a padding 0 3,1,1,3 so that it's slightly larger bottom and right as to create some kind of shadow effect. If you don't want that, just make the padding equal. I defined the settings a styles as to make them easily reusable (they are in a app-wide resource dictionary in the app I am now developing).

Why it has to be this way - no idea, but I hope it will save some other Xamarin Forms newbie the frustration I experienced this afternoon. Maybe there are better alternatives - I really welcome comments. But this works

Sample project can be found here.

13 June 2015

View model driven animations using behaviors and MVVMLight in Xamarin Forms

Intro
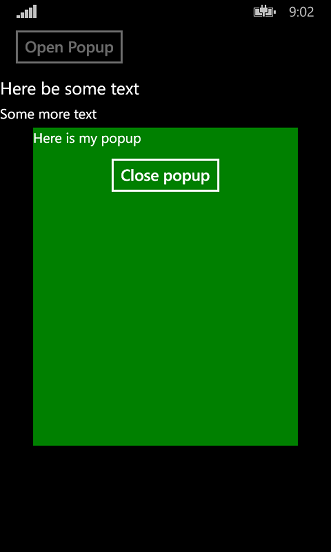
For some time now I have been making a number of behaviors implementing animations driven by view models for Windows and Windows Phone. Implementing animations in behaviors results into reusable animation building block without the need to copy and paste the functionality into code behind – or the need to remember how the internals exactly worked (you know they say a good programmer is a lazy programmer ;) ). I wanted to check if it would be possible to make animations for Xamarin Forms in a similar way, and it turns out to be possible. I have created a proof-of-concept that allows you to animate a kind of popup using a behavior, a view model and a little bit of code-behind plumbing. The popup folds open in a vertical direction from the center of the screen. It looks like this:

Setting the stage
I started out with a standard Xamarin Forms Portable project, and brought in my favorite MVVM framework MVVMLight. Then I added an empty StartPage.xaml to the portable project, and modified the constructor of the default App class to start with that page, in stead of with the default code:

public App()
{
  MainPage = new StartPage();
}

This is quite a standard way to set up a Xamarin Forms application using a XAML-based start page. I did not make it up myself ;) .

Passing startup events to the view model
A behavior in Xamarin.Forms has two events you can trap – OnAttachedTo and OnDetachingFrom – by basically overriding the methods with that name. But those are fired apparently before the visual element to which the behavior is attached to is loaded and made part of a layout: the attached object has no size, and no parent. To make matters more complicated, there is also no OnLoaded event on the attached object, like in WinRT XAML. So when do you know when the layout is ready?

It appears that on page level there is such an event: OnAppearing (and it’s counterpart OnDisppearing) which once again can be trapped by overriding those methods. What we need to do is pass the fact that these methods have been called to the view model. The more or less standard way to do that seems to be something like as follows. I first defined an interface:

namespace AnimationBehaviorDemo.ViewModels
{
  public interface IPageViewModelBase
  {
    void OnViewAppearing();
    void OnViewDisappearing();
  }
}

and then a base class implementing that interface. This is not strictly necessary, but I always feel compelled to make a base class for convenience, yet I don’t want to force myself or my fellow developers into always needing to use that base class. The interface allows me an escape route out of a possible undesirable inheritance kludge. I think that’s just good architecture.

using GalaSoft.MvvmLight;

namespace AnimationBehaviorDemo.ViewModels
{
  public class PageViewModelBase : 
     ViewModelBase, IPageViewModelBase
  {
    public virtual void OnViewAppearing()
    {
      ViewHasAppeared = true;
    }

    public virtual void OnViewDisappearing()
    {
      ViewHasAppeared = false;
    }

    private bool viewHasAppeared;
    public bool ViewHasAppeared
    {
      get { return viewHasAppeared; }
      set { Set(() => ViewHasAppeared, ref viewHasAppeared, value); }
    }
  }
}

And there we see the familiar MVVMLight syntax again. So great if you can use an awesome friend from the Windows ecosystem in a cross platform setting again (thanks Laurent!).

Anyway, now I can make a view model inheriting from PageViewModelBase (or at least implementing IPageViewModelBase), use it as binding context and pass the events to the view model using the code behind of the start page like this:

public partial class StartPage : ContentPage
{
  public StartPage()
  {
    InitializeComponent();
    BindingContext = new MyViewModel();
  }

  protected override void OnAppearing()
  {
    Context.OnViewAppearing();
    base.OnAppearing();
  }

  protected override void OnDisappearing()
  {
    Context.OnViewDisappearing();
    base.OnDisappearing();
  }

  private IPageViewModelBase Context
  {
    get { return (IPageViewModelBase)BindingContext; }
  }
}

In every page you make using this behavior then needs to have this kind of plumbing. Of course, you can define a nice base class for this as well, making the last three methods disappear again. Have a blast. I only have one page in this solution, so I leave it at this. The important thing is – we have now a way to pass the fact that the view is ready to the view model, a behavior can bind to this, and things can happen in the right order.

The view model
Using the PageViewModelBase as a starter, I add a simple command and a property for the behavior to bind to as well:

using System.Windows.Input;
using GalaSoft.MvvmLight.Command;

namespace AnimationBehaviorDemo.ViewModels
{
  public class AnimationViewModel : PageViewModelBase
  {
    public AnimationViewModel()
    {
      TogglePopup = new RelayCommand(DoTogglePopup);
    }
public ICommand TogglePopup { get; private set; } private void DoTogglePopup() { IsPopupVisible = !IsPopupVisible; } private bool isPopupVisible; public bool IsPopupVisible { get { return isPopupVisible; } set { Set(() => IsPopupVisible, ref isPopupVisible, value); } } } }

Nothing special here – standard MVVMLight view model and syntax.

The animation behavior
I will be going through this step by step, to hopefully convey what I am doing here. The basics are the two methods I already have mentioned by name: OnAttachedTo and OnDetachingFrom
using System;
using Xamarin.Forms;

namespace AnimationBehaviorDemo.Behaviors
{
  public class FoldingPaneBehavior: Behavior<View>
  {
    private View associatedObject;

    private double desiredHeight;

    protected override void OnAttachedTo(View bindable)
    {
      base.OnAttachedTo(bindable);
      associatedObject = bindable;
      bindable.BindingContextChanged += (sender, e) =>
          BindingContext = associatedObject.BindingContext;
    }

    protected override void OnDetachingFrom(View bindable)
    {
      associatedObject = null;
      base.OnDetachingFrom(bindable);
    }
  }   
}    

This basically sets up the behavior, keeping a reference to the object it’s bound to. In the OnAttachedTo there is an odd piece of code. Basically, if you don’t use this, binding to the Bindable Properties that I will show later on will not work. I have no idea why this is. It took me quite some nosing around in the Xamarin forums and eventually I found this solution here in this thread. I am not sure if this is a recommendable way. But it seems to work.

Then we get to Bindable Properties, and I think of those as the Attached Dependency Properties of WinRT XAML (in fact, they have been in XAML since WPF). In fact, we need two: one to get notified of the view having appeared, and one for the popup needing to displayed (and hidden again). For the sake of brevity, I show only the property for the popup toggle:

#region IsPopupVisible Attached Dependency Property
public static readonly BindableProperty IsPopupVisibleProperty =
   BindableProperty.Create<SlidingPaneBehavior, bool>(t => t.IsPopupVisible,
   default(bool), BindingMode.OneWay,
   propertyChanged: OnIsPopupVisibleChanged);

public bool IsPopupVisible
{
  get
  {
    return (bool)GetValue(IsPopupVisibleProperty);
  }
  set
  {
    SetValue(IsPopupVisibleProperty, value);
  }
}

private static void OnIsPopupVisibleChanged(BindableObject bindable, 
                                            bool oldValue, bool newValue)
{
  var thisObj = bindable as SlidingPaneBehavior;
  if (thisObj != null)
  {
    thisObj.AnimatePopup(newValue);
  }
}
#endregion

Like Attached Dependecy Properties in Windows this is quite some code, a lot hinges on connecting the dots in the right way, and a part of it depends on naming conventions. To make life easier, I made a Visual Studio snippet for that. The whole purpose of this construct is to make sure the AnimatePopup method gets called with the right parameter whenever the bound property changes.

But first – initialization
The first Bindable Property – that I did not even show – is called OnViewHasAppeared, is bound to the OnViewHasAppeared of the view model, and fires a method that is (very originally) called Init:

private double unfoldingHeight;
private const double HeightFraction = 0.6;
private const double WidthFraction = 0.8;

private void Init()
{
  var p = associatedObject.ParentView;
  unfoldingHeight = Math.Round(p.Height * HeightFraction, 2);
  associatedObject.WidthRequest = Math.Round(p.Width * WidthFraction , 2);
  associatedObject.HeightRequest = 0;
  associatedObject.IsVisible = false;
}

This sets the width of the popup to 0.8 times that of the parent view, it’s height to 0 and it’s visibility to false, effectively creating an invisible pane. It also calculates the height to which the panel should be unfolded, that is, when it is unfolded – 0.6 times the height of the parent. Mind you, these values are now constants, but could just as well be properties as well, with values you could set from XAML - thus creating a more customizable experience.

The actual animation is done by these two methods and some more constants:

private const int FoldOutTime = 750;
private const int FoldInTime = 500;

private void AnimatePopup(bool show)
{
  if (show)
  {
    associatedObject.IsVisible = true;
    Animate(0, unfoldingHeight, FoldOutTime);
  }
  else
  {
    Animate(unfoldingHeight, 0, FoldInTime);
  }
}

private void Animate(double start, double end, uint runningTime)
{
  var animation = new Animation(
    d => associatedObject.HeightRequest = d, start, end, Easing.SpringOut);

  animation.Commit(associatedObject, "Unfold", length: runningTime, 
    finished: (d, b) =>
  {
    if (associatedObject.Height.Equals(0))
    {
      associatedObject.IsVisible = false;
    }
  });
}

If the popup should be displayed (triggered by the change on the IsPopupDisplayed property) it first sets the popup’s visibility to true (although it’s still effectively invisible, as it has zero height) and then it launches an animation that goes from 0 to the unfoldingHeight in about 750ms. The Animate method then creates the actual animation, that animates the HeightRequest using and easing method (also a familiar friend from our good old Storyboards). By calling the Commit on it, you actually launch the animation, and you can apparently also make some kind of callback running when the animation is finished – in this case, when it determines the height is 0 (thus the popup has been folding in) – it should make it invisible again. Take note that the folding back goes a bit faster than the unfolding – 500ms in stead of 750ms. They could be the same, of course. It’s just a nice touch.

Putting it all together
In Xamarin Forms XAML, it then looks like this:

<Grid>

  <StackLayout HorizontalOptions="StartAndExpand" VerticalOptions="StartAndExpand">
    <Button Text="Open Popup" HorizontalOptions="Center" VerticalOptions="Start"
        IsEnabled="{Binding IsPopupVisible, Converter={StaticResource InverseBooleanConverter}}"
        Command="{Binding TogglePopup}"></Button>
    <Label Text="Here be some text" FontSize="25"></Label>
    <Label Text="Some more text" FontSize="20"></Label>
  </StackLayout>

  <ContentView BackgroundColor="Green" 
               HorizontalOptions="CenterAndExpand" 
               VerticalOptions="CenterAndExpand" >
    <ContentView.Behaviors >
      <behaviors:FoldingPaneBehavior 
        ViewHasAppeared ="{Binding ViewHasAppeared}" 
        IsPopupVisible="{Binding IsPopupVisible}"/>
    </ContentView.Behaviors>
    <StackLayout>
      <Label Text="Here is my popup" FontSize="20"></Label>
      <Button Text="Close popup" HorizontalOptions="Center"
     IsEnabled="{Binding IsPopupVisible}"
     Command="{Binding TogglePopup}"></Button>
    </StackLayout>
  </ContentView>
  
</Grid

imageimage

First you have the StackLayout containing the initial user interface, then the ContentView that contains the ugly green popup and the behavior. Notice the button on the initial UI gets disabled by binding to IsPopupVisible too, using a bog standard InverseBooleanConverter that I took from here. I think it’s actually the same as the WinRT value converter but I was too lazy to check ;)

Caveat emptor
Warning – you mileage may vary with this approach. I am not very versed in Xamarin Forms yet and I have no idea what amount of rules I am now violating. I find the hack in OnAttachedTo a bit worrisome, and I wonder if is has side effects. In addition, Xamarin Forms is a very rapidly evolving platform so anything I write today may be obsolete tomorrow. Also, this behavior does not yet take into account any changes in screen size (or rotation) that may occur after the behavior is initialized. I don’t doubt though this could be added.

Conclusion
With this article I hope I have given you some thought about how to write reusable x-plat animation blocks that can be wired together using behaviors. I still think it’s very important to keep such stuff from code behind as much as possible (although never loosing track of practicality – if some effect can be created using two lines of code behind, it’s not very smart to write a bazillion lines of code just to avoid that). What is sorely missed in this environment is my old friend Blend, which in a Windows environment can be used to drag behaviors on top of elements and wire some properties together in a simple UI. In Xamarin, it’s hand coding XAML all the way. Still, it’s an improvement over putting all this stuff in code behind.

As usual, a sample solution can be found on GitHub. This includes the snippet for creating Bindable Properties.

Credits and thanks
I want to thank two of my fellow developers colleagues at Wortell for being an inspiration to this blog post: Bruce Wilkins for showing me the two events that occur when a Xamarin Forms page loads and unloads, and Edwin van Manen for showing me the Xamarin Forms animation basics. They made me understand some parts that I needed to connect the dots and make this technique work.

08 February 2015

Using a full-size none-stretched background image in a Xamarin.Forms app

Intro

I always like to use a kind of a translucent background image to my app’s screens, that makes it look a bit more professional than just a plain single-colored screen – a trick I learned from my fellow MVP Mark Monster in the very early days of Windows Phone development. Now that I am trying to learn some Xamarin development, I want to do the same thing – but it turns out that works a bit different from what I am used to.

Setting up the basic application

I created a Xamarin Forms portable app “BackGroundImageDemo”, but when you create a new Xamarin Forms application using the newest templates in Xamarin 3.9, you get an application that uses forms, but no XAML. Having lived and dreamed XAML for the last 5 years I don’t quite like that, so start out with making the following changes:

1. Update all NuGet packages - this will get you (at the time of this writing) the 1.3.2 forms packages

2. Add StartPage.Xaml to BackGroundImageDemo (Portable)

<?xml version="1.0" encoding="utf-8" ?>
<ContentPage xmlns="http://xamarin.com/schemas/2014/forms"
             xmlns:x="http://schemas.microsoft.com/winfx/2009/xaml"
             x:Class="BackGroundImageDemo.StartPage">
	<Label Text="Hello world from XAML" VerticalOptions="Center" 
         HorizontalOptions="Center" FontSize="30" />
</ContentPage>

3. Make some changes to the App.cs in BackGroundImageDemo (Portable) to make it use the XAML page:

namespace BackGroundImageDemo
{
  public class App : Application
  {
    public App()
    {
      // The root page of your application
      MainPage = new StartPage();
    }
    
    // stuff omitted
  }
}

And when you run that, for instance on Windows Phone, it looks like this:

image

JupiterAdding a background picture

Now suppose I want to make an app related to astronomy – then I might use this beautiful picture of Jupiter, that I nicked off Wikipedia, as a background image:

It has a nice transparent background, so that will do. And guess what, the ContentPage class has a nice BackgroundImage attribute, so we are nearly done, right?

As per instructions found on the Xamarin developer pages, images will need to be:

  • For Windows Phone, in the root
  • For Android, in the Resources/drawable folder
  • For iOS, in Resources folder

In addition, you must set the right build properties for this image:imageimage

  • For Windows Phone, set “Build Action” to “Content” (this is default) and “Copy to Output Directory” to “Copy if newer”
  • For Android, this is “AndroidResource” and “Do not copy”
  • For iOS, this is “BundleResource” and “Do not copy”

So I copy Jupiter.png three times in all folders (yeah I know, there are smarter ways to do that, that’s not the point here) add BackgroundImage=’'Jupiter.png” to the ContentPage tag and… the result, as we can see on the to the right, is not quite what we hoped for. On Android, Jupiter is looking like a giant Easter egg. Windows Phone gives the same display. On the Cupertino side, we get a different but equally undesirable effect.

RelativeLayout to the rescue

Using RelativeLayout and constraint expressions, we can more or less achieve the same result as Windows XAML’s “Uniform”.

<?xml version="1.0" encoding="utf-8" ?>
<ContentPage xmlns="http://xamarin.com/schemas/2014/forms"
             xmlns:x="http://schemas.microsoft.com/winfx/2009/xaml"
             x:Class="BackGroundImageDemo.StartPage" >
  <RelativeLayout>
    <Image Source="Jupiter.png" Opacity="0.3"
                RelativeLayout.WidthConstraint=
                  "{ConstraintExpression Type=RelativeToParent, Property=Width}"
                RelativeLayout.HeightConstraint=
                  "{ConstraintExpression Type=RelativeToParent, Property=Height}"/>
    <Grid RelativeLayout.WidthConstraint=
              "{ConstraintExpression Type=RelativeToParent, Property=Width}"
            RelativeLayout.HeightConstraint=
              "{ConstraintExpression Type=RelativeToParent, Property=Height}">

      <Label Text="Hello world from XAML" VerticalOptions="Center"
         HorizontalOptions="Center" FontSize="30"/>
    </Grid>
  </RelativeLayout>
</ContentPage>

All elements within a RelativeLayout will essentially be drawn on top of each other, unless you specify a BoundsConstraint. I don’t do that here, so essentially every object will drawn from 0,0. By setting width and height of the RelativeLayout’s children to essentially the width and height of the RelativeLayout itself, is will automatically stretch to fill the screen. And thus the image ends up in the middle, as does the Grid with the actual UI in it. Just make sure you put the image Image first and the Grid second, or else the image will appear over your text.

I also added Opacity = “0.3” to make the image translucent and not so bright that it actually wipes out your UI. The exactly value of the opacity is a matter of taste and you will need to determine how it affects the readability of the actual UI on a real device. Also, you might consider editing the image in Paint.Net or the like and set its to 0.3 opacity hard coded in the image, I guess that would save the device some work.

Anyway, net result:

imageimageimage

Demo solution, as always, can be downloaded here.