Showing posts with label Universal Apps. Show all posts

25 January 2015

Keeping popups above the bottom app bar in Windows 8.1 store apps

Recently, I wrote about the KeepFromBottomBehavior that helped me to deal with popups that appeared on the bottom of the screen, but were covered by the app bar when using the full screen by applying ApplicationViewBoundsMode.UseCoreWindow. When I started porting parts of Travalyzer to Windows 8.1 as a companion app, I kind of ran into the same problem: popup appearing ‘under’ the bottom app bar.

image

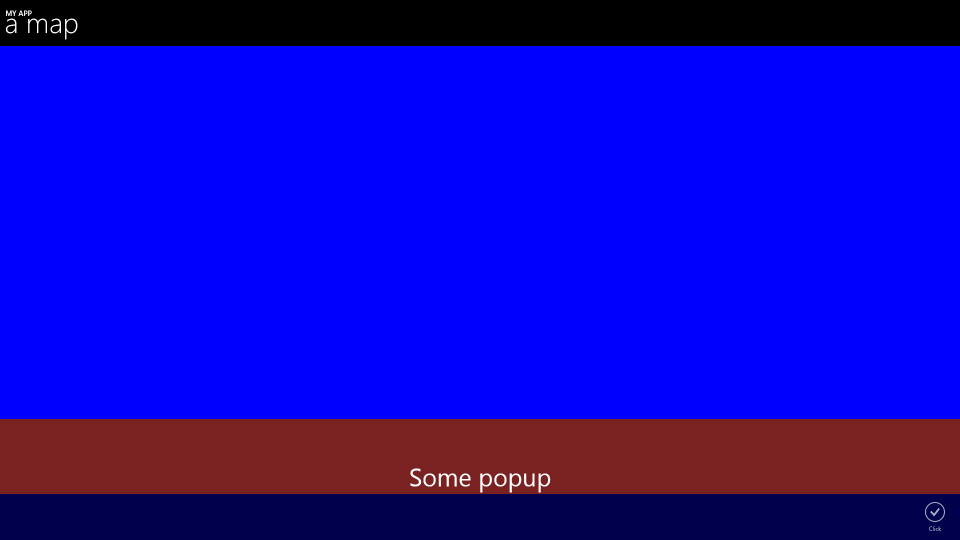
(This time I replaced the map by a simple blue area, to prevent you from needing to install the Bing Maps SDK to run the sample).

So I kind-of ported my KeepFromBottomBehavior to Windows 8.1, and got the following result.image

Which is exactly what I wanted. If the App bar is open, the popup up appears above the App bar, if it is closed, it appears on the very bottom of the screen:

image

The code is actually a lot simpler than the KeepFromBottomBehavior for Windows Phone 8.1,

using System.Threading.Tasks;
using Windows.UI.Xaml;
using Windows.UI.Xaml.Controls;

namespace WpWinNl.Behaviors
{
  public class KeepFromBottomBehavior : SafeBehavior<FrameworkElement>
  {
    private double originalBottomMargin;
    private AppBar bottomAppBar;
    protected override void OnSetup()
    {
      var page = AssociatedObject.GetVisualAncestors().OfType<Page>().First();
      bottomAppBar = page.BottomAppBar;
      bottomAppBar.Opened += BottomAppBarManipulated;
      bottomAppBar.Closed += BottomAppBarManipulated;
      originalBottomMargin = AssociatedObject.Margin.Bottom;
      UpdateBottomMargin();
      base.OnSetup();
    }

    void BottomAppBarManipulated(object sender, object e)
    {
      UpdateBottomMargin();
    }

    protected override void OnCleanup()
    {
      bottomAppBar.Opened -= BottomAppBarManipulated;
      bottomAppBar.Closed -= BottomAppBarManipulated;
      base.OnCleanup();
    }

    private async void UpdateBottomMargin()
    {
      await Task.Delay(1);
      var currentMargins = AssociatedObject.Margin;

      var newMargin = new Thickness(currentMargins.Left, 
currentMargins.Top, currentMargins.Right, originalBottomMargin + (bottomAppBar.IsOpen ?
bottomAppBar.ActualHeight : 0)); AssociatedObject.Margin = newMargin; } public double WindowHeight { get; set; } } }

Here we see this behavior works very different from it’s Windows Phone counterpart. It finds the Page this behavior is on - using the GetVisualAncestors extension methods from WpWinNl - and attaches itself to the bottom AppBar’s Opened and Closed events. When these events are fired, the bottom margin of the whole panel this behavior is attached to is increased with the actual height of the bottom AppBar. Easy as cake. The only weird thing is the Task.Delay(1). I found out that if you omit that, the behavior’s actions will flip-flop, that is, it won’t move the panel when you open the AppBar, but it will move it up when you close it. I think this has something to do with the calculation of the ActualHeight not being done yet. By using Task.Delay, with however small the value, the whole event is asynchronous and thus the calculation is not being blocked by whatever it was being blocked ;)

The WindowHeight is no longer a dependency property and is in fact no longer used, it’s just kept here to keep the behavior’s signature identical to it’s Windows Phone counterpart. In the sample solution you will see this behavior works stand-alone, it does not need SizeListenerBehavior as a companion to bind to.

The sample solution is essentially the same as in the previous article, but contains both code for Windows and Windows Phone now.

22 December 2014

A behavior to show a MessageDialog from a MVVMLight viewmodel in Universal apps–with callbacks

Of course you are now all writing MVVM based apps, after all I have been advocating that for years, and you are listening this here old venerable MVP, right? ;). Anyway, some UI interactions between UI and viewmodel can seem to be a bit complicated, but these kinds of problems are usually pretty simple to solve with a combination of a behavior, the MVVMLight messenger, and a message containing a callback. And as I hate to write things more than once, I  made this into a reusable behavior. It ain’t rocket science, but it’s nice and clean.

I start with a class holding the actual message, and in this class file I have defined a callback delegate as well:

using System.Threading.Tasks;
using GalaSoft.MvvmLight.Messaging;

namespace WpWinNl.Behaviors
{
  public class MessageDialogMessage : MessageBase
  {
    public MessageDialogMessage(string message, string title,
                                string okText, string cancelText,
                                MessageDialogCallBack okCallback = null,
                                MessageDialogCallBack cancelCallback = null,
                                object sender = null, object target = null)
                                : base(sender, target)
    {
      Message = message;
      Title = title;
      OkText = okText;
      CancelText = cancelText;
      OkCallback = okCallback;
      CancelCallback = cancelCallback;
    }

    public MessageDialogCallBack OkCallback { get; private set; }
    public MessageDialogCallBack CancelCallback { get; private set; }
    public string Title { get; private set; }
    public string Message { get; private set; }
    public string OkText { get; private set; }
    public string CancelText { get; private set; }
  }

  public delegate Task MessageDialogCallBack();
}

It’s a basic MVVMLight BaseMessage child class, with properties for various texts, and two optional callbacks for OK and cancel actions.

The behavior itself is, as behaviors go, pretty simple:

using System;
using System.Diagnostics;
using Windows.UI.Popups;
using Windows.UI.Xaml;
using GalaSoft.MvvmLight.Messaging;

namespace WpWinNl.Behaviors
{
  public class MessageDialogBehavior : SafeBehavior<FrameworkElement>
  {
    protected override void OnSetup()
    {
      Messenger.Default.Register<MessageDialogMessage>(this, ProcessMessage);
      base.OnSetup();
    }

    private async void ProcessMessage(MessageDialogMessage m)
    {
      bool result = false;
      var dialog = new MessageDialog(m.Message, m.Title);

      if (!string.IsNullOrWhiteSpace(m.OkText))
      {
        dialog.Commands.Add(new UICommand(m.OkText, cmd => result = true));
      }

      if (!string.IsNullOrWhiteSpace(m.CancelText))
      {
        dialog.Commands.Add(new UICommand(m.CancelText, cmd => result = false));
      }

      try
      {
        await dialog.ShowAsync();
        if (result && m.OkCallback != null)
        {
          await m.OkCallback();
        }

        if (!result && m.CancelCallback != null)
        {
          await m.CancelCallback();
        }
      }
      catch (Exception ex)
      {
        Debug.WriteLine("double call - ain't going to work");
      }
    }
  }
}

This being once again a SafeBehavior, it simply starts to listen to MessageDialogMessage messages. When one is received, a MessageDialog is constructed with the message and title to display, as well as an optional Ok and Cancelbutton – and callback. If you send a message, you can provide optionally provide simple method from your viewmodel to be called by the behavior when Ok or Cancel is called, thus providing a two-way communication channel. Mind, though, all this is async, which has a curious side effect: if you send another message before the user has clicked Ok or Cancel, this will raise an exception.This will be displayed in the Visual Studio output window while you debug, but it won’t show up in release, and your message won’t be displayed either – so you need to carefully control sending messages, and not throw them out like there’s no tomorrow.

I have made a little sample app – a Universal app of course, because there have been some pretty clear hints by Microsoft this is the way to go forward. You will notice everything worthwhile is the shared project, up to the MainPage.xaml. People who were present at the latest Lowlands WpDev day last October will remember my fellow MVP Nico Vermeir saying in his talk “don’t do that, there’s pain in there”, and while this is true, it’s an ideal thing for lazy demo writers.

I started out with a blank Universal app, and moved the MainPage.Xaml and it’s companion MainPage.Xaml.cs to the shared project. Then I brought in my WpWinNl project that, amongst other things, drags in MVVMLight and everything else you need. Then I created this whopping complex viewmodel:

using System.Threading.Tasks;
using System.Windows.Input;
using GalaSoft.MvvmLight;
using GalaSoft.MvvmLight.Command;
using GalaSoft.MvvmLight.Messaging;
using WpWinNl.Behaviors;

namespace SampleMessagePopup
{
  public class MainViewModel : ViewModelBase
  {
    public ICommand MessageCommand
    {
      get
      {
        return new RelayCommand(
          () => 
            Messenger.Default.Send(new MessageDialogMessage(
              "Do you really want to do this?", "My Title", 
              "Hell yeah!", "No way", 
              HellYeah, Nope)));
      }
    }

    private async Task HellYeah()
    {
      Result = "Hell yeah!";
    }

    private async Task Nope()
    {
      Result = "NOOOO!";
    }


    private string result = "what?";
    public string Result
    {
      get { return result; }
      set { Set(() => Result, ref result, value); }
    }
  }
}

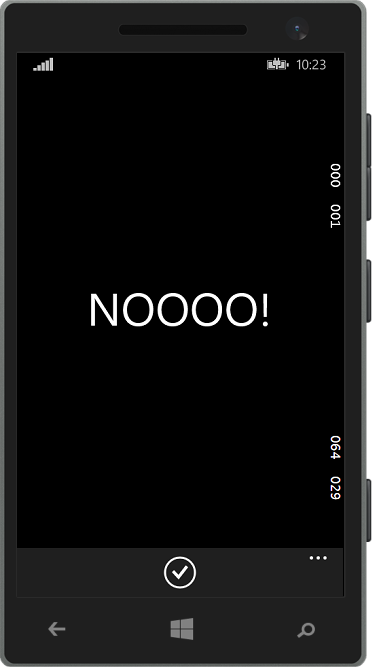
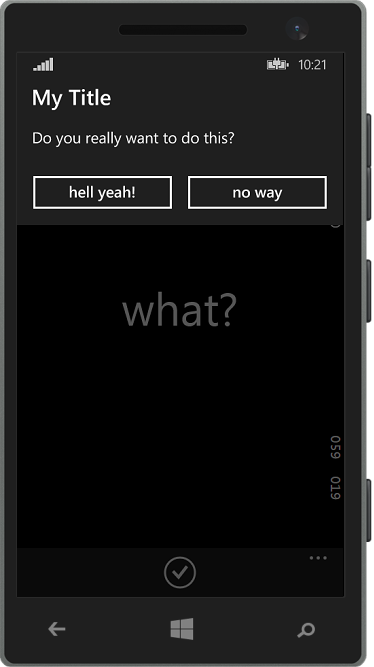
imageimageIf you fire the command, it will show a dialog that looks like the left on these two screens (on Windows Phone) and if you press the “no way” button it will show the very right screen. A few things are noticeable:

  • Both methods are async, although they don’t implement anything asynchronous. That’s because I wanted to be able do awaitable things in the callback and a contract is a contract – were not making JavaScript here. Only tools like ReSharper (highly recommended) will make you notice it, but you can ignore it for now.
  • You might notice the callback methods are private but still the behavior is apparently able to call these methods. This, my dear friends who grew up in the nice era of managed OO languages that shield you from the things that move below you in the dark dungeons of your processor, is because you basically give a pointer to a method – and that’s accessible anywhere. Your compiler may tell you it’s a private method, but that’s more like it has a secret telephone number – if you got that, you can access it anywhere ;-). Us oldies who grew up with C or Assembler can tell you all about the times when boats were made of wood and men were made of steel and the great ways you can shoot yourself in the foot with this kind of things. If you want to make you app testable it makes more sense to make the methods public, by the way, but I could not let the opportunity to show this great example of the law of leaky abstractions pass.

But I digress, I know, that is also a sign of age ;)

The Xaml is of course also pretty simple – as this app does not do much:

<Page
    xmlns="http://schemas.microsoft.com/winfx/2006/xaml/presentation"
    xmlns:x="http://schemas.microsoft.com/winfx/2006/xaml"
    xmlns:Interactivity="using:Microsoft.Xaml.Interactivity" 
    xmlns:Behaviors="using:WpWinNl.Behaviors"
    x:Class="SampleMessagePopup.MainPage"
    DataContext="{StaticResource MainViewModel}">
  <Interactivity:Interaction.Behaviors>
    <Behaviors:MessageDialogBehavior/>
  </Interactivity:Interaction.Behaviors>
  <Page.BottomAppBar>
    <CommandBar>
      <AppBarButton Icon="Accept" Label="go ask!" 
                    Command="{Binding MessageCommand}"/>
    </CommandBar>
  </Page.BottomAppBar>

  <Grid Background="{ThemeResource ApplicationPageBackgroundThemeBrush}" >
  	<TextBlock Text="{Binding Result}" HorizontalAlignment="Center" 
                   VerticalAlignment="Center" FontSize="56"/>
  </Grid>
</Page>

Notice the behavior sitting on the page itself. For obvious reasons, it’s the logical place to put. You can also put it on the top grid. But whatever you do, use only one per page. They all listen to the same message, and if you put more of them on one page you will get an interesting situation where multiple behaviors will try to show the same MessageDialog. I have not tried this, but I assume it won’t be very useful.

To make this work, by the way, you need of course to declare your viewmodel in App.Xaml. You have no other choice here, as the App Bar sits at the top level of the page, the button calls the command and thus the resource must be one level higher, i.e. the app itself.

<Application
    x:Class="SampleMessagePopup.App"
    xmlns="http://schemas.microsoft.com/winfx/2006/xaml/presentation"
    xmlns:x="http://schemas.microsoft.com/winfx/2006/xaml"
    xmlns:local="using:SampleMessagePopup"
    xmlns:system="using:System">

  <Application.Resources>
    <local:MainViewModel x:Key="MainViewModel" />
  </Application.Resources>
</Application>

Again, if you use something like ReSharper a simple click on the declaration in MainPage.Xaml will make this happen.

So, that’s all there is to it. You won’t find the code for this behavior in the solution, as it is already in WpWinNl. Just like the previous one ;). As usual, a sample solution is provided, but in inspired by my fellow MVP Diederik Krols I’ve have decided that going forward I will publish those on GitHub.

13 December 2014

A behavior to deal with UI consequences of full screen and Software Keys in Windows Phone 8.1

This week I was presented with an interesting challenge. Using this technique, I used the whole screen for my app. The problem was I had not anticipated a Denim feature for the so called software buttons. For those unfamiliar with that – on the newest low and mid-tier phones the back, start and search buttons are not necessarily hardware buttons anymore, but can be a dedicated piece of screen that shows buttons. This enables hardware manufacturers to make phones for all platforms in one (hardware) package. Now the Denim firmware – that comes with the Lumia 73x and 83x - enables users to make those software buttons disappear – so the extra piece of screen can be used by the app itself. Pretty awesome. This can be done by using pressing a little arrow that appears on the left of the button bar:image


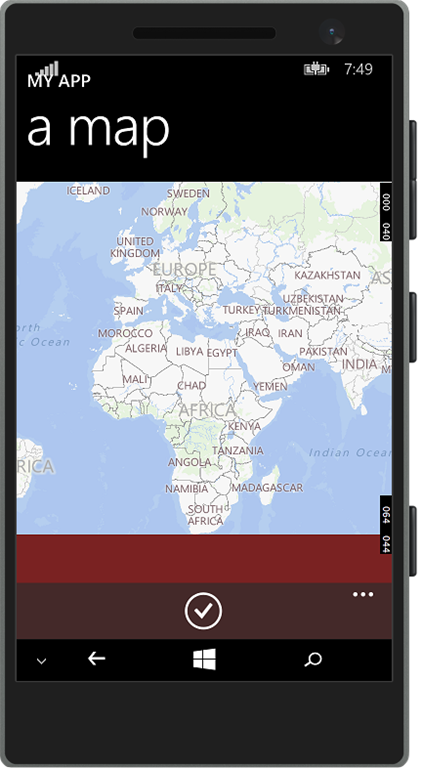
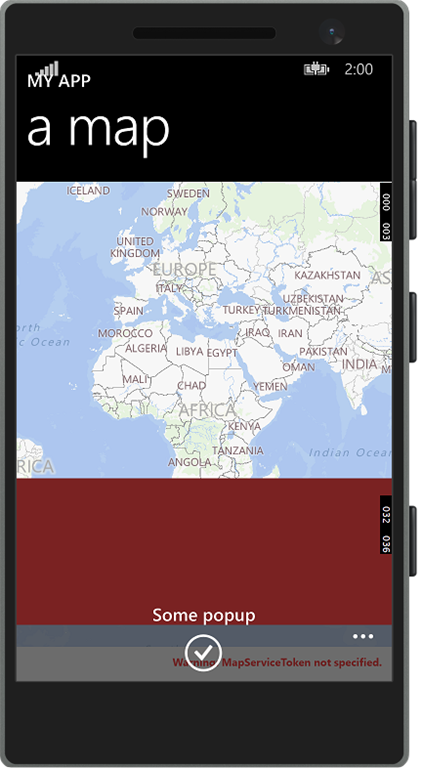
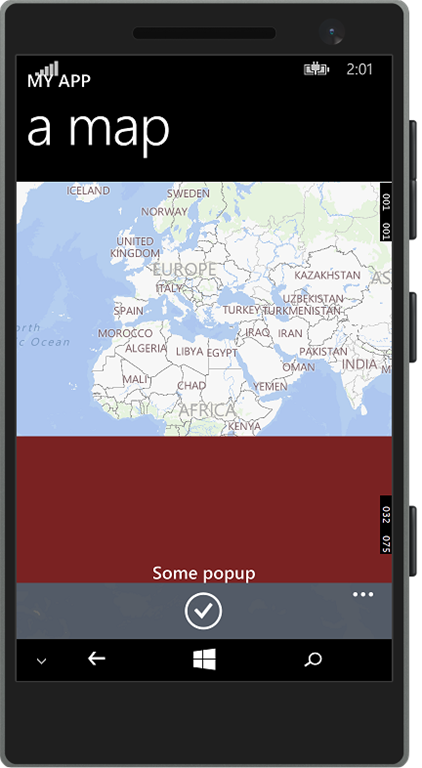
It can be brought up again by swiping in from the bottom of the imagescreen. Pretty cool, but with a side effect I had not anticipated. If the application view bound mode is set to ApplicationViewBoundsMode.UseCoreWindow in App.Xaml.cs the phone reports the whole screen size – not only the part that is normally taken by the status bar on top and the application bar at the bottom, but also the part that is used by the button bar. The My SensorCore app Travalyzer employs slide-in ‘windows’ that slide in from the side and stick to the bottom. I just took an offset the size of the application bar, and I was done, right? Yeah. Until my app got deployed to Denim phones. When the button bar is hidden, there is no problem as you can see to the right. But when it is not hidden… image

I believe the correct word in this circumstance is something like “blimey”, or maybe “crikey”, depending on what kind part of the globe you come from.

The solution is – you guessed it – a behavior. Or actually, two. But one is an oldie. Never one for original names, I have called it KeepFromBottomBehavior.

The code is actually surprisingly simple:
using Windows.UI.ViewManagement;
using Windows.UI.Xaml;

namespace WpWinNl.Behaviors
{
  public class KeepFromBottomBehavior : SafeBehavior<FrameworkElement>
  {
    private double originalBottomMargin;
    protected override void OnSetup()
    {
      originalBottomMargin = AssociatedObject.Margin.Bottom;
      UpdateBottomMargin();
      ApplicationView.GetForCurrentView().VisibleBoundsChanged += 
        KeepInViewBehaviorVisibleBoundsChanged;

      base.OnSetup();
    }

    void KeepInViewBehaviorVisibleBoundsChanged(ApplicationView sender, object args)
    {
      UpdateBottomMargin();
    }

    private void UpdateBottomMargin()
    {
      if (WindowHeight > 0.01)
      {
        var currentMargins = AssociatedObject.Margin;

        var newMargin = new Thickness(
          currentMargins.Left, currentMargins.Top, currentMargins.Right,
          originalBottomMargin + 
            (WindowHeight - ApplicationView.GetForCurrentView().VisibleBounds.Bottom));
        AssociatedObject.Margin = newMargin;
      }
    }

    #region WindowHeight
  }
}

Like all my behaviors, it’s a SafeBehavior so you have a nice and easy base class. It first saves the current Bottom margin, and then calls the “UpdateBottomMargin” method. That method assumes “WindowHeight” contains the actual (full) height of the space available to the app. It subtracts that from that height the bottom of the rectangle depicting the visible bounds, that is – the part that is, according to the phone, not obscured by an App Bar. That it adds to the original bottom margin (in my app that is zero – I want the window to stick to the very bottom). Net effect: the object to which this behavior is attached always moves upward and downward if the user opens or closes the ‘software button bar’, and if he rotates the phone, it takes that into account as well.

Now WindowHeight is a region (yeah flame me, I use that for Dependency properties) containing a  Dependency property that calls UpdateBottomMargin as well if the WindowHeight changes.

public const string WindowHeightPropertyName = "WindowHeight";

public double WindowHeight
{
  get { return (double)GetValue(WindowHeightProperty); }
  set { SetValue(WindowHeightProperty, value); }
}

public static readonly DependencyProperty WindowHeightProperty = DependencyProperty.Register(
    WindowHeightPropertyName,
    typeof(double),
    typeof(KeepFromBottomBehavior),
    new PropertyMetadata(default(double), WindowHeightChanged));
 
public static void WindowHeightChanged(DependencyObject d, DependencyPropertyChangedEventArgs e)
{
  var thisobj = d as KeepFromBottomBehavior;
  var newValue = (double)e.NewValue;
  if (thisobj != null)
  {
    thisobj.UpdateBottomMargin();
  }
}

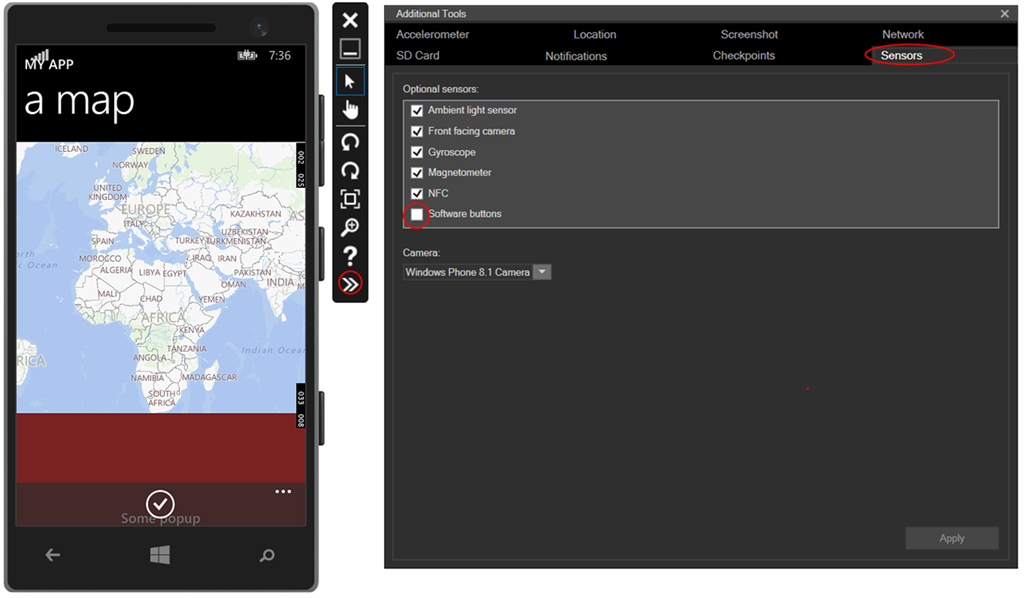
But how does this property get it’s value? Enter our old friend SizeListenerBehavior. How this all works, will be demonstrated using a simple app. First,we need to have an emulator capable of displaying software keys. The 8.1 U1 WXGA 4.5 inch fits the bill.To enable soft keys display, you will need to open the additional tools, and under sensor you will find the “Software buttons” checkbox. The emulator will reboot, and then show a screen with software keysimageimageEven with just hardware keys most of the ‘popup’ already disappears behind the app bar, but if you hide the software keys, then swipe them up again, it indeed looks pretty bad – the text “Some popup” has disappeared behind the software buttons bar, and most of the controls that could be there are hardly readable, let alone usable to the user.

The XAML for this page is not quite the most complex in the world.
<Page [name space stuff omitted]
    >
  <Page.BottomAppBar>
    <CommandBar Opacity="0.7">
      <AppBarButton Icon="Accept" Label="Click"/>
    </CommandBar>
  </Page.BottomAppBar>

  <Grid>
    <Grid.RowDefinitions>
      <RowDefinition Height="Auto"/>
      <RowDefinition Height="*"/>
    </Grid.RowDefinitions>

    <!-- Title Panel -->
    <StackPanel Grid.Row="0" Margin="12,0,0,0">
      <TextBlock  Text="MY APP" Style="{ThemeResource TitleTextBlockStyle}" 
                  Margin="0,12,0,0" />
      <TextBlock Text="a map" Margin="0,-6.5,0,26.5" 
                 Style="{ThemeResource HeaderTextBlockStyle}" 
                 CharacterSpacing="{ThemeResource PivotHeaderItemCharacterSpacing}" 
                 VerticalAlignment="Top"/>
    </StackPanel>

    <Maps:MapControl Grid.Row="1"/>
    <Grid Height="150" Grid.Row="1" VerticalAlignment="Bottom" 
      Background="#FF7A2222" >
      <TextBlock Text="Some popup"  
                 Style="{ThemeResource TitleTextBlockStyle}" 
                 VerticalAlignment="Bottom" HorizontalAlignment="Center" />
    </Grid>
  </Grid>
</Page>

Now to solve the problem, follow just these easy steps:

  1. Pull in the newest version of WpWinNl from NuGet. Make sure you have set the NuGet package manager settings to “including prerelease’. You will need to have the 2.1.2 alpha version or higher. Don’t worry about that alpha – I am already using this in my apps, I just haven’t got around to making this a final version.
  2. Compile the application
  3. Open the Windows Phone project in Blend
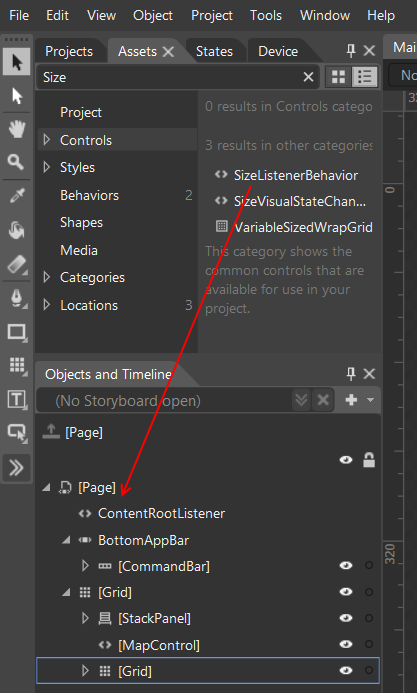
  4. Find the SizeListenerBehavior in “Assets” , drag it on top of the Page Element, rename it to ContentRootListener
    image
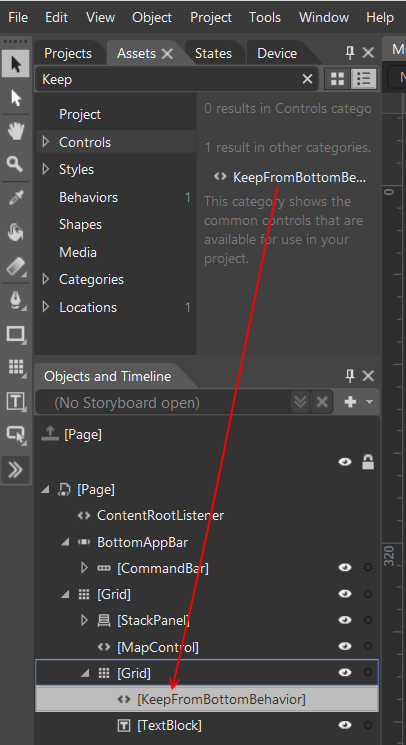
  5. Find the “KeepFromBottomBehavior”, then drag it on top of the grid holding the ‘popup’
    image
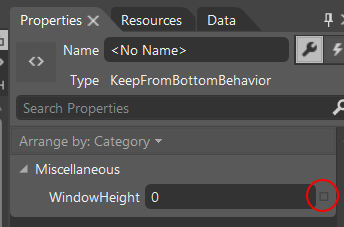
  6. On the right hand side, find the “Properties” tab and select the little square beside “WindowHeight”
    image
    In the popup menu, select “Bind to Element”
  7. Now select ContentRootListener element again (in the Objects and TimeLine tab where you just put it in step 4
  8. Select WatchedObjectHeight. That’s it. You are done.
The XAML now looks like this:
<Page [name space stuff omitted]
   >
  <Page.BottomAppBar>
    <CommandBar Opacity="0.7">
      <AppBarButton Icon="Accept" Label="Click"/>
    </CommandBar>
  </Page.BottomAppBar>

  <Interactivity:Interaction.Behaviors>
    <Behaviors:SizeListenerBehavior x:Name="ContentRootListener"/>
  </Interactivity:Interaction.Behaviors>

  <Grid>
    <Grid.RowDefinitions>
      <RowDefinition Height="Auto"/>
      <RowDefinition Height="*"/>
    </Grid.RowDefinitions>

    <!-- Title Panel -->
    <StackPanel Grid.Row="0" Margin="12,0,0,0">
      <TextBlock  Text="MY APP" Style="{ThemeResource TitleTextBlockStyle}" 
        Margin="0,12,0,0" />
      <TextBlock Text="a map" Margin="0,-6.5,0,26.5" 
        Style="{ThemeResource HeaderTextBlockStyle}" 
        CharacterSpacing="{ThemeResource PivotHeaderItemCharacterSpacing}" 
        VerticalAlignment="Top"/>
    </StackPanel>

    <Maps:MapControl Grid.Row="1"/>
    <Grid Height="150"  Grid.Row="1" VerticalAlignment="Bottom" 
    Background="#FF7A2222" >
      <Interactivity:Interaction.Behaviors>
        <Behaviors:KeepFromBottomBehavior 
        WindowHeight="{Binding WatchedObjectHeight, 
        ElementName=ContentRootListener}"/>
      </Interactivity:Interaction.Behaviors>
      <TextBlock Text="Some popup"  
        Style="{ThemeResource TitleTextBlockStyle}" 
        VerticalAlignment="Bottom" HorizontalAlignment="Center" />
    </Grid>
  </Grid>
</Page

In bold and red you see the new parts. And sure enough, if you now watch the ‘popup’ it will always be above the App Bar – it will even move dynamically move up and down if you open and close the software buttons.

imageimage

Problem solved, case closed. You don’t even have to type code because the behavior is already in WpWinNl.

Mind you – this behavior works only on Windows Phone 8.1, since it only is applicable to Windows Phone. That’s because the ApplicationView.GetForCurrentView().VisibleBoundsChanged event is only available on Windows Phone.

Demo solutions – before and after adding NuGet Package and behaviors – can be found here. Mind you – both solutions contain a Windows 8.1 project, but that does not do anything.

Special thanks to my colleague Valentijn Makkenze for first noticing this problem, Ben Greeve and this guy for sending me screenshots, and Hermit Dave for some valuable pointers.

12 November 2014

Executing and testing geofencing background tasks in Universal Apps

Intro

On October 18th the Dutch and Belgian Windows Platform Development communities got together for an event called “Lowlands WPdev 2014”- yours truly was one of the conference organizers, and gave a talk about geofencing. This blog post is basically a partial write-down, just explaining the code and how to test it.

The ShopAlerter application

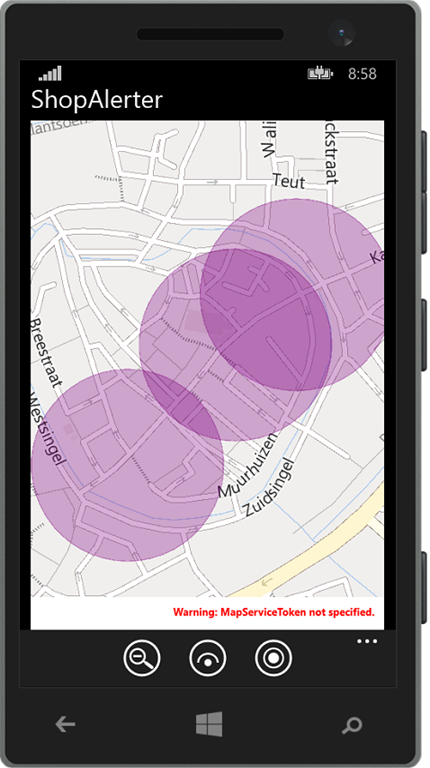
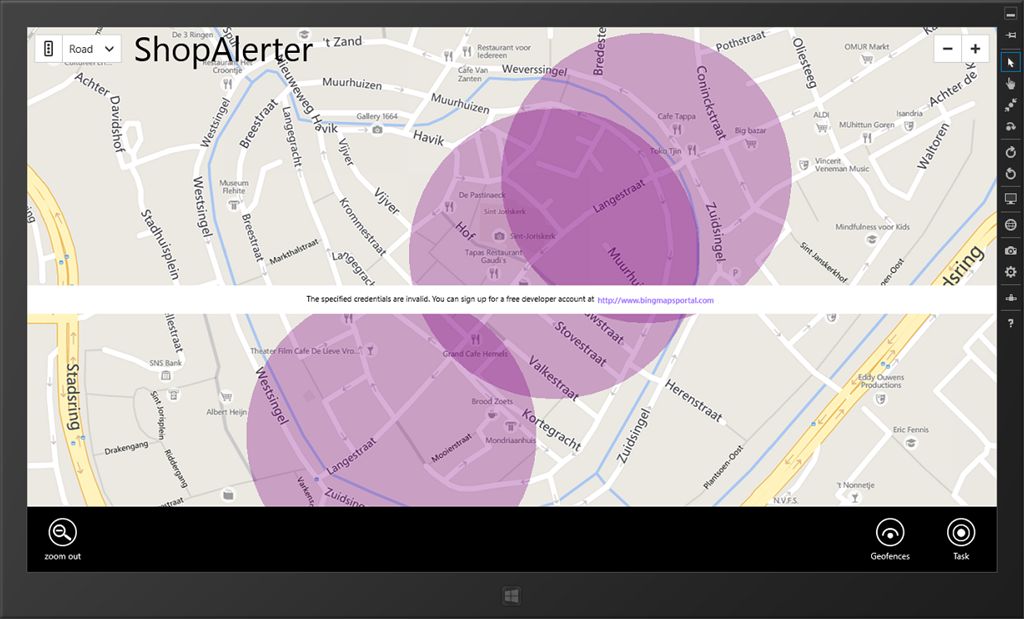
The application is very simple and shows itself like this on Windows Phone 8.1 and Windows 8.1:

imageimage

It shows the created geofences on the map. On Windows Phone, we use Here Maps, on Windows we use Bing Maps. As both banners show, you should get a key for both map platforms to get you app certified. As the enters a geofence, a trigger is fired to show you are approaching a shop and a toast message is being displayed. That is – in theory. In practice stuff is not so easy, especially in Windows.

Project structure

image

The project consists out of what nowadays is a pretty standard Universal App structure, with a Windows, Windows Phone and a Shared Project. In the shared project is the App.xaml and a partial class MainPage.cs, basically holding some of the code behind stuff that normally goes into MainPage.xaml.cs. But we want to share as much code as possible – and we can.

The Mapping.Utilities.Pcl contains helper methods to visualize geofences on the map – described in an earlier article about visualizing geofences.

The MappingUtilities.Windows contains one helper class to convert to the common Geopoint type to the specific Location and LocationCollection types used by Bing Maps.

Finally, the ShopAlerter.Background is a so-called Windows Runtime Component. Background tasks need to be defined specifically in such a component. I am not entirely sure why, but that’s the way it is.

Windows Phone project

The Windows Phone project is pretty simple: a little bit of XAML, and some code behind. The XAML is just this:

<Page[Name space stuff omitted]>
  <Page.BottomAppBar>
    <CommandBar>
      <AppBarButton Icon="ZoomOut" Label="zoom out" Click="ZoomOut"/>
      <AppBarButton Label="Geofences" Icon="View" Click="ToggleGeofences"/>
      <AppBarButton Label="Task" Icon="Target" Click="ToggleTask"/>
    </CommandBar>
  </Page.BottomAppBar>

  <Grid Background="{ThemeResource ApplicationPageBackgroundThemeBrush}">
    <Grid Margin="12,0,12,0" >
      <Grid.RowDefinitions>
        <RowDefinition Height="Auto"/>
        <RowDefinition Height="*"/>
      </Grid.RowDefinitions>
      <StackPanel Margin="0,0,0,5">
        <TextBlock TextWrapping="Wrap" Text="ShopAlerter" FontSize="26.667"/>
      </StackPanel>
      <maps:MapControl Grid.Row="1" x:Name="MyMap" >
      </maps:MapControl>
    </Grid>
  </Grid>
</Page>

A command bar with three buttons, and a grid containing the header text and the map itself. The user hits the middle geofences button to turn the geofences on and off, and hits the right button to register the task. The left(zoom out) button is only there for demo purposes – believe me, sometimes the touch screen and the emulator suddenly decide no longer to play together, and while zooming in with a mouse is easy (just double click), zooming out is not possible. So although I don’t consider myself a pro presenter, I feel I can give pro tip here for demoing something with maps – always include a zoom out button to save your … behind when something goes wrong ;-)

It’s hard to believe, but the Windows Phone specific code, in MainPage.Xaml.cs is just this:

protected override void OnNavigatedTo(NavigationEventArgs e)
{
  GeofenceMonitor.Current.Geofences.Clear();
  MyMap.Center = new Geopoint(
    new BasicGeoposition { Latitude = 52.155915, Longitude = 5.390376 });
  MyMap.ZoomLevel = 16;
}

const int fenceIndex = 1;
private void DrawGeofences()
{
  //Draw semi transparent purple circles for every fence
  var color = Colors.Purple;
  color.A = 80;

  // Note GetFenceGeometries is a custom extension method
  foreach (var pointlist in GeofenceMonitor.Current.GetFenceGeometries())
  {
    var shape = new MapPolygon
    {
      FillColor = color,
      StrokeColor = color,
      Path = new Geopath(pointlist.Select(p => p.Position)),
      ZIndex = fenceIndex

    };
    MyMap.MapElements.Add(shape);
  }
}

private void RemoveGeofences()
{
  var routeFences = MyMap.MapElements.Where(
      p => p.ZIndex == fenceIndex).ToList();
  foreach (var fence in routeFences)
  {
    MyMap.MapElements.Remove(fence);
  }
}

This is the power of the Universal App. All the rest is either in the shared project or the Windows Runtime Component that is also used both on Windows and Windows Phone. What you basically see is the OnNavigatedTo method that clears the geofences, and sets the zoom level and center point of the map. The other two methods are just used for drawing circles on the map and removing them – also showed in the same article I wrote earlier in my article about visualizing geofences.

The Shared project

So what's in this famous shared project then, huh? Well, just the partial class MainPage.cs. This adds methods to both the Windows and the Windows Phone MainPage.xaml.cs. The key thing is to understand code is shared, not binaries. Every line is compiled twice, both into the Windows and the Windows Phone project. Unlike Portable Class Libraries or Windows Runtime Components, which are shared binary.

So. The method called by pressing the middle button adds (and shows) or removes the geofences. This is a simple toggle function like this.

private void ToggleGeofences(object sender, RoutedEventArgs e)
{
  if (!GeofenceMonitor.Current.Geofences.Any())
  {
    foreach (var location in LocationObject.GetLocationObjects())
    {
      AddFence(location.Id, location.Location);
    }

    DrawGeofences(); // Actual implementation deferred to none shared portion
  }
  else
  {
    GeofenceMonitor.Current.Geofences.Clear();
    RemoveGeofences(); // Actual implementation deferred to none shared portion
  }
}

Note the actual drawing and removing is done by none shared code. This implies that both in Windows and in Windows Phone there must be methods "DrawGeofences" and "RemoveGeofences" implemented. You can also see here a method "AddFence" being called. This creates an actual geofence that is being monitored by the device:

  public void AddFence(string key, Geopoint position)
  {
    // Replace if it already exists for this key
    var oldFence = GeofenceMonitor.Current.Geofences.FirstOrDefault(p => p.Id == key);
    if (oldFence != null)
    {
      GeofenceMonitor.Current.Geofences.Remove(oldFence);
    }

    var geocircle = new Geocircle(position.Position, 150);
    const bool singleUse = false;
    MonitoredGeofenceStates mask = 0;
    mask |= MonitoredGeofenceStates.Entered;

    // NOTE: Dwelling time!
    var geofence = new Geofence(key, geocircle, mask, singleUse, 
                                TimeSpan.FromSeconds(1));
    GeofenceMonitor.Current.Geofences.Add(geofence);
}

The key thing about geofences is that they, well, have a key as well as a location. So if you add a geofence, you should first check if a geofence with the given key is already present. If it is, delete it first before adding one with the same key.

Then I create the shape for the geofence. Currently, only circles are supported so I create a circle with 150 meters in diameter. Then I define the geofence should be used multiple times – setting singleUse to true will make it disappear from the GeofenceMonitor automatically after it has been triggered. The mask will determine to what events the GeofenceMonitor will respond on this particular geofence. You can choose between Entered, Exited, Removed and None – to respond to multiple events, just OR ( +| ) to the mask like I show in the code.

Finally a word on dwelling time. This feature is here to prevent edge cases, in the most literal sense of the word. Suppose you are sitting on the edge of a fence – geo positioning is never that accurate, and the phone would probably detect it’s in, out, in, out, in (etc) the fence. If your App user gets a bazillion notifications showing that, you will probably not hit a 5 star rating anytime soon. So the default value is 10 seconds – only if you are 10 seconds in a geofence (or left it for 10 seconds) something will happen. For my demos I usually take 1 second because well, audiences tend to get uncomfortable watching a screen where nothing much happens (and the presenter too, for what matters). For production scenario’s, take some time to think about the speed your typical user will move with, the size of your geofences, and the dwelling time you select. I spent some time figuring out why none of my triggers ever went off – using the default 10 seconds, geofences with a 25 m diameter, and moving at 50km/h. I was already out of any fence again before even half the dwelling time had passed ;-)

Finally the method to register the background task, which is pretty simple:

private async void ToggleTask(object sender, RoutedEventArgs e)
{
  var registered = AlertTask.IsTaskRegistered();
  if (registered)
  {
     AlertTask.Unregister();
  }
  else
  {
    await AlertTask.Register();
  }

  var dlg = new MessageDialog(
     string.Format("Task {0}", !registered ? "registered" : "unregistered"));
  await dlg.ShowAsync();
}

The Background task

The background task is defined in one class containing the actual implementation of the task, as well as some static methods to handle registering and unregistering – an idea from our local DX guru Rajen Kishna, that I improved a little upon. The basic class definition with the required Run method is pretty simple:

public sealed class AlertTask : IBackgroundTask
{
  public void Run(IBackgroundTaskInstance taskInstance)
  {
    var monitor = GeofenceMonitor.Current;
    if (monitor.Geofences.Any())
    {
      var reports = monitor.ReadReports();
      foreach (var report in reports)
      {
        var l = LocationObject.GetLocationObject(report.Geofence.Id);

        switch (report.NewState)
        {
          case GeofenceState.Entered:
            {
              ShowToast("Approaching shop", l.Name);
              break;
            }
        }
      }
    }
  }
}

Mind you – in a Windows Runtime Component classes are sealed. This is mandatory. Anyway, when the background task is triggered, I first check if there are any geofences – logically there should be, for what else could have triggered this task. But they have been deleted on some other thread – it never hurts to be careful. Then I follow this procedure:

  1. Read all the reports from the monitor
  2. Each report should hold a Geofence object
  3. That has an id
  4. Use the id to retrieve the original object the geofence was created from

For the last step I use a LocationObject helper method. That is kind of my ‘data base’, which I will show later. Having retrieved the object, I can show it’s name in a toast.

private static void ShowToast(string firstLine, string secondLine)
{
  var toastXmlContent = 
    ToastNotificationManager.GetTemplateContent(ToastTemplateType.ToastText02);

  var txtNodes = toastXmlContent.GetElementsByTagName("text");
  txtNodes[0].AppendChild(toastXmlContent.CreateTextNode(firstLine));
  txtNodes[1].AppendChild(toastXmlContent.CreateTextNode(secondLine));

  var toast = new ToastNotification(toastXmlContent);
  var toastNotifier = ToastNotificationManager.CreateToastNotifier();
  toastNotifier.Show(toast);

  Debug.WriteLine("Toast: {0} {1}", firstLine, secondLine);
}

A simple helper method, that I kinda stole from Rajen as well. My only improvement is the Debug.WriteLine at the end, which we unfortunately will need badly further down the road.

The methods to query the background task’s state, to register and unregister is are also based upon Rajen’s sample, only I have made the Register task actually awaitable. That’s a real live application of the trick I blogged about yesterday.

private const string TaskName = "ShopAlerterTask";
//NOTE:  WinRT component cannot return a Task<T>, but CAN return 
//IAsyncOperation<T>/>
public static IAsyncOperation<bool> Register()
{
  return RegisterInternal().AsAsyncOperation();
}

private async static Task<bool> RegisterInternal()
{
  if (!IsTaskRegistered())
  {
    await BackgroundExecutionManager.RequestAccessAsync();
    var builder = new BackgroundTaskBuilder 
      { Name = TaskName, TaskEntryPoint = typeof(AlertTask).FullName };

    builder.SetTrigger(new LocationTrigger(LocationTriggerType.Geofence));
    builder.Register();
    return true;
  }
  return false;
}

public static void Unregister()
{
  var entry = BackgroundTaskRegistration.AllTasks.FirstOrDefault(
     t => t.Value.Name == TaskName);

  if (entry.Value != null)
  {
    entry.Value.Unregister(true);
  }
}

public static bool IsTaskRegistered()
{
  return BackgroundTaskRegistration.AllTasks.Any(t => t.Value.Name == TaskName);
}

In the RegisterInternal method I simply make a fairly standard background task, only it’s now triggered by a LocationTrigger. The odd thing is, the only parameter you can – and must – supply to the LocationTrigger’s constructor is a LocationTriggerType enum, and that only has one value – Geofence. I assume the API designers originally planned to implement more options here but in it’s current state it’s looking a bit strange. But anyway, it works, that’s the important part. If now anyone enters or exits a geofence, the Run method will be called.

Location object

This is not very interesting, but only showed here for the sake of completeness. It’s basically an object with an ID and a location (which I need for creating a geofence) and a name to display. Two static helper methods help me to create a list of fake hard coded objects, or retrieve one by ID. The area is real – it’s the main shopping street of my home town Amersfoort – but the data is completely fake. There is, unfortunately, no Microsoft store on this continent, let alone in Amersfoort.

public sealed class LocationObject
{
  public LocationObject()
  {
  }

  public LocationObject(string id, string name, 
     double latitude, double longitude)
  {
    Id = id;
    Name = name;
    Location = new Geopoint(
        new BasicGeoposition 
          { Latitude = latitude, Longitude = longitude });
  }

  public string Id { get; set; }

  public string Name { get; set; }

  public Geopoint Location { get; set; }

  public static IEnumerable<LocationObject> GetLocationObjects()
  {
    return new List<LocationObject>
           {
             new LocationObject("1","Microsoft Store", 52.157043, 5.392407),
             new LocationObject("5","Colruyt", 52.156339, 5.391015),
             new LocationObject("9","The PhoneHouse", 52.154651, 5.388553),

           };
  }
  public static LocationObject GetLocationObject(string id)
  {
    return GetLocationObjects().FirstOrDefault(p => p.Id == id);
  }
}

Testing the Windows Phone project

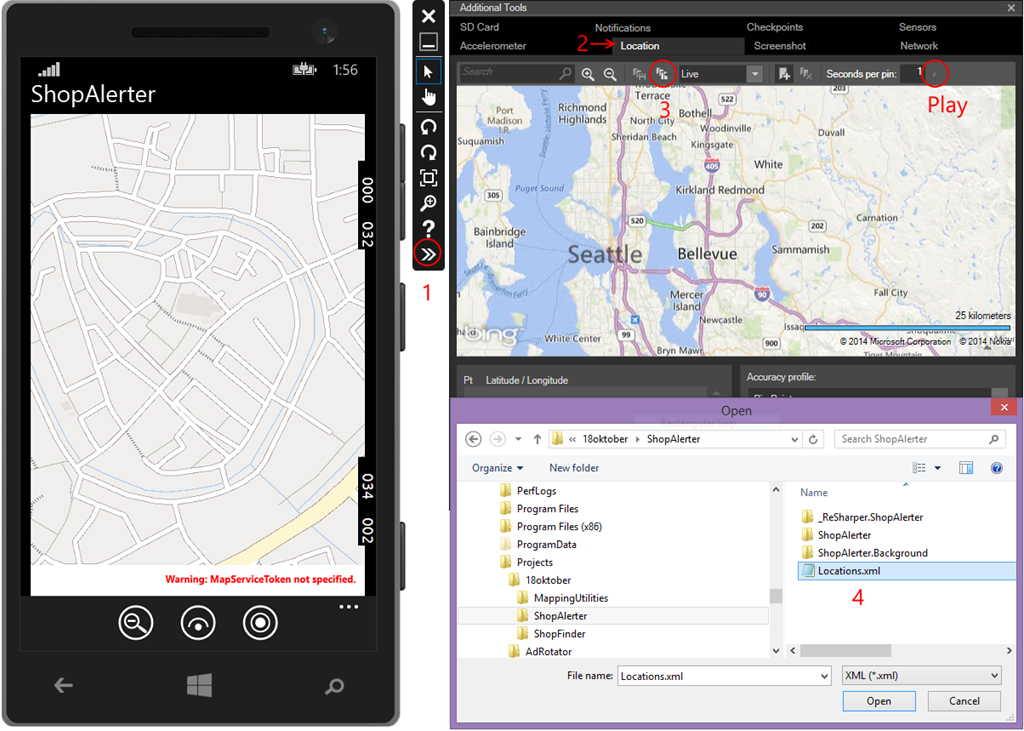
This is pretty easy, thanks to the awesome Windows Phone emulator and it’s tools. Deploy the Windows Phone 8.1 project to the emulator, then proceed as follows (I kind of like that Bothell is displayed by default, as I spend two nights there recently visiting an old friend):

image

  1. imagePress the “Additional tools” button
  2. Select the “Location” tab
  3. Select the “Load” button
  4. Find the file “Locations.xml” that comes with the demo solution (it is in the project root) and select it.

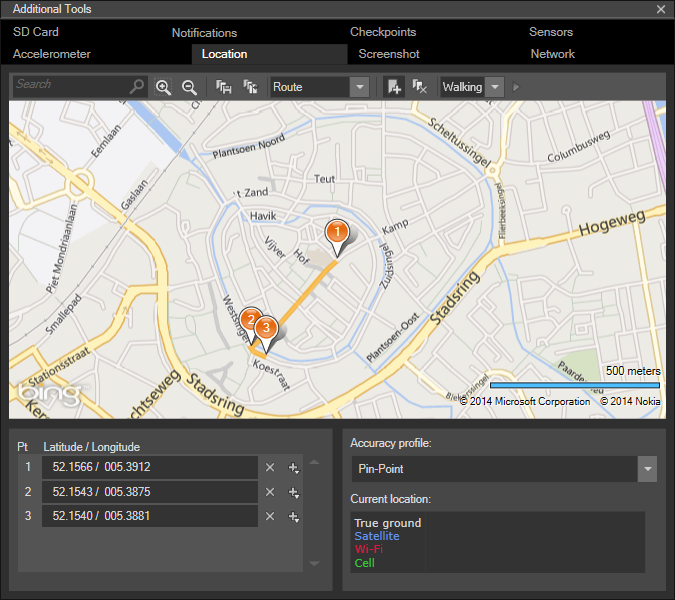
Note I also marked the play button – we will need that later. After you have loaded the xml file, zoom in about five times (press the zoom in button) and you should see about as displayed on the right.

Then proceed as follows:

  • Press the middle button on the application bar (the one that is labeled “Geofences”). The geofences should appear as semi translucent circles as displayed in the very first image on top of this post.
  • Then press the right button on the application bar (“Task”) – this should pop up a message box indicating the task has been registered
  • The press the “Play” button on the Location Tools

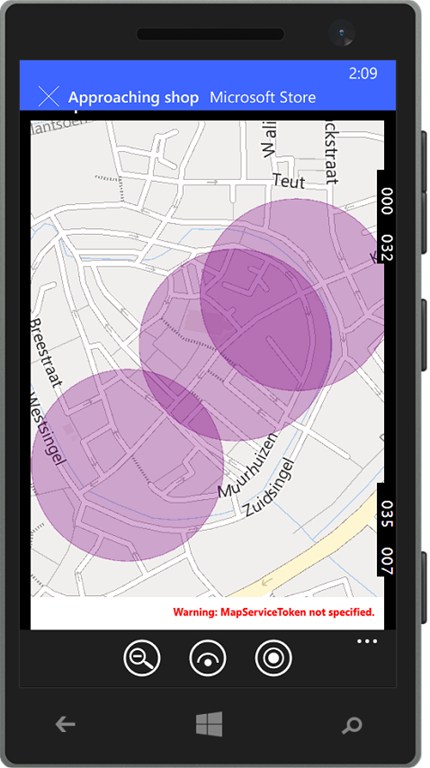
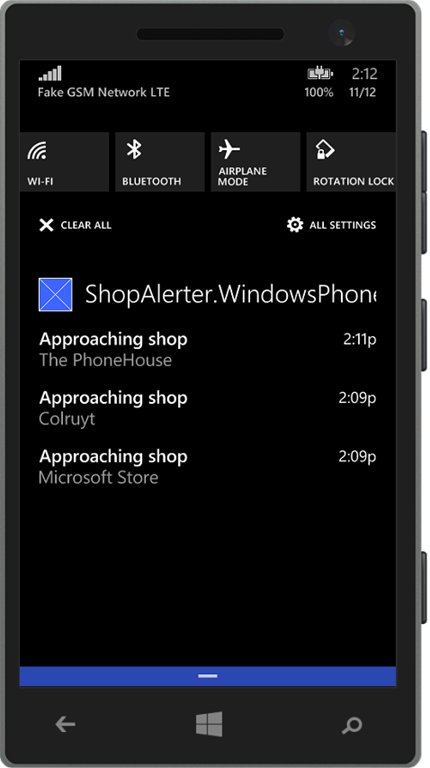
Now if you have done everything right, pretty soon you should see the first toast pop up, and they should appear in the notification center as well. Since the phone should move on walking speed (it’s a pedestrian area) you might need to wait for a while for them all to appear.

imageimage

Awesome. Now it’s time to have a look at the Windows project.

The Windows project

Since we are using maps we are actually in a quite bad position, as the convergence story is still pretty weak in this area. For Windows uses Bing Maps – you will need to install the Bing Maps toolkit, use a different kind type of object for map positions (Location in stead of Geopoint), and Bing Maps is a native component so this will make your app a native app, too (i.e. not AnyCPU). And yet… This is all the XAML we need

<Page>
  <Page.BottomAppBar>
    <CommandBar IsOpen="True">
      <CommandBar.SecondaryCommands>
        <AppBarButton Icon="ZoomOut" Label="zoom out" Click="ZoomOut"/>
      </CommandBar.SecondaryCommands>
      <AppBarButton Label="Geofences" Icon="View" Click="ToggleGeofences"/>
      <AppBarButton Label="Task" Icon="Target" Click="ToggleTask"/>
    </CommandBar>
  </Page.BottomAppBar>
  <Grid Background="{ThemeResource ApplicationPageBackgroundThemeBrush}">
    <maps:Map x:Name="MyMap"></maps:Map>
    <TextBlock HorizontalAlignment="Left" TextWrapping="Wrap" Text="ShopAlerter" 
               VerticalAlignment="Top" Foreground="Black" FontSize="48"
               Margin="150,5,0,0"/>
  </Grid>
</Page>

Granted, different, but not that different and I also choose a little bit different layout anyway. The only Windows specific code is this:

 MapShapeLayer fenceLayer;

protected override void OnNavigatedTo(NavigationEventArgs e)
{
  base.OnNavigatedTo(e);
  GeofenceMonitor.Current.Geofences.Clear();

  MyMap.Center = 
  new Location { Latitude = 52.155915, Longitude = 5.390376 };
  MyMap.ZoomLevel = 17;

  fenceLayer = new MapShapeLayer { ZIndex = 1 };
  MyMap.ShapeLayers.Add(fenceLayer);
}

private void DrawGeofences()
{
  var color = Colors.Purple;
  color.A = 80;
  foreach (var pointlist in GeofenceMonitor.Current.GetFenceGeometries())
  {
    var shape = new MapPolygon
    {
      FillColor = color,
      Locations = pointlist.ToLocationCollection()
    };
    fenceLayer.Shapes.Add(shape);
  }
}

private void RemoveGeofences()
{
  fenceLayer.Shapes.Clear();
}

That is all.  I love the Universal App model. All I need are methods to set the initial zoom level and location of the map, and methods to draw and delete geofence geometries. The rest is shared code in some way or the other.

You can see here Bing Maps uses the concept of layers. That’s about the only thing Bing Maps handles better than Here Maps IMHO – the z-index of map objects is handled by a layer object rather than on a per-object basis. This makes certain display manipulations a lot easier and faster. The real pain, though, is in testing this.

Testing the Windows project

We will need to test in the Windows Simulator. After all, we will need to test using locations, and I don’t feel like running around our main shopping street testing my app. Now there are some interesting challenges:

  1. The Simulator does not support a notion of route – only of location. You can basically appear on one location and then on another, but not make it smoothly move from a to b, like the Windows Phone simulator. But that is the least of our worries.
  2. The Windows simulator does not display toast notifications. This apparently has something to do with the simulator being a kind-of-copy of your actual PC, with all your apps installed.
  3. The Windows simulator does not allow the registration of background tasks. Try it. You will simply get an exception saying “This request not supported”. You can unregister, but not register. I have no idea why.

This sounds like a classical catch-22 – we need the Simulator to simulate locations, but we cannot register background task to actually use those locations, and even if we could, we cannot display the result. But there is a way out. Kind of. A long and winding way. Follow these steps:

  1. Run the app from Visual Studio on your local machine first.
  2. Make sure the “Debug Location” toolbar is visible. If it’s not: click View/Toolbars and check “Debug Location”. You will need to do this step only once.
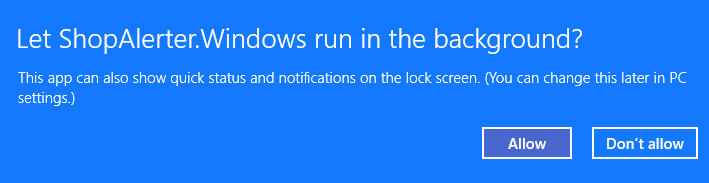
  3. Press the “Task” Application bar button. This will show the following pop up, that you may have seen before on other apps asking for background access
    image
    and if you press “Allow” you will get
    image
  4. The task is now registered. Now stop the application (just from Visual Studio).
  5. Deploy and run the app from Visual Studio on the simulator. Remember I wrote about this being a kind of copy of your PC? Guess what, your app is already there, including the background task.
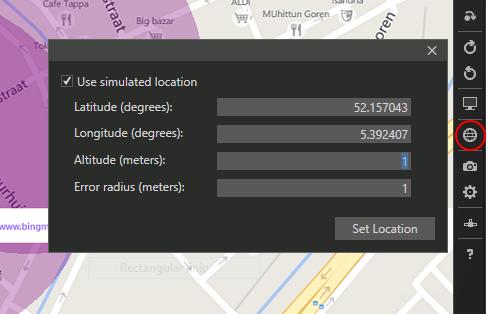
  6. Hit the “Geofence” application bar button. You will now see the geofences.
  7. You will now have to set the location of the simulator. There’s a button for that on the right hand side of it’s window. I picked the location of the ‘Microsoft Store’ as location.image
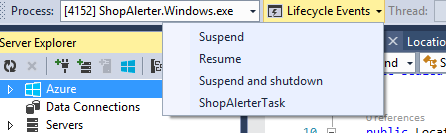
  8. Nothing happens if you press the “Set Location” button. Now go to the Debug/Location toolbar. Click the Lifecyle Events drop down. It should show the following, if it does not, try to reselect the
    ShopAlerter.Windows.exe again first
    image
  9. Still nothing seems to happen. But if you mosey back to Visual Studio and have a look at your output window….
    image
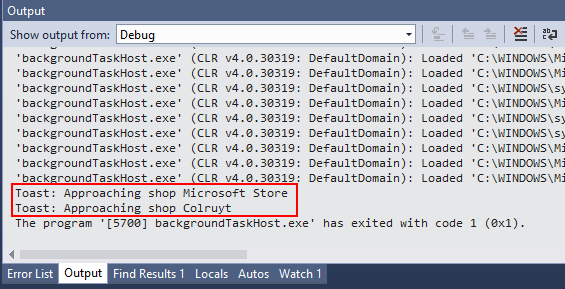
    Lo and behold – the result of the Debug.WriteLine. The toast code has fired, the geofence therefore has been activated, thus our code works.

Some thoughts and things to take into account

  • To make this app work at all, you will need to set some capabilities. For both apps, you will need the “Location” capabilities, and both applications needs to be Toast capable.
  • For the Windows application, you will need to set a Badge logo.
  • To save battery and to prevent you app from hogging the processor, LocationTriggers will only fire once every 2 minutes – at most, at least on the phone. So this technique is not very suitable for high-precision, high-speed tracking. Geofence events will “coalesce”, as it is so beautifully called – meaning they happen about every two minutes all at the same time.
  • The Windows Simulator – to put it very mildly – is not quite on par with the Windows Phone emulator. Particularly the situation around location simulation, background tasks and notifications could benefit significantly from quite some attention. I sincerely hope this will be addressed in some future release – preferably the very next one.

Credits

I have been standing on the shoulders of giants cobbling this all together, most notably:

Demo solution available here.

11 November 2014

Returning Task<T> from a Windows Runtime Component

A very short tip this time, that took me some time to find out.

You will need a Windows Runtime Component if you want, for instance, host a background task in an Universal App. The problem with these components is that you cannot return a Task<T> from a public method. You can use Task<T> inside the component, but not return it to the outside world. If you have a method

public async Task<bool> SomeMethod()
{
  return false; // whatever
}

in your Windows RT component, it won’t even compile. But there is a solution – you can return an IAsyncOperation<T>, and that is awaitable too.

Therefore, I use this simple wrapper to use the method both from inside and outside:

public IAsyncOperation<bool> PublicMethod()
{
  return InternalMethod().AsAsyncOperation();
}

private Task<bool> InternalMethod()
{
  return false; // whatever
}

And we’re done. This will compile, and you can now call “await myObject.PublicMethod()” from outside the Windows Runtime Component.

Sometimes code is so easy if you just know how to do it. No sample this time (again) as this is such a small piece of code. If you want to see it running, wait for the next post ;)

25 June 2014

Building multi-resolution popups in an Universal App

With the advent of Windows Phone 8.1 multiple resolution are now also becoming a fact of life for Windows Phone developers (as they already were for Windows Store developers). This has a few side effects, which will require you to think about the size of things that need to cover part of the screen. Particularly you can get into trouble with animations built with visual states, which tend to have fixed number in them. I already dabbled into this when I ported Two Phone Pong to Windows 8.1 and had to make a screen-size independent scroll-into-view pane.

Now, for a demo app I have been working on, I wanted to make a popup that always used 1/3th of the screen. That used to be easy, as we had only one resolution, more or less, and for the rest Windows Phone 8 did some auto scaling. Now it needs a little more work. Very little, as it turned out I almost had all the pieces in place:

  • I already had the UnfoldBehavior, which can be used to let UI elements appear and disappear by ‘folding’ them in or out.
  • I already had the SizeListenerBehavior, which allows me to data bind to the actual width and height of an element

The only thing that was missing was this very simple converter:

using System;
using System.Globalization;

namespace WpWinNl.Converters
{
  public class PercentageConverter : BaseValueConverter
  {
    public override object Convert(object value, Type targetType, 
      object parameter, CultureInfo culture)
    {
      double parmValue;
      if (value is double && double.TryParse(parameter.ToString(), 
                                            out parmValue))
      {
        value = (double)value * parmValue / 100;
      }
      return value;
    }

    public override object ConvertBack(object value, Type targetType, 
      object parameter, CultureInfo culture)
    {
      if (value is double && (parameter is double || parameter is int))
      {
        value = (double)value / 100 / (double)parameter;
      }
      return value;
    }
  }
}

Basically all it does is dividing the incoming value by 100 and multiply it with the parameter value, so if you supply “33” as ConverterParameter is will multiply the incoming value by 0.33, effectively dividing it by 3 (ish).

So now I can define a simple app with a map (for instance), and when the popup is displayed, it always takes the bottom third of the screen. Regardless of screen resolution.

On the 4” WVGA (800x480) emulator this looks like this:

imageimage

While on a 1080p 6” emulator it looks like this:

imageimage

Added bonus: the popup resizes automatically as you rotate the phone. It always takes the bottom third of the screen.

The way to achieve this is pretty simple:

<!-- some stuff snipped -->
<Grid>
  <interactivity:Interaction.Behaviors>
    <behaviors:SizeListenerBehavior x:Name="ContentRootListener"/>
  </interactivity:Interaction.Behaviors>
  <!-- some stuff snipped -->
  
  <Grid Grid.Row="1" Margin="19,9.5,19,0">
    <maps:MapControl>
    </maps:MapControl>
    <!-- the Grid below is the actual popup window -->
    <Grid Height="{Binding WatchedObjectHeight, 
      ElementName=ContentRootListener, Converter={StaticResource PercentageConverter}, 
      ConverterParameter=33}" VerticalAlignment="Bottom" Background="Blue" >
      <interactivity:Interaction.Behaviors>
        <behaviors:UnfoldBehavior RenderTransformY="1" Direction="Vertical" 
                                  Activated="{Binding IsOpen}"/>
      </interactivity:Interaction.Behaviors>
      <StackPanel>
        <TextBlock Text="This is my popup" FontSize="22"></TextBlock>
        <StackPanel Orientation="Horizontal">
          <TextBlock Text="It's height is:" FontSize="22"></TextBlock>
          <TextBlock Text="{Binding WatchedObjectHeight, 
            ElementName=ContentRootListener, Converter={StaticResource PercentageConverter}, 
            ConverterParameter=33}" 
            FontSize="22"></TextBlock>
        </StackPanel>
      </StackPanel>
    </Grid>
  </Grid>
</Grid>
  • The top grid has a SizeListenerBehavior. This enables me to bind to the ActualHeight and of the top grid as it changes by binding to WatchedObjectHeight of the SizeListenerBehavior.
  • The height of the popup is set like by actually binding to said value. By using the converter with a parameter of 33 it will – when activated – always use 1/3rd of the screen – or 1/3rd of whatever element your SizeListenerBehavior is sitting on.
  • By setting the UnfoldBehavior’s RenderTransformY to 1 and the Direction to Vertical the popup will open from the bottom up. This is not new, that was already in the original article about UnfoldBehavior.

I have included a small demo solution to show off this little trick. It uses my pre-release version of WpWinNl 2.0.x and a little MVVMLight, but you could use this just as easy from a non-MVVM app. But I still think the beauty of this all is that can be initiated from a viewmodel ;)

In addition, although the demo solution only contains a Windows Phone app, this trick works just as well as on Windows Store apps, as both UnfoldBehavior and SizeListenerBehavior are already in the new WpWinNl NuGet package.