30 July 2019

Fixing error Failed to locate “CL.exe” or MSB8020 when deploying IL2CPP solution

Symptom

You have created a Unity project to create an app using MRTK2, and you want to use the new IL2CPP backend. You open the solution in Visual Studio 2019, you try to deploy it by using Build/Deploy and all the way at the end the compiler complains about “CL.exe” missing.

Alternatively, you might get the slightly more verbose error:

error MSB8020: The build tools for Visual Studio 2017 (Platform Toolset = 'v141') cannot be found. To build using the v141 build tools, please install Visual Studio 2017 build tools.  Alternatively, you may upgrade to the current Visual Studio tools by selecting the Project menu or right-click the solution, and then selecting "Retarget solution".

Cause

You have most likely used the the recommended Unity version (2018.4.2f1) to create the project. This version – the name gives it away – was released before Visual Studio 2019, and therefore assumes the presence of Visual Studio 2017 and it’s accompanying C++ tools set, ‘V141’. So Unity generated a C++ solution referencing that tool set.

But now it’s 2019, you have kissed Visual Studio 2017 goodbye, installed Visual Studio 2019. And that comes with tool set V142.

Solution

Either you install V141 using the Visual Studio Installer, or you tell the generated solution to use V142. I personally prefer the last one, because newer is always better right ;)

Simply right-click the project in the solution that has “(Universal Windows)” behind it’s name, select properties, tab general and then the problem is already pretty evident:

Simply select Visual Studio 2019 (142) for Project Toolset and you are good to go. This setting will stay as long as you don’t delete the generated project – Unity will simply change what needs to be changed, and leave as much as it can (to speed up the generation process).

Conclusion

Simple fix, but can be hard to find. Hence a simple blog about it

29 July 2019

Minimal required software for MRTK2 development for HoloLens 2 and Immersive headsets

Intro

A short one this time – and codeless to. You see, next Saturday I will be giving an workshop for MixUG Netherlands about development with the Mixed Reality Toolkit 2 for Immersive headsets, together with my colleague, partner in crime and fellow MVP Alexander Meijers. One of the things that came up preparing for this workshop was what you would actually need to develop with the Mixed Reality Toolkit 2. Since ye olden days of the HoloToolkit, quite a few things have changed – Unity, the minimal OS version, and there’s even a new version of Visual Studio. So I set out to complete a minimal shopping list with a few optional items. Fortunately, our friends over at Microsoft Azure make it quite simple to spin up a totally pristine machine so you don’t run into the typical developer machine issues – multiple versions of Visual Studio with different workloads and a myriad of Unity versions – which makes it hard to tell sometimes what is required for what app.

OS version

Easy one. Windows 10, 1809 or (recommended) 1903. Everything I tested, I tested on Windows 10 Pro

Visual Studio

You will need Visual Studio 2019 community edition. 2017 will work too, but is much slower. Download Visual Studio 2019 community from this link and choose the following work loads:

  • UWP development with optional components USB connectivity and C++ (V142) UWP tools checked
  • Game development with Unity with the optional component 2018.3 64-bit editor unchecked

In images:

Make sure you install Visual Studio before Unity.

Offline installer

A fun trick – if you want to make an offline installer for the community edition for these particular workloads, open a command prompt after downloading the installer, and type (on one line):

vs_community.exe --layout c:\vsinstaller
--add Microsoft.VisualStudio.Workload.ManagedGame
--add Microsoft.VisualStudio.Workload.Universal
--add Microsoft.VisualStudio.Component.Windows10SDK.IpOverUsb
--add Microsoft.VisualStudio.ComponentGroup.UWP.VC --lang en-US

In c:\vsinstaller you will then find a complete install ‘layout’ for all the necessary components. Might be useful if you want to prepare multiple computers.

Unity

2018.4.2f1, taken from ProjectSettings/ProjectVersion.txt in the mrtk_development branch. This particular version can be downloaded directly from this link.

Choose as minimal components

  • Unity 2018.4.2f1
  • UWP Build Support

Mind you – this sets you op for HoloLens 2 and Windows Mixed Reality Immersive headsets only.

Optional – HoloLens 2 emulator

I have already written extensively about it. You can get it here. Be aware that it requires Hyper-V being installed. If you have installed Windows 10 1903, it will run right away. On 1809 you will need some trickery.

Conclusion

It’s not that hard to get up and running for MRTK2 development for HoloLens 2 and Windows Mixed Reality Immersive headsets. And now you have a nice complete ‘shopping list’ for when you want to prepare your PC.

14 July 2019

Migrating to MRTK2–manipulating holograms by grabbing

Intro

To be honest, the title of this blog post is a bit weird, because in Mixed Reality Toolkit 1 the concept of grabbing was unknown, as HoloLens 1 does not support this kind of gestures. But nevertheless, as I am on this quest of documenting all the gems I discover while migrating an existing app to Mixed Reality Toolkit 2, this is one of the things I came across so I am shoehorning it in this blog post series – the 8th installment of it already. And the fun thing about this one if that although there is a demo project available, I am going to write no code at all. The whole concept of manipulation by grabbing can be done by simply dragging MRTK2 components on top of a game object.

'Far manipulation'

This is really extremely simple. If I want to make a cube draggable in the 'classic' sense - that is, point a cursor to it, pinch and move my hand, and then the cube follows, all you have to do is add a ManipulationHandler to the cube, with default settings:

And then you simply point the 'hand ray' to it, pinch and move:

But as you could see, I can only drag it. I can't move it anymore - or rotate - as my hand comes closer, like at the end of the movie. I fact, I can't do anything anymore.

Allow grabbing and moving

For that, we will need to add another script: Near Interaction Grabbable.

And now, if the hand comes close to the cube, you can do all kinds of crazy stuff with it

Some settings to consider

  • If you don't want to allow 'far manipulation' (the first type) but only want to allow the manipulation by grapping, you can uncheck the "Allow Far Manipulation" on the ManipulationHandler.
  • If you want to see where the actual grab connection point is, check the "Show Tether When Manipulating" checkbox on Near Interaction Grabbable. This will look like this:

I bet there are more settings to consider, but I haven't tried those yet (or felt the need to do so).

Conclusion

The code of this completely code-less sample can be found here. I can't wait to add code like this to real-world HoloLens 2 projects. But alas, we still need to wait for the device :)

09 July 2019

Migrating to MRTK2– handling tap, touch and focus ‘manually’ (in code)

Wait a minute – you did handle tap before, right?

Indeed, dear reader, I did. But I also had signed up for a MixUG session on Wednesday July 3. And while making demos for that I learned some other ways to handle interaction. Once again it shows that the best way to learn things is to try to teach them – because the need to explain things induces the need to actually obtain a deeper knowledge.

Ye olde way

In the MRTK 1, it was thus:

  • Handle tap – implement IInputClickHandler
  • Handle drag – implement IManipulationHandler
  • Handle focus – implement
  • Handle touch – forget it. ;)

The new way

In the MRTK 2 it is now

  • Handle tap – implement IMixedRealityPointerHandler
  • Handle drag – see above
  • Handle focus – implement IMixedRealityFocusHandler
  • Handle touch – IMixedRealityTouchHandler

Now I am going to ignore drag for this tutorial, and concentrate me on tap, focus and touch

IMixedRealityPointerHandler

This requires you to implement four methods:

  • OnPointerDown
  • OnPointerDragged
  • OnPointerUp
  • OnPointerClicked

OnPointerClicked basically intercept a tap or an air tap, and will work as such as you deploy the demo project to a HoloLens 1. After being bitten by people tapping just a tiny bit to slow and therefore not getting response, I tend to implement OnPointerDown rather than OnPointerClicked to capture a 'tap' event, but that's a matter of preference.

IMixedRealityFocusHandler

You will need to implement:

  • OnFocusEnter
  • OnFocusExit

The method names are the same as in MRKT1, only the signatures not - you now get a parameter of type FocusEventData which does give you some more information - by what the object was focused (we have multiple ways of doing that now!), what the previous focused object was, and what the new focused object is.

IMixedRealityTouchHandler

This requires you to implement

  • OnTouchStarted
  • OnTouchCompleted
  • OnTouchUpdated

But there is a twist to that. As we will soon see.

Show-off

To show off how it all works, I have created a little demo project. You can run it either in the emulator or the Unity editor (or a HoloLens 2, if you are in the HoloLens team and part some very few selected parties - I am unfortunately neither).

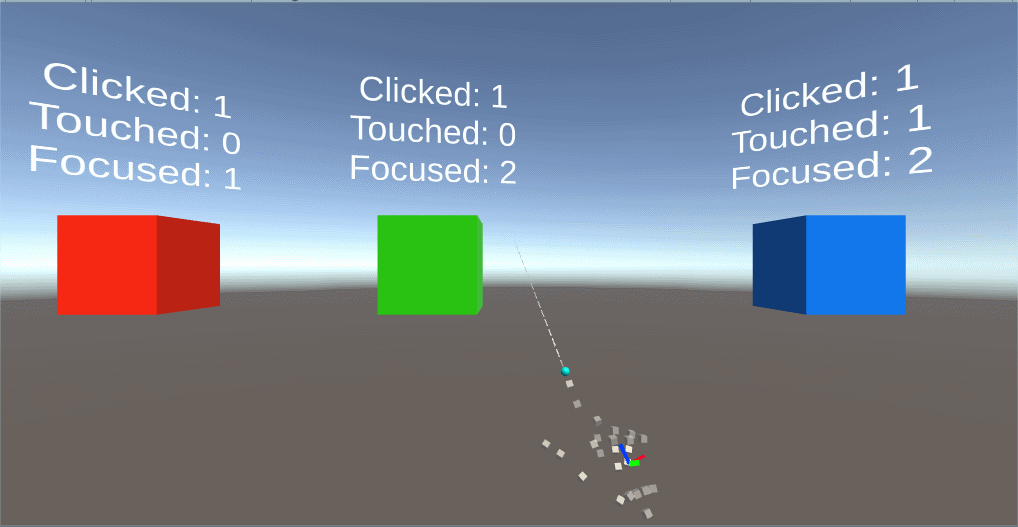
I have created a little script CodedInteractionResponder that shows off how this works. This script implements all the three interfaces I just wrote about. If you open the demo project in Unity show itself like this. All three cubes have the script attached to them.

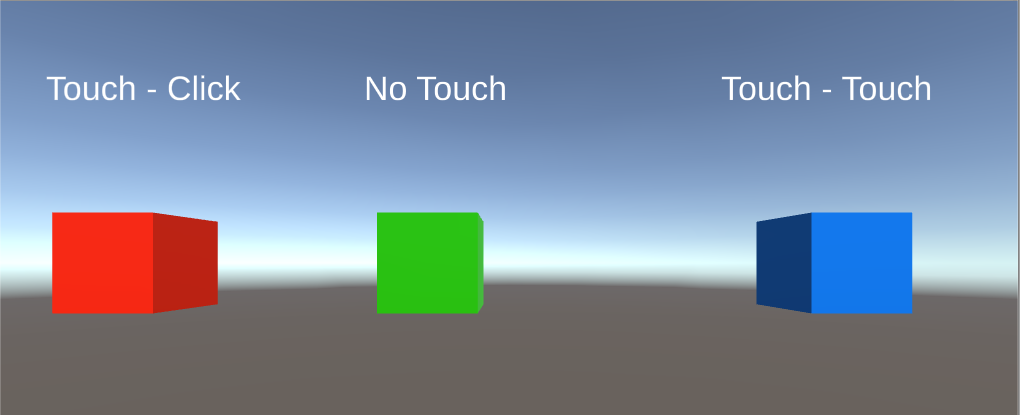
The text above the cubes will show how much times a cube has been either focused, touched or clicked. I you press play and then the space bar, the right hand will appear (or use ctrl for the left hand). Moving the hand can be done by using the mouse - if you move the hand ray over the cubes it will trigger a focus event, if you tap the left mouse button you will trigger a tap, and if you move the hand towards the cube (using the WASD keys) it will trigger a touch event.

That is to say - you would expect that. But that is not always the case

What happens is this:

  • You can click or focus the green cube, but you cannot touch it. Nothing happens if you try.
  • You can click, focus or touch the red cube, but if you touch it, the number of times it's clicked is increasing. Not the number of touches.
  • Only the blue cube works as expected.

Yet they all have the CodedInteractionResponder. How does this compute?

NearInteractionTouchable

The best way to explain this, is an image showing the bottom half of all the three cubes

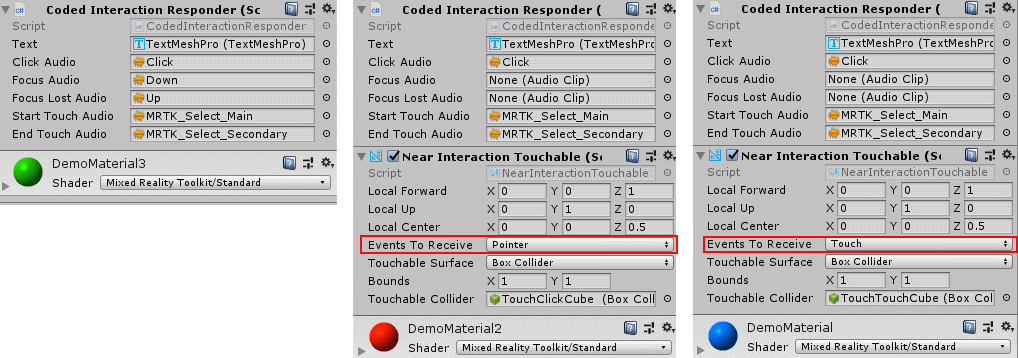
The green cube misses the NearInteractionTouchable. This script is necessary to have touch events being fired at all. So unlike IMixedRealityPointerHandler and IMixedRealityFocusHandler, where a mere implementation of the interface will trigger an event, a touch event - that is, methods in IMixedRealityTouchHandler being called - requires the addition of a NearInteractionTouchable script.

And NearInteractionTouchable has another trick up it's sleeve. Suppose you have a button - whether it's (air) tapped or actually touched/pressed, you want to activate the same code. If you change "Events to Receive" from it's default "Touch" to "Pointer" (as I did with the red cube) touching the cube will actually trigger a pointer event. This saves you a few lines of code. So basically NearInteractionTouchable can act as a kind of event router. And this is why the red cube never shows a touch event - but a click event instead.

Be aware NearInteractionTouchable needs a collider to work on. This collider needs to be on the same object the script is on. So if you make an empty game object as a hat stand for a a bunch of smaller game objects, make sure to manually add a collider that envelops all game objects, otherwise the 'touch' won't seem to work.

What, no code?

Yes, there is code, but it's pretty straightforward and if you want to have a look at CodeInteractionResponder, have a look in GitHub. It's actually so simple I felt it a little bit overdone to verbatim repeat parts in this blog post itself.