Showing posts with label MVVM. Show all posts

05 January 2015

Binding shapes to the Windows Phone 8.1 Here Maps control

Intro

Every time I meet someone from the Windows Phone Map team (or get into contact with them in some other way) I talk about the importance of being able to data bind shapes to the maps. Things are definitely improving: XAML elements can displayed using data binding out of the box (we used to need the Windows Phone toolkit for that), but Map Shapes alas not. As the saying goes – ‘if the mountain will not come to Muhammad, then Muhammad must go to the mountain' I took up an old idea that I used for Bing Maps on Windows 8 and later converted to Windows Phone 8.0 – and basically adapted it for use in Windows Phone 8.1. Including some bug fixes.

Map display elements recap

You can display either XAML elements on top of the map or use map shapes. XAML elements can be anything, a can be displayed by either adding them in code to the map’s Children property, or by using a MapItemControl, databind it’s ItemSource property to a list object and them define a template for the display using properties from the object bound to the template. Typically, that looks like this:

<Maps:MapItemsControl ItemsSource="{Binding Activities}">
    <Maps:MapItemsControl.ItemTemplate>
        <DataTemplate >
            <Image Source="{Binding Image}" Height="25"
                Maps:MapControl.NormalizedAnchorPoint="{Binding Anchor}" 
                Maps:MapControl.Location="{Binding Position}">
            </Image>
        </DataTemplate>
    </Maps:MapItemsControl.ItemTemplate>
</Maps:MapItemsControl>

Important to know is that these elements are not drawn by the map, but on top of the map, by the UI thread. Typically, they are slow.

Map shapes, on the other hand, are drawn by the map itself, by native code, and therefore fast. You can add them to the map by adding a MapShape child class to the maps’ MapElements properties. You can choose from MapPolyLine, MapPolygon and – new in Windows Phone 8.1 – MapIcon. Data binding is, unfortunately, not something that is supported.

Enter WpWinNlMaps

This time, you won’t have to type or have to look at a lot of code, as I have already published all that’s necessary on NuGet – in the WpWinNlMaps package. You simply add this to your application, and you are ready to go. Mind you, this pulls in a lot of other stuff – the WpWinNl package itself, MVVMLight, and some more stuff. This will enable you to bind view models to the map, have them displayed to and make them ‘tappable’. This is all done with the aid of – you guessed it – a behavior. MapShapeDrawBehavior to be precise.

Concepts

Typically, maps are divided into layers. You can think of this as logical units representing one class of real-world objects (or ‘features’ as they tend to be called in the geospatial word). For instance, “houses”, “gas stations”, “roads”. In Windows Phone, this is clearly not the case: all MapShapes are thrown into one basket – the MapElements property. In WpWinNlMaps, a layer roughly translates to one behavior attached to the map.

A MapShapeDrawBehavior contains a few properties

  • ItemsSource – this is where you bind your business objects/view models to
  • PathPropertyName – the name of the property in a bound object that contains the Geopath describing the object’s location
  • LayerName – the name of the layer. Make sure this is unique within the map
  • ShapeDrawer – the name of the class that actually determines how the Geopath in PathPropertyName is actually displayed
  • EventToCommandMappers – contains a collection of events of the map that need to be trapped, mapped to a command on the bound object that needs to be called when the map receives this event. Presently, the only events that make sense are “Tapped” and “MapTapped”.

A sample up front

Before going further into detail, let’s do a little sample first, because theory is fine, but code works better, in my experience. So I have a little class containing a viewmodel that has a Geopath, and Name, and a command that can be fired:

public class PointList : ViewModelBase
{
  public PointList()
  {
    Points = null;
  }
  public string Name { get; set; }

  public Geopath Points { get; set; }
  
  public ICommand SelectCommand
  {
    get
    {
      return new RelayCommand<MapSelectionParameters>(
        p => DispatcherHelper.CheckBeginInvokeOnUI(() => 
        Messenger.Default.Send(new MessageDialogMessage(
          Name, "Selected object", "Ok", "Cancel"))));
    }
  }
}

Suppose a couple of these things are sitting in my main view model’s property “Lines”, then I can simply display a number of blue violet lines by using the following XAML

<maps:MapControl x:Name="MyMap" >
  <mapbinding:MapShapeDrawBehavior LayerName="Lines" ItemsSource="{Binding Lines}" 
       PathPropertyName="Points">
  
      <mapbinding:MapShapeDrawBehavior.EventToCommandMappers>
        <mapbinding:EventToCommandMapper EventName="MapTapped" 
             CommandName="SelectCommand"/>
      </mapbinding:MapShapeDrawBehavior.EventToCommandMappers>
      
      <mapbinding:MapShapeDrawBehavior.ShapeDrawer>
        <mapbinding:MapPolylineDrawer Color="BlueViolet"/>
      </mapbinding:MapShapeDrawBehavior.ShapeDrawer>
      
  </mapbinding:MapShapeDrawBehavior>
</maps:MapControl

So:image

  • Objects are created from the collection “Lines”
  • The name of the layer is “Lines” (this does not need to correspond with the name used in the previous bullet)
  • The property containing the Geopath for a single object in the list “Lines” is called “Points”
  • When the event “MapTapped” is detected on one of these lines, the command “SelectCommand” is to be fired. Mind you, this command should be on the bound object. Notice this fires a MessageDialogMessage that can be displayed by a MessageDialogBehavior. Basically, if all the parts are in place, it will show a message dialog displaying the name of the object the user tapped on.
  • This object is to be drawn as a blue violet line.

The result being something as displayed to the right.

Map shape drawers

These are classes that turn the Geopath into an actual shape. You get three out of the box that can be configured using a few simple properties.

  • MapIconDrawer
  • MapPolyLineDrawer
  • MapPolygonDrawer

To draw an icon, line or polygon (duh).  The key thing is – the drawers are very simple. For instance, this is the drawer that makes a line:

public class MapPolylineDrawer : MapLinearShapeDrawer
{
  public MapPolylineDrawer()
  {
    Color = Colors.Black;
    Width = 5;
  }

  public override MapElement CreateShape(object viewModel, Geopath path)
  {
    return new MapPolyline { Path = path, StrokeThickness = Width, 
                             StrokeColor = Color, StrokeDashed = StrokeDashed, 
                             ZIndex = ZIndex };
  }
}

There is only one method CreateShape that you need to override to make your own drawer. You get the viewmodel and the Geopath (as extracted by the MapShapeDrawBehavior and you can simply mess around with it.

The drawer class model is like this:
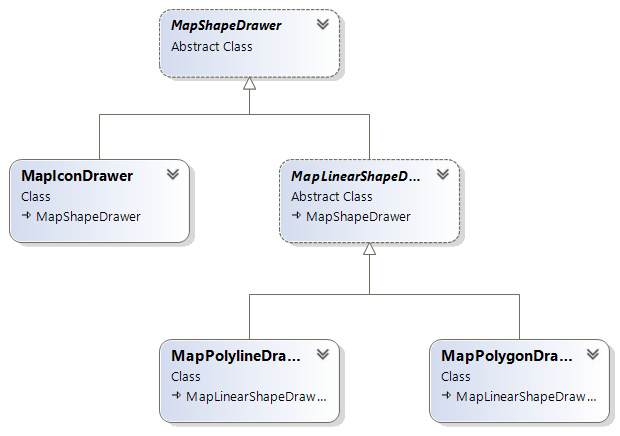
image

Trapping events and activating commands with EventToCommandMapper

By adding an EventToCommandMapper to EventToCommandMappers you can make a command get called when an event occurs. You can do that easily in XAML as displayed in the sample. Basically only events that have a MapInputEventArgs or TappedRoutedEventArgs can be trapped. In most real-world cases you will only need to trap MapTapped. See the example above how to do that. Keep in mind, again, that although the event is trapped on the map, the command is executed on the elements found on the location of the event.

There is a special case though where you might want to trap the “Tapped” event too – that is when you mix and match XAML elements and MapShapes. See this article for background information on that particular subject.

Some limitations and caveats

  • Even for MapIcons the PathPropertyName needs to point to a Geopath. This is to create a common signature for the CreateShape method in the drawers. Geopaths of one point are valid, so that is no problem. If you provide Geopaths containing more than one point, it will just use the first point.
  • Although the properties are read from bound objects, those properties are not bound themselves. Therefore, an object that has already been drawn on the map will not be updated on the map if you change the contents of the Geopath. You will need to make sure the objects are in an ObservableCollection and then replace the whole object in the collection to achieve that result.
  • If you use a method like mine to deal with selecting objects (firing messages), your app’s code will need to deal with multiple selected objects – since there can be more than one object on one location. My sample solution does clearly not do that. All objects will fire a message, but only one will show the message dialog. A better way to deal with it would be
    • Make a message that contains the MapSelectionParameters that are supplied to the command that is fired on select (see sample code)
    • Have the MainViewModel collect those messages, and decide based upon the SelectTime timestamp what messages are the result of one select action and should be displayed together.
  • In professional map systems the order of the layers determines the order in which elements are drawn. So the layers that are drawn first, appear at the bottom, and everything that’s drawn later on top of it. In Windows Phone, the Z-index of each element determines that. So be sure to set those in the right order if you want to appear stuff on top of each other.
  • Be aware that MapIcons are a bit of an oddball. First, they are drawn using a ‘best effort’. In layman’s terms, this means that some of them won’t a appear if they are too close together. If there are a lot close together, a lot won’t appear. This will change while you zoom and pan, and you have no way to control it. Furthermore, MapIcons don’t always show on top of other shapes even if you specify the Z-index to be higher.

Conclusion
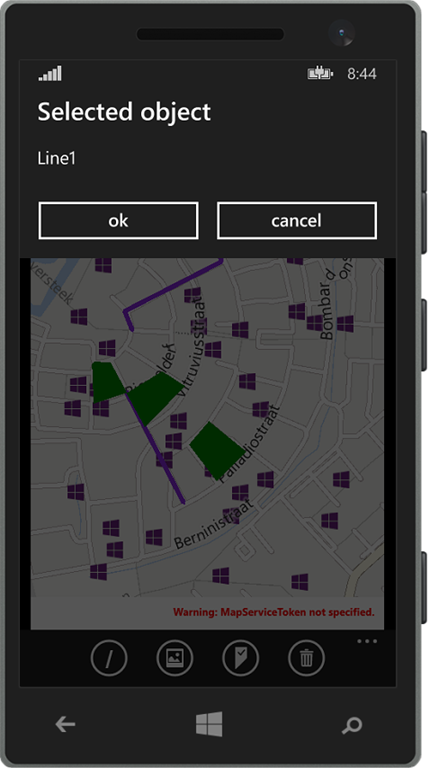
imageThe sample solution shows the drawing of icons, lines and polygons using the binding provided by WpWinNlMaps. You can tap on a map element and the name of the tapped element will display in a message dialog. This should give you a running start in using this library.

Although there are quite some limitations with respect to the binding, mainly caused by the nature of how the map works (you cannot bind to a command that is to be called when you tap the element – you can just provide the name of the command, just like the path property) I think this library makes using the map a lot easier – at least in MVVM apps. I am using this library extensively in my latest app Travalyzer.

Happy mapping!

22 December 2014

A behavior to show a MessageDialog from a MVVMLight viewmodel in Universal apps–with callbacks

Of course you are now all writing MVVM based apps, after all I have been advocating that for years, and you are listening this here old venerable MVP, right? ;). Anyway, some UI interactions between UI and viewmodel can seem to be a bit complicated, but these kinds of problems are usually pretty simple to solve with a combination of a behavior, the MVVMLight messenger, and a message containing a callback. And as I hate to write things more than once, I  made this into a reusable behavior. It ain’t rocket science, but it’s nice and clean.

I start with a class holding the actual message, and in this class file I have defined a callback delegate as well:

using System.Threading.Tasks;
using GalaSoft.MvvmLight.Messaging;

namespace WpWinNl.Behaviors
{
  public class MessageDialogMessage : MessageBase
  {
    public MessageDialogMessage(string message, string title,
                                string okText, string cancelText,
                                MessageDialogCallBack okCallback = null,
                                MessageDialogCallBack cancelCallback = null,
                                object sender = null, object target = null)
                                : base(sender, target)
    {
      Message = message;
      Title = title;
      OkText = okText;
      CancelText = cancelText;
      OkCallback = okCallback;
      CancelCallback = cancelCallback;
    }

    public MessageDialogCallBack OkCallback { get; private set; }
    public MessageDialogCallBack CancelCallback { get; private set; }
    public string Title { get; private set; }
    public string Message { get; private set; }
    public string OkText { get; private set; }
    public string CancelText { get; private set; }
  }

  public delegate Task MessageDialogCallBack();
}

It’s a basic MVVMLight BaseMessage child class, with properties for various texts, and two optional callbacks for OK and cancel actions.

The behavior itself is, as behaviors go, pretty simple:

using System;
using System.Diagnostics;
using Windows.UI.Popups;
using Windows.UI.Xaml;
using GalaSoft.MvvmLight.Messaging;

namespace WpWinNl.Behaviors
{
  public class MessageDialogBehavior : SafeBehavior<FrameworkElement>
  {
    protected override void OnSetup()
    {
      Messenger.Default.Register<MessageDialogMessage>(this, ProcessMessage);
      base.OnSetup();
    }

    private async void ProcessMessage(MessageDialogMessage m)
    {
      bool result = false;
      var dialog = new MessageDialog(m.Message, m.Title);

      if (!string.IsNullOrWhiteSpace(m.OkText))
      {
        dialog.Commands.Add(new UICommand(m.OkText, cmd => result = true));
      }

      if (!string.IsNullOrWhiteSpace(m.CancelText))
      {
        dialog.Commands.Add(new UICommand(m.CancelText, cmd => result = false));
      }

      try
      {
        await dialog.ShowAsync();
        if (result && m.OkCallback != null)
        {
          await m.OkCallback();
        }

        if (!result && m.CancelCallback != null)
        {
          await m.CancelCallback();
        }
      }
      catch (Exception ex)
      {
        Debug.WriteLine("double call - ain't going to work");
      }
    }
  }
}

This being once again a SafeBehavior, it simply starts to listen to MessageDialogMessage messages. When one is received, a MessageDialog is constructed with the message and title to display, as well as an optional Ok and Cancelbutton – and callback. If you send a message, you can provide optionally provide simple method from your viewmodel to be called by the behavior when Ok or Cancel is called, thus providing a two-way communication channel. Mind, though, all this is async, which has a curious side effect: if you send another message before the user has clicked Ok or Cancel, this will raise an exception.This will be displayed in the Visual Studio output window while you debug, but it won’t show up in release, and your message won’t be displayed either – so you need to carefully control sending messages, and not throw them out like there’s no tomorrow.

I have made a little sample app – a Universal app of course, because there have been some pretty clear hints by Microsoft this is the way to go forward. You will notice everything worthwhile is the shared project, up to the MainPage.xaml. People who were present at the latest Lowlands WpDev day last October will remember my fellow MVP Nico Vermeir saying in his talk “don’t do that, there’s pain in there”, and while this is true, it’s an ideal thing for lazy demo writers.

I started out with a blank Universal app, and moved the MainPage.Xaml and it’s companion MainPage.Xaml.cs to the shared project. Then I brought in my WpWinNl project that, amongst other things, drags in MVVMLight and everything else you need. Then I created this whopping complex viewmodel:

using System.Threading.Tasks;
using System.Windows.Input;
using GalaSoft.MvvmLight;
using GalaSoft.MvvmLight.Command;
using GalaSoft.MvvmLight.Messaging;
using WpWinNl.Behaviors;

namespace SampleMessagePopup
{
  public class MainViewModel : ViewModelBase
  {
    public ICommand MessageCommand
    {
      get
      {
        return new RelayCommand(
          () => 
            Messenger.Default.Send(new MessageDialogMessage(
              "Do you really want to do this?", "My Title", 
              "Hell yeah!", "No way", 
              HellYeah, Nope)));
      }
    }

    private async Task HellYeah()
    {
      Result = "Hell yeah!";
    }

    private async Task Nope()
    {
      Result = "NOOOO!";
    }


    private string result = "what?";
    public string Result
    {
      get { return result; }
      set { Set(() => Result, ref result, value); }
    }
  }
}

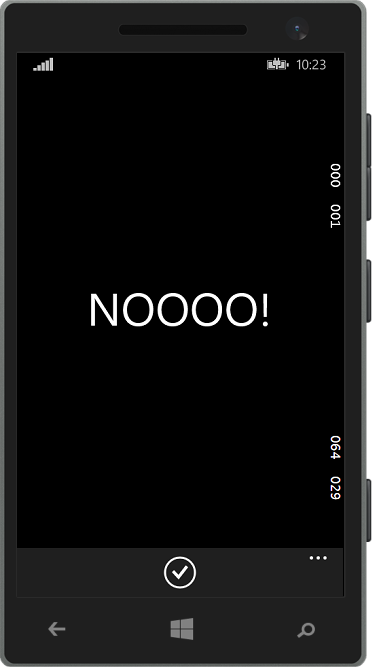
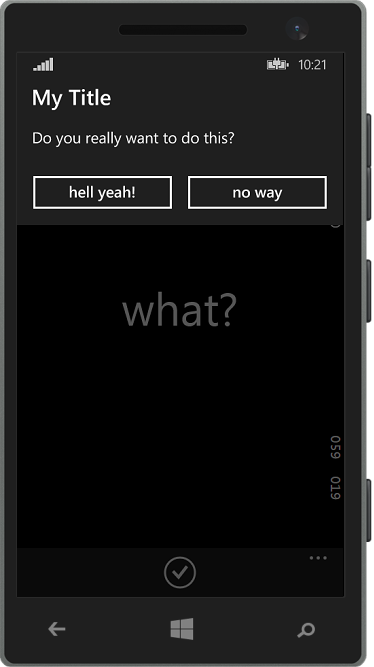
imageimageIf you fire the command, it will show a dialog that looks like the left on these two screens (on Windows Phone) and if you press the “no way” button it will show the very right screen. A few things are noticeable:

  • Both methods are async, although they don’t implement anything asynchronous. That’s because I wanted to be able do awaitable things in the callback and a contract is a contract – were not making JavaScript here. Only tools like ReSharper (highly recommended) will make you notice it, but you can ignore it for now.
  • You might notice the callback methods are private but still the behavior is apparently able to call these methods. This, my dear friends who grew up in the nice era of managed OO languages that shield you from the things that move below you in the dark dungeons of your processor, is because you basically give a pointer to a method – and that’s accessible anywhere. Your compiler may tell you it’s a private method, but that’s more like it has a secret telephone number – if you got that, you can access it anywhere ;-). Us oldies who grew up with C or Assembler can tell you all about the times when boats were made of wood and men were made of steel and the great ways you can shoot yourself in the foot with this kind of things. If you want to make you app testable it makes more sense to make the methods public, by the way, but I could not let the opportunity to show this great example of the law of leaky abstractions pass.

But I digress, I know, that is also a sign of age ;)

The Xaml is of course also pretty simple – as this app does not do much:

<Page
    xmlns="http://schemas.microsoft.com/winfx/2006/xaml/presentation"
    xmlns:x="http://schemas.microsoft.com/winfx/2006/xaml"
    xmlns:Interactivity="using:Microsoft.Xaml.Interactivity" 
    xmlns:Behaviors="using:WpWinNl.Behaviors"
    x:Class="SampleMessagePopup.MainPage"
    DataContext="{StaticResource MainViewModel}">
  <Interactivity:Interaction.Behaviors>
    <Behaviors:MessageDialogBehavior/>
  </Interactivity:Interaction.Behaviors>
  <Page.BottomAppBar>
    <CommandBar>
      <AppBarButton Icon="Accept" Label="go ask!" 
                    Command="{Binding MessageCommand}"/>
    </CommandBar>
  </Page.BottomAppBar>

  <Grid Background="{ThemeResource ApplicationPageBackgroundThemeBrush}" >
  	<TextBlock Text="{Binding Result}" HorizontalAlignment="Center" 
                   VerticalAlignment="Center" FontSize="56"/>
  </Grid>
</Page>

Notice the behavior sitting on the page itself. For obvious reasons, it’s the logical place to put. You can also put it on the top grid. But whatever you do, use only one per page. They all listen to the same message, and if you put more of them on one page you will get an interesting situation where multiple behaviors will try to show the same MessageDialog. I have not tried this, but I assume it won’t be very useful.

To make this work, by the way, you need of course to declare your viewmodel in App.Xaml. You have no other choice here, as the App Bar sits at the top level of the page, the button calls the command and thus the resource must be one level higher, i.e. the app itself.

<Application
    x:Class="SampleMessagePopup.App"
    xmlns="http://schemas.microsoft.com/winfx/2006/xaml/presentation"
    xmlns:x="http://schemas.microsoft.com/winfx/2006/xaml"
    xmlns:local="using:SampleMessagePopup"
    xmlns:system="using:System">

  <Application.Resources>
    <local:MainViewModel x:Key="MainViewModel" />
  </Application.Resources>
</Application>

Again, if you use something like ReSharper a simple click on the declaration in MainPage.Xaml will make this happen.

So, that’s all there is to it. You won’t find the code for this behavior in the solution, as it is already in WpWinNl. Just like the previous one ;). As usual, a sample solution is provided, but in inspired by my fellow MVP Diederik Krols I’ve have decided that going forward I will publish those on GitHub.

09 June 2014

Using Fody.PropertyChanged for automatic PropertyChangedEvents and model-to-viewmodel communication

When you are working with MVVM, you are faced with a couple of interesting challenges. Usually you have something like this:

You see a lot of properties with a lot of repetitive code. Of course, you can use snippets to make that easier, but still. It looks cluttered.

using GalaSoft.MvvmLight;

namespace MyApp.Logic.ViewModels
{
  public class DummyViewModel : ViewModelBase
  {
    private string myProperty;
    public string MyProperty
    {
      get { return myProperty; }
      set
      {
        if (myProperty != value)
        {
          myProperty = value;
          RaisePropertyChanged(() => MyProperty);
        }
      }
    }

    private string yourProperty;
    public string YourProperty
    {
      get { return yourProperty; }
      set
      {
        if (yourProperty != value)
        {
          yourProperty = value;
          RaisePropertyChanged(() => YourProperty);
        }
      }
    }

    public void DoSomething()
    {}
  }
}

And it usually gets more cluttered, as people tend to put what amounts to business logic into the viewmodel. I used to make a viewmodel as a wrapper around a model, like this.

namespace MyApp.Logic.Models
{
  public class DummyModel
  {
    public string YourProperty { get; set; }
    public string MyProperty { get; set; }

    public void DoSomeBusinessThing()
    { }
  }
}
and then something like this, also created via snippets
using GalaSoft.MvvmLight;
using MyApp.Logic.Models

namespace MyApp.Logic.ViewModels
{
  public class DummyViewModel : ViewModelBase
  {
    public DummyViewModel()
    {
    }

    public DummyViewModel(DummyModel model)
    {
      Model = model;
    }
    public DummyModel Model { get; set; }

    public string MyProperty
    {
      get { return Model.MyProperty; }
      set
      {
        if (Model.MyProperty != value)
        {
          Model.MyProperty = value;
          RaisePropertyChanged(() => MyProperty);
        }
      }
    }

    public string YourProperty
    {
      get { return Model.YourProperty; }
      set
      {
        if (Model.YourProperty != value)
        {
          Model.YourProperty = value;
          RaisePropertyChanged(() => YourProperty);
        }
      }
    }
  }
}
Nice. But now you have a different problem. I you call DoSomeBusinessThing and that affects "MyProperty" or "YourProperty" on the model in some way, how is the viewmodel supposed to know and fire a PropertyChanged?

Enter Fody - a great toolkit. It is basically an extensible toolkit for “weaving” .NET assemblies. It accepts plugins to decide what is actually injected. The most useful for our problem is the PropertyChanged.Fody.Which is also available as a Nuget package that you can easily add to your project. You then take your good old DummyObject and add the attribute ImplementPropertyChanged to it.

using PropertyChanged;

namespace Travalyzer.Logic.ViewModels
{
  [ImplementPropertyChanged]
  public class DummyModel
  {
    public string YourProperty { get; set; }
    public string MyProperty { get; set; }

    public void DoSomeBusinessThing()
    { }
  }
}

and boom. If something affects a property, the property will fire PropertyChanged. PropertyChanged.Fody will add all kinds of smart logic to your model, as described here. Ain't that cool, you don't even have to make a viewmodel anymore.

Well, sorry to rain on your parade, but if you now start to add commands to your enhanced model and properties or methods that are only used for display (for instance, a formatted date) you are basically polluting your business layer. It’s like adding business logic to your viewmodel, but coming from the opposite direction. Yes, you can now bind directly to model properties and they will fire a PropertyChanged, but business logic is business logic and thou shalt not pollute that with methods indented to deliver data for display and UI interaction. That is what viewmodels are for. And your viewmodel may still need to do something so it still may need to be notified. After some puzzling I came up with the following. First, I define a base class for my models with minimal baggage:

using System.ComponentModel;
using GalaSoft.MvvmLight.Threading;
using PropertyChanged;

namespace WpWinNl.MvvmLight
{
  [ImplementPropertyChanged]
  public class BaseNotifyingModel : INotifyPropertyChanged
  {
    public event PropertyChangedEventHandler PropertyChanged;

    protected virtual void OnPropertyChanged(string propertyName = null)
    {
      if (PropertyChanged != null)
      {
        DispatcherHelper.CheckBeginInvokeOnUI(() => 
            PropertyChanged(this, new PropertyChangedEventArgs(propertyName)));
      }
    }
  }
}

I don’t even use MVVMLight’s ViewmodelBase, but a very simple INotifyPropertyChanged implementation. PropertyChanged.Fody is apparently smart enough to leave that part of the class alone if it’s already implemented. But of course I do use other smart things by Laurent Bugnion – the DispatcherHelper. Mind you, this requires it being initialized in App.Xaml.cs. The most important thing is that the PropertyChanged event can be used by the viewmodel to track possible changes in the model. I use this in the following base view model, which is used on MVVMLight ViewModelBase:

using System.ComponentModel;
using GalaSoft.MvvmLight;
using PropertyChanged;

namespace WpWinNl.MvvmLight
{
  [ImplementPropertyChanged]
  public class TypedViewModelBase<T> : ViewModelBase where T : BaseNotifyingModel 
  {
    private T model;

    public TypedViewModelBase()
    {
    }

    public TypedViewModelBase(T model)
    {
      Model = model;
    }

    public T Model
    {
      get { return model; }
      set
      {
        if (value != model)
        {
          if (model != null)
          {
            model.PropertyChanged -= ModelPropertyChanged;
          }
          model = value;
          if (model != null)
          {
            model.PropertyChanged += ModelPropertyChanged;
          }
        }
      }
    }

    protected virtual void ModelPropertyChanged(object sender, 
       PropertyChangedEventArgs e)
    {
    }
  }
}

imageIf you derive your models from BaseNotifyingModel and your viewmodels from TypedViewModelBase you will have a model that automatically fires INotifyPropertyChanged on any property that is changed – so it can be used in data binding – and you will have viewmodels that will automatically be notified of any change in their model – and by overriding ModelPropertyChanged you can act on that.

Now of course this is all very nice and very architecty, but how would this ever be useful? Suppose you have a list of business object containing a location. When the user selects it, you want to display it’s street address. You can get that using the MapLocationFinder API. If you have a few 100 points, and you want to get all the addresses – this can take quite some time. So you want to do this on-demand, as displayed in the Windows Phone demo solution.


So I created this model:

using System;
using System.Linq;
using Windows.Devices.Geolocation;
using Windows.Services.Maps;
using WpWinNl.MvvmLight;

namespace FodyDemo.Models
{
  public class LocationData : BaseNotifyingModel
  {
    public LocationData()
    {
      TimeStamp = DateTime.Now;
    }

    public int Id { get; set; }

    public bool HasLocation { get; set; }

    public Geopoint Position { get; set; }

    public DateTimeOffset TimeStamp { get; set; }

    private MapLocation locationInfo;

    public MapLocation LocationInfo
    {
      get
      {
        if (locationInfo == null)
        {
          lock (this)
          {
            MapLocationFinder.FindLocationsAtAsync(Position).
AsTask().ContinueWith(p => { var firstLocationData = p.Result.Locations; if (firstLocationData != null) { LocationInfo = firstLocationData.FirstOrDefault(); HasLocation = true; } }); } } return locationInfo; } set { locationInfo = value; } } } }

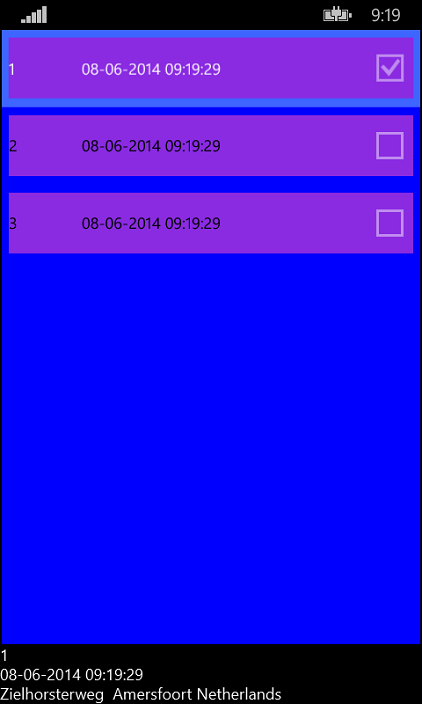
Basically, only if the LocationInfo property is accessed it is actually retrieved. In real life, I would probably implement this using a “LoadLocation” method or something, but whatever – this works as well. If the location is found, not only the LocationInfo is set, but also the HasLocation property, which makes the checkbox light up. In the list, the following properties are bound like this: 

<TextBlock Text="{Binding Model.Id}" FontSize="15"
VerticalAlignment="Center"></TextBlock> <TextBlock Text="{Binding DateAndTime}" Grid.Column="1" FontSize="15"
VerticalAlignment="Center"></TextBlock> <CheckBox IsChecked="{Binding Model.HasLocation}" IsEnabled="False"
Grid.Column="2" ></CheckBox

You can see HasLocation is bound directly to the Model, still it gets a PropertyChanged event fired courtesy of Fody. The DataAndTime property apparently coming from the ViewModel, but Location Property is left alone. for now. The panel at the bottom, where the selected object is displayed, is like this

<TextBlock Text="{Binding Model.Id}" FontSize="15" ></TextBlock>
<TextBlock Text="{Binding DateAndTime}" Grid.Row="1" FontSize="15"></TextBlock>
<TextBlock Text="{Binding LocationName}" Grid.Row="2"
FontSize="15"></TextBlock>

In the the viewmodel it looks like this:

using System.ComponentModel;
using System.Globalization;
using System.Windows.Input;
using Windows.Services.Maps;
using FodyDemo.Messages;
using FodyDemo.Models;
using GalaSoft.MvvmLight.Command;
using GalaSoft.MvvmLight.Messaging;
using WpWinNl.MvvmLight;

namespace FodyDemo.ViewModels
{
  public class LocationViewModel : TypedViewModelBase<LocationData>
  {

    public LocationViewModel()
    {
    }

    public LocationViewModel(LocationData ld) : base(ld)
    {
    }

    public string DateAndTime
    {
      get
      {
        return Model != null ? 
          Model.TimeStamp.ToString("dd-MM-yyyy hh:mm:ss", 
            CultureInfo.InvariantCulture) : string.Empty;
      }
    }

    public string LocationName
    {
      get {
        return Model != null && Model.LocationInfo != null ? 
        GetFormattedAdress(Model.LocationInfo.Address) : string.Empty; }
    }

    private string GetFormattedAdress(MapAddress a)
    {
      return string.Format("{0} {1} {2} {3}", a.Street, a.StreetNumber,
a.Town, a.Country); } public ICommand SelectCommand { get { return new RelayCommand( () => Messenger.Default.Send(new SelectedObjectMessage(this))); } } protected override void ModelPropertyChanged(object sender,
PropertyChangedEventArgs e) { if (e.PropertyName == "LocationInfo") { RaisePropertyChanged(() => LocationName); } } } }

You can see the LocatioName property shows a neatly formatted address – and gets a manual RaisePropertyChanged when the ModelPropertyChanged is fired from the model (once again courtesy of Fody) – it checks if that is indeed the “LocationInfo” property and boom – the UI knows it must update because a property from the model is changed, even tough that property is not directly bound to the property.

Thus you can use the viewmodel as it is intended – a place to bind model and view together, a converter on steroids as Josh Smith put is so aptly as early as 2008. A simple base class will add some minimal extra functionality to your business class to make it play within MVVM – but it will still keep it clean.

Important detail – if you use the MVVMLight DispatcherHelper, you must initialize it first. I usually do this in the App.xaml.cs.

The demo solution, which contains some more code, can be found here. Credits go to the equally smart as sarcastic-in-a-fun-way Scott Lovegrove, who first put me on track with Fody quite some time ago, but only recently I was smart enough to actually take his advice and try it out. My base class for models was based on this Fody sample – but of course I thought I was smarter that that and opted for events rather than MVVMLight messages, it being a more lightweight solution. I like to reserve the Messenger for inter-viewmodel communication.

If you did indeed read all the way through here – congratulations. This is a very architect’s article, not some fun thing to make a cool new user control. But once in a while I start pondering about things like this, to keep my code cleaner, and make things better. If I haven’t bored you to death with it, you might be one of the very rare species that has some architectural genes hidden in your DNA too. I like to think I have, although I am more of a micro-architect, not one that only draws enormous complex diagrams for a living ;)

27 October 2013

An MVVM friendly tap+send and Bluetooth connection helper for Windows Phone 8

Why?
Early this year I blogged about TtcSocketHelper, an MVVM friendly helper object that allowed you connect two Windows Phone 8 devices to each other using a socket.I made two games with it– Pull the Rope and 2 Phone Pong, head-to-head style games that are played over two phones, exchanging JSON data to keep things in sync. A lot of things happened the last 10 months: super cheap devices entered the market – most notably the Nokia Lumia 520. It is a full fledged Windows Phone 8, but it’s super cheap and as a consequence it does not support NFC (and thus no tap+send). That apparently is of no concern to buyers, as according to AdDuplex stats, it took off like a bat out of hell. In just six months it grabbed what is now almost 33% of the Windows Phone 8 market. In other words, by limiting my app to NFC enabled phones I cut myself off from a significant – and growing – part of the market.

PhonePairConnectionHelper – supporting Bluetooth browsing
So I rewrote TtcSocketHelper into PhonePairConnectionHelper – basically the same class, but it now supports connecting phones using tap+send as well as by using the tried and tested way of Bluetooth pairing. Since October 21st 2 Phone Pong  1.3.0 is in the store, proudly powered by this component, now enabling my game to be played by 50% more people!
In this article I am going to concentrate on connecting via Bluetooth, as connecting via tap+send is already described in my article from January 2013.
The start of the object is simple enough again, and actually looks a lot like the previous incarnation:
using System;
using System.Collections.Generic;
using System.Diagnostics;
using System.Threading.Tasks;
using GalaSoft.MvvmLight.Messaging;
using Windows.Foundation;
using Windows.Networking.Proximity;
using Windows.Networking.Sockets;
using Windows.Storage.Streams;

namespace Wp7nl.Devices
{
  public class PhonePairConnectionHelper
  {
    private ConnectMethod connectMode;

    public PhonePairConnectionHelper()
    {
      Messenger.Default.Register<NavigationMessage>(this, ProcessNavigationMessage);
      PeerFinder.TriggeredConnectionStateChanged +=
        PeerFinderTriggeredConnectionStateChanged;
      PeerFinder.ConnectionRequested += PeerFinderConnectionRequested;
    }
  
    private void ProcessNavigationMessage(NavigationMessage message)
    {
      Debug.WriteLine("PhonePairConnectionHelper.ProcessNavigationMessage " + 
                       message.NavigationEvent.Uri);

      if (message.IsStartedByNfcRequest)
      {
        Start();
      }
    }
  }
}
The most notable is now that the setup is being done in the constructor. The class still listens to the NavigationMessage and if so, it still calls the start method (this is for the tap+send route, that still works). The PeerFinder is set up to listen to TriggeredConnecState events (i.e. events that happen after a tap+send) but also -  and this is important – to plain ole Bluetooth requests (ConnectionRequested event). The start method now, is pretty much changed:
public void Start(ConnectMethod connectMethod = ConnectMethod.Tap, 
  string displayAdvertiseName = null)
{
  PeerFinder.Stop();
  connectMode = connectMethod;
  if (!string.IsNullOrEmpty(displayAdvertiseName))
  {
    PeerFinder.DisplayName = displayAdvertiseName;
  }
  PeerFinder.AllowBluetooth = true;
  PeerFinder.Start();

  // Enable browse
  if (connectMode == ConnectMethod.Browse)
  {
    PeerFinder.FindAllPeersAsync().AsTask().
      ContinueWith(p => FirePeersFound(p.Result));
  }
}
The ConnectMethod enumeration, as you can already see from the code, enables you to indicate which method you want to use:
namespace Wp7nl.Devices
{
  public enum ConnectMethod
  {
    Tap,
    Browse
  }
}
The Start method has an optional parameter that gives you the ability to choose a connection method, and if necessary add a display name. The display name only applicable for the Bluetooth method. The interesting thing is – if you don’t provide a name, like I did in the sample, it will just use the phone’s name as you have provided it (by giving it a name via Explorer if you connect if via a USB cable to your computer)  - abbreviated to 15 characters. Why this is only 15 characters – your guess is as good as mine.
If you call this method without any parameters, it uses default values and will try to connect using tap+send, just like before.
Before selecting a method, you might want to check what connection methods the device support by using the two helper properties in the object:
public bool SupportsTap
{
  get
  {
    return (PeerFinder.SupportedDiscoveryTypes &
       PeerDiscoveryTypes.Triggered) == PeerDiscoveryTypes.Triggered;
  }
}

public bool SupportsBrowse
{
  get
  {
    return (PeerFinder.SupportedDiscoveryTypes &
      PeerDiscoveryTypes.Browse) == PeerDiscoveryTypes.Browse;
  }
}
Mind you – the helper is not so intelligent that it refuses to connect in a non-supported mode. And I don’t check for it in the sample app either. That is up to your app. But anyway – back up a little. If you try to connect via Bluetooth, the component tries to find all peers – that is, other phones running the same app, using FindAllPeersAsync, and fires the PeersFound event when it is done:
private void FirePeersFound(IEnumerable<PeerInformation> args)
{
  if (PeersFound != null)
  {
    PeersFound(this, args);
  }
}

public event TypedEventHandler<object, IEnumerable<PeerInformation>> PeersFound;
Your app has to subscribe to this event, and it then gets a list of “PeerInformation” objects. And PeerEvent has a number of properties, but the only one you will need to concern yourself is the “DisplayName” property. You display that in a list, a dropdown or whatever in your app, and after the user has made a selection, you call the Connect method:
public void Connect(PeerInformation peerInformation)
{
  DoConnect(peerInformation);
}

private void DoConnect(PeerInformation peerInformation)
{
  PeerFinder.ConnectAsync(peerInformation).AsTask().ContinueWith(p =>
  {
    socket = p.Result;
    StartListeningForMessages();
    PeerFinder.Stop();
    FireConnectionStatusChanged(TriggeredConnectState.Completed);
  });
}
And boom. You have a connection to the phone you have selected. The only thing that’s now missing is that the phone you have connected to, does not have a connection to you yet. But as you made the connection, the PeerFinder fired the ConnectionRequested event. Remember we set up a listener “PeerFinderConnectionRequested” to that in the constructor? Well guess what, part of the payload of the arguments of that event method gets is a PeerInformation object as well, containing the information to connect back to the phone that just connected to you :-). Which makes connecting back pretty easy:
private void PeerFinderConnectionRequested(object sender, 
                                           ConnectionRequestedEventArgs args)
{
  if (connectMode == ConnectMethod.Browse)
  {
    DoConnect(args.PeerInformation);
  }
}
And done. We know have a two-way socket connection using Bluetooth and we can call the SendMessage method just like before, and listen to result by subscribing to MessageReceived event. The only thing I did break in this helpers’ interface with regard to it predecessor is the ConnectionStatusChanged event type. This used to be

public event TypedEventHandler<object, 
             TriggeredConnectionStateChangedEventArgs>
             ConnectionStatusChanged; 
and now is
public event TypedEventHandler<object, TriggeredConnectState>
             ConnectionStatusChanged;
So if you subscribe to this event, you don’t have to check for args.State, but just for args itself. This was necessary to be able to fire connect events from DoConnect.
The rest of the class is nearly identical to the old TtcSocketHelper, and I won’t repeat myself here.

To use this class

First, decide if you are going to for for the tap+send route or the Bluetooth route. My apps check the SupportsTap and SupportsBrowse properties. If NFC (thus tap+send) is supported, I offer both options and give the users a choice to select a connect method. If is not supported, I offer only Bluetooth.
For the NFC route, the way to go still is:
  • Make sure you app does fire a NavigationMessage as described here
  • Make a new PhonePairConnectionHelper .
  • Subscribe to its ConnectionStatusChanged event
  • Subscribe to its MessageReceived event
  • Call Start
  • Wait until a TriggeredConnectState.Completed comes by
  • Call SendMessage – and see them appear in the method subscribed to MessageReceived on the other phone.
The way to go for Bluetooth is:
  • Make a new PhonePairConnectionHelper .
  • Subscribe to its ConnectionStatusChanged event
  • Subscribe to its MessageReceived event
  • Subscribe to its PeersFoundevent
  • Call Start with ConnectMethod.Browse and a display name
  • Wait until a PeersFound event comes by
  • Select a peer to connect to in your app
  • Call the Connect method with the selected peer
  • Wait until a TriggeredConnectState.Completed comes by
  • Call SendMessage – and see them appear in the method subscribed to MessageReceived on the other phone.

So basically, there isn’t that much difference ;-)

Changes in original sample
The fun thing is, you don’t even have to change that much to the existing demo solution. I added to the viewmodel the following code:

#region Bluetooth stuff

private bool useBlueTooth;
public bool UseBlueTooth
{
  get { return useBlueTooth; }
  set
  {
    if (useBlueTooth != value)
    {
      useBlueTooth = value;
      RaisePropertyChanged(() => UseBlueTooth);
    }
  }
}

private PeerInformation selectedPeer;

public PeerInformation SelectedPeer
{
  get { return selectedPeer; }
  set
  {
    if (selectedPeer != value)
    {
      selectedPeer = value;
      RaisePropertyChanged(() => SelectedPeer);
    }
  }
}

public ObservableCollection<PeerInformation> Peers { get; private set; }

private void PeersFound(object sender, IEnumerable<PeerInformation> args)
{
  Deployment.Current.Dispatcher.BeginInvoke(() =>
  {
    Peers.Clear();
    args.ForEach(Peers.Add);
    if (Peers.Count > 0)
    {
      SelectedPeer = Peers.First();
    }
    else
    {
      ConnectMessages.Add("No contacts found");
    }
  });
}

public ICommand ConnectBluetoothContactCommand
{
  get
  {
    return new RelayCommand(() =>
    {
      connectHelper.Connect(SelectedPeer);
      Peers.Clear();

    });
  }
}

#endregion
Basically:
  • A property to determine whether you are using Bluetooth or not (not = tap+send)
  • A property holding the selected Peer
  • A list of available peers
  • The callback for the helper’s PeersFound event. Not that everything here happens within a Dispatcher. As the PeersFound event comes back from a background thread, it has no access to the UI – but since it updates several bound properties, it needs that access – hence the Dispatcher.
  • and a command to allow the user to select a certain peer. Notice the Peers.Clear after the Peer is selected. That is because I use my HideWhenCollectionEmptyBehavior to display the UI for showing and selecting peers. This behavior is in the sample solution as code as I kind of forgot to add this to the last edition of my wp7nl library on codeplex.*ahem*
Two minor additions to the rest of the viewmodel: in the Init method, where I set up all the connectHelper, it now says:
connectHelper = new PhonePairConnectionHelper();
connectHelper.ConnectionStatusChanged += ConnectionStatusChanged;
connectHelper.MessageReceived += TtsHelperMessageReceived;
connectHelper.PeersFound += PeersFound;  // Added for Bluetooth support
And there’s also a little change in the StartCommand to accommodate the fact that if the user selects Bluetooth, the connectHelper should be called in a slightly different way.
public ICommand StartCommmand
{
  get
  {
    return new RelayCommand(
        () =>
        {
          ConnectMessages.Add("Connect started...");
          CanSend = false;
          CanInitiateConnect = false;
          // Changed for Bluetooth.
          if(UseBlueTooth)
          {
            connectHelper.Start(ConnectMethod.Browse);
          }
          else
          {
            connectHelper.Start();
          }
        });
  }
}
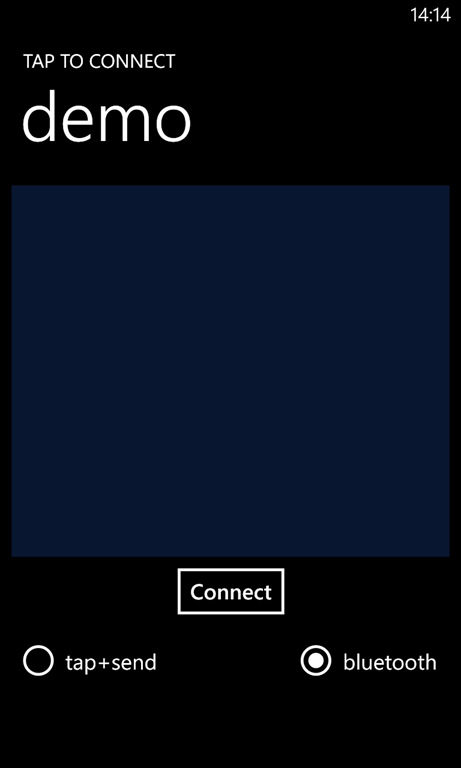
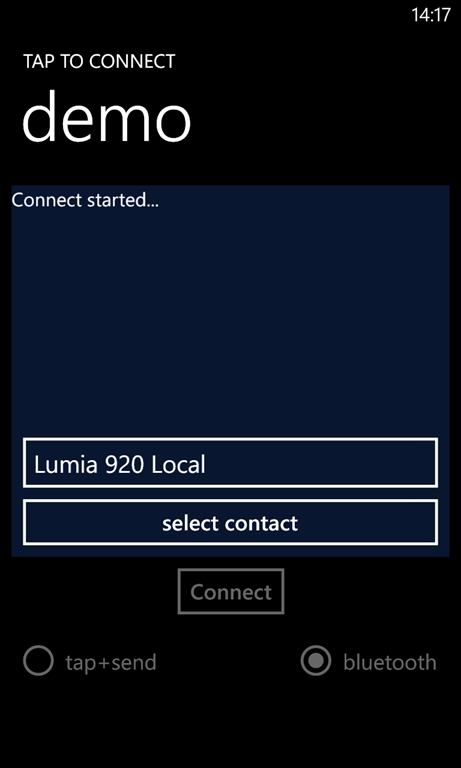
wp_ss_20131027_0001To enable the user to actually select a connection method, the start screen has changed a little and now sports two radio buttons. Bluetooth is selected by default.
<RadioButton Content="tap+send" 
IsChecked="{Binding UseBlueTooth, Converter={StaticResource BooleanInvertConvertor}, Mode=TwoWay}"  
  IsEnabled="{Binding CanInitiateConnect, Mode=OneWay}" />
<RadioButton Content="bluetooth" IsChecked="{Binding UseBlueTooth, Mode=TwoWay}" 
  HorizontalAlignment="Right" Margin="0" 
  IsEnabled="{Binding CanInitiateConnect, Mode=OneWay}" />
which is not quite rocket science, and some more code to give a user a simple UI to view and select found peers:
<Grid x:Name="bluetoothconnectgrid" VerticalAlignment="Bottom">
  <Grid.RowDefinitions>
    <RowDefinition Height="Auto"/>
    <RowDefinition Height="Auto"/>
  </Grid.RowDefinitions>
  <i:Interaction.Behaviors>
    <behaviors:HideWhenCollectionEmptyBehavior Collection="{Binding Peers}"/>
  </i:Interaction.Behaviors>
  <toolkit:ListPicker x:Name="OpponentsListPicker" Margin="12,0" VerticalAlignment="Top" 
      ExpansionMode="FullScreenOnly" 
      ItemsSource="{Binding Peers}" SelectedItem="{Binding SelectedPeer, Mode=TwoWay}" />
  <Button Content="select contact" Height="72" Grid.Row="1" 
      Command="{Binding ConnectBluetoothContactCommand, Mode=OneWay}"/>
</Grid>
wp_ss_20131027_0002Also not very complicated – a listpicker displays the peers and selects a peer, and the button fires the command to do the actual connecting. I rather like the use of HideWhenCollectionEmptyBehavior here – this automatically shows this piece of UI as there are peers in the list, and hides it when they are not. It’s rather elegant, if I may say so myself. On the picture right you can see it shows the name of my 920 – abbreviated to 15 characters.
After the connection has been made – either by Bluetooth or by tap+send – you can use this app to chat just like the previous version.

Important things to know
  • If you are a developer who wants protect your customers from disappointments, you have checked the “NFC” as requirement in the WMAppManifest.xml when you built an app on top of my previous TtcSocketHelper. Remove that checkmark now. Or else your app still won’t be available for phones like the 520 that don’t have NFC. And that quite defies the point of this whole new class.
  • I have found out Bluetooth browsing on Windows Phone 8 has some peculiar things to take into account
    • You still have to be quite close together – somewhere within the meter range – to find peers. Once the connection is made, you can move further apart
    • The first phone to start searching for a peer, usually finds nothing. The second one finds one opponent, the third one two. The search process usually doesn’t last very long – in most cases just a few seconds – before the PeerFinder either gives up or comes back with a peer. It’s advisable not to call Connect automatically if you find only one peer – that might not be the one the user was looking for. Always keep the user in control.
  • If you connect via tap+send, you will only need to start the app on one of the phones and press the connect button – the other phone will automatically fire up the app (or even download it if it is not there) when the devices are tapped together.
  • For the Bluetooth route, the app needs to be started on both phones and on both phones you will need to press the connect button.

Conclusion

The app market is always in flux, that’s true for all platforms but that sure goes for Windows Phone. It’s important to stay in touch with those developments. There’s a lot of growth in the Windows Phone market – especially on the low end of the phones. Walking the extra mile for those groups is important – cater for as much users as you can. I hope I helped you a little with that, both by general example and actual code. Demo solution, as always, can be downloaded here.

10 May 2013

Windows Phone 8 navigation part 3–assembling the MVVMLight app

Last time on, on Dotnetbyexample…

In the first post I described how to write the business logic to find a location by searching for an address by text, and in the second post I described how to do some actual routing – still, only business logic and viewmodels. And we kept in mind all the results should be tombstonable, and how to make sure this all worked by using simple unit/integration tests.

Today, it’s time for the actual app. Bear in mind this post will actually refer to a lot of earlier other posts – from even outside this series. In this post I am also going to show you that working with you designer sometimes means you need to make little tweaks to your viewmodels to make it work the way you want, or make life easier on the designer. Remember, you are the technician, the person who needs to make it finally work.

GUI and interaction design

So, after conferring with the designer we have agreed the app should work like this:

Windows Phone 8 navigate by MVVMLight

The route is displayed as a line, every maneuver as a star, and when you tap that star it should show a panel showing the maneuver description. For interested parties – this is a car route I could take to my home to my work at Vicrea ;-)

Well – the moving panels are easy to solve with some View States and DataTriggers – I’ve been down that road before. Showing a line and points on a map from the view model – been there done that, wrote behaviors for that and those are snugly in the wp7nl library which is, not quite coincidental, part of this solution already.

So, we need to do the following: 

  • Define the app user interface, that is:
    • Two panels enabling the user to input text and select a route, e.g. a user interface for both the GeocodeViewModels in RoutingViewmodel. We’ll make a user control from that
    • A panel with From/To info making showing the address from an to, and making it possible to let the From and To panel into view. This will be a user control as well
    • A button firing off the RoutingViewmodel’s DoRoutingCommand
    • A panel that’s shown as the user taps a maneuver. This, too, will be a user control.
    • A Map
  • A MainViewModel that’s acting as a kind of locator and a serialization root point, like I always do.
  • Something to handle the view state.

Adding ViewState management

Just like I did before in this post, I added a DisplayState enumeration in de NavigationDemo.Logic project, like this:

namespace NavigationDemo.Logic.States
{
  public enum DisplayState
  {
    Normal = 0,
    SearchFrom = 1,
    SearchTo = 2,
    ShowManeuver = 3
  }
}
one state for every panel, and a “Normal” state for every other panel. And then I decided to take the easy way out and add the state control to the RoutingViewmodel, basically to make data binding easier. Of course I could have made a separate view model for this, but what the heck, it’s only a few lines of code anyway:
[DoNotSerialize]
public ICommand DisplayPopupCommand
{
  get
  {
    return new RelayCommand<string>(
        p =>
        {
          DisplayState = (DisplayState)Enum.Parse(typeof(DisplayState), p);
        });
  }
}

private DisplayState displayState;
public DisplayState DisplayState
{
  get { return displayState; }
  set
  {
    if (displayState != value)
    {
      displayState = value;
      RaisePropertyChanged(() => DisplayState);
    }
  }
}    

It makes life easier on the designer, he does not have mess around with data context so much. The property is the actual storage for the DisplayState, and the command sets the display state to it's parameter. All described before. The final piece is a little adaption in the SelectedManeuver property, there we need to add in the setter:

DisplayState = SelectedManeuver != null ? DisplayState.ShowManeuver : DisplayState.Normal;
directly behind the RaisePropertyChanged. This will have the panel showed automatically when a non-null value is detected after the setter has been accessed. 

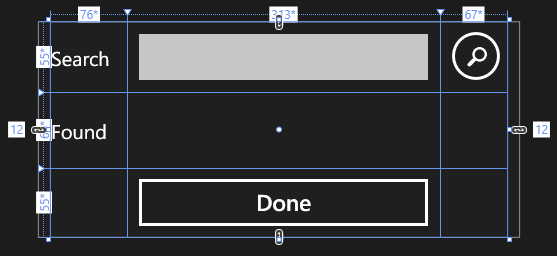
imageGeocodeViewModel ui

I tend to put user controls into a separate folder UserControls (never been one for original naming conventions anyway). The design of the GeocodeControl looks like this:

And I’ve put it in XAML like this:

<UserControl.Resources>
  <DataTemplate x:Key="AddressTemplate">
    <Grid>
      <TextBlock HorizontalAlignment="Left" TextWrapping="Wrap" Text="{Binding Address}"
VerticalAlignment="Top"/> </Grid> </DataTemplate> </UserControl.Resources> <Grid x:Name="LayoutRoot" Background="{StaticResource PhoneChromeBrush}"> <Grid Margin="12,0" > <!-- Definitions omitted --> <Button Grid.Column="2" Style="{StaticResource RoundButton}" Command="{Binding SearchLocationCommand, Mode=OneWay}" VerticalAlignment="Bottom" HorizontalAlignment="Left" Height="72" Width="72"
Margin="0,0,-5,0" > <Rectangle Fill="{StaticResource PhoneForegroundBrush}" Width="44" Height="44" > <Rectangle.OpacityMask> <ImageBrush ImageSource="/images/feature.search.png" Stretch="Fill"/> </Rectangle.OpacityMask> </Rectangle> </Button> <TextBlock TextWrapping="Wrap" Text="Search" VerticalAlignment="Center"
Height="27" Margin="0,23,0,22" /> <TextBlock TextWrapping="Wrap" Text="Found" Grid.Row="1"
VerticalAlignment="Center" Height="27"/> <TextBox Grid.Column="1" TextWrapping="NoWrap"
Text="{Binding SearchText, Mode=TwoWay}"> <i:Interaction.Behaviors> <Behaviors:TextBoxChangeModelUpdateBehavior/> </i:Interaction.Behaviors> </TextBox> <ListBox Grid.Column="1" Grid.Row="1" Margin="12" ItemsSource="{Binding MapLocations}" SelectedItem="{Binding SelectedLocation,Mode=TwoWay}" ItemTemplate="{StaticResource AddressTemplate}"/> <Button Content="Done" Grid.Row="2" Grid.Column="1" VerticalAlignment="Center" Margin="0,23,0,22" Height="71" Command="{Binding DoneCommand}"/> </Grid> </Grid>

There will be two instances of this user control – one to determine the “From” address, and one for the “”To” address.

There are some things to note here, all underlined in red:

  • I am using a RoundButton style to get a round button, to show an standard image feature_search.png. I pulled this ages ago from this post by Alex Yakhnin if I am not mistaken.
  • There is no data context set, therefore, the data context – a GeocodeViewModel – should be set in the parent element. No problem. But the DoneCommand, which should dismiss the panel, is therefore also in the GeocodeViewModel, and there is no code for that. Worse, the actual state control logic is in a totally different view model – in this case the RoutingViewmodel. Two view models, having no real knowledge of each other, yet needing to get some data across – that spells m-e-s-s-e-n-g-e-r.

Adding some Messenger magic

We define a simple message “DoneMessage” that, when received by the RoutingViewmodel (that also keeps the view state) will dismiss all popups. It’s pretty easy to implement:

namespace NavigationDemo.Logic.Messages
{
  public class DoneMessage{ }
}

And in the RoutingViewmodel, in the constructor, just one line:

Messenger.Default.Register<DoneMessage>(this, 
msg => DisplayState = DisplayState.Normal);

Well, okay, one line split in two ;). But anyway, this allows to add a DoneCommand in GeocodeViewModel simply like this:

[DoNotSerialize]
public ICommand DoneCommand
{
  get
  {
    return new RelayCommand(() => Messenger.Default.Send(new DoneMessage()));
  }
}

And boom – executing the DoneCommand in RoutingViewmodel will reset the DisplayState to Normal, dismissing all popups. That is, as soon as we have implemented the DataTriggers and the ViewStates ;-)

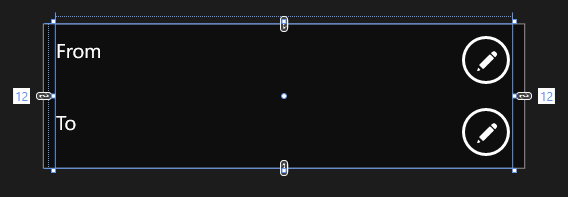
imageLocationPanel

This is the thing used to scroll the GeocodeControls into view, looking like this

<Grid Height="144" VerticalAlignment="Top" Background="#7F000000">
  <Grid Margin="12,0">
    <Grid >
      <!-- Definitions omitted -->
      <TextBlock TextWrapping="Wrap" Text="From" VerticalAlignment="Top"
Margin="0,12,0,0" Height="27" /> <TextBlock TextWrapping="Wrap" Text="To" Grid.Row="1" VerticalAlignment="Top"
Margin="0,12,0,0" Height="27"/> <TextBlock TextWrapping="Wrap" Text="{Binding FromViewModel.SelectedLocation.Address, Mode=TwoWay}" Grid.Column="1" VerticalAlignment="Top" Margin="0,12,0,0" /> <TextBlock TextWrapping="Wrap" Text="{Binding ToViewModel.SelectedLocation.Address, Mode=TwoWay}" Grid.Row="1" Grid.Column="1" VerticalAlignment="Top" Margin="0,12,0,0" /> <Button Grid.Column="2" Style="{StaticResource RoundButton}" Command="{Binding DisplayPopupCommand, Mode=OneWay}" CommandParameter="SearchFrom" VerticalAlignment="Center" HorizontalAlignment="Left" Height="72"
Width="72" Margin="0,0,-10,0" > <!-- Rounded button stuff omitted --> </Button> <Button Grid.Column="2" Grid.Row="1" Style="{StaticResource RoundButton}" Command="{Binding DisplayPopupCommand, Mode=OneWay}" CommandParameter="SearchTo" VerticalAlignment="Center" HorizontalAlignment="Left" Height="72" Width="72"
Margin="0,0,-10,0"> <!-- Rounded button stuff omitted --> </Button> </Grid> </Grid> </Grid>

for the sake of brevity I cut some things out of the XAML. Most interesting to note here, once again red and underlined:

  • The 3nd and the 4th TextBlock show the Address of the Selected location of the From and the To GeocodeViewModel
  • The buttons both call the same command, but with a parameter – this will determine which popup appears. Or actually, the viewstate which will be selected, but that amounts to the same

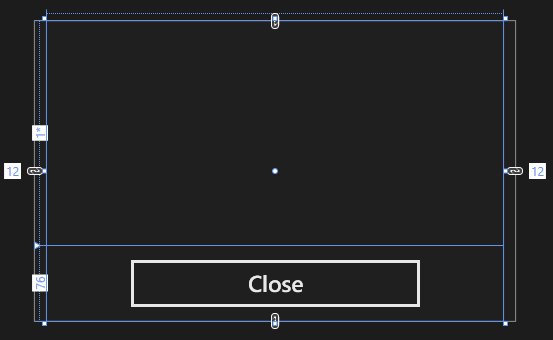
imageManeuverPopup

This is the popup that appears from the side, as the user has tapped on a start.

It’s a pretty simple piece, both how it looks and in XAML:

<Grid x:Name="LayoutRoot" Background="{StaticResource PhoneChromeBrush}" Opacity="0.9">
  <Grid Margin="12,0" >
    <Grid.RowDefinitions>
      <RowDefinition Height="*"/>
      <RowDefinition Height="76"/>
    </Grid.RowDefinitions>
    <Grid.ColumnDefinitions>
    </Grid.ColumnDefinitions>
    <TextBlock Grid.Row="0" TextWrapping="Wrap" Text="{Binding Description}" 
      HorizontalAlignment="Center"/>
    <Button Content="Close" Grid.Row="1" VerticalAlignment="Center"     
      Height="71" Width="313" Command="{Binding DoneCommand}" />
  </Grid>
</Grid>

With only one thing really to note – this popup needs to be able to be dismissed to – so we can implement the exact same DoneCommand as in GeocodeViewModel and put it into ManeuverViewModel. Copy – paste – done. Of course you can also make a base class for both viewmodels and making both GeocodeViewModel ManeuverViewModel child classes of it. This won’t save you much code in this case though.

MainViewModel

This is kinda not very interesting – see for an explanation on usage this post, that’s quite old already. MainViewModel is the root for all view model, used as a starting point for data binding and tomb stoning But this is what we are going to use a binding root. How the initialization and tombstoning from App.xaml.cs is working is described in the same post, some I am not going to repeat that. This particular MainViewModel looks like this:

using GalaSoft.MvvmLight;
using NavigationDemo.Logic.Models;

namespace NavigationDemo.Logic.ViewModels
{
  public class MainViewModel : ViewModelBase
  {
    public NavigationModel Model { get; set; }

    public MainViewModel()
    {
    }

    public MainViewModel(NavigationModel model)
    {
      Model = model;
    }

    private RoutingViewmodel routingViewModel;
    public RoutingViewmodel RoutingViewModel
    {
      get
      {
        if (routingViewModel == null)
        {
          routingViewModel = new RoutingViewmodel(Model);
        }
        return routingViewModel;
      }
      set
      {
        if (routingViewModel != value)
        {
          routingViewModel = value;
          RaisePropertyChanged(() => RoutingViewModel);
        }
      }
    }

    private static MainViewModel instance;
    public static MainViewModel Instance
    {
      get
      {
        return instance;
      }
      set { instance = value; }
    }

    public static MainViewModel CreateNew()
    {
      if (instance == null)
      {
        instance = new MainViewModel(new NavigationModel());
      }
      return instance;
    }
  }
}

We define it as a data source in App.Xaml

<ViewModels:MainViewModel x:Key="MainViewModelDataSource"/>
Which requires the following definition in your App.xaml header:
xmlns:ViewModels="clr-namespace:NavigationDemo.Logic.ViewModels;assembly=NavigationDemo.Logic"

MainPage.xaml – the main gui

Initially, this has four major parts:

  • The header
  • The Map
  • The three routing panels (2x GeocodeControl + 1x  LocationPanel)
  • The ManeuverPopup
  • The search button.

Now the header is simple enough:

<Grid x:Name="LayoutRoot" Background="Transparent" 
  DataContext="{Binding Instance, Source={StaticResource MainViewModelDataSource}}">
  <Grid.RowDefinitions>
    <RowDefinition Height="Auto"/>
    <RowDefinition Height="*"/>
  </Grid.RowDefinitions>

  <StackPanel x:Name="TitlePanel" Grid.Row="0" Margin="12,17,0,28">
    <TextBlock Text="NAVIGATE BY MVVMLIGHT" 
      Style="{StaticResource PhoneTextNormalStyle}" Margin="12,0"/>
  </StackPanel>

The only more or less interesting part is the data binding. Then comes the map. This uses my MapShapeDrawBehavior to bind the shapes to map:

<Grid x:Name="ContentPanel" Grid.Row="1" Margin="12,0,12,0" 
   DataContext="{Binding RoutingViewModel}">
  <maps:Map Wp8nl_MapBinding:MapBindingHelpers.MapArea="{Binding ViewArea}"
              Center="{Binding MapCenter, Mode=TwoWay}"
              ZoomLevel="{Binding ZoomLevel, Mode=TwoWay}">
    <i:Interaction.Behaviors>
      <MapBinding:MapShapeDrawBehavior LayerName="Route" ItemsSource="{Binding RouteCoordinates}" 
        PathPropertyName="Geometry">
        <MapBinding:MapShapeDrawBehavior.ShapeDrawer>
          <MapBinding:MapPolylineDrawer Color="Green" Width="10"/>
        </MapBinding:MapShapeDrawBehavior.ShapeDrawer>
      </MapBinding:MapShapeDrawBehavior>
      <MapBinding:MapShapeDrawBehavior LayerName="Maneuvers" ItemsSource="{Binding Maneuvers}" 
        PathPropertyName="Location">
        <MapBinding:MapShapeDrawBehavior.ShapeDrawer>
          <MapBinding:MapStarDrawer Color="Red" Arms="8" InnerRadius="25" OuterRadius="50"/>
        </MapBinding:MapShapeDrawBehavior.ShapeDrawer>
        <MapBinding:MapShapeDrawBehavior.EventToCommandMappers>
          <MapBinding:EventToCommandMapper EventName="Tap" CommandName="SelectCommand"/>
        </MapBinding:MapShapeDrawBehavior.EventToCommandMappers>
      </MapBinding:MapShapeDrawBehavior>
  </maps:Map>

Things of notice here:

  • The grid where the map is in (and incidentally, almost the whole user interface, has the RoutingViewModel as it’s data context.
  • Map view area is not bindable so that’s bound using a simple attached dependency property, I will include this in the coming version for the wp7nl library on codeplex but skip it for now. Center and ZoomLevel are simple direct property bindings
  • The actual route is a green line, bound to RouteCoordinates. TheMapShapeDrawBehavior actually expects a list of objects, so we gave it a list, remember from the previous post?
  • The Maneuvers are display as red stars, by binding a MapShapeDrawBehavior to the Maneuvers list. If one is tapped, the SelectCommand on the ManeuverViewModel is fired, causing the the selected maneuver to be sent over the Messenger

Next, are the three panels:

<UserControls:LocationsPanel VerticalAlignment="Top"/>
<UserControls:GeocodeControl x:Name="GeocodeFrom" VerticalAlignment="Top" 
        RenderTransformOrigin="0.5,0.5" 
        DataContext="{Binding FromViewModel}">
  <UserControls:GeocodeControl.RenderTransform>
    <CompositeTransform TranslateY="-326"/>
  </UserControls:GeocodeControl.RenderTransform>
</UserControls:GeocodeControl>
<UserControls:GeocodeControl x:Name="GeocodeTo" VerticalAlignment="Top" 
       RenderTransformOrigin="0.5,0.5"
       DataContext="{Binding ToViewModel}">
  <UserControls:GeocodeControl.RenderTransform>
    <CompositeTransform TranslateY="-326"/>
  </UserControls:GeocodeControl.RenderTransform>
</UserControls:GeocodeControl>
<UserControls:ManeuverPopup x:Name="maneuverPopup" VerticalAlignment="Bottom" 
     Height="151" RenderTransformOrigin="0.5,0.5" Margin="0,0,0,72"
     DataContext="{Binding SelectedManeuver}">
  <UserControls:ManeuverPopup.RenderTransform>
    <CompositeTransform TranslateX="470"/>
  </UserControls:ManeuverPopup.RenderTransform>
</UserControls:ManeuverPopup>

Actually rather straightforward. From panel binds to FromViewModel, To panel to ToViewModel, and the maneuverPopup to SelectedManeuver.

The last part ain’t rocket sciece: just a simple BindableApplicationBar with one button executing the actual routing command:

<phone7Fx:BindableApplicationBar BarOpacity="0.9" >
  <phone7Fx:BindableApplicationBarIconButton Command="{Binding RoutingViewModel.DoRoutingCommand}"
                                             IconUri="/images/feature.search.png"
                                             Text="Route" />
</phone7Fx:BindableApplicationBar>

The only thing to notice is that since it’s sitting outside the content panel, in the main grid, it’s data content is het MainViewModel to I have to prepend the RoutingViewModel again.

DataTrigger Animation Magic

I am going to keep this simple: if you want to know how to create this, I suggest you read my article on ViewModel driven multi-state animations using DataTriggers and Blend on Windows Phone. I have created the following visual states:

<VisualStateManager.CustomVisualStateManager>
  <ei:ExtendedVisualStateManager/>
</VisualStateManager.CustomVisualStateManager>
<VisualStateManager.VisualStateGroups>
  <VisualState x:Name="Normal"/>
  <VisualStateGroup x:Name="Search">
    <VisualStateGroup.Transitions>
      <VisualTransition GeneratedDuration="0:0:0.5"/>
    </VisualStateGroup.Transitions>
    <VisualState x:Name="SearchFrom">
      <Storyboard>
        <DoubleAnimation To="0" 
          Storyboard.TargetProperty="(UIElement.RenderTransform).(CompositeTransform.TranslateY)" 
          Storyboard.TargetName="GeocodeFrom"/>
      </Storyboard>
    </VisualState>
    <VisualState x:Name="SearchTo">
      <Storyboard>
        <DoubleAnimation To="0" 
          Storyboard.TargetProperty="(UIElement.RenderTransform).(CompositeTransform.TranslateY)" 
          Storyboard.TargetName="GeocodeTo"/>
      </Storyboard>
    </VisualState>
     <VisualState x:Name="ShowManeuver">
      <Storyboard>
        <DoubleAnimation Duration="0" To="0" 
          Storyboard.TargetProperty="(UIElement.RenderTransform).(CompositeTransform.TranslateX)" 
          Storyboard.TargetName="maneuverPopup" />
      </Storyboard>
    </VisualState>
  </VisualStateGroup>
</VisualStateManager.VisualStateGroups>
You can see “Search” moves “GeocodeFrom”  into view, “SearchTo” moves GeocodeTo into view, and “ShowManeuver”  shows the maneuverPopup. And Normal is the base state, basically moving everything back to it’s base place, i.e. out of the screen. I also created these data triggers.
 <i:Interaction.Triggers>
  <ei:DataTrigger Binding="{Binding DisplayState}" Value="0">
    <ei:GoToStateAction StateName="Normal" />
  </ei:DataTrigger>
  <ei:DataTrigger Binding="{Binding DisplayState}" Value="1">
    <ei:GoToStateAction StateName="SearchFrom" />
  </ei:DataTrigger>
  <ei:DataTrigger Binding="{Binding DisplayState}" Value="2">
    <ei:GoToStateAction StateName="SearchTo" />
  </ei:DataTrigger>
  <ei:DataTrigger Binding="{Binding DisplayState}" Value="3">
    <ei:GoToStateAction StateName="ShowManeuver" />
  </ei:DataTrigger>
</i:Interaction.Triggers>

These are all sitting inside the contentpanel, right above the map.

And finally… well… not really

If you run the app now – or download the sample solution, lo and behold – the app works as designed. That is … until you press the start button and start the app anew. You will notice the fact that although the right location is displayed, the route is not, the LocationPanel is empty again, but the search text is not. How the hell is this possible? We have written test till the cows came home!

Well, I can tell you we have run in some very subtle serialization bugs. Fixing those bugs is what we are going to do in the next and last episode. Like I said in the previous episode, no amount of unit and/or integration testing is going to free you from manually testing your app – is just a tool to increase, maintain and guarantee the quality of some parts of your app.

Anyway – the solution so far can be downloaded here.

01 May 2013

Windows Phone 8 navigation part 2–routing, route details,tombstoning–and testing

What happened last time on this show

In the previous post I described to how to write the business logic to find a location by searching for an address by text, how to be able to tombstone the results, and how to make sure this all worked by using simple tests. Fine, but the purpose was routing, that is, actually making the app finding instructions to get from A to B. As a GIS buff, being used to complex algorithms and stuff, this is almost embarrassingly easy in Windows Phone 8. You basically need an object of type RouteQuery, plonk in any number of waypoints (at least two, of course, being the start and the end) and a method of transport (drive or walk). And that’s basically it.

But we still have to honor the other two requirements – in needs to be testable and serializable so we can support tombstoning

Find the route, Luke phone

So in the solution I created last time I add another business class that does the actual finding of the route:

using System.Collections.Generic;
using System.Device.Location;
using System.Threading.Tasks;
using Microsoft.Phone.Maps.Services;
using Wp7nl.Utilities;

namespace NavigationDemo.Logic.Models
{
  public class NavigationModel
  {
    public NavigationModel()
    {
      From = new GeocodeModel();
      To = new GeocodeModel();
    }

    public async Task DoRouting()
    {
      await DoRouting(From.SelectedLocation.GeoCoordinate, 
                      To.SelectedLocation.GeoCoordinate);
    }

    public async Task DoRouting(GeoCoordinate from, GeoCoordinate to)
    {
      var wayPoints = new List<GeoCoordinate>(new[] { from, to });
      var routeQuery = new RouteQuery 
        { TravelMode = TravelMode.Driving, Waypoints = wayPoints };
      FoundRoute = await routeQuery.GetRouteAsync();
    }

    public Route FoundRoute { get; set; }   

    public GeocodeModel From { get; set; }

    public GeocodeModel To { get; set; }
  }
}

This comes in the NavigationDemo.Logic project, in the Models folder, next to GeocodeModel. Here you can see what I just mentioned – the actual navigation logic is very simple. This whole model comes down to three lines (red, bold and underlined). But, does this work?

Testing the routing

In the unit test app I added a NavigationModelTest class. To ease testing, I created public overload method where I can directly supply the waypoints. We already know the GeocodeModel works. We have tested that before.

using System;
using System.Device.Location;
using System.Linq;
using System.Threading;
using System.Windows;
using Microsoft.VisualStudio.TestPlatform.UnitTestFramework;
using NavigationDemo.Logic.Models;

using Wp7nl.Utilities;
namespace NavigationDemo.Logic.Test { [TestClass] public class NavigationModelTest { [TestMethod] public void TestPointRouting() { var m = new NavigationModel(); var waitHandle = new AutoResetEvent(false); Deployment.Current.Dispatcher.BeginInvoke(async () => { await m.DoRouting( new GeoCoordinate(52.182679977268, 5.39752000942826), new GeoCoordinate(52.1061999723315, 5.03457002341747)); waitHandle.Set(); }); waitHandle.WaitOne(TimeSpan.FromSeconds(25)); Assert.IsTrue(m.FoundRoute.Geometry.Any()); } } }

Route finding is async as well and needs to run on the UI thread, hence the hoopla with the AutoResetEvent and the Dispatcher. Basically I ask the the RouteQuery to find some route from one place to another in the Netherlands. For those interested: it’s a road I drove for many a hackathon – from my street to the street where our former Dutch DPE Matthijs Hoekstra used to live before he decided to go upstream to Seattle to join the Windows Phone team. I actually seem to recall I wrote this very code in his house at the last ‘kitchen table’ hackathon :-)

There are two things to wonder at at this point:

  1. Will this serialize to support tombstoning? (remember from the previous post the MapLocation that came back from GeocodeQuery did not)
  2. What the hell is it that we find?

Does this serialize?

I added a second test to NavigationModelTest  which is basically an extended version of the first.

[TestMethod]
public void TestStoreNavigationModel()
{
  var m = new NavigationModel();

  var waitHandle = new AutoResetEvent(false);

  Deployment.Current.Dispatcher.BeginInvoke(async () =>
  {
    await m.DoRouting(
        new GeoCoordinate(52.182679977268, 5.39752000942826),
        new GeoCoordinate(52.1061999723315, 5.03457002341747));
    waitHandle.Set();
  });

  waitHandle.WaitOne(TimeSpan.FromSeconds(25));

  var h = new IsolatedStorageHelper<NavigationModel>();
  if (h.ExistsInStorage())
  {
    h.DeletedFromStorage();
  }
  h.SaveToStorage(m);

  var retrieved = h.RetrieveFromStorage();

  Assert.IsTrue(retrieved.FoundRoute.Geometry.Any());
}

And here we go again: the test fails with SilverlightSerializer complaining that “Could not construct an object of type 'Microsoft.Phone.Maps.Services.Route', it must be creatable in this scope and have a default parameterless constructor”. So we basically have the same problem we had in the previous post. The way to make this test work is to adorn FoundRoute in NavigationModel

[DoNotSerialize]
public Route FoundRoute { get; set; }
and change the last line of test a little
Assert.IsNotNull(retrieved);

The test now succeeds, but the route you found is now of course still not serialized. You can wonder (or gripe on twitter) why Microsoft have implemented it this way, but that won’t get your app any closer to shipping. It simply means we have to defer tombstoning of the found route to the viewmodel again, just like in the previous post.

What DO we get back?

Actually, quite a lot. The routing information is very detailed. The main Route class has the following properties and methods:

public class Route : IRoutePath
{
  public LocationRectangle BoundingBox { get; internal set; }
  public TimeSpan EstimatedDuration { get; internal set; }
  public ReadOnlyCollection<Device.Location.GeoCoordinate> Geometry 
{ get; internal set; } public ReadOnlyCollection<RouteLeg> Legs { get; internal set; } public int LengthInMeters { get; internal set; } }

A route can exist out of multiple RouteLeg objects (if you give the RouteQuery more than two waypoints. RouteLeg is defined as follows:

public class RouteLeg : IRoutePath
{
  public LocationRectangle BoundingBox { get; internal set; }
  public TimeSpan EstimatedDuration { get; internal set; }
  public ReadOnlyCollection<Device.Location.GeoCoordinate> Geometry 
        { get; internal set; }
  public int LengthInMeters { get; internal set; }
  public ReadOnlyCollection<RouteManeuver> Maneuvers 
       { get; internal set; }
}

Which makes me feel that a RouteLeg and a Route are nearly the same object and there might have been some code re-use possibilities, but I digress. A RouteLeg consists, apart from a geometry, out of various RouteManeuvers, which look like this:

public class RouteManeuver
{
  public RouteManeuverInstructionKind InstructionKind { get; internal set; }
  public string InstructionText { get; internal set; }
  public int LengthInMeters { get; internal set; }
  public GeoCoordinate StartGeoCoordinate { get; internal set; }
}

The InstructionText literally contains stuff like “Turn left on xyz street” and a location where this should happen. RouteManeuverInstructionKind is an enum describing the kind of instruction and really is so comprehensive it’s actually a bit hilarious, so go and have a look on it. But you can very much use this to depict what you the driver needs to do, and I am pretty sure this is what Nokia’s “Here Drive”  uses under the hood. So here we have a full fledged routing API under the hood – but there’s no way in Hades we are ever going to serialize that will all those internal sets, as we already ascertained.

In real life, at this point you really need to confer with the stakeholder and the designer – what is it what we are going to show and how we are going to show it? Since I am both and developer at this point, I decided I want to show the route on the map as a line, the maneuvers (being the point where you actually need to do something) as symbols you can tap on, and having a window with the InstructionText to pop up as you do. Basically we’ll end up with a simple routing system in stead of a full fledged navigation app, but we have to start somewhere. And being the lazy *** I am, I am going to re-use the map binding behavior I wrote last year for Windows 8 and Windows Phone 8. But that’s later. First the view models.

Enter the viewmodels – again

The first, and most simple viewmodel is for handling the maneuver we are going to show in the popup

using System.Windows.Input;
using GalaSoft.MvvmLight;
using GalaSoft.MvvmLight.Command;
using GalaSoft.MvvmLight.Messaging;
using Microsoft.Phone.Maps.Controls;
using Wp7nl.Utilities;

namespace NavigationDemo.Logic.ViewModels
{
  public class ManeuverViewModel: ViewModelBase
  {
    private GeoCoordinateCollection location;
    public GeoCoordinateCollection Location
    {
      get { return location; }
      set
      {
        if (location != value)
        {
          location = value;
          RaisePropertyChanged(() => Location);
        }
      }
    }

    private string description;
    public string Description
    {
      get { return description; }
      set
      {
        if (description != value)
        {
          description = value;
          RaisePropertyChanged(() => Description);
        }
      }
    }

    [DoNotSerialize]
    public ICommand SelectCommand
    {
      get
      {
        return new RelayCommand(
            () => Messenger.Default.Send(this),
            () => true);
      }
    }
  }
}

The command firing of the object itself over the Messenger is a time-tested and tried method I use – if a user selects an object from a list, let a viewmodel that has the actual list of these objects as a property – I call that the ‘parent’ - handle the select. This prevents a whole lot who messing around with data contexts. Be nice to your designer ;-). Also note the geometry in this class is a GeoCoordinateCollection – although the maneuver is a point, my MapShapeDrawBehavior needs a GeoCoordinateCollection, because it does not know in advance if it needs to draw a point or a shape.

The next one is a bit awkward and also direct result of the way my MapShapeDrawBehavior behavior works – it needs a list of objects with a property that’s a GeoCoordinateCollection – this being the geometry. But the RouteLeg gives me a ReadOnlyCollection<GeoCoordinate> and we have only one object – one route. So I write a simple wrapper viewmodel to make sure that it has:

using System.Collections.Generic;
using System.Device.Location;
using GalaSoft.MvvmLight;
using Microsoft.Phone.Maps.Controls;
using Wp7nl.Utilities;

namespace NavigationDemo.Logic.ViewModels
{
  public class RouteGeometryViewModel : ViewModelBase
  {
    public RouteGeometryViewModel()
    {
    }

    public RouteGeometryViewModel(IEnumerable<GeoCoordinate> coordinates)
    {
      Geometry = new GeoCoordinateCollection();
      Geometry.AddRange(coordinates);
    }

    private GeoCoordinateCollection geometry;
    public GeoCoordinateCollection Geometry
    {
      get { return geometry; }
      set
      {
        if (geometry != value)
        {
          geometry = value;
          RaisePropertyChanged(() => Geometry);
        }
      }
    }
  }
}

… and make sure the viewmodel holding this object has a list of these.

And finally, the RoutingViewModel itself, that starts like this:

using System.Collections.ObjectModel;
using System.Device.Location;
using System.Linq;
using System.Threading.Tasks;
using System.Windows.Input;
using GalaSoft.MvvmLight;
using GalaSoft.MvvmLight.Command;
using GalaSoft.MvvmLight.Messaging;
using Microsoft.Phone.Maps.Controls;
using NavigationDemo.Logic.Models;
using Wp7nl.Utilities;

namespace NavigationDemo.Logic.ViewModels
{
  public class RoutingViewmodel : ViewModelBase
  {
    public RoutingViewmodel()
    {
      Maneuvers = new ObservableCollection<ManeuverViewModel>();
      RouteCoordinates = new ObservableCollection<RouteGeometryViewModel>();

      Messenger.Default.Register<ManeuverViewModel>(this, 
                                                    p => SelectedManeuver = p);
    }

    public RoutingViewmodel(NavigationModel model)
      : this()
    {
      Model = model;
    }

    private ManeuverViewModel selectedManeuver;
    public ManeuverViewModel SelectedManeuver
    {
      get { return selectedManeuver; }
      set
      {
        selectedManeuver = value;
        RaisePropertyChanged(() => SelectedManeuver);
      }
    }

    public ObservableCollection<RouteGeometryViewModel> RouteCoordinates 
{ get; set; } public ObservableCollection<ManeuverViewModel> Maneuvers { get; set; } } }

In the default constructor sits the standard initialization of the ObservableCollection types, as well as the setup for ManeuverViewModel select interception. Further below another constructor to make initialization from code easier, and the SelectedManeuver property. Nothing special here yet. We add two viewmodels for both to and from searching:

private GeocodeViewModel toViewModel;
public GeocodeViewModel ToViewModel
{
  get { return toViewModel; }
  set
  {
    if (toViewModel != value)
    {
      toViewModel = value;
      RaisePropertyChanged(() => ToViewModel);
    }
  }
}

private GeocodeViewModel fromViewModel;
public GeocodeViewModel FromViewModel
{
  get { return fromViewModel; }
  set
  {
    if (fromViewModel != value)
    {
      fromViewModel = value;
      RaisePropertyChanged(() => FromViewModel);
    }
  }
}

And then the public model property as well, with some clever skullduggery here:

private NavigationModel model;
public NavigationModel Model
{
  get { return model; }
  set
  {
    model = value;
    if (model != null)
    {
      ToViewModel = new GeocodeViewModel(model.To) { Name = "To" };
      FromViewModel = new GeocodeViewModel(model.From) { Name = "From" };
    }
  }
}

The “Name” property has no function whatsoever in the code, but I assure you – if you have two identical viewmodels in your app, having them easily distinguishable by a simple property that you can see in a breakpoint helps a ton!

Finally, the piece that does the actual routing:

public async Task DoRouting()
{
  await DoRouting(
   FromViewModel.SelectedLocation.Location,
   ToViewModel.SelectedLocation.Location);
}

public async Task DoRouting(GeoCoordinate from, GeoCoordinate to)
{
  RouteCoordinates.Clear();
  Maneuvers.Clear();
  await Model.DoRouting(from, to);
  RouteCoordinates.Add(new RouteGeometryViewModel(Model.FoundRoute.Geometry));
  ViewArea = Model.FoundRoute.BoundingBox;
  Model.FoundRoute.Legs.ForEach(r =>
  Maneuvers.AddRange(
    r.Maneuvers.Select(
      p => new ManeuverViewModel { 
Description = p.InstructionText,
Location =
new GeoCoordinateCollection { p.StartGeoCoordinate }}))); } [DoNotSerialize] public ICommand DoRoutingCommand { get { return new RelayCommand( async () => { await DoRouting(); }); } }

Once again I have a public overload with just coordinates to make testing easier. The line with all the Lambdas basically iterates over all legs of the route, gets all maneuvers per leg, and creates ManeuverViewModel types of every maneuver, using the StartGeoCoordinate of said maneuver to create location. Also note I put the route’s bounding box into a ViewArea property of the RoutingViewModel (code omitted) to enable the designer to let the map zoom to the extent of the new-found route. In the RoutingViewModel are two more properties I omitted – ZoomLevel and MapCenter, they are with ViewArea taken from the map binding sample I wrote last year.

Well… that’s quite some code. And now the proof of the pudding…

Testing the RoutingViewModel

I added a class RoutingViewModelTest and a simple test method to see if coordinates and maneuvers are duly filled when I call the DoRouting method with coordinates

using System;
using System.Device.Location;
using System.Linq;
using System.Threading;
using System.Windows;
using Microsoft.VisualStudio.TestPlatform.UnitTestFramework;
using NavigationDemo.Logic.Models;
using NavigationDemo.Logic.ViewModels;
using Wp7nl.Utilities;


namespace NavigationDemo.Logic.Test
{
  [TestClass]
  public class RoutingViewModelTest
  {
    [TestMethod]
    public void TestSimpleRoutingViewModel()
    {
      var vm = new RoutingViewmodel(new NavigationModel());

      var waitHandle = new AutoResetEvent(false);

      Deployment.Current.Dispatcher.BeginInvoke(async () =>
      {
        await vm.DoRouting(
            new GeoCoordinate(52.182679977268, 5.39752000942826),
            new GeoCoordinate(52.1061999723315, 5.03457002341747));
        waitHandle.Set();
      });

      waitHandle.WaitOne(TimeSpan.FromSeconds(25));

      Assert.IsTrue(vm.RouteCoordinates.Any());
      Assert.IsTrue(vm.Maneuvers.Any());
    }
  }
}

Which, not entirely surprising, is the case. Now if you follow the TDD pattern correctly, you should add all kinds of mocks and interfaces between these classes and also test every method separately. I decided to go more for the integration test like route – so I made a big test which basically emulates a complete routing request, tombstones it and checks the result.

[TestMethod]
public void TestSearchRoutingViewModelAndTombstoning()
{
  var waitHandle = new AutoResetEvent(false);

  var vm = new RoutingViewmodel(new NavigationModel());
  vm.FromViewModel.SearchText = "Springerstraat Amersfoort Netherlands";
  vm.ToViewModel.SearchText = "Heinrich Bertestraat Utrecht";
  Deployment.Current.Dispatcher.BeginInvoke(async () =>
  {
    await vm.FromViewModel.SearchLocations();
    await vm.ToViewModel.SearchLocations();
    waitHandle.Set();
  });
  waitHandle.WaitOne(TimeSpan.FromSeconds(5));

  Assert.IsTrue(vm.FromViewModel.MapLocations.Any());
  Assert.IsTrue(vm.ToViewModel.MapLocations.Any());

  vm.FromViewModel.SelectedLocation = vm.FromViewModel.MapLocations[0];
  vm.ToViewModel.SelectedLocation = vm.ToViewModel.MapLocations[0];
  Deployment.Current.Dispatcher.BeginInvoke(async () =>
  {
    await vm.DoRouting();
    waitHandle.Set();
  });

  waitHandle.WaitOne(TimeSpan.FromSeconds(5));

  var h = new IsolatedStorageHelper();
  if (h.ExistsInStorage())
  {
    h.DeletedFromStorage();
  }
  h.SaveToStorage(vm);

  var retrievedVm = h.RetrieveFromStorage();

  Assert.IsTrue(vm.RouteCoordinates.Any());
  Assert.IsTrue(vm.Maneuvers.Any());
  Assert.IsTrue(retrievedVm.RouteCoordinates.Count == vm.RouteCoordinates.Count);
  Assert.IsTrue(retrievedVm.FromViewModel.SearchText == 
    "Springerstraat Amersfoort Netherlands");
  Assert.IsTrue(retrievedVm.Maneuvers.Count == vm.Maneuvers.Count);
}

So, I first setup a complete new RoutingViewModel with NavigationModel, simulate the user input two streets and let them search locations. Then I test if there are any locations found at all. I can safely assume they are, since the previous tests worked as well, but still. Then I actually let the app perform routing, ‘tombstone’ the whole viewmodel and retrieve it again.

And then I do a number of tests to check if anything is found at all, and if whatever comes back from storage matches what went into it. It will not surprise you – it does. This test is far from comprehensive – you could test all the properties one by one, but at least you now can have a reasonable confidence in the basic workings of your app. What’s more – if you start changing things and test start failing, you know your app will probably fail too somewhere down the line.

Conclusion (so far)

By using unit/integration testing we have been able to make and test a working model of the app, finding out how stuff work and tackling serialization problems head on before we actually made a user interface at all – therefore eliminating potential double work by both you and your designer. Next time we will actually start assembling the app, and we will learn that no amount of unit testing will eliminate you from the fact that you still need to test your app manually ;-)

Once again, before I get flamed: technically I showed you how to do integration tests, not unit tests, because I tested multiple classes interacting with each other, in stead of single methods and/or properties

As always, a finished solution (if you can call this finished) is available for download here.