Being a new tech junkie, I of course wanted to try the waters when the Kinect beta SDK was released on June 16, 2011. I thought it best to avoid domestic trouble and let the Kinect my wife bought back in December sit nicely connected to the XBox360 downstairs, and ordered a second Kinect – which just happened to be on sale for only €99.
The global idea
I wanted to create a simple application that allows you to both pan and zoom on a standard Google Maps web site, using hand gestures and some speech commands. I wanted to show visual feedback projected over the browser, like moving hands and stuff like that. Because I wanted to re-use some of my hard-won Windows Phone 7 knowledge, I wanted to use MVVM as well. So enter MVVMLight and while I was at it, version 4 too. The SDK is not usable from Silverlight, so the choice fell logically on Windows Presentation Foundation (WPF) to host a browser and see how things went from there. The result is below. It’s pretty crude and the user experience leaves much to be desired, but it’s a nice start. I will explain what I’ve done and why, and as usual include the whole sample application.
Basic operation
When the application opens up, it shows Google Maps in a full screen browser, and pretty much nothing else. To enable a demo I am planning to give, the Kinect is not immediately initialized. Forgive this old Trekkie - I could not resist. For years I’ve envied Kirk and Picard for being able to command their computer by talking to it. To get the application to start tracking your hands, you have to say “Kinect engage”. :-)
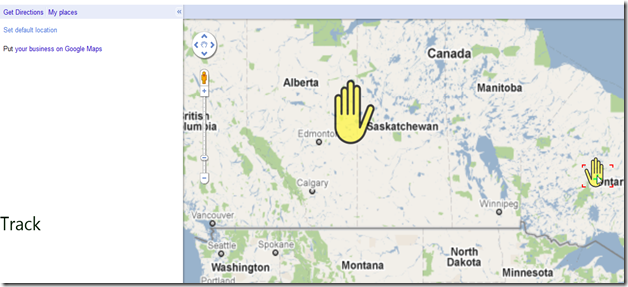
If Kinect understands your command, it will show the command to the left. If you move your hands, to yellow semi-transparent hand symbols should appear. If you move your hands from left to right they follow you – moving them forward will make them smaller, moving them backward bigger.
If you say “Kinect track” you can do the following:
 If you hold your left hand closer to your body than your right hand by some 20 cm, it will zoom in on the location of your right hand (green “plus” symbol on the right hand symbol).
 If you hold your left hand further from your body than your right hand by some 20 cm, it will zoom out on the location of your right hand (red “minus” symbol on the right hand symbol”)
 If you stretch out both arms and then move your hands, you can pan the map (blue circle with cross will appear on both of the hand symbols).
Below is a partial screenshot showing Kinect zooming in on Ontario.
Miscellaneous voice commands:
- “Kinect stop tracking” will keep following your hands but disable zoom and pan until you say “Kinect track” again
- “Kinect video on” will show what the Kinect video cam is seeing on the top left of the screen
- “Kinect video off” will hide video again (you might want to do this as it’s heavy on performance)
- “Kinect shutdown” will exit the application
The application in action. Since my computer choked on running both Kinect and a screen recorder I actually did this the old fashioned way using a video camera recording the screen ;)
Setting the stage
To get this sample to work, you need quite a lot of stuff, both hard- and software. First, of course, you will need a Kinect sensor. Be aware you cannot use a Kinect that comes with an XBox360s – that only has the proprietary orange Kinect connector that may look like and USB connector, but most certainly is not. You will need a retail Kinect for Xbox360 sensor, which includes special USB/power cabling – that will connect to your PC’s ‘ordinary’ USB port
A word to the wise: if you have a desk top PC, connect Kinect to a back USB port and never, ever use an USB extension cable. Unless you are entertained by very frequent BSOD’s. I learned it the hard way - make sure you don’t.
Then you need quite some stuff to download and install:
I would also recommend very much installing the Kinect project templates for Visual Studio 2010 by the brilliant Dennis Delimarsky. I started out by using his Kinect Skeleton template application.
MVVMLight 4
MVVMLight 4 does not have a binary release yet, as far as I understand, so I pulled the sources from CodePlex, compiled the whole stuff and took the following parts:
- GalaSoft.MvvmLight.WPF4.dll
- GalaSoft.MvvmLight.Extras.WPF4.dll
- Microsoft.Practices.ServiceLocation.dll
- System.Windows.Interactivity.dll
After building you will find the first file in GalaSoft.MvvmLight\GalaSoft.MvvmLight (NET4)\bin\Release, the others in GalaSoft.MvvmLight\GalaSoft.MvvmLight.Extras (NET4)\bin\Release
Coding4Fun Kinect Toolkit
I used only a tiny bit of it, and still have to investigate what it can do, but you can find it here on CodePlex.
Setting up the project
 A good programmer is a lazy programmer, so I just selected Dennis Delimarsky’s KinectSkeletonApplication template (you will find it under Visual C#\Windows\Kinect). That creates a nice basic WPF-based Kinect skeleton tracking application that works out of the box – it projects the video image Kinect sees, and tracks your hands with two red circles. This actually got me off the ground in no time at all, so kudos and thanks to you, Dennis!
After peeking in Dennis’ code I cleaned the MainPage.xaml and MainPage.xml.cs. Then I added the following references:
- Coding4Fun.Kinect.Wpf.dll
- GalaSoft.MvvmLight.WPF4.dll
- GalaSoft.MvvmLight.Extras.WPF4.dll
- Microsoft.Practices.ServiceLocation.dll
- System.Windows.Interactivity.dll
- Microsoft.Speech.dll (on my computer it’s sitting in C:\Program Files\Microsoft Speech Platform SDK\Assembly)
As usual, I put assemblies like this in a solution folder called “Binaries” first, to ensure they become part of the solution itself. The net result is displayed right:
Main viewmodel
MainViewModel is very simple and is basically nothing more than a Locater:
using GalaSoft.MvvmLight;

namespace MapController.ViewModel
{
  public class MainViewModel : ViewModelBase
  {
    private static PoseViewModel _poseViewModelInstance;
    public static PoseViewModel PoseViewModel
    {
      get { return _poseViewModelInstance ??
        (_poseViewModelInstance = new PoseViewModel()); }
    }
  }
}
This is a pretty standard pattern that makes sure that now matter how much MainViewModels you create by XAML instantiation, there will be one and only one PoseViewModel.
The Pose viewmodel
PoseViewModel is currently a kind of God class and probably should be broken up should this become a real application one day. This is where most of the Kinect stuff lives. And it’s remarkably small for all the things it actually does. It starts out like this:
using System;
using System.Collections.Generic;
using System.Linq;
using System.Windows;
using Coding4Fun.Kinect.Wpf;
using GalaSoft.MvvmLight;
using GalaSoft.MvvmLight.Messaging;
using MapController.Messages;
using Microsoft.Research.Kinect.Nui;
using Vector = Microsoft.Research.Kinect.Nui.Vector;

namespace MapController.ViewModel
{
  public class PoseViewModel : ViewModelBase, IDisposable
  {
    private Runtime _runtime;
    private const int Samples = 2;
    private const string DefaultleftHand = "Resources/lefthand.png";
    private const string DefaultrightHand = "Resources/righthand.png";

    private readonly List<SkeletonData> _skeletons;

    public PoseViewModel()
    {
      if (!IsInDesignMode)
      {
        _leftHandImage = DefaultleftHand;
        _rightHandImage = DefaultrightHand;
        _skeletons = new List<SkeletonData>();
        _runtime = new Runtime();
        _runtime.SkeletonFrameReady += RuntimeSkeletonFrameReady;
        _runtime.VideoFrameReady += RuntimeVideoFrameReady;
        _runtime.Initialize(
          RuntimeOptions.UseSkeletalTracking | RuntimeOptions.UseColor);
        _runtime.VideoStream.Open(ImageStreamType.Video,
          2, ImageResolution.Resolution640x480, ImageType.Color);
        Messenger.Default.Register<CommandMessage>(this, ProcessSpeechCommand);
        SpeechController.Initialize();
      }
    }

    void RuntimeVideoFrameReady(object sender, ImageFrameReadyEventArgs e)
    {
      if (ShowVideo)
      {
        Messenger.Default.Send(new VideoFrameMessage {Image = e.ImageFrame.Image});
      }
    }
  }
}
Important to note is the Vector alias on top – there is also a System.Windows.Vector and you sure don’t want to use that one. This basically initializes the Kinect “Runtime”, instructs it to use skeleton and video tracking and defines callbacks for that. The SpeechController – I will get to that later – is initialized as well. Note the _skeletons list – I use that to take the average of a more than one (actually two) skeletons to make the hand tracking a bit more stable.
Note also the callback “RuntimeVideoFrameReady”- it just shuttles off a frame in a message. A behavior - the DisplayVideoBehavior - will take care of that. I tried to do this with data binding; it works, but gave a less than desirable performance, to put it mildly.
The ViewModel has 12 properties, which all follow the new MVVMLight 4 syntax:
private Vector _lefthandPosition;
public Vector LeftHandPosition
{
  get { return _lefthandPosition; }
  set
  {
    if (!_lefthandPosition.Equals(value))
    {
       _lefthandPosition = value;
       RaisePropertyChanged(() => LeftHandPosition);
    }
  }
}
To prevent this blog post challenging Tolstoy’s "War and Peace'” for length I will only name the rest by name and type:
- Vector RightHandPosition
- double LeftHandScale
- double RightHandScale
- Visibility HandVisibility
- string LeftHandImage
- string RightHandImage
- bool IsInitialized
- bool IsTracking
- bool ShowVideo
- string LastCommand
Except for this one, since is does something more – it changes the images for the hands, if neccesary:
private bool _isPanning;
public bool IsPanning
{
  get { return _isPanning; }
  set
  {
    if (_isPanning != value)
    {
      _isPanning = value;
      LeftHandImage = _isPanning ? "Resources/leftpan.png" : DefaultleftHand;
      RightHandImage = _isPanning ? "Resources/rightpan.png" : DefaultrightHand;
      RaisePropertyChanged(() => IsPanning);
    }
  }
}
The actual skeleton and pose processing code is surprisingly simple, then:
void RuntimeSkeletonFrameReady(object sender, SkeletonFrameReadyEventArgs e)
{
  if (IsInitialized)
  {
    var skeletonSet = e.SkeletonFrame;

    var data = (from s in skeletonSet.Skeletons
                where s.TrackingState == SkeletonTrackingState.Tracked
                select s).FirstOrDefault();

    lock (new object())
    {
      _skeletons.Add(data);
    }
    if (_skeletons.Count < Samples)
    {
      return;
    }
    lock (new object())
    {
      LeftHandPosition =
        ScaleJoint(_skeletons.Average(JointID.HandLeft)).Position;
      RightHandPosition =
        ScaleJoint(_skeletons.Average(JointID.HandRight)).Position;
      var spinePosition =
        ScaleJoint(_skeletons.Average(JointID.Spine)).Position;
      _skeletons.Clear();

      LeftHandScale = RelativePositionToScale(spinePosition, LeftHandPosition);
      RightHandScale = RelativePositionToScale(spinePosition, RightHandPosition);
      HandVisibility = Visibility.Visible;

      if (IsTracking)
      {
        // Both arms stretched: initiate pan
        IsPanning = ((spinePosition.Z - LeftHandPosition.Z) > 0.5 &&
                    (spinePosition.Z - RightHandPosition.Z) > 0.5);

        if (!IsPanning)
        {
          // Send a zoom in/out message depending on the hand's relative positions
          var handDist = (LeftHandPosition.Z - RightHandPosition.Z);
          if (handDist > 0.2)
          {
            // left hand pulled back: zoom in
            Messenger.Default.Send(new ZoomMessage
             { X = RightHandPosition.X, Y = RightHandPosition.Y, Zoom = 1 });

            RightHandImage = "Resources/rightzoomin.png";
          }
          else if (handDist < -0.2)
          {
            // left hand pushed forward back: zoom out
            Messenger.Default.Send(new ZoomMessage
              { X = RightHandPosition.X, Y = RightHandPosition.Y, Zoom = -1 });
            RightHandImage = "Resources/rightzoomout.png";
          }
          else
          {
            RightHandImage = DefaultrightHand;
          }
        }
      }
      else
      {
        IsPanning = false;
      }
    }
  }
}
This is really the core of the whole pose recognition performed by this application. The method basically takes a skeleton and puts it in a list. If the desired number of samples are obtained, the average of joints is calculated and scale to the screen. Then it checks if both hands are 50 cm or more before the main body (‘Spine’) – this is assumed to be a panning pose. If that’s not recognized, the method tries to detect if one hand is more than 20 cm before another, so it should initiate a zoom action – this is done by sending a ZoomMessage. If that’s so, the right hand’s image is changed accordingly. The ZoomMessage is so simple I will omit it's source here
This uses a few other methods:
/// <summary>
/// Convert a relative position to a scale
/// </summary>
/// <param name="spinePos"></param>
/// <param name="handPos"></param>
/// <returns></returns>
private double RelativePositionToScale( Vector spinePos, Vector handPos )
{
  // 30 cm before the chest is 'zero position'
  return 1 - ((spinePos.Z - handPos.Z - 0.3) * 1.8);
}

/// <summary>
/// Scale a joint
/// </summary>
/// <param name="joint"></param>
/// <returns></returns>
private Joint ScaleJoint(Joint joint)
{
  return joint.ScaleTo(
    (int)SystemParameters.PrimaryScreenWidth,
    (int)(SystemParameters.PrimaryScreenHeight), 0.5f, 0.5f);
}
Both speak pretty much for themselves. The Joint.ScaleTo extension method is coming from Coding4Fun. The ‘Average’ extension methods are my own, and are defined in a separate class:
using System.Collections.Generic;
using System.Linq;
using Microsoft.Research.Kinect.Nui;
using Vector = Microsoft.Research.Kinect.Nui.Vector;

namespace MapController
{
  public static class KinectExtensions
  {
    /// <summary>
    /// Calculates the average Vectors of a any number of Vectors
    /// </summary>
    public static Vector Average(this IEnumerable<Vector> vectors)
    {
      return new Vector {
        X = vectors.Select(p => p.X).Average(),
        Y = vectors.Select(p => p.Y).Average(),
        Z = vectors.Select(p => p.Z).Average(),
        W = vectors.Select(p => p.W).Average(),
      };
    }

    /// <summary>
    /// Calculates the average of a specific Joint in a number of vectors
    /// </summary>
    public static Joint Average( this IEnumerable<SkeletonData> data,
      JointID joint)
    {
      return new Joint
      {
        Position = data.Select(skeleton =>
          skeleton.Joints[joint].Position).Average()
      };
    }
  }
}
Now let's have a look at the GUI.
Transparent overlay window
WPF poses some unique challenges, one of those being the fact that no WPF objects can be drawn on top of Win32 objects – like, for instance, a WebBrowser control. To circumvent this I created second child window – full screen, like the first window, but Transparent. So I added KinectOverlay.xaml. This window is launched from MainWindow.xaml.cs as a child window like this:
namespace MapController
{
  public partial class MainWindow : Window
  {
    public MainWindow()
    {
      InitializeComponent();
      Loaded += MainWindowLoaded;
    }

    void MainWindowLoaded(object sender, RoutedEventArgs e)
    {
      var w = new KinectOverlay {Owner = this};
      w.Show();
    }
  }
}
MainWindow
There's not much in there, actually. Just a browser and some behaviors.
<Window xmlns="http://schemas.microsoft.com/winfx/2006/xaml/presentation"
    xmlns:x="http://schemas.microsoft.com/winfx/2006/xaml"
    xmlns:i="http://schemas.microsoft.com/expression/2010/interactivity"
    xmlns:MapController_Behaviors="clr-namespace:MapController.Behaviors"
    WindowStyle="None" WindowState="Maximized"
    x:Class="MapController.MainWindow" Height="355" Width="611"
    ShowInTaskbar="True" AllowsTransparency="False"
    DataContext="{Binding PoseViewModel, Source={StaticResource MainViewModel}}">
  <i:Interaction.Behaviors>
    <MapController_Behaviors:ZoomBehavior/>
    <MapController_Behaviors:PanBehavior
        RightHandPosition="{Binding RightHandPosition, Mode=TwoWay}"
        LeftHandPosition="{Binding LeftHandPosition, Mode=TwoWay}"
        IsPanning="{Binding IsPanning, Mode=TwoWay}">
    </MapController_Behaviors:PanBehavior>
  </i:Interaction.Behaviors>
   <Grid x:Name="Grid">
     <WebBrowser x:Name="Browser" Source="http://maps.google.com" />
   </Grid>
</Window>
As you can see, the actual zoom and pan actions are performed by two behaviors – named “Zoombehavior” and “PanBehavior”. Windows Phone 7 developers, please take note of the fact that WPF allows you to directly bind to behavior dependency properties (this will be possible in the next Windows Phone 7 release as well, since that runs Silverlight 4-ish). Here we come down to the dirty parts of the solution, for the actual map manipulation is performed by simulating mouse position and buttondowns for dragging, and mouse wheel rotations for zoomin in and out. If you are interested in the actual innards of these things, please refer to the sample solution. Below is just a short description
- The Zoombehavior just waits for a ZoomMessage – and then simulates a zoom in or out by moving the mouse cursor to the position of the right hand, and then simulating a scroll wheel rotation by one position. It only accepts one zoom per 2 seconds to prevent zooming in or out at an uncontrollable rate.
- The PanBehavior has three dependency properties bound to both hand positions, and IsPanning. If the model says its panning, it calculates the point between left and right hand, and uses that as a dragging origin.
Both use a NativeWrapper static class that uses some Win32 api calls – courtesy of pinvoke.net
KinectOverlay
Also pretty simple: A Grid containing a Canvas, which contains standard behavior, and then three images and a text: left hand, right hand, video output, and text place holder to show the last command – all bound to the PoseViewModel. Don’t you just love the power of XAML? ;-)
<Window
    xmlns="http://schemas.microsoft.com/winfx/2006/xaml/presentation"
    xmlns:x="http://schemas.microsoft.com/winfx/2006/xaml"
    xmlns:i="http://schemas.microsoft.com/expression/2010/interactivity"
    xmlns:ei="http://schemas.microsoft.com/expression/2010/interactions"
    xmlns:d="http://schemas.microsoft.com/expression/blend/2008"
    xmlns:mc="http://schemas.openxmlformats.org/markup-compatibility/2006"
    xmlns:MapController_Behaviors="clr-namespace:MapController.Behaviors"
    mc:Ignorable="d" x:Class="MapController.KinectOverlay"
    Title="KinectOverlay" Height="300" Width="300" WindowStyle="None"
    WindowState="Maximized" Background="Transparent" AllowsTransparency="True">
  <Grid>
  <i:Interaction.Behaviors>
    <ei:FluidMoveBehavior AppliesTo="Children" Duration="0:0:0.5">
    <ei:FluidMoveBehavior.EaseX>
      <SineEase EasingMode="EaseInOut"/>
    </ei:FluidMoveBehavior.EaseX>
    <ei:FluidMoveBehavior.EaseY>
      <SineEase EasingMode="EaseInOut"/>
    </ei:FluidMoveBehavior.EaseY>
    </ei:FluidMoveBehavior>
  </i:Interaction.Behaviors>
  <Canvas Background="Transparent"
  DataContext="{Binding PoseViewModel, Source={StaticResource MainViewModel}}">

    <!-- Left hand -->
    <Image Source="{Binding LeftHandImage}" x:Name="leftHand" Stretch="Fill"
       Canvas.Left="{Binding LeftHandPosition.X, Mode=TwoWay}"
       Canvas.Top="{Binding LeftHandPosition.Y, Mode=TwoWay}"
       Visibility="{Binding HandVisibility}" Opacity="0.75"
       Height="118" Width="80" RenderTransformOrigin="0.5,0.5">
    <Image.RenderTransform>
      <TransformGroup>
      <ScaleTransform ScaleX="{Binding LeftHandScale}"
        ScaleY="{Binding LeftHandScale}"/>
      <SkewTransform/>
      <RotateTransform/>
      <TranslateTransform X="-40" Y="-59"/>
      </TransformGroup>
    </Image.RenderTransform>
    </Image>

    <!-- Right hand -->
    <Image x:Name="righthand" Source="{Binding RightHandImage}" Stretch="Fill"
       Canvas.Left="{Binding RightHandPosition.X, Mode=TwoWay}"
       Canvas.Top="{Binding RightHandPosition.Y, Mode=TwoWay}"
       Visibility="{Binding HandVisibility}" Opacity="0.75"
       Height="118" Width="80" RenderTransformOrigin="0.5,0.5">
    <Image.RenderTransform>
      <TransformGroup>
      <ScaleTransform ScaleX="{Binding RightHandScale}"
        ScaleY="{Binding RightHandScale}"/>
      <SkewTransform/>
      <RotateTransform/>
      <TranslateTransform X="-40" Y="-59"/>
      </TransformGroup>
    </Image.RenderTransform>
    </Image>

    <!-- Video -->
    <Image Canvas.Left="0" Canvas.Top="100" Width ="360"
     Visibility="{Binding ShowVideo, Converter={StaticResource booleanToVisibilityConverter}}">
    <i:Interaction.Behaviors>
      <MapController_Behaviors:DisplayVideoBehavior/>
    </i:Interaction.Behaviors>
    </Image>

    <!-- Shows last speech command -->
    <TextBlock Canvas.Left="10" Canvas.Top="500" Text="{Binding LastCommand}"
      FontSize="36" Foreground="#FF001900"></TextBlock>
  </Canvas>
  </Grid>
</Window>
Note that both MainPage.xaml and KinectOverlay.xaml are full-screen with no Window-style but that KinectOverlay.xaml has Background="Transparent" and AllowsTransparency="True" attributes. This actually creates the ‘transparent overlay.’
Speech recognition
If you think, after reading this, that skeleton tracking with Kinect is almost embarrassingly simple, wait till you see speech recognition. I barely scratched the surface I think, but apart from a lot of initialization bruhaha getting Kinect to recognize basic phrases is a simple matter of feeding a couple of strings to a “Choices” object, feeding that to a “GrammarBuilder” and finally loading that into the “SpeechRecognitionEngine” object. Add a callback to it’s SpeechRecognized property and out come your recognized strings. No calibration, initialization, no hours of ‘training’, nothing – it just works.
Moving back to the last part of the PoseViewModel: at the very end of it is a static property for the speech controller and a simple switch recognizing the speech commands.
#region Speech commands
private static SpeechController _speechControllerInstance;
public SpeechController SpeechController
{
  get { return _speechControllerInstance ??
    (_speechControllerInstance = new SpeechController()); }
}

private void ProcessSpeechCommand(CommandMessage command)
{
  switch (command.Command)
  {
    case VoiceCommand.Shutdown:
      {
        Application.Current.Shutdown(); break;
      }
    //etc etc rest of the commands omitted
    case VoiceCommand.VideoOff:
      {
        ShowVideo = false; break;
      }
  }

  LastCommand = command.Command.ToString();
}
#endregion
The method ProcessSpeechCommand is called whenever the model receives a CommandMessage – that is issued by the SpeechController. As you can see, the spoken commands are contained in a simple enumeration “VoiceCommand”. Being too lazy to make a proper factory for all the commands, I include the factory methods in CommandMessage as well:
using System.Collections.Generic;
using Microsoft.Speech.Recognition;

namespace MapController.Messages
{
  /// <summary>
  /// Command the application is supposed to understand
  /// </summary>
  public class CommandMessage
  {
    public VoiceCommand Command { get; set; }

    /// <summary>
    /// Factory methods
    /// </summary>
    private static Dictionary<string, VoiceCommand> _commands;
    public static IDictionary<string, VoiceCommand> Commands
    {
      get
      {
        if (_commands == null)
        {
          _commands = new Dictionary<string, VoiceCommand>
          {
            {"kinect engage", VoiceCommand.Engage},
            {"kinect stop tracking", VoiceCommand.StopTracking},
            {"kinect track", VoiceCommand.Track},
            {"kinect shutdown", VoiceCommand.Shutdown},
            {"kinect video off", VoiceCommand.VideoOff},
            {"kinect video on", VoiceCommand.VideoOn}
          };
        }
        return _commands;
      }
    }

    public static Choices Choices
    {
      get
      {
        var choices = new Choices();
        foreach (var speechcommand in Commands.Keys)
        {
          choices.Add(speechcommand);
        }
        return choices;
      }
    }
  }
}
The static Commands property is simple translation table from actual text to VoiceCommand enumeration values. The voice commands themselves (as you see, it’s just strings) are fed into a Choices object. Now the only thing that’s missing is the actual speech recognition ‘engine’:
using System;
using System.Globalization;
using System.IO;
using System.Linq;
using System.Threading;
using System.Windows;
using System.Windows.Threading;
using GalaSoft.MvvmLight.Messaging;
using MapController.Messages;
using Microsoft.Research.Kinect.Audio;
using Microsoft.Speech.AudioFormat;
using Microsoft.Speech.Recognition;

namespace MapController.ViewModel
{
  public class SpeechController : IDisposable
  {
    private const string RecognizerId = "SR_MS_en-US_Kinect_10.0";
    private SpeechRecognitionEngine _engine;
    private KinectAudioSource _audioSource;
    private Stream _audioStream;
    private Thread _audioThread;

    public void Initialize()
    {
      // Audio recognition needs to happen on a separate thread
      _audioThread = new Thread(InitSpeechRecognition);
      _audioThread.Start();
    }

    private void InitSpeechRecognition()
    {
      // All kinds on initialization bruhaha directly taken from sample
      _audioSource = new KinectAudioSource
                  {
                    FeatureMode = true,
                    AutomaticGainControl = false,
                    SystemMode = SystemMode.OptibeamArrayOnly
                  };
      var ri =
        SpeechRecognitionEngine.InstalledRecognizers().
          Where(r => r.Id == RecognizerId).FirstOrDefault();
      _engine = new SpeechRecognitionEngine(ri.Id);
      var gb = new GrammarBuilder { Culture = new CultureInfo("en-US") };

      // Building my command list
      gb.Append(CommandMessage.Choices);

      // More initialization bruhaha directly taken from sample
      var g = new Grammar(gb);
      _engine.LoadGrammar(g);
      _engine.SpeechRecognized += SreSpeechRecognized;

      _audioStream = _audioSource.Start();
      _engine.SetInputToAudioStream(_audioStream,
                                    new SpeechAudioFormatInfo(
                                    EncodingFormat.Pcm, 16000, 16, 1,
                                    32000, 2, null));
      _engine.RecognizeAsync(RecognizeMode.Multiple);
    }

    private void SreSpeechRecognized(object sender,
      SpeechRecognizedEventArgs e)
    {
      // Convert spoken text into a command
      if (CommandMessage.Commands.ContainsKey(e.Result.Text))
      {
        Application.Current.Dispatcher.Invoke(DispatcherPriority.Normal,
          new Action(() =>
            Messenger.Default.Send(
               new CommandMessage {
               Command = CommandMessage.Commands[e.Result.Text] })));
      }
    }
  }
}
This is mostly converted from the basic Speech sample. Only the red things are actually (mostly) mine. Most interesting to note is the fact that for some reason speech recognition needs to be done on a separate thread. Don’t ask me why – it just needs to. In the middle you can see I feed my Choices-built-from-commands to a ‘SpeechRecognitionEngine’ going via the ‘GrammarBuilder’ as described earlier, and the SreSpeechRecognized that fires when a speech command is recognized. I call the Messenger back on the UI thread (remember, we are on a separate thread here so nothing bound can be accessed directly) and the result is fired back into the ProcessSpeechCommand of the model, that acts on it as described above.
Caveat: this speech recognition does not work with an ordinary microphone. Kinect is doing the recognition, apparently. Speech recognition samples without a Kinect connected to your computer simply do not start up.
Conclusion and lessons learned
As said before, the solution is pretty crude, and so is the user experience. For instance, the application might start with measuring body dimensions. A person with arms shorter that 50 cm would have trouble getting the application to pan, for instance ;-). But for a first try – with no prior experience – I think it’s a nice start of getting off the ground with Kinect development. I had tremendous fun experimenting with it, although I got a bit distracted from my main passion, i.e. Windows Phone 7. I hope to show this very soon at Vicrea and who knows, maybe this will turn into actual work ;-)
Apart from the actual knowledge and concepts of the API and Kinect controlling, I have learned the following lessons from this application
- A good technical implementation of controlling applications with gestures needs an API that is supplied by the controlled application, or some kind of wrapper. I now use a pretty crude trick, by simulating mouse actions. For a real gesture controlled application something more is needed
- When it comes to gesture control, you are basically on your own, without guidelines on ‘how to do things’. For the past 20 years we’ve been using mouse and keyboard to control our computers. This led to a well defined ‘language’ of ‘concepts that has firmly taken root in our consciousness – things like clicking left and right buttons, dragging, using the mouse wheel for zooming in our out, using cursor keys, menu structures (like about/help and tools/properties) – heck, things like CTRL-ALT-DELETE even have become a figure of speech. But when in comes to gestures, there are no rules, written or unwritten, that describe the ‘logical’ way of zooming and panning a map. Apart from creating the application itself, I had to ‘invent’ the actual poses or gestures. So the logic in zooming out by pulling a hand toward me is mine, but not necessarily yours. A very odd experience. But a fun one.
Sample solution can be obtained here.