02 March 2013

Publishing games in the Brazilian Windows Phone store

Brazil, a strong developing economy, is the largest country is South America, and has the biggest population of South America as well. From a game developer’s standpoint, it’s unfortunately also one of the ‘restricted’ countries. In short, this means you cannot submit a game – any game - to the Brazilian Windows Phone store without it being rated first. Since most developers outside of Brazil think this is a complicated and expensive procedure, and don’t speak Portuguese anyway – they tend to uncheck the Brazilian store and thereby leaving the Brazilians stranded, and denying themselves the opportunity to branch out in South America.

Now this is no longer necessary. A Brazilian guy named Guilherme S. Manso contacted me on twitter about a month ago claiming he made a write-up describing how to get your game rated for the Brazilian store. This got me about half-way, and the rest was explained to me in a Skype session by my fellow Phone Development MVP Rodolpho Marques Do Carmo. With Guilherme’s permission I reworked both explanations to one blog post, making it easy for every game developer to enter the Brazilian store. And the procedure is free, too.

If the game already has an ESRB or PEGI game rating
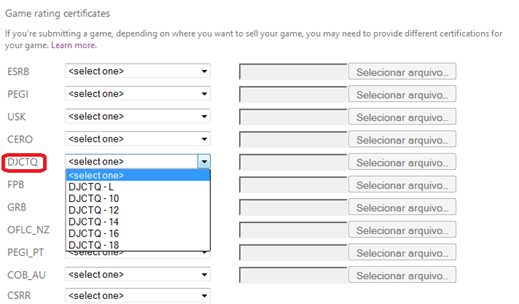
imageRecently, the government of Brazil started accepting the indicative international PEGI and ESRB ratings as a prerequisite for a “national auto rating”. That is, if a game has been rated by any of these institutions, all you need to do is to select one of the age groups from the DJCTQ (the Brazilian government rating) and attach the document that proves that the game has the PEGI or ESRB rating when you submit the game in the Windows Phone Development center. You must choose an age range that matches as closely as possible to the age received by indicative classification PEGI or ESRB. L is for all ages, the others show the age groups – 10 years, 12 and so on. If you already have a rating like this you probably know all about rating and probably don’t need this blog post anyway. I did not follow this track – my game had no rating at all.

If you don’t have any rating yet and want a Brazilian specific rating
First of all, you will need this document. It’s mostly English so it should be intelligible for almost everyone able to read this blog post ;-). It’s a Word document, and it mostly contains check boxes. I ticked check boxes by right-clicking them, selecting “Properties” and then clicking “Selected” under “default value”. You have to fill in some other stuff and then you have to hand-sign it. It’s rather straightforward. You can then print the result, sign it and scan it, or – as I did - sign it with the a pen on a tablet and save the result as PDF. The word document as I used it – minus my signature – can be seen here and used as an example.

Second, you will need to write a synopsis of the game – and provide game itself. I did this the easy way and combined these points: I made another Word document that described the game, provided a global store link to the game, a link to the game in the USA store, and I made a video of the game play that I made available for download. The document I used can be found here. They have a lot of games to process, so make the work of the raters as easy as possible. Another tip: make sure there is a trial version of the game available. If the game needs to be bought first, it will take much longer to get certified.

Third – optionally – you will need to provide a bill of rights for the game. This is only necessary when the Rating Requester Name is different from the Publisher Name (or when it’s not clear that it comes from the same producer). It is a simple statement signed by hand as well, saying that you are the copyright owner of the game or that the holder is aware that you are asking for the classification. Since that did not apply to me, I have no example of that.

E-mailing the rating request
You will need to e-mail the rating request document (the thing with all the checkboxes), the synopsis and optionally the bill of rights to classificacaoindicativa@mj.gov.br.
The title of the mail needs to be: "Jogo para Classificação - <your game name>" (this is the only part that needs to be Portuguese).
I simply e-mailed:
"Dear Sir, Madam,
I hereby request certification of my game Catch’em birds for release in Brazil according to the attached documentation.

Highest regards

Joost van Schaik
Amersfoort
The Netherlands

Obtainingimage the game certificate
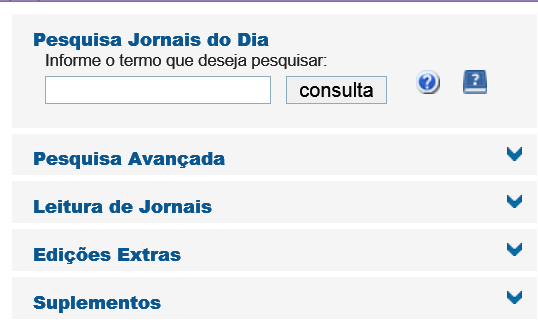
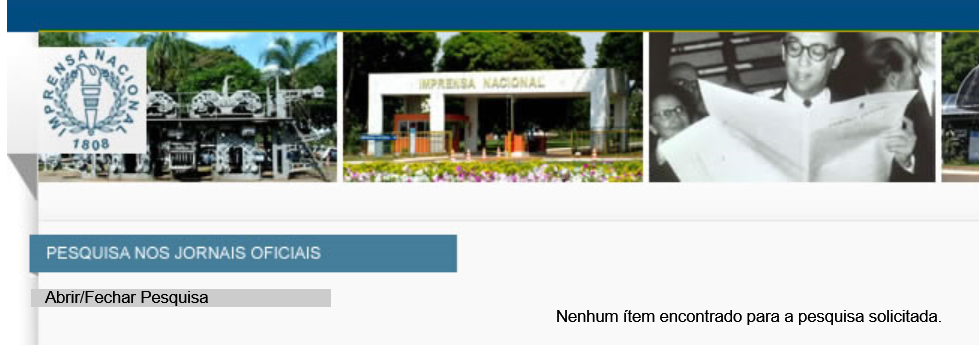
Here things get a little odd: certification will take about ten days, but you will not be informed about the progress or the result. You will need to go to this page regularly to check if your app has passed certification. It shows itself like showed to the left. You simply enter the name or part of the name of your game, click ‘consulta’, and with any luck it will show a result. There is a catch: it will only displayed on this page for a pretty short time. If you miss it, you will get this page, which basically means ‘not found’

image
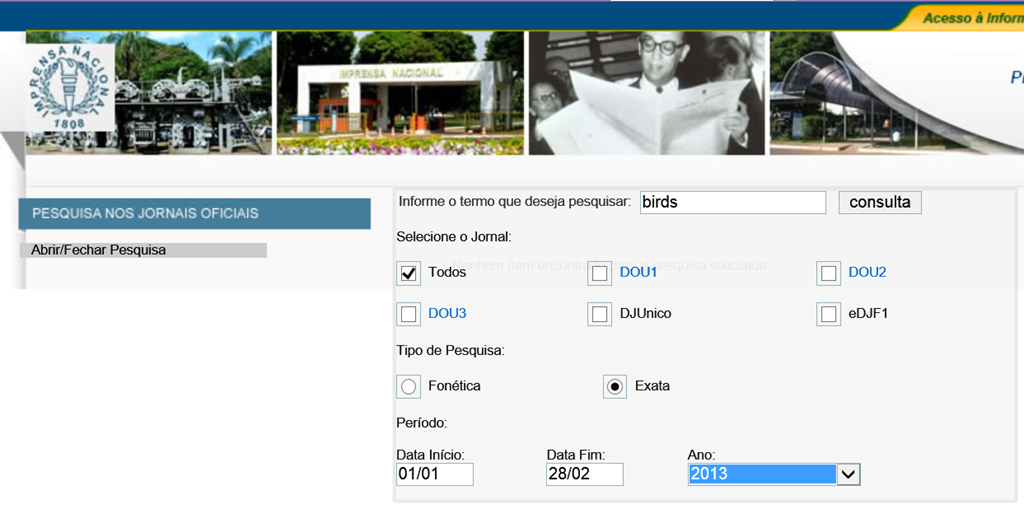
But, if you hit the grey bar at the left bottom that says “Abrir/Fechar Pesquisa” you get an extended search form that allows you to enter dates and stuff:image
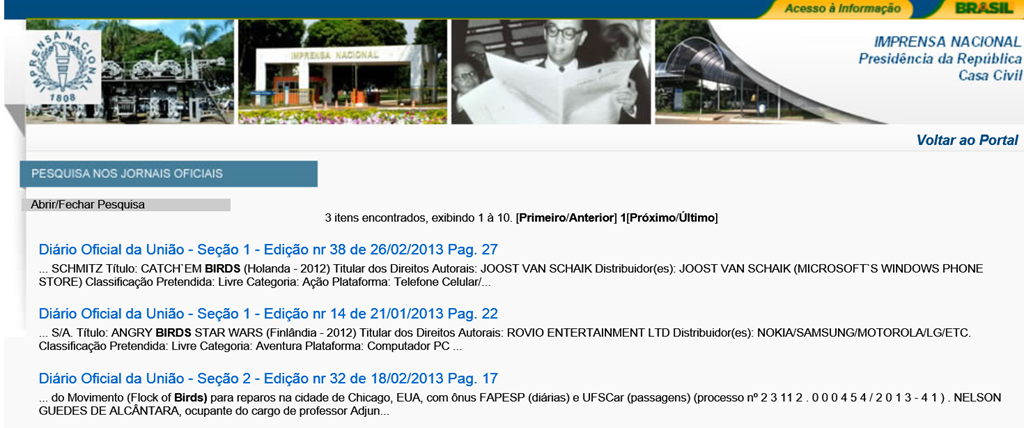
So here I ask the ‘find everything (todos) that contains the word ‘birds’ and was approved between January 1st and February 28th 2013 and now if you hit ‘consulta’…

image
Bingo! Click the blue header (in my case “Diário Oficial da União - Seção 1 - Edição nr 38 de 26/02/2013 Pag. 27”) and this will download a file called “INPDFViewer.pdf”. That’s basically a page of a Brazilian law book saying your game is permitted for the given classification. There’s a bunch of games on that page, but near the end of the page it says:
Título: CATCH`EM BIRDS (Holanda - 2012)
Titular dos Direitos Autorais: JOOST VAN SCHAIK
Distribuidor(es): JOOST VAN SCHAIK (MICROSOFT`S WINDOWS PHONE STORE)
Classificação Pretendida: Livre
Categoria: Ação
Plataforma: Telefone Celular/Smartphone
Tipo de Análise: Sinopse e Vídeo
Classificação: Livre
Processo: 08017.004064/2013-35
Requerente: JOOST VAN SCHAIK

And that’s it. Now you can tick the ‘Brazil’ checkbox in the Windows Phone dev center, select a category according to your classification, and upload the INPDFViewer.pdf as proof. I have tried this procedure to the end, and my game is now in the Brazilian store. And so, my friends, can be yours. The road to Brazil is now wide open for game developers, thanks to Guilherme and Rodolpho, so let’s go to Brazil!

BTW, I haven’t tried this but I assume publishing Windows 8 Store apps can be done following the same procedure.

07 February 2013

A KnockOut.js binding helper for a JQuery Mobile Slider

For those who have missed it – besides all the things I do on Windows Phone and Windows 8 I actually have a job, and in that job I am currently doing a lot of HTML5/Javascript development – now focusing on a Single Page App using (amongst others) Knockout.js and JQuery Mobile. For those who don’t know: Knockout is a great tool that makes data binding possible in a web environment, making the way I think about making applications – using MVVM – possible in an HTML/Javascript  environment as well. If you use Amplify.js you even have messaging. Oh goody!

Now don’t get me wrong – I am not forsaking XAML and C# (like some others *ahem*), but I tried to find a way to bind a JQuery Mobile slider to Knockout.js. That’s not supported out of the box, so you have to make or find a customer ‘binding helper’ and I found so much examples that were plainly wrong or incomplete that I had to blog mine, which is complete and actually works:

ko.bindingHandlers.jQuerySliderValue = {
  // Initialize slider
  init: function (element, valueAccessor)
  {
    var val = valueAccessor()();
    var el = $(element);
    el.slider({ value: val });

    el.bind("change", function (event, ui)
    {
      var value = valueAccessor()();
      if (value !== el.val)
      {
        valueAccessor()(parseInt(el.val()));
      }
    });
  },

  //handle the model value changing
  update: function (element, valueAccessor)
  {
    var el = $(element);

    var value = ko.utils.unwrapObservable(valueAccessor()());
    if (value !== el.val())
    {
      el.val(value);
      el.slider("refresh");
    }
  }
};

You can use this in HTML like this:

<input type="range" name="slider-1" id="slider-1" 
  min="0" max="5"
  data-bind="jQuerySliderValue: locationDataIndex" />

Now I haven’t all conjured this up out of thin air, there are plenty of samples on, for instance, stackoverflow. Actually my most important addition to the samples out there is the red parseInt piece. All samples seem to fail to take into account that a) data binding can happen both way and b) a Jquery mobile slider apparently returns a string value.  This leads to some interesting results if you try to manipulate the return value in your javascript view model by adding 1 to it. What you think happens is:

0+1=1 , 1+1=2 etc.

But like I said, used this way a range return a string, so you get

“0” + 1 = “01” , “01” +1 = “011”.

And an interesting out of range error. The really gotcha is that it seems to go well the first time, the error only occurs the second time. It seems to make no sense at all. Sure, I could have used input type="number" data-type="range", maybe that would have helped as well, but that ain’t in the samples either. Either way, this fixes it for all cases.

So, this is a very old type of blog post, not so much written from the desire to teach and share but borne from sheer annoyance about the incompleteness and incorrectness of what’s out there – the feeling that actually fuelled the creation of this blog ;-)

14 January 2013

An MVVM-friendly ‘tap-to-connect’ NFC socket network helper for Windows Phone 8

For my Windows Phone 8 game “Pull the Rope” I wrote a utility class to make pairing phones and obtaining a  two-way communication channel a little bit easier. I already dabbled into this while developing the game, but now I feel it’s time to show a more comprehensive solution.

I re-use the NavigationEventArgsExtensions and the NavigationMessage from my previous article “Handling Windows Phone 8 NFC startup events using the MVVMLight” without describing them further – I suggest you read this article as a preface to this one if you haven’t done so before. The utility class I describe in this article handles the pairing via tap-to-connect and provides – when that’s done – a method for sending a message and an event for receiving a message. I have peppered the code with debug statements, so can you nicely see in your output windows what’s exactly happening inside of the class when you are debugging on the phone.

Messages are sent and received as strings, therefore the message argument class is not very complex either:

using System;

namespace Wp7nl.Devices
{
  public class ReceivedMessageEventArgs : EventArgs
  {
    public string Message { get; set; }
  }
}
The start of the TtcSocketHelper (‘Tap-To-Connect’) class, as I have called it, is as follows:
using System;
using System.Diagnostics;
using System.Threading.Tasks;
using GalaSoft.MvvmLight.Messaging;
using Windows.Foundation;
using Windows.Networking.Proximity;
using Windows.Networking.Sockets;
using Windows.Storage.Streams;

namespace Wp7nl.Devices
{
  public class TtcSocketHelper
  {
    public TtcSocketHelper()
    {
      Messenger.Default.Register<NavigationMessage>(this, 
        ProcessNavigationMessage);
    }

    public virtual void Start()
    {
      PeerFinder.TriggeredConnectionStateChanged += 
         PeerFinderTriggeredConnectionStateChanged;

      PeerFinder.AllowBluetooth = true;
      PeerFinder.Start();
    }

    private void ProcessNavigationMessage(NavigationMessage message)
    {
      Debug.WriteLine("TtsHelper.ProcessNavigationMessage " + 
        message.NavigationEvent.Uri);

      if (message.IsStartedByNfcRequest)
      {
        Start();
      }
    }
  }
}
The constructor subscribes this helper class to a message that will need to be fired when the application navigates to it's main page. If it detects the app is started by an NfcRequest - i.e. a tap-to-connect, the PeerFinder is immediately started to allow for the further build-up of the connection. I already described this technique in the article I already mentioned. The method Start can also be called by an the application, for instance the press of a “connect” button. Note that I only allow Bluetooth connections – this is because this class comes from my game, which does not need the highest possible speed, but the lowest possible latency. Ironically Wi-Fi seems to have a little more latency than Bluetooth.

The next part is the handling of the connection process itself:

private void PeerFinderTriggeredConnectionStateChanged(object sender, 
             TriggeredConnectionStateChangedEventArgs args)
{
  switch (args.State)
  {
    case TriggeredConnectState.Completed:
      FireConnectionStatusChanged(args);
      socket = args.Socket;
      StartListeningForMessages();
      PeerFinder.Stop();
      break;
    default:
      FireConnectionStatusChanged(args);
      break;
  }
}

private void FireConnectionStatusChanged(TriggeredConnectionStateChangedEventArgs args)
{
  Debug.WriteLine("TtsHelper: " + args);
  if (ConnectionStatusChanged != null)
  {
    ConnectionStatusChanged(this, args );
  }
}

public event TypedEventHandler<object, 
             TriggeredConnectionStateChangedEventArgs> ConnectionStatusChanged;

private StreamSocket socket;

This is kind of nicked from the Bluetooth app to app sample at MSDN, although I made it a bit simpler: only on TriggeredConnectState.Completed I need to do something, i.e. obtain a socket. For the rest of the events, I just pass them to the outside world in case it’s interested.

Next is the part that initiates and performs the actual listening for messages, once the socket is obtained:

private async void StartListeningForMessages()
{
  if( socket != null )
  {
    if (!listening)
    {
      listening = true;
      while (listening)
      {
        var message = await GetMessage();
        if (listening)
        {
          if (message != null && MessageReceived != null)
          {
            MessageReceived(this, 
               new ReceivedMessageEventArgs {Message = message});
          }
        }
      }
    }
  }
}

private async Task<string> GetMessage()
{
  try
  {
    if (dataReader == null) dataReader = new DataReader(socket.InputStream);
    await dataReader.LoadAsync(4);
    var messageLen = (uint)dataReader.ReadInt32();

    await dataReader.LoadAsync(messageLen);
    var message = dataReader.ReadString(messageLen);
    Debug.WriteLine("Message received: " + message);

    return message;
  }
  catch (Exception ex)
  {
    Debug.WriteLine("GetMessage: " + ex.Message);
  }
  return null;
}

public event TypedEventHandler<object, ReceivedMessageEventArgs> MessageReceived;

private DataReader dataReader;

private bool listening;

The StartListeningForMessages basically enters an endless loop – endless that is, until the “listening” is set to “false” - waiting for GetMessage to return something. The GetMessage is almost 100% nicked from the Bluetooth app to app sample at MSDN. the first four bytes are supposed to contain the message length, the rest is payload, hence the two read actions.

Then of course we need a method to actually send messages:

private readonly object lockObject = new object();

public async void SendMessage(string message)
{
  Debug.WriteLine("Send message:" + message);
  if (socket != null)
  {
    try
    {
      lock (lockObject)
      {
        {
          if (dataWriter == null)
          {
            dataWriter = new DataWriter(socket.OutputStream);
          }

          dataWriter.WriteInt32(message.Length);
          dataWriter.StoreAsync();

          dataWriter.WriteString(message);
          dataWriter.StoreAsync();
        }
      }
    }
    catch (Exception ex)
    {
      Debug.WriteLine("SendMessage: " + ex.Message);
    }
  }
}
private readonly object lockObject = new object();

private DataWriter dataWriter;

which comes almost directly from my earlier article “Preventing high speed socket communication on Windows Phone 8 going south when using async/await

And finally we have this brilliant method, which basically resets the TtcSocketHelper class back to its initial status.

public void Reset()
{
  PeerFinder.Stop();
  if (dataReader != null)
  {
    try
    {
      listening = false;
      if (dataReader != null)
      {
        dataReader.Dispose();
        dataReader = null;
      }
      if (dataWriter != null)
      {
        dataWriter.Dispose();
        dataWriter = null;
      }
      if (socket != null)
      {
        socket.Dispose();
        socket = null;
      }
    }
    catch (Exception ex)
    {
    }
  }
}

To use this class:

  • Make sure you app does fire a NavigationMessage as described here
  • Make a new TtcSocketHelper.
  • Subscribe to its ConnectionStatusChanged event
  • Subscribe to its MessageReceived event
  • Call Start
  • Wait until a TriggeredConnectState.Completed comes by
  • Call SendMessage – and see them appear in the method subscribed to MessageReceived on the other phone.

Oh, and don’t forget to set ID_CAP_PROXIMITY in your WMAppManifest.Xaml.right?

The source code – and a working demo of this component – can be found in the demo solution right here. It’s a very simple chat-application built upon TtcSocketHelper. Of course this is all MVVMLight based, and I start off with the basic viewmodel and its properties:

using System.Collections.ObjectModel;
using System.Windows;
using System.Windows.Input;
using GalaSoft.MvvmLight;
using GalaSoft.MvvmLight.Command;
using GalaSoft.MvvmLight.Messaging;
using Windows.Networking.Proximity;
using Wp7nl.Devices;

namespace TtcDemo.Viewmodels
{
  public class NfcConnectViewModel : ViewModelBase
  {
    private TtcSocketHelper ttcSocketHelper;

    public ObservableCollection<string> ConnectMessages { get; private set; }
    public ObservableCollection<string> ReceivedMessages { get; private set; }

    private bool canInitiateConnect;
    public bool CanInitiateConnect
    {
      get { return canInitiateConnect; }
      set
      {
        if (canInitiateConnect != value)
        {
          canInitiateConnect = value;
          RaisePropertyChanged(() => CanInitiateConnect);
        }
      }
    }

    private bool isConnecting;
    public bool IsConnecting
    {
      get { return isConnecting; }
      set
      {
        if (isConnecting != value)
        {
          isConnecting = value;
          RaisePropertyChanged(() => IsConnecting);
        }
      }
    }

    private bool canSend;
    public bool CanSend
    {
      get { return canSend; }
      set
      {
        if (canSend != value)
        {
          canSend = value;
          RaisePropertyChanged(() => CanSend);
        }
      }
    }
    
    private string message;
    public string Message
    {
      get { return message; }
      set
      {
        if (message != value)
        {
          message = value;
          RaisePropertyChanged(() => Message);
        }
      }
    }
  }
}

We have a TtcSocketHelper itself, and two ObservableCollections of strings. ConnectMessages serves is to report the connection progress, and ReceivedMessages hold the messages received by your ‘opponent’ once the connection is established. Then we have three booleans, that basically turn on or off certain parts of the user interface depending on the state:

  • Initially, IsConnecting is true and CanSend is false. That should show a part of the user interface to show ConnectMessages.
  • If the app is started by the user, CanInitiateConnect is true as well, so the user can click on some “connect” button as well. If the apps is started by an NFC request, the process of creating a connection is initiated by someone else and the user should not be able to press a “connect” button to prevent the whole process from being south. I my mind I call the instance of the app that has been started by the user “master”, the instance started by the NFC request “slave”.
  • If the connection has been successfully established, IsConnecting should become false and CanSend true, disabling the controls handling the connection setup, and enabling the controls doing the actual chatting stuff.

And yeah, I know, usually CanSend != IsConnecting so I could replace this with one boolean. But that makes the designer’s job harder, as I will show further on.

Finally we have the Message property, which is where the message the user wants to send. We’ll come to that later. The viewmodel is initialized via a method “Init”, now called in the constructor:

public NfcConnectViewModel()
{
  Init();
}

private void Init()
{
  Messenger.Default.Register<NavigationMessage>(this, ProcessNavigationMessage);

  if (ConnectMessages == null)
  {
    ConnectMessages = new ObservableCollection<string>();
  }

  if (ReceivedMessages == null)
  {
    ReceivedMessages = new ObservableCollection<string>();
  }

  if (!IsInDesignMode)
  {
    if (ttcSocketHelper == null)
    {
      ttcSocketHelper = new TtcSocketHelper();
      ttcSocketHelper.ConnectionStatusChanged += ConnectionStatusChanged;
      ttcSocketHelper.MessageReceived += TtsHelperMessageReceived;
    }
    else
    {
      CanSend = true;          
    }
  }
  IsConnecting = true;
}

It doesn’t really do that much – apart from initializing the ObservableCollections, creating an instance of TtcSocketHelper and subscribing to its events, and setting the initial status. There are two things to note here – one, in design mode both CanSend and IsConnecting are true so all the parts of the GUI are enabled. This is to remain friends with the designer, who can now shut on or off both the connection part of the GUI and the messaging part when he/she chooses using Blend, making the design process a lot easier - in stead of having to muck around in your code – or worse, by coming to complain to you.

The second thing to note is that this viewmodel also subscribes to NavigationMessage (just as TtcSocketHelper itself) . This is because the viewmodel likes to know as well if it’s in a master or slave app:

private void ProcessNavigationMessage(NavigationMessage message)
{
  CanInitiateConnect = !message.IsStartedByNfcRequest;
}

so it can enable or disable the connect button. The handling of the connection messages is done by ConnectionStatusChanged:

private void ConnectionStatusChanged(object sender,
  TriggeredConnectionStateChangedEventArgs e)
{
  Deployment.Current.Dispatcher.BeginInvoke(() =>
    ConnectMessages.Add(GetMessageForStatus(e.State)));
    
  if (e.State == TriggeredConnectState.Completed)
  {
    Deployment.Current.Dispatcher.BeginInvoke(() =>
    {
      IsConnecting = false;
      CanSend = true;
    });
  }
}

private static string GetMessageForStatus(TriggeredConnectState state)
{
  switch (state)
  {
    case TriggeredConnectState.Listening:
      return "Listening....";

    case TriggeredConnectState.PeerFound:
      return "Opponent found";

    case TriggeredConnectState.Connecting:
      return "Opponent found";

    case TriggeredConnectState.Completed:
      return "Connection succesfull!";

    case TriggeredConnectState.Canceled:
      return "Connection canceled";

    default: //TriggeredConnectState.Failed:    
      return "Connection failed";
  }
}

That first adds a message to ConnectMessages using a little helper method GetMessageForStatus (I’d suggest loading this from a resource if you do this in a real app) . After that, if it detects a TriggeredConnectState.Completed message coming by, switches from connect mode to chat mode, so to speak. Since all these events are raised outside of the UI thread, say hello to your old friend Dispatcher to prevent cross-thread access exceptions. Oh, and then of course there’s the little matter of enabling the user actually starting the whole connection process:

public ICommand StartCommmand
{
  get
  {
    return new RelayCommand(
        () =>
        {
          ConnectMessages.Add("Connect started...");
          CanSend = false;
          CanInitiateConnect = false;
          ttcSocketHelper.Start();
        });
  }
}

It adds a message to ConnectMessage (to show “see, I am really doing something!”), disables the connect button (as to prevent an annoying Windows Phone certification tester crashing your program) and then it starts the helper. All this is only needed to handle the build-up of the connection. All that actually handles the chatting is merely this:

public ICommand SendComand
{
  get
  {
    return new RelayCommand(
      () =>
      {
        ttcSocketHelper.SendMessage(Message);
        Message = string.Empty;
      }
   );
  }
}

private void TtsHelperMessageReceived(object sender,
                                      ReceivedMessageEventArgs e)
{
  Deployment.Current.Dispatcher.BeginInvoke(() =>
    ReceivedMessages.Add(e.Message));
}

As you can see it’s only a command that relays the message to the TtcSocketHelper and then clears the field, and a simple method listening for messages and adding received message contents to ReceivedMessages, once again with the aid of the Dispatcher.

Since this article is already way longer than I planned, I limit myself to the part of the XAML that is actually interesting:

<!-- Connect panel-->
<Grid x:Name="ConnectGrid" Margin="0,0,0,76" Grid.RowSpan="2" 
   Visibility="{Binding IsConnecting, Converter={StaticResource VisibilityConverter}}">
  <Grid.RowDefinitions>
    <RowDefinition Height="425*"/>
    <RowDefinition Height="106*"/>
  </Grid.RowDefinitions>
  <Button Content="Connect" HorizontalAlignment="Center" VerticalAlignment="Top"
     IsEnabled="{Binding CanInitiateConnect}" Command="{Binding StartCommmand}" 
     Grid.Row="1"/>
  <ListBox ItemsSource="{Binding ConnectMessages}" Background="#FF091630"/>
</Grid>

<!-- Message panel-->
<Grid x:Name="MessageGrid" 
      Visibility="{Binding CanSend, Converter={StaticResource VisibilityConverter}}" >
  <Grid.RowDefinitions>
    <RowDefinition Height="110*"/>
    <RowDefinition Height="100*"/>
    <RowDefinition Height="412*"/>
  </Grid.RowDefinitions>
  <TextBox Height="72" Margin="0,10,0,0" TextWrapping="Wrap" VerticalAlignment="Center" 
    Text="{Binding Message, Mode=TwoWay}"/>
  <Button Content="send message" Grid.Row="1" Command="{Binding SendComand, Mode=OneWay}"/>
  <ListBox Grid.Row="2" ItemsSource="{Binding ReceivedMessages}" 
           Background="#FF091630" Margin="12,0"/>
</Grid

wp_ss_20130116_0002[1]wp_ss_20130116_0001[1]You can see ConnectGrid whose visibility is controlled by IsConnecting, and a MessageGrid whose visibility is controlled by CanSend. Then there is the Connect button that is enabled or disabled by CanInitiateConnect. The two faces of the application look like as showed on the right. On the left image you see the app just after connect has been initiated by the ‘master’ the right shows the app after having received a message from the first phone and the user of the second phone responding.

I will add the classes described in this article to the wp8-specific version of  my wp7nl CodePlex library soon. In the mean time, you can find them in the Wp7nl.Contrib project of the demo solution.

For the record, there’s also a ResetCommand in the viewmodel that makes it possible to reset the whole connection process, but that’s currently not bound to a button of sorts. I leave that as exercise for the reader ;-)

A final word: I am aware of the fact that I could also have used the Visual State Manager to turn pieces of the GUI on and off (and animate that, too) but I did not want to add even more complexity to this article.

13 January 2013

Playing sounds on Windows Phone using the MVVMLight Messenger

In my never-ending quest to preach the gospel of MVVM in general and MVVMLight in particular as the way to make a structured Windows Phone application I show a little part of my my newest Windows Phone app, “Pull the Rope”. It’s a basically a rope pulling contest played on two phones. I think it’s quite fun to play but I am pretty sure it’s even more hilarious to watch other people play it, swiping like maniacs on their phones.

The first version did not even have sounds – I decided to go the “ship early ship often” route this time – so some days ago I submitted a version that does some supportive sound. Of course my game is MVVMLight based and for adding the game sound I pulled a tried-and-tested (at least, by me) out of the hat – the Messenger-Behavior combo.Using the Messenger requires of course a message, so I started off with that:

namespace Wp7nl.Audio
{
  public class PlaySoundEffectMessage
  {
    public PlaySoundEffectMessage(string soundName, bool start = true)
    {
      SoundName = soundName;
      Start = start;
    }

    public string SoundName { get; private set; }

    public bool Start { get; private set; }
  }
}

So this message has only two options – an identifier for the sound that must be started, and a boolean that indicates whether the sound should be started (default) or stopped (this for sounds that are played in a loop).

Then the behavior itself. As usual, I start off with a couple of Dependency Properties, to support data binding:

  • SoundFileLocation (string) – the location of the sound file to play
  • SoundName (string) – the sound identifier; if PlaySoundEffectMessage.SoundName has the same value a this property, the behavior will take action.
  • Repeat (bool) – indicates if the sound should be played in a loop or not.

I hope you will forgive me for not including the Dependency Properties’ code in the this article as it is pretty much run of the mill and takes a lot of space.

The core of the behavior itself is actually pretty simple. It’s meant to be used in conjunction with a MediaElement. First, the setup. I created this as a SafeBehavior to make setup and teardown a little less complex:

using System;
using System.Windows;
using System.Windows.Controls;
using GalaSoft.MvvmLight.Messaging;
using Wp7nl.Behaviors;

namespace Wp7nl.Audio
{
  public class PlaySoundEffectBehavior : SafeBehavior<MediaElement>
  {
    protected override void OnSetup()
    {
      Messenger.Default.Register<PlaySoundEffectMessage>(
        this, DoPlaySoundFile);
      AssociatedObject.IsHitTestVisible = false;
      AssociatedObject.AutoPlay = false;
      var soundUri = new Uri(SoundFileLocation, UriKind.Relative);
      AssociatedObject.Source = soundUri;
      AssociatedObject.Position = TimeSpan.FromSeconds(0);
      SetRepeat(Repeat);
    }
  }
}

So basically this behavior subscribes to the message type we just defined. Then it goes on initializing the MediaElement – disabling hit test and autoplay, actually setting the sound file URI, initializing it to the beginning and initializing repeat (or not).

The method DoPlaySoundFile, which kinda does all the work, isn’t quite rocket science either:

private void DoPlaySoundFile(PlaySoundEffectMessage message)
{
  if (SoundName == message.SoundName)
  {
    if (message.Start)
    {
      AssociatedObject.Position = TimeSpan.FromSeconds(0);
      AssociatedObject.Play();
    }
    else
    {
      AssociatedObject.Stop();
    }
  }
}

If a message is incepted with the same sound name as has been set to the behavior in the XAML, then either start or stop the sound.

The rest of the behavior is basically some odds and ends:

private void SetRepeat(bool repeat)
{
  if (AssociatedObject != null)
  {
    if (repeat)
    {
      AssociatedObject.MediaEnded += AssociatedObjectMediaEnded;
    }
    else
    {
      AssociatedObject.MediaEnded -= AssociatedObjectMediaEnded;
    }
  }
}

private void AssociatedObjectMediaEnded(object sender, RoutedEventArgs e)
{
  AssociatedObject.Position = TimeSpan.FromSeconds(0);
  AssociatedObject.Play();
}

protected override void OnCleanup()
{
  Messenger.Default.Unregister(this);
  AssociatedObject.MediaEnded -= AssociatedObjectMediaEnded;
}

The first method, SetRepeat, enables or disables repeat. As a MediaElement does not support the endless SoundMvvmloop by itself, repeat as such is implemented by subscribing the method AssociatedObjectMediaEnded to the MediaEnded event of the MediaElement – that does nothing more than kicking off the sound again. If repeat has to be turned off, the AssociatedObjectMediaEnded is unsubscribed again and the sound automatically ends.

Finally, the last method is called when the behavior is deactivated. It removes the messenger subscription and a possible repeat event subscription.

So how would you go about and use such a behavior? To demonstrate it’s working, I have created a small sample solution with the very exiting *cough* user interface showed to the right. What this app does is, as you click on the go button, is fire off the PlaySoundCommand command in the following, admittedly somewhat contrived view model:

using System;
using System.Windows;
using System.Windows.Input;
using System.Windows.Threading;
using GalaSoft.MvvmLight;
using GalaSoft.MvvmLight.Command;
using GalaSoft.MvvmLight.Messaging;
using Wp7nl.Audio;

namespace SoundMvvm.Viewmodels
{
  public class SoundViewModel : ViewModelBase
  {
    public ICommand PlaySoundCommand
    {
      get
      {
        return new RelayCommand(
          () =>
            {
              var t = new DispatcherTimer {Interval =  
                      TimeSpan.FromSeconds(4)};
              t.Tick += TimerTick;
              t.Start();
            });
      }
    }

    private void TimerTick(object sender, EventArgs e)
    {
      tickNumber++;
      switch (tickNumber)
      {
        case 1:
          Messenger.Default.Send(new PlaySoundEffectMessage("Sad trombone"));
          break;
        case 2:
          Messenger.Default.Send(new PlaySoundEffectMessage("Ping"));
          break;
        case 3:
          Deployment.Current.Dispatcher.BeginInvoke(() => 
            Messenger.Default.Send(new PlaySoundEffectMessage("Ping", false)));
          var t = sender as DispatcherTimer;
          t.Stop();
          t.Tick -= TimerTick;
          break;
      }
    }

    private int tickNumber;
  }
}

This initializes and starts a DispatcherTimer that will fire every four seconds. So the first four seconds after you click the button absolutely nothing will happen – I wanted to simulate the situation in which an event in the view model, not necessarily directly kicks off the sound. At the first tick – after four seconds – the view model fires a message making the behavior start the “Sad trombone” sound, which runs about four seconds. Then it fires off the “Ping” message, which causes the “Ping” sound to be started and repeated by the behavior. After another four seconds (good for about three ‘pings’) it’s killed again by the second “Ping” message. And then this little app has done all it could. Cue sad trombone indeed ;-)

As to the XAML to make this all work, I’ve outlined in red (and underline for the color blind readers) the interesting parts:

<phone:PhoneApplicationPage
    x:Class="SoundMvvm.MainPage"
    xmlns="http://schemas.microsoft.com/winfx/2006/xaml/presentation"
    xmlns:x="http://schemas.microsoft.com/winfx/2006/xaml"
    xmlns:phone="clr-namespace:Microsoft.Phone.Controls;assembly=Microsoft.Phone"
    xmlns:shell="clr-namespace:Microsoft.Phone.Shell;assembly=Microsoft.Phone"
    xmlns:d="http://schemas.microsoft.com/expression/blend/2008"
    xmlns:mc="http://schemas.openxmlformats.org/markup-compatibility/2006"
    xmlns:i="clr-namespace:System.Windows.Interactivity;assembly=System.Windows.Interactivity"
    xmlns:audio="clr-namespace:Wp7nl.Audio;assembly=Wp7nl.MvvmLight"
    xmlns:viewmodels="clr-namespace:SoundMvvm.Viewmodels"
    mc:Ignorable="d"
    FontFamily="{StaticResource PhoneFontFamilyNormal}"
    FontSize="{StaticResource PhoneFontSizeNormal}"
    Foreground="{StaticResource PhoneForegroundBrush}"
    SupportedOrientations="Portrait" Orientation="Portrait"
    shell:SystemTray.IsVisible="True" >

  <phone:PhoneApplicationPage.Resources>
    <viewmodels:SoundViewModel x:Key="SoundViewModel" />
  </phone:PhoneApplicationPage.Resources>
  <Grid x:Name="LayoutRoot" Background="Transparent" 
DataContext="{StaticResource SoundViewModel}"> <Grid.RowDefinitions> <RowDefinition Height="Auto"/> <RowDefinition Height="*"/> </Grid.RowDefinitions> <StackPanel x:Name="TitlePanel" Grid.Row="0" Margin="12,17,0,28"> <TextBlock Text="DEMO MVVM SOUNDS"
Style="{StaticResource PhoneTextNormalStyle}" Margin="12,0"/> <TextBlock Text="play sounds" Margin="9,-7,0,0" Style="{StaticResource PhoneTextTitle1Style}"/> </StackPanel> <Grid x:Name="ContentPanel" Grid.Row="1" Margin="12,0,12,0"> <Button Content="go!" Margin="0,31,0,0" VerticalAlignment="Top" Width="128" Height="80" Command="{Binding PlaySoundCommand}"/> </Grid> <MediaElement> <i:Interaction.Behaviors> <audio:PlaySoundEffectBehavior SoundName="Sad trombone" SoundFileLocation="/Sound/Sad_Trombone-Joe_Lamb-665429450.mp3"/> </i:Interaction.Behaviors> </MediaElement> <MediaElement> <i:Interaction.Behaviors> <audio:PlaySoundEffectBehavior Repeat="True" SoundName="Ping" SoundFileLocation="/Sound/Elevator-Ding-SoundBible.com-685385892.mp3"/> </i:Interaction.Behaviors> </MediaElement> </Grid> </phone:PhoneApplicationPage>

On top we have the DataContext set to our viewmodel, which, by using it this way, is automatically instantiated. The “go!” button is bound to the PlaySoundCommand, and then you see near the bottom the two MediaElement objects which each a PlaySoundEffectBehavior. The first one plays the “Sad trombone" once as the message is received, the second repeatedly (Repeat=”True”) the “ping” sound until it receives a message with “Start” the to “false” indicating it should shut up.

In the sample solution you will find two projects: SoundMvvm (the app itself) and Wpnl.Contrib, which both the behavior and the message class. As you probably understand from this setup, both classes will be soon in the wp7nl CodePlex library.For the record, this is a Windows Phone 8 app, but I think this should work on Windows Phone 7 as well, although on 7 I would still go for the XNA SoundEffect class. The technique used for this behavior comes from my Catch’em Birds for Windows 8 app by the way, where you don’t have XNA at all.

26 December 2012

Handling Windows Phone 8 NFC startup events using the MVVMLight Messenger

wp_ss_20121226_0002As regular readers of this blog know, I am currently playing around with NFC on Windows Phone 8. I peeked a little in the Bluetooth app to app sample at MSDN to understand how to find a ‘peer’. A peer is defined as the same app, installed on a different phone. So basically you go around installing the app on two phones, start it on phone 1, make sure it calls PeerFinder.Start(), tap the phones together and presto - the popup as displayed in the image on the right appears. If you check ‘open app’ – or whatever it shows in the language you have selected – the app is started on the second phone as well.

You can distinguish between an app being started by itself, or with the “open app” button by overriding the OnNavigatedTo method from the app’s main startup page. If the app is all started up by itself, the NavigationEventArgs.Uri just contains the name of the main page, for instance “MainPage.xaml”. But if it is started by an NFC event, the Uri ends with the following rather funny long string:

ms_nfp_launchargs=Windows.Networking.Proximity.PeerFinder:StreamSocket

Annoyingly, the OnNavigatedTo event is only available inside the page’s code. If you want to handle this the MVVM way, you want this to be taken care of by a view model or a model, not by the page’s code behind.

I have gone the following route. First, I define a little extension method that easily helps me to determine if the app was initiated by the user or by an NFC event:

using System.Windows.Navigation;

namespace Wp7nl.Devices
{
  public static class NavigationEventArgsExtensions
  {
    public static bool IsStartedByNfcRequest(this NavigationEventArgs e)
    {
      var isStartedByNfcRequest = false;
      if (e.Uri != null)
      {
        isStartedByNfcRequest = 
          e.Uri.ToString()
          .Contains("ms_nfp_launchargs=Windows.Networking.Proximity.PeerFinder:StreamSocket");
      }
      return isStartedByNfcRequest;
    }
  }
}

And as I don’t like to pass bare events around, I make a little wrapper class to use as a message:

using System.Windows.Navigation;
using Wp7nl.Devices;

namespace PullTheRope.Logic.Messages
{
  public class NavigationMessage
  {
    public NavigationEventArgs NavigationEvent { get; set; }

    public bool IsStartedByNfcRequest
    {
      get 
      { 
        return NavigationEvent != null && NavigationEvent.IsStartedByNfcRequest();
      }
    }
  }
}

And it contains a convenient shortcut method as well. Then the only thing you have to do is indeed override the OnNavigatedTo method, like this:

protected override void OnNavigatedTo(NavigationEventArgs e)
{
  base.OnNavigatedTo(e);
  Messenger.Default.Send(new NavigationMessage {NavigationEvent = e});
}

This is the only ‘breaking’ of the purist's MVVM approach – but as the event is nowhere else available, it’s also the only way to get it done. Sometimes you have to take the pragmatic approach. Anyway, somewhere in your model or view model you define which method should be called when the message is received

Messenger.Default.Register<NavigationMessage>(this, ProcessNavigationMessage);

a method to trap it

private void ProcessNavigationMessage(NavigationMessage message)
{
  // whatever – we are back in MVVM territory
}

and I trust you can take it from there ;-) .

Be aware the events generated are generated outside the GUI thread, so if you try to data bind properties changed from the event method, you might run into cross thread access errors. Deployment.Current.Dispatcher.BeginInvoke is your friend, then.

17 December 2012

On blogging, sharing and commenting

This is not about code, but about something a fellow developer and blogger told me, which made me quite sad. It’s a kind of personal rant, so feel free to skip it if you are looking for code.

In 2007, after a frustrating search on the internet for a complete and working code sample for whatever it was, I was quite pissed off. And I decided “well if apparently people are too lazy or too much ‘look at me’ superior to post complete and working samples, I will start doing so myself”. I also could have gone to the blogs I visited posting comments like “you moron, this code is incomplete and/or wrong” or “why don’t you stop coding/blogging the cr*p you post is useless”. While technically I would have been right, I don’t think it would have helped me solve my problems. Starting blogging myself did not help me solve that problems either, but at least I had a place where I could dump my own solutions for later reference. Very handy. Apparently other people liked it too.

I was lucky enough to post a few good articles, and a few very dumb ones too, but those were met with “hey, that’s obsolete”, “hey, this is a better solution” or “I think you are missing a few steps” – with links and information. I either did take the articles down, or reworked them with the new information. I was lucky enough not to get lambasted, flamed or receive abusive comments or mails – no, my baby steps were encouraged by a few people – mostly MVPs by the way – who kind of nudged me along the rocky path of the beginning blogger.

That encouragement made me go on, becoming confident enough so that when the occasional abusive comment arrived, I was able to ignore the wording of the comment and fix the error, or challenge the commenter: “so if you are such a know-it-all, why don’t you blog about it - why do you leave me stumbling in the dark making stupid avoidable errors?”.

I recently talked to the beginning blogger I mentioned before, who was severely flamed in the beginning of his ‘career’, and he almost quit blogging of that. The wording I use in the second paragraph are more or less quotes of what he received.

This is really very counterproductive behavior. If you are someone who likes to demonstrate his/her knowledge on someone else’s blog by making demeaning remarks – realize what you are effectively doing is extinguishing enthusiasm that may have grown into the creation of a vast information resource. You are killing creativity, stomping out the sharing flame, making one of the very few willing to take time to share knowledge retreat into his/her shell, maybe never to come back again.

The very short version:

Flaming other people’s blog has never led to more examples and information. If you want more and better examples: stimulate and encourage where you can, correct if you feel you must, and try to behave like a civilized human being.

And above all, start blogging yourself. Don’t be a prick – share. Use your knowledge to improve people, not to tear them down. That’s community. That’s how it works.

Thank you.

16 December 2012

Preventing high speed socket communication on Windows Phone 8 going south when using async/await

Currently I am working on a Windows Phone 8 action game in which you can fight a kind of duel. This involves pairing the phones via NFC and then obtaining a socket trough which the phones can exchange game information. Liking to steal from examples myself (why do you think I name my blog this way, eh?) I stole code from the Bluetooth app to app sample at MSDN. Now this is a great sample but it has one kind of problem for me.

I’ll skip the pairing, the obtaining of the socket and the definition of the data reader – that’s all documented in the MSDN sample. The method to send a message to the opponent was, in condensed form:

public async void SendMessage(string message)
{
  if (dataWriter == null)
  {
    dataWriter = new DataWriter(socket.OutputStream);
  }

  dataWriter.WriteInt32(message.Length);
  await dataWriter.StoreAsync();

  dataWriter.WriteString(message);
  await dataWriter.StoreAsync();
}

while at the same time both opponenents where listening using a simple method like

public async Task GetMessage()
{
  if (dataReader == null) dataReader = new DataReader(socket.InputStream);
  await dataReader.LoadAsync(4);
  var messageLen = (uint)dataReader.ReadInt32();
  Debug.WriteLine(messageLen);

  await dataReader.LoadAsync(messageLen);
  var message = dataReader.ReadString(messageLen);
  Debug.WriteLine(message);
  return message;
}

From the debug statements in this code you can see things weren’t exactly working as planned. Now the way this is supposed to work is as follows: as the opponent sends a message using SendMessage, the other phone is receiving a message via the socket in GetMessage. The first four bytes contain an unsigned integer containing the length of the rest of the message – which is supposed to be a string.

I noticed that while things went off to a good start, sooner or later one of the two phones would stop receiving messages or both games crashed simultaneously. I got all kind of null value errors, index out of range and whatnot. When I started debugging, I found out that while the app on phone 1 said it sent a 3-character string, the receiving app on phone 2 sometimes got a huge number for the message length, that obviously wasn’t sent, it read past the end of the stream – crash.

The MSDN sample works fine, as long as it is used for the purpose it was written, i.e. sending out (chat) messages at a kind of sedate pace – not for sending a lot of events per second to keep a game in sync. The essence of a stream is that it’s a stream indeed – things have to be written and read in the right order. For what happened of course was a race condition between two or more events in a short timeframe. The first event wrote the message length, the second event as well, then possibly a third, before the first one came to writing the actual message, and whatever arrived on the other phone was a garbled jumble of bytes that did exactly reflect what happened on the sending phone, but wasn’t the orderly message length – message payload stream the other phone expected.

The way I solved it – in a ‘there-I-fixed-it’ kind of way – was to use a lock on the write code so at least stuff went in the stream in the order the other phone was expecting it:

public async void SendMessage(string message)
{
  lock (this)
  {
    if (dataWriter == null)
    {
      dataWriter = new DataWriter(socket.OutputStream);
    }

    dataWriter.WriteInt32(message.Length);
    dataWriter.StoreAsync();

    dataWriter.WriteString(message);
    dataWriter.StoreAsync();
  }
}

Note you have to remove the “await” before the StoreAsync methods as those are not allowed within a lock. This method makes sure one message – and the whole message – is written on the stream and nothing comes in between.

Update – the first version of this posting contained a small error – which has been graciously pointed out to me by a few readers (see comments section). Also, I’ve been pointed to an article by Scott Hanselman about a similar subject. I’ve tried using the AsyncLock by Stephen Toub he describes but found out that although it works very good and my game does become a bit more fluid, the lag in getting messages across is a lot higher. Net effect: while the game runs more smoothly on both phones, the game state actually gets out of sync very fast, making the game unplayable. Apparently the AsyncLock approach doesn’t work for high speed continuous message exchange, so for now I’ll stick to the approach I described above.