19 April 2013

Windows Phone 8 navigation part 1–geocoding, tombstoning–and testing

After my post about reverse geocoding I set out to make a little app to demonstrate routing in Windows Phone 8. The demo app went quite out of hand, so I decided to split the post up in a few smaller posts. In the course of it I am going to build a basic navigation app that enables the user to determine two locations, find a route between those locations, and display them on a map – all using MVVMLight, of course.

And now the 2012.2 update to Visual Studio is released, we can finally build Windows Phone MVVM apps the way things are intended to be: by writing some unit test first, getting the basic functions right, before creating an all-out app. This makes it especially handy to test one important requirement that go for all my apps – all the models and viewmodels must be serializabe, so I can tombstone using SilverlightSerializer like I have been doing for over two years now.

At this point I am not really sure how much blog posts this will take me, but I guess at least three, maybe four.

What is unit testing and why should I do that?

Professional software developers are usually all in on this. What you basically do is write code that asserts that pieces of your code are behaving the way you expect them to do. I am sure everyone has had the episode that you change one little thing that should be inconsequential and suddenly, at some seemingly totally unrelated place, things start going South. Unit tests call little pieces of of your code and test if the result of calling a method, setting a property or whatever gives the result you expect. If you write unit tests, and then change something, and test start failing in unrelated places – it’s like a smoke detector going off. Your code starts detecting bugs for you. Nice, eh? I also gives you the a way to mess around with all kinds of APIs getting things right before you start wasting time on a complex GUI that you can’t get to work because the underlying code cannot work the way you want.

What is geocoding?

Geocoding is what we GIS buffs say when we mean ‘finding a location on earth by it’s name”. If I put “Boston  USA” in a geocoder I expect to get a coordinate that puts me somewhere on the east coast of the United States, if I enter “Springerstraat 36 Netherlands” I expect a coordinate that shows me my own house, or somewhere nearby. Some geocoders can take info that’s not tied to an address, but things like, like ‘town hall Little Rock USA”. In general – in goes a descriptive text, out come one or more matches with coordinates.

Enough introduction. Let’s code.

Setting the stage

I started out doing the following:

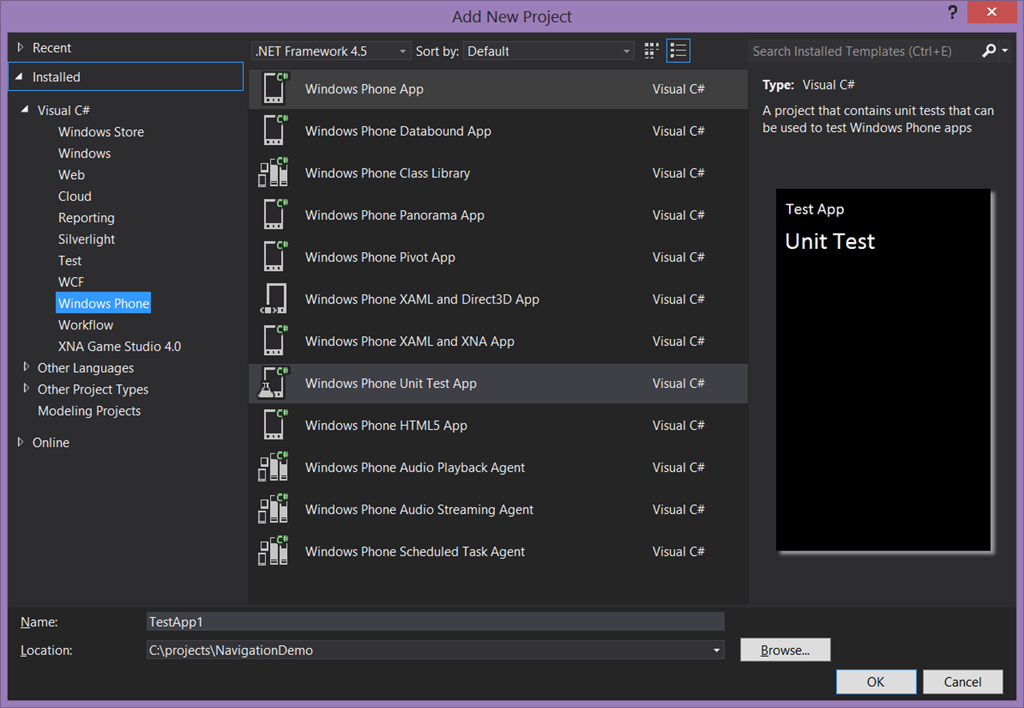
  • Create a new Windows Phone App “NavigationDemo”. Target framework 8.0
  • Add a Windows Phone Class Library “NavigationDemo.Logic”
  • Add a Windows Phone Unit Test app “NavigationDemo.Logic.Test”
  • In NavigationDemo, create a reference to NavigationDemo.Logic
  • In NavigationDemo.Logic.Test, make a reference to NavigationDemo.Logic as well.
  • In both NavigationDemo and NavigationDemo.Logic.Test, select WMAppManifest.xml in Properties and enable the “ID_CAP_MAP” capbility

Now, because I am a lazy ******* and like to re-use I did things before, bring in the following nuget packages:

  • wp7nl (this will pull in MVVMLight Libraries-only version and the Windows Phone toolkit as well)
  • Microsoft.Bcl.Async

wp7nl also has a Windows Phone 8 version (it’s name is retained for historic reasons). Install both packages in all three projects.

GeocodeModel – take one

In “NavigationDemo.Logic”, add a folder “GeocodeModel” and put the following class in there:

using System;
using System.Collections.Generic;
using System.Device.Location;
using System.Linq;
using System.Threading.Tasks;
using Microsoft.Phone.Maps.Services;
using Wp7nl.Utilities;

namespace NavigationDemo.Logic.Models
{
  public class GeocodeModel
  {
    public GeocodeModel()
    {
      MapLocations = new List<MapLocation>();
      SearchLocation = new GeoCoordinate();
    }
    public string SearchText { get; set; }

    public GeoCoordinate SearchLocation { get; set; }

    public MapLocation SelectedLocation { get; set; }

    public List<MapLocation> MapLocations { get; set; }

    public async Task SearchLocations()
    {
      MapLocations.Clear();
      SelectedLocation = null;
      var geoCoder = new GeocodeQuery
      {
        SearchTerm = SearchText,
        GeoCoordinate = SearchLocation
      };
      MapLocations.AddRange(await geoCoder.GetMapLocationsAsync());
      SelectedLocation = MapLocations.FirstOrDefault();
    }
  }
}

To perform geocoding, we need the GeocodeQuery class. So we embed that into a class with a method to perform the actual geocoding, a search string to holds the user input, a list of MapLocation (the output of GeocodeQuery) and SelectedLocation to the user’s selection.

Note there is also a SearchLocation property of type GeoCoordinate. That’s because the GeocodeQuery also needs a location to start searching from. If the programmer using my model doesn’t set it, I choose a default value. But you can imagine this being useful if someone just enters ‘Amersfoort’ for SearchText and a coordinate somewhere in the Netherlands – that way the GeocodeQuery knows that you want to have Amersfoort in the Netherlands, and not the Amersfoort in South Africa. Anyway, it’s now time for

Writing the search test

Add a new class GeocodeModelTest to NavigationDemo.Logic.Test and let’s write our first test:

using System;
using System.Threading;
using System.Windows;
using Microsoft.VisualStudio.TestPlatform.UnitTestFramework;
using NavigationDemo.Logic.Models;

namespace NavigationDemo.Logic.Test
{
  [TestClass]
  public class GeocodeModelTest
  {
    [TestMethod]
    public void TestFindBoston()
    {
      var m = new GeocodeModel { SearchText = "Boston USA" };
      var waitHandle = new AutoResetEvent(false);

      Deployment.Current.Dispatcher.BeginInvoke(async () =>
      {
        await m.SearchLocations();
        waitHandle.Set();
       });
      waitHandle.WaitOne(TimeSpan.FromSeconds(5));

      Assert.AreEqual(m.SelectedLocation.GeoCoordinate.Latitude, 42, 1);
      Assert.AreEqual(m.SelectedLocation.GeoCoordinate.Longitude, -71, 1);
      Assert.AreEqual(m.SelectedLocation.Information.Address.City, 
         "Boston");
      Assert.AreEqual(m.SelectedLocation.Information.Address.State,
        "Massachusetts");
      Assert.AreEqual(m.SelectedLocation.Information.Address.Country, 
        "United States of America");
    }
  }
}

The GeocodeQuery runs async and needs to run on the UI thread as well. If you have no idea what I am fooling around here with the Dispatcher and the AutoResetEvent, please read this article first. Anyway, this test works. Boston is indeed on the east coast of the United States and still in Massachusetts. Most reassuring. Now let’s see if SilverlightSerializer will indeed serialize this.

Writing the serialization test – take one

The first part is basically a repeat of the first test – writing unit test sometimes involves a lot of boring copy & paste work – but the last part is different:
 [TestMethod]
 public void TestStoreAndRetrieveBoston()
 {
   var m = new GeocodeModel { SearchText = "Boston USA" };
   var waitHandle = new AutoResetEvent(false);

   Deployment.Current.Dispatcher.BeginInvoke(async () =>
   {
     await m.SearchLocations();
     waitHandle.Set();
   });
   waitHandle.WaitOne(TimeSpan.FromSeconds(5));
   Assert.IsNotNull(m.SelectedLocation);

   // Actual test
   var h = new IsolatedStorageHelper<GeocodeModel>();
   if (h.ExistsInStorage())
   {
     h.DeletedFromStorage();
   }
   h.SaveToStorage(m);

   var retrievedModel = h.RetrieveFromStorage();
   Assert.AreEqual(retrievedModel.SelectedLocation.Information.Address.City,
	"Boston");
 }
}

Adding this test to GeocodeModelTest will reveal a major bummer – a couple of the classes that are returned by GeocodeQuery – starting with MapLocation - have private constructors and cannot be serialized. Our model cannot be serialized. The usual approach to this kind of problem is to write a kind of wrapper class that can be serialized. But… using MVVMLight you are most of the time making wrapper classes anyway – that’s what a ViewModel is, after all, so let’s use that.

Writing the serialization test - take two

First, adorn the stuff that cannot be serialized in the GeocodeModel with the [DoNotSerialize] attribute, like this:

[DoNotSerialize]
public MapLocation SelectedLocation { get; set; }

[DoNotSerialize]
public List MapLocations { get; set; }
and the test is reduced to this:
[TestMethod]
public void TestStoreAndRetrieveBoston()
{
  var m = new GeocodeModel { SearchText = "Boston USA" };
  // Actual test
  var h = new IsolatedStorageHelper();
  if (h.ExistsInStorage())
  {
    h.DeletedFromStorage();
  }
  h.SaveToStorage(m);

  var retrievedModel = h.RetrieveFromStorage();
  Assert.AreEqual(retrievedModel.SearchText, "Boston USA");
}

Hurray, this works, but the model’s results are now no longer storing stuff. MapLocations is empty, so is SelectedLocation, if they are deserialized. Bascially we are now only testing if indeed the search test is retained after storage and retrieval. Well, it is.

Enter the viewmodels

So far I mainly showed what does not work. Now it’s time to show what does. First, we make a viewmodel around MapLocation:

using System.Device.Location;
using GalaSoft.MvvmLight;
using Microsoft.Phone.Maps.Services;

namespace NavigationDemo.Logic.ViewModels
{
  public class MapLocationViewModel : ViewModelBase
  {
    public MapLocationViewModel()
    {
    }

    public MapLocationViewModel(MapLocation model)
    {
      var a = model.Information.Address;

      Address = string.Format("{0} {1} {2} {3} {4}", 
            a.Street, a.HouseNumber, a.PostalCode,
            a.City,a.Country).Trim();
      Location = model.GeoCoordinate;
    }

    private string address;
    public string Address
    {
      get { return address; }
      set
      {
        if (address != value)
        {
          address = value;
          RaisePropertyChanged(() => Address);
        }
      }
    }

    private GeoCoordinate location;
    public GeoCoordinate Location
    {
      get { return location; }
      set
      {
        if (location != value)
        {
          location = value;
          RaisePropertyChanged(() => Location);
        }
      }
    }
  }
}

That takes care of the MapLocation not being serializable. Once it is initialized, it does no longer need the model anymore. Which is a good thing, since it cannot be serialized ;-). Next is the GeocodeViewModel itself:

using System.Collections.ObjectModel;
using System.Threading.Tasks;
using System.Windows.Input;
using GalaSoft.MvvmLight;
using GalaSoft.MvvmLight.Command;
using NavigationDemo.Logic.Models;
using Wp7nl.Utilities;
using System.Linq;

namespace NavigationDemo.Logic.ViewModels
{
  public class GeocodeViewModel : ViewModelBase
  {
    public GeocodeViewModel()
    {
      MapLocations = new ObservableCollection<MapLocationViewModel>();
    }

    public string Name { get; set; }

    public GeocodeViewModel( GeocodeModel model) : this()
    {
      Model = model;
    }

    public GeocodeModel Model{get;set;}

    public ObservableCollection<MapLocationViewModel> MapLocations { get; set; }

    [DoNotSerialize]
    public string SearchText
    {
      get { return Model.SearchText; }
      set
      {
        if (Model.SearchText != value)
        {
          Model.SearchText = value;
          RaisePropertyChanged(() => SearchText);
        }
      }
    }

    private MapLocationViewModel selectedLocation;
    public MapLocationViewModel SelectedLocation
    {
      get { return selectedLocation; }
      set
      {
        if (selectedLocation != value)
        {
          selectedLocation = value;
          RaisePropertyChanged(() => SelectedLocation);
        }
      }
    }
    
    public async Task SearchLocations()
    {
      MapLocations.Clear();
      SelectedLocation = null;
      await Model.SearchLocations();
      MapLocations.AddRange(Model.MapLocations.Select( 
        p=> new MapLocationViewModel(p)));
      SelectedLocation = MapLocations.FirstOrDefault();
    }
    
    [DoNotSerialize]
    public ICommand SearchLocationCommand
    {
      get
      {
        return new RelayCommand(async () => await SearchLocation());
      }
    }
  }
}

Notice that the only attribute that is serialized by the model, is now marked [DoNotSerialize]. This is really important – since the model may not be around yet when deserializing takes place, it would result in a null reference. If you pass things to the model, let the model serialize it. If you don’t let the viewmodel take care of it.

Writing the search test for the viewmodel

So since we are now no longer testing the model but the viewmodel, I added a new class “GeocodeViewModeTest” to, well, test the viewmodel.

using System;
using System.Threading;
using System.Windows;
using Microsoft.VisualStudio.TestPlatform.UnitTestFramework;
using NavigationDemo.Logic.Models;
using NavigationDemo.Logic.ViewModels;
using Wp7nl.Utilities;
namespace NavigationDemo.Logic.Test { [TestClass] public class GeocodeViewModelTest { [TestMethod] public void TestFindBostonWithViewModel() { var vm = new GeocodeViewModel( new GeocodeModel { SearchText = "Boston USA" }); var waitHandle = new AutoResetEvent(false); Deployment.Current.Dispatcher.BeginInvoke(async () => { await vm.SearchLocations(); waitHandle.Set(); }); waitHandle.WaitOne(TimeSpan.FromSeconds(5)); Assert.AreEqual(vm.SelectedLocation.Address, "Boston United States of America"); Assert.AreEqual(vm.SelectedLocation.Location.Latitude, 42, 1); Assert.AreEqual(vm.SelectedLocation.Location.Longitude, -71, 1); } } }

Lo and behold, this test succeeds as well. Now the second test is actually a lot more interesting:

[TestMethod]
public void TestStoreAndRetrieveBostonWithViewModel()
{
  var vm = new GeocodeViewModel(
    new GeocodeModel { SearchText = "Boston USA" });
  var waitHandle = new AutoResetEvent(false);

  Deployment.Current.Dispatcher.BeginInvoke(async () =>
  {
    await vm.SearchLocations();
    waitHandle.Set();
  });
  waitHandle.WaitOne(TimeSpan.FromSeconds(5));
  Assert.IsNotNull(vm.SelectedLocation);

  var h = new IsolatedStorageHelper<GeocodeViewModel>();
  if (h.ExistsInStorage())
  {
    h.DeletedFromStorage();
  }
  h.SaveToStorage(vm);

  var retrievedViewModel = h.RetrieveFromStorage();
  Assert.AreEqual(retrievedViewModel.SelectedLocation.Address,
    "Boston United States of America");
  Assert.AreEqual(
    retrievedViewModel.SelectedLocation.Location.Latitude, 42, 1);
  Assert.AreEqual(
    retrievedViewModel.SelectedLocation.Location.Longitude, -71, 1);
}

And indeed, after retrieving the viewmodel from storage, the same asserts are fired and the test passes. Success: we can now find location and tombstone

Conclusion

I showed you some basic geocoding – how to find a location using a text input. I hope I have showed you also that unit tests are not only a way to assure some basic code quality and behavior, but are also a way to determine ahead if things are going to work the way you envisioned. Unit test make scaffolding and proof-of-concept approach of development a lot easier – you need a lot less starting up an app, clicking the right things and then finding breakpoint-by-breakpoint what goes wrong. Quite early in my development stage I ran into the fact that some things were not serializable. Imagine finding that out when the whole app was already mostly done, and then somewhere deep down something goes wrong with the tombstoning. Not fun.

Complete code – that is, complete for such an incomplete app – can be found here. Next time, we will do some actual navigation.

To prevent flames from Test Driven Design (TDD) purists: a variant of unit tests are integration test. Technically a unit test tests only tiny things that have no relation to another, like one object, method or property. Integration tests test the workings of larger pieces of code. So technically I am mostly writing integration tests. There, I’ve said it.

10 April 2013

ViewModel driven multi-state animations using DataTriggers and Blend on Windows Phone

Long long time ago I wrote how to drive animations from your ViewModel using DataStateBehavior, and I explicitly stated this was the only way to do it, since (quoting myself), “Windows Phone 7 does not support DataTriggers”. That was then, and this is now. The drawback of DataStateBehavior is that you basically can only do on/off animations, which makes more complex multi-state animations impossible. There was another behavior that could do that, but I could not find that anymore and I could not quite remember the name. And then I suddenly stumbled upon the Microsoft.Expression.Interactions assembly – and in its Microsoft.Expression.Interactions.Core namespace there is indeed a DataTrigger. And that seems to have been present in the 7.1 framework as well. *Cough*.

So in this blog post I am going to demonstrate how to animate a few ‘popup windows’ via a single Visual State block and a ViewModel, using DataTriggers. I am going to show this using Visual Studio 2012, MVVMLight and mostly Blend. It’s time to give this unsung hero some love again, so I am going to follow the tutorial-style again.

imageSetting the stage

  • Open Visual Studio, create a “Windows Phone app”, and target 8.0 (it should work in 7.1 as well BTW)
  • Click Tools/Library Package Manager/Manage NuGet Packages for Solution.
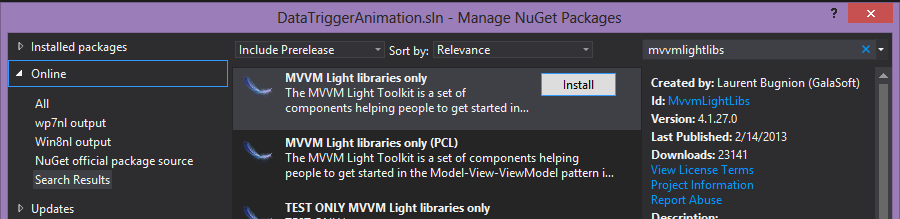
  • Search for MvvmLightLibs, select “MVVM Light Libraries only”
  • Click “Install”, “Ok” and “I Accept”

Building the ViewModel

The ViewModel actually consist out of two files – an enumeration describing the states and the actual ViewModel itself. First, create a folder “ViewModel” in your solution, and the create the enumeration like this:

namespace DataTriggerAnimation.ViewModel
{
  public enum DisplayState
  {
    Normal = 0,
    ShowPopupHello = 1,
    ShowPopupBye = 2,
  }
}

And then the ViewModel like this:

using System;
using System.Windows.Input;
using GalaSoft.MvvmLight;
using GalaSoft.MvvmLight.Command;

namespace DataTriggerAnimation.ViewModel
{
  public class DisplayViewModel : ViewModelBase
  {
    private DisplayState displayState;
    public DisplayState DisplayState
    {
      get { return displayState; }
      set
      {
        if (displayState != value)
        {
          displayState = value;
          RaisePropertyChanged(() => DisplayState);
        }
      }
    }

    public ICommand DisplayPopupCommand
    {
      get
      {
        return new RelayCommand<string>(
            (p) =>
              {
                DisplayState = (DisplayState)Enum.Parse(typeof(DisplayState), p);
              });
      }
    }

    public ICommand CloseCommand
    {
      get
      {
        return new RelayCommand(() 
           => DisplayState = DisplayState.Normal);
      }
    }
  }
}

The important thing to note is that the command “DisplayPopupCommand” requires a parameter to determine the popup that must be displayed. The CloseCommand is equivalent to a DisplayPopupCommand with parameter “Normal”, and is just there for making the designer’s life easier.

… and that’s all the coding we are going to do. Build your application and close Visual Studio. The rest, just like my last animation post is done in Blend! All of it.

Creating the first panel

  • imageDrag a grid on the empty rectangle “ContentPanel”. Like all GUI objects, these can be found on the Assets tab on the left top.
  • Click on the “Grid” in the “Objects on Timeline” pane left, and rename it to “Panel1”
  • Right-click on the “Panel1” grid, hit ‘Reset Layout/All”
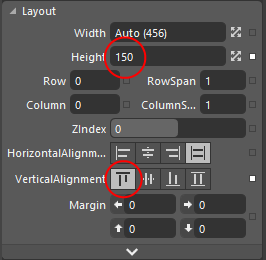
  • Go to the right-hand pane, select “Properties” and expand the “Layout” pane if it’s collapsed.
  • Then click “Top” for Vertical Alignment.
  • Then enter “150” for height

Then proceed to add a text:

  • imageDrag a TextBlock on the “Panel1” grid. You can do this by either dragging it on the design surface on top of “Panel1”, or on the “Objects and Timeline” pane (also on top of “Panel1”)
  • Change the text from “TextBlock” to “Hello this is popup one”
  • Do Reset Layout/All on this text as well
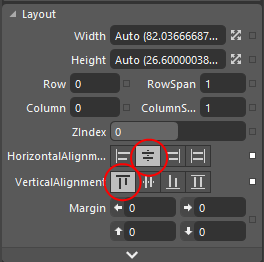
  • In the Layout Pane, select Horizontal Alignment “Center” and Vertical Alignment “Top”

And finally add a button:

  • imageDrag a button on Panel1
  • Do Reset Layout/All on this button as well
  • Change the caption to “Done”
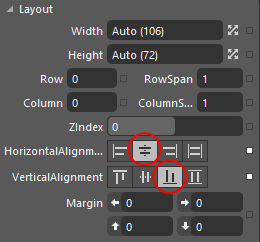
  • In the Layout Pane, select Horizontal Alignment “Center” and Vertical Alignment “Bottom”

And then finally do something that seems like pretty bonkers, but trust me: it will all become clear in the end:

  • imageSelect Panel1 in the Objects and Timeline panel.
  • Go to the Properties pane on the right hand side, and find the “Transform” pane. It’s usually collapsed. Expand it first.
  • Select Center Point tab - the 2nd tab from the right under “Rendertransform” (with the dot on in)
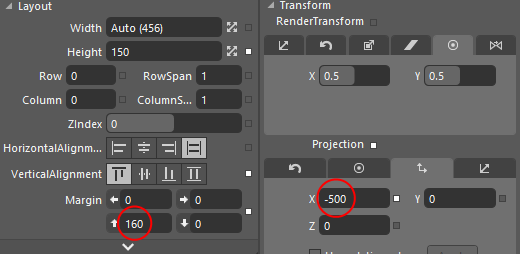
  • For both X and Y type “0.5”. This sets the transformation point dead in the middle of the panel
  • Then also select the Global offset tab – that’s the 2nd tab from the right under “Projection” (with the up and left pointing arrow on it)
  • imageEnter “500” for X.

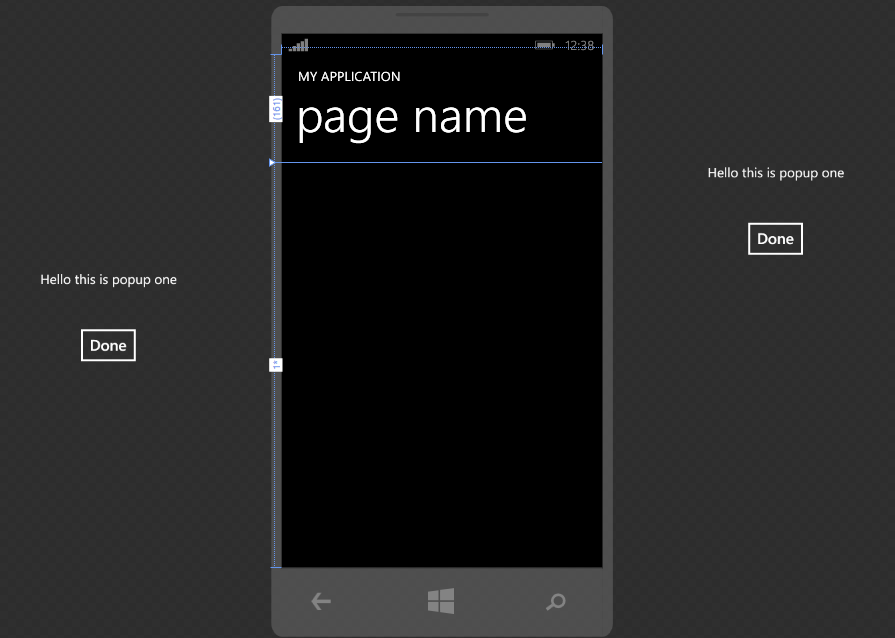
Your design surface now should look like showed on the right. The panel is sitting well right of the phone. Bonkers, I said it. ;-).
Creating the second panel

Going to be a bit lazy here. I don’t want to to the whole sequence again

  • Select Panel 1 in “Objects and Timeline”
  • Hit CTRL-C, CTRL-V. This will result in a Panel1_Copy below Panel 1
  • imageRename that to “Panel2”
  • Go to the Properties tab again on the right, and enter “160” for top margin. This should result in Panel2 appearing under Panel1
  • Then, for an encore, go to the Transform panel again and change “500” for X Projection to -500

The second panel should jump to the left and imageresulting design surface should now look like this:

Creating the popup buttons

At this time I am going to assume you now understand the layout panel, so I am not going to make screenshots of every button you need to click and number you need to enter in the layout panels ;-)

  • Drag a StackPanel on the design surface, near the bottom of the screen.
  • Do Reset Layout/All,
  • Select Vertical Alignment Bottom, and enter a height of 220.
  • Proceed to drag three buttons on top of the StackPanel. These should appear under each other, taking the full width of the screen.
  • Change the captions of the buttons to (from top to bottom) “Popup 1”, “Popup 2” and “Done”.

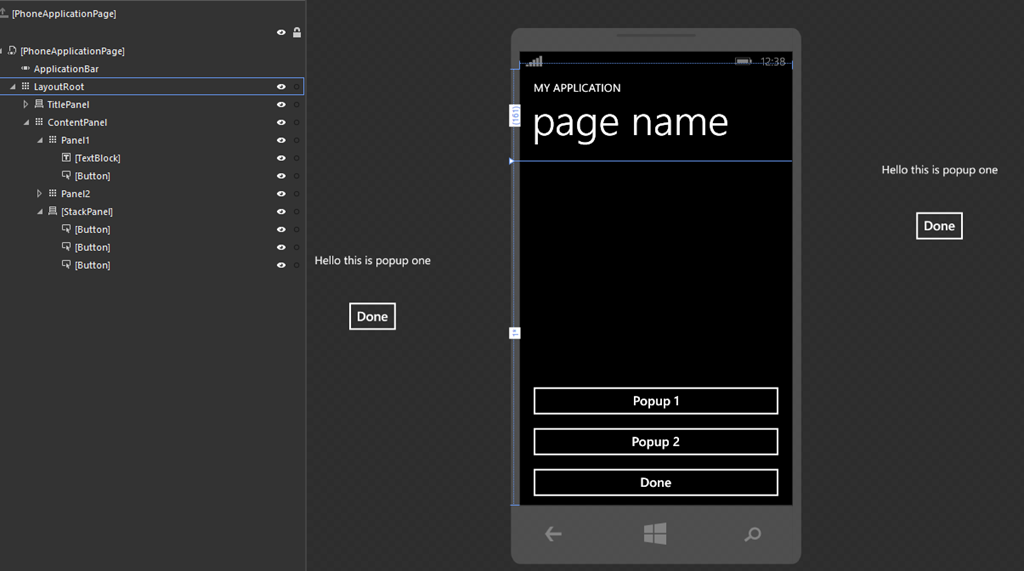
The final design surface, including the objects tree, should look like this:

image

Defining the Visual States

We have three visual states:

  • None of the popups are displayed
  • Popup 1 is displayed
  • Popup 2 is displayed

To create these, proceed as follows:

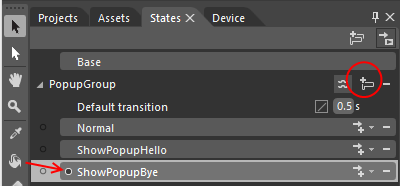
  • imageAt the top left, click the “States” Tab.
  • Click the “Add state Group” Button
  • Rename “VisualStateGroup” to "PopupGroup”
  • Enter “0.5” for “Default Transition”. This indicates any state transitions will be automatically animated over a 0.5 second time period.

Next steps:

  • imageClick the “Add state” Button
  • Rename the state “VisualState” to “Normal”
  • Add two more states, “ShowPopupHello” and “ShowPopupBye”
  • Click the red dot before “ShowPopupBye”.  The red color disappears. The main design surface should now have a caption “ShowPopupBye state recording is off”

Now the next things are tricky, so pay close attention and make sure you do this exactly right.

  • Select “Panel1” in “Objects and Timeline”
  • Click state “ShowPopupHello”. The main design surface should now have a caption “ShowHelloPopupstate recording is on” and have a red border.
  • Go to the Transform panel again, select under projection the Global offset (2nd tab from the right) again and change 500 back to 0. Panel 1 should now appear in the phone screen
  • Now select state “ShowPopupBye”. Panel 1 disappears again
  • Select Panel2
  • Change its global offset to 0 as well. Now panel 2 appears in the phone screen
  • Select State “Normal”
  • Select the red dot before “Normal” to turn state recording off. Both panels now should be outside of the phone screen again.
  • Select “Base” on top of the State panel.

Bringing in the ViewModel

Before we are going to connect the Visual States to the ViewModel’s actions, let’s first bring it in. That’s pretty easy.

  • imageGo top right and select the data tab.
  • Select the “Create data source” button all to the right and select “Create object data source”
  • On about the 8th line you should see “DisplayViewModel”. Select that
  • Enter “DisplayViewModelDataSource” in the “Data source name” box
  • Hit OK.
  • Net result should be as displayed to the right.

Setting up initial data binding

This is so ridiculously easy in Blend it always makes me happy when I get to this state.

  • Drag “DisplayViewModel” from the data tab on top of the LayoutRoot panel in the Objects and Timeline panel
  • Drag “CloseCommand” on top of all three “Done” buttons. You can do that either on the design surface or on the Objects and Timeline panel, whatever you like.
  • Proceed to drag “PopupCommand” on top of both the “Popup 1” and “Popup 2” button.
  • Now select the “Popup 1” button, and select the “Properties” tab again.
  • On top there’s a “Search properties” box. The developers of Blend soon recognized the number of things you can set it so big you can easily loose track. Enter “Command” in that search box to limit the number of properties it shows.
  • The Properties box now should only show “Command” and “CommandParameter”. Enter value “ShowPopupHello” for “CommandParameter”
  • Now select the “Popup 2” button, and enter “ShowPopupBye” for “CommandParameter”
  • Clear the text “Command” from “Search Properties” so you can see all the properties again.

Programming by dragging stuff on top of each other. Ain’t life fun sometimes?

Furioso dragon-13-Enter the dragon: datatriggers for putting it all together

And now for the really scary part – the datatriggers. Just kidding of course – just more dragging stuff and filling in some fields. The odd thing is – from the Blend perspective, data triggers are hardly visible. We are using GotoStateActions. Finish the app by following these final steps:

  • Drag a GotoStateAction from Assets box on top of ContentPanel. If you can’t find it: type “goto” in the search box of the Asset panel. It will popup in the list to the right of the panel
  • Under Properties, Click on the “New” button next to “TriggerType” and select “DataTrigger” in the box that pops up.
  • Behind “Binding”, click the barrel like icon. A dialog pops up with the properties of your DisplayViewModel. Select “DisplayState” and hit OK
  • Enter “0” for value
  • imageFor StateName, select “Normal”
  • Drag another GotoStateAction from Assets box on top of ContentPanel. Make this a DataTrigger to, select the same property to bind to, but
    • Enter “1” for “Value”
    • Select “ShowPopupHello” for StateName
  • And finally, a third GotoStateAction with 2 as value and “ShowPopupBye” for StateName.

And that’s all. If you run your application (you should be able to hit F5 from Blend) you will get a simple app that scrolls Popup 1 from the left in half a second when you hit “Popup 1”, and scroll it back when you hit on of the done buttons. If you hit the “Popup 2” button when Popup 1 is visible, it will scroll the second popup into the screen while simultaneously scrolling the first on out of the screen.

The data triggers look like this in XAML:

<i:Interaction.Triggers>
  <ec:DataTrigger Binding="{Binding DisplayState}" Value="0">
    <ec:GoToStateAction StateName="Normal"/>
  </ec:DataTrigger>
  <ec:DataTrigger Binding="{Binding DisplayState}" Value="1">
    <ec:GoToStateAction StateName="ShowPopupHello"/>
  </ec:DataTrigger>
  <ec:DataTrigger Binding="{Binding DisplayState}" Value="2">
    <ec:GoToStateAction StateName="ShowPopupBye"/>
  </ec:DataTrigger>
</i:Interaction.Triggers>

Some things to note

  • We hardly did program anything at all, and what’s more – we did not even make animations or storyboards. By simply setting the default transition to 0.5 seconds and indicating where we want stuff to be once a state is reached, the Windows Phone framework automatically infers and creates an animation when changing state, moving the GUI elements from one place to another in half a second (in stead of flashing them from one place to another).
  • In the Command I was able to use names as defined in the enumeration because I did an Enum.Parse in the ViewModel, in the data triggers I had to use the real value (0,1,2) to be able to compare. Something that can be fixed using a converter, but I did not want to complicate things.
  • The fact that the visual state names have the same name as the enumeration values, does not bear any significance. I could have named them Huey, Dewey, and Louie for all I cared. Only the CommandParameter values need to be the same as the Enumeration string, and the DataTriggers need to have the same numeric value.

That’s it. Although the Visual Studio 2012 designer is light years ahead of the 2010 designer, Blend still rocks when defining a lot of stuff in XAML. Have fun making beautifully animated apps with this.

If you don’t feel like following all these steps yourself, find, as usual, the completed solution here.

27 March 2013

Enabling basic OpenLayers pinch zooming for Internet Explorer 10 touch events

A phenomenon described by the term ‘webkit monoculture’ is causing quite some concern in the web development community. A lot of web developers are basically coding for webkit and webkit only, or more specifically Safari on IOS. HTML5 and standards are great, but certain parts of the web development stack are moving back to a ‘works on my environment’ status that we just were getting rid of. This phenomenon rears it’s ugly head itself on all kind of places, including in the OpenLayers toolkit that I am using for my work at Vicrea.

For those not familiar with OpenLayers: think Google Maps, but then with real GIS functionality, without commercial licensing, without ads in the map, and without all kind of legal strings attached. Pure open source client side web GIS. With the advent of touch devices its community added some basic touch functionality to it, like pinch zoom. That works very smooth, provided – you guessed it – you work on a web kit based browser. Microsoft, in all its wisdom, has chose to implement touch events in a completely different way. As to why this is, and what exactly is standard or not – that is not exactly my concern here. I am making a web GIS that is not supported my Windows 8 touch devices and Windows Phone 8. That, of course, is unacceptable to me ;-)

So I created a little OpenLayers style control that adds pinch zoom to Internet Explorer 10. It’s pure JavaScript and a little primitive – it’s basically zooming in on the map center, and not on the point between your fingers, but it’s working pretty well IMHO.

It also works pretty simple: upon the activate command, it hooks itself onto two events of the map’s layerContainerDiv – MSPointerDown and MSGestureChanged. The first one is fired at the first touch point going down, the second one when MSGesture recognizes an MSGestureChanged. Important is also setting the map’s fractionalZoom property to true.

OpenLayersWindowsPinchZoom = OpenLayers.Class(OpenLayers.Control,
  {
    autoActivate: true,

    gesture: null,

    defaultHandlerOptions: {},

    initialize: function (options)
    {
      this.handlerOptions = OpenLayers.Util.extend({}, this.defaultHandlerOptions);
      OpenLayers.Control.prototype.initialize.apply(this, options);
    },

    activate: function ()
    {
      if (OpenLayers.Control.prototype.activate.apply(this, arguments))
      {
        if (window.navigator.msPointerEnabled)
        {
          this.map.fractionalZoom = true;

          this.gesture = new MSGesture();
          this.gesture.target = this.map.layerContainerDiv;
          var self = this;

          this.gesture.target.addEventListener("MSPointerDown", function (evt)
          {
            self.gesture.addPointer(evt.pointerId);
          });

          this.gesture.target.addEventListener("MSGestureChange", function (evt)
          {
            // Make scale result smaller to prevent high zoom speeds.
            if (evt.scale !== 1)
            {
              var scale = 1;
              if (evt.scale > 1)
              {
                scale = (evt.scale - 1) / 4 + 1;
              }
              else
              {
                scale = 1 - ((1 - evt.scale) / 4);
              }
              // map.zoomTo is buggy as hell so I use this convoluted way to 
              // calculate a new zoom area
              var resolution = self.map.getResolutionForZoom(self.map.zoom * scale);
              var bounds = self.map.calculateBounds(self.map.getCenter(), resolution);
              self.map.zoomToExtent(bounds);
            }
          });
        }
        return true;
      }
      else
      {
        return false;
      }
    },

    CLASS_NAME: "OpenLayersWindowsTouch"
  }
);

The MSGestureChanged event has a scale, which is a number either bigger (zoom in) or smaller (zoom out) than 1. After that it’s simply calling some standard map functions to calculate the new display area and fire away. The most logical one to use would be map.ZoomTo, but that completely messes up the map tile layout after a few times and this workaround via the resolution calculation prevents that. I assume there is a bug in the zoomTo code.

There is another detail – to prevent Internet Explorer to handle the zoom events itself, you have to mark the div in which the map will come with css style:

-ms-touch-action: none

I did that inline for the sake of simplicity ;-)

<div id="map2" class="smallmap" style="-ms-touch-action: none"></div>

As for creating the map with the control enabled: this is a normal map with just the standard controls:

map1 = new OpenLayers.Map('map1', 
	 {controls: [new OpenLayers.Control.Navigation(), 
                       new OpenLayers.Control.PanZoomBar()], 
	  numZoomLevels: 15});
while the second one sports my new control as well:
map2 = new OpenLayers.Map('map2', 
	 {controls: [new OpenLayers.Control.Navigation(), 
		  new OpenLayers.Control.PanZoomBar(),
		  new OpenLayersWindowsPinchZoom()], 
	  numZoomLevels: 15});

imageAnd that’s all there is to it. For the OpenLayers purists: yes, I am aware that I don’t implement destroy and potentially create memory leaks. I just wanted to kick off IE10 support. I hope the ‘real’ OpenLayers developers do better and now start supporting IE10 by themselves ;-)

I have made a little live demo site which looks like showed on the left. You can watch it live here and download a zip file containing all the necessary file in one go here.

The control has been tested successfully on a Nokia Lumia Windows Phone 8, a Microsoft RT and a Microsoft Surface Pro.

21 March 2013

Unit testing async Windows Phone 8 code on the UI thread with VS 2012.2 CTP4

imageThis may be the most cryptic acronym-laden title I ever used for a blog post, but it quite exactly describes what I was trying to do yesterday.

The Visual Studio 2012 CTP4 makes it possible to write real Windows Phone 8 unit tests that run in the Visual Studio Unit Test runner (in stead of only on the emulator). So when I wanted to investigate the Routing API that is new in Windows Phone 8, I decided not to write an application outright, but start out with unit test.

I set up a new solution with two projects, as I usually do: one with the actual app - and one class library with the view models, models and other logic in it that isnot directly related to the user interface. And then I added a Windows Phone 8 Unit Test App.

First things first: when I want to test routing, I first need to give the user an option to select a location to go to. I decided to use the Geocoding API. I decided the view model should contain the following:

  • A string property SearchText to be filled by the user
  • An ObservableCollection of MapLocation called MapLocations to be filled by the Geocoder, intended to be bound to a list control of some kind to enable the user to select on of the founds locations.
  • A MapLocation property SelectedLocation to hold the MapLocation selected by the user
  • A little method to actually perform the geocoding
  • A command wrapping this method.

My good and very smart friend - and fellow Phone development MVP - Matteo Pagani has already covered some ground in this direction by writing this article and inspired by it I decided to pull in the Microsoft.Bcl.Async library as well so I could use async/await, on the premises that you can never have too much beta software in your project ;-)

The method I wanted to test was pretty simple:

public async Task SearchLocation()
{
  MapLocations.Clear();
  SelectedLocation = null;
  var geoCoder = new GeocodeQuery { 
SearchTerm = SearchText, GeoCoordinate = new GeoCoordinate() }; MapLocations.AddRange(await geoCoder.GetMapLocationsAsync()); }

And so was the test method – I let it search for the street I live in.

[TestMethod]
public async Task TestLocationWrong1()
{
  var testVm = new GeocodeViewModel
    {SearchText = "Springerstraat Amersfoort Netherlands"};
  await testVm.SearchLocation();
  Assert.IsTrue(testVm.MapLocations.Any());
}

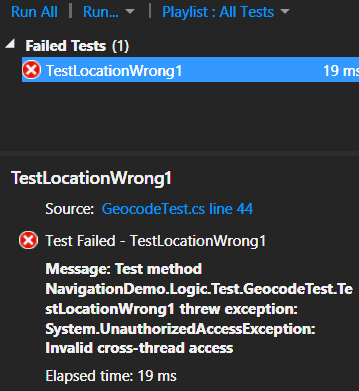
imageI ran the test…. and was quite surprised by the result. “Invalid cross thread access"??? I don’t even have a UI. Very interesting. Apparently the GeocodeQuery needs to be run on the UI thread. As to why this is, I have no idea. Some people (hi Morten ;-) ) say that if you have to unit test on the UI thread, you are doing it wrong. That may be the case, but it seems I have little choice here and  I still want to test my view model.

According to this page there is a UITestMethodAttribute for Windows Store applications to solve this kind of problems – but not for Windows Phone 8 (yet) so obviously I had to pull in the Dispatcher. Since calling stuff from the Dispatcher runs asynchronously as well take 2 didn’t work of course…

[TestMethod]
public void TestLocationWrong2()
{
  var testVm = new GeocodeViewModel 
  { SearchText = "Springerstraat Amersfoort Netherlands" };
  Deployment.Current.Dispatcher.BeginInvoke(async () => await testVm.SearchLocation());
  Assert.IsTrue(testVm.MapLocations.Any());
}

…for the simple reason that the although testVM.SearchLocation is now fired on the UI thread, the Assert is not, and it is executed directly after the BeginInvoke is called and MapLocations still is empty when the Assert is evaluated.

I don’t know if there’s a smarter way to do this, but I used an AutoResetEvent to solve it. I used that to block the test thread until the UI thread is done, like this:

[TestMethod]
public void TestLocationSearchHasResult()
{
  var waitHandle = new AutoResetEvent(false);
  var testVm = new GeocodeViewModel { SearchText = "Springerstraat Amersfoort Netherlands" };
  Deployment.Current.Dispatcher.BeginInvoke(async () =>
    {
      await testVm.SearchLocation();
      waitHandle.Set();
    });
  waitHandle.WaitOne(TimeSpan.FromSeconds(5));
  Assert.IsTrue(testVm.MapLocations.Any());
}

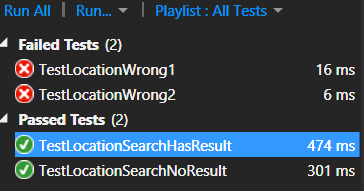
image

The test thread waits until waitHandle.Set() is called – or five seconds, whatever happens first – and then it performs the Assert. And that works.

As usual, you can download a demo solution here. It was actually meant to be a solution demoing the Route API, as stated earlier, but I thought this subject deserved a blog post on its own.

As stated, this project requires installation of the Visual Studio 2012 CTP4. This has a GoLive license, but it’s still preview software. Install it on your own risk.

Update: Pedro Lamas, a Windows Phone Development specialist working for Nokia, has posted about his port of UITestMethodAttribute to Windows Phone. That runs the whole test on the UI thread in stead of only the the mandatory part. This brute-force method may not be desirable for all cases, but it sure is pretty easy to use.

13 March 2013

Simple reverse geocoding with Windows Phone 8 and MVVMLight

screenshotHaving worked in Geographical Information Systems over 20 years, I can tell you rightfully the new Windows Phone 8 mapping and location abilities are more than enough to make a map maniac like me getting twinkly eyes. It has capabilities that are unheard of even just a couple of years ago – and I don’t need a big workstation, I don’t even need a PC - it’s running on my phone. The world in my pocket – in the most literal sense possible.

Two popular applications of GIS are geocoding and reverse geocoding. Geocoding enables you to find the position of earth for a descriptive text – say an address, city, building name, or any other phrase indicating a place on Earth. This is usually rather straightforward. Reverse geocoding is exactly the opposite – it’s the “what’s here?” question – given a location, what do I find here? Incidentally, answering questions like this is how I make a living at Vicrea.

Windows Phone 8 makes reverse geocoding almost embarrassingly easy. Even when using MVVMLight. So I made a simple app that show the address(es) found at the location where you tap on the map.

We start off with a simple model with two properties:

using System.Collections.ObjectModel;
using System.Device.Location;
using System.Linq;
using GalaSoft.MvvmLight;
using Microsoft.Phone.Maps.Services;

namespace TapReverseGeocode.Logic.ViewModels
{
  public class MapViewModel : ViewModelBase
  {
    public MapViewModel()
    {
      Addresses = new ObservableCollection<string>();
    }

    private GeoCoordinate tapCoordinate;
    public GeoCoordinate TapCoordinate
    {
      get { return tapCoordinate; }
      set
      {
        tapCoordinate = value;
        RaisePropertyChanged(() => TapCoordinate);
        StartReverseGeoCoding();
      }
    }

    public ObservableCollection<string> Addresses { get; set; }
  }
}

The ObservableCollection “Addresses” will hold the results, and as usual when binding to ObservableCollection you must make sure it is initialized before anything else – the constructor is a good place for that. The designer can bind this to some kind of GUI element that displays the result.

The TapCoordinate property is a GeoCoordinate and that fires off the actual reverse geocoding – and I have omitted the usual “if (viewModelPropertyName != value)” check on purpose. Even when the user taps the same location twice, I want to have the reverse geocoding code to fire every time.

The code that starts the reverse geocoding itself ain’t quite rocket science:

private void StartReverseGeoCoding()
{
  var reverseGeocode = new ReverseGeocodeQuery();
  reverseGeocode.GeoCoordinate = 
    new GeoCoordinate(TapCoordinate.Latitude, TapCoordinate.Longitude);
  reverseGeocode.QueryCompleted += ReverseGeocodeQueryCompleted;
  reverseGeocode.QueryAsync();
}

To prevent race conditions I make a new GeoCoordinate from the one provided by the user, set up a call back, and fire off the async query.

The final piece is this simple callback that processes the result of the reverse geocoding.

private void ReverseGeocodeQueryCompleted(object sender, 
  QueryCompletedEventArgs<System.Collections.Generic.IList<MapLocation>> e)
{
  var reverseGeocode = sender as ReverseGeocodeQuery;
  if (reverseGeocode != null)
  {
    reverseGeocode.QueryCompleted -= ReverseGeocodeQueryCompleted;
  }
  Addresses.Clear();
  if (!e.Cancelled)
  {
    foreach (var adress in e.Result.Select(adrInfo => adrInfo.Information.Address))
    {
      Addresses.Add(string.Format("{0} {1} {2} {3} {4}", 
        adress.Street, adress.HouseNumber, adress.PostalCode,
        adress.City,adress.Country).Trim());
    }
  }
}

It clears up the callback, clears the Addresses list, and then processes the parts of the result into a single string per address. Like any good reverse geocoding service Microsoft have implemented this to return a set of results – there may be more addresses on one location, for instance in a large apartment building – although I never got more than one result back per location when I tested this in the Netherlands.

This a complete reverse geocoding viewmodel that basically does not care where the GeoCoordinate comes from, or the result goes to. So this is very versatile. There isn’t any GUI, and yet we already have a working app

The initial XAML for binding this stuff – after setting the datacontext to this viewmodel – looks pretty simple:

<Grid x:Name="ContentPanel" Grid.Row="1" Margin="12,0,12,0">
  <maps:Map/>
  <Grid Height="58" VerticalAlignment="Top" Background="#7F000000">
    <phone:LongListSelector ItemsSource="{Binding Addresses}" 
      HorizontalContentAlignment="Left" Margin="12,0"/>
  </Grid>
</Grid>

… and then we run into a challenge. Two actually. The last tapped location is not a property we can bind to, and that the location is a Point – a screen location, not a GeoCoordinate in real world coordinates.

This can be solved by using an Attached Dependency Property (I think), by some Code Behind or my trademark way - by creating a simple behavior. After all, I don’t want to bother designers with code and I like the easy reusability of a behavior:

using System.Device.Location;
using System.Windows;
using Microsoft.Phone.Maps.Controls;
using Wp7nl.Behaviors;

namespace Wp8nl.Behaviors
{
  public class TapToCoordinateBehavior : SafeBehavior<Map>
  {
    protected override void OnSetup()
    {
      AssociatedObject.Tap += AssociatedObjectTap;
    }

    void AssociatedObjectTap(object sender, 
      System.Windows.Input.GestureEventArgs e)
    {
      var tapPosition = e.GetPosition((UIElement)sender);
      TappedCoordinate = 
        AssociatedObject.ConvertViewportPointToGeoCoordinate(tapPosition);
    }

    protected override void OnCleanup()
    {
      AssociatedObject.Tap -= AssociatedObjectTap;
    }

 // GeoCoordinate TappedCoordinate dependency property omitted

   }
}

This behavior is implemented as a SafeBehavior child class, to prevent memory leaks. It’s actually pretty simple – it traps the ‘Tap’ event, determines the location, converts it to a GeoCoordinate and puts it into the TappedCoordinate Dependency Property. Which, in turn, can be bound to the view model. The designer can simply drag this behavior on top of the map and set up the data binding. Don’t you love Blend? XAML take 2:

<Grid x:Name="ContentPanel" Grid.Row="1" 
   Margin="12,0,12,0">
  <maps:Map>
    <i:Interaction.Behaviors>
      <Behaviors:TapToCoordinateBehavior 
          TappedCoordinate="{Binding TapCoordinate, Mode=TwoWay}"/>
    </i:Interaction.Behaviors>
  </maps:Map>
  <Grid Height="58" VerticalAlignment="Top" Background="#7F000000">
    <phone:LongListSelector ItemsSource="{Binding Addresses}" 
           HorizontalContentAlignment="Left" Margin="12,0"/>
  </Grid>
</Grid>

And that’s all there is to it. Reverse geocoding is Windows Phone 8 is insanely easy.

Full source code, as usual, can be downloaded here.

08 March 2013

Surface RT versus Surface Pro versus the competition for REAL dummies

About every pundit who is somewhat interested in Microsoft either by love or abject hate has written about this already – and still I am going to do my take. Why? Because I am one the few people on this planet who actually was crazy enough to purchase both a Surface RT and a Surface Pro and therefore am entitled to my rant – and because I still get comments like “I think Surface Pro is too expensive for a tablet and has too little battery life for it”, which indicates people still completely don’t get it. With ‘tablet’ almost invariantly people mean “iPad”, by the way.

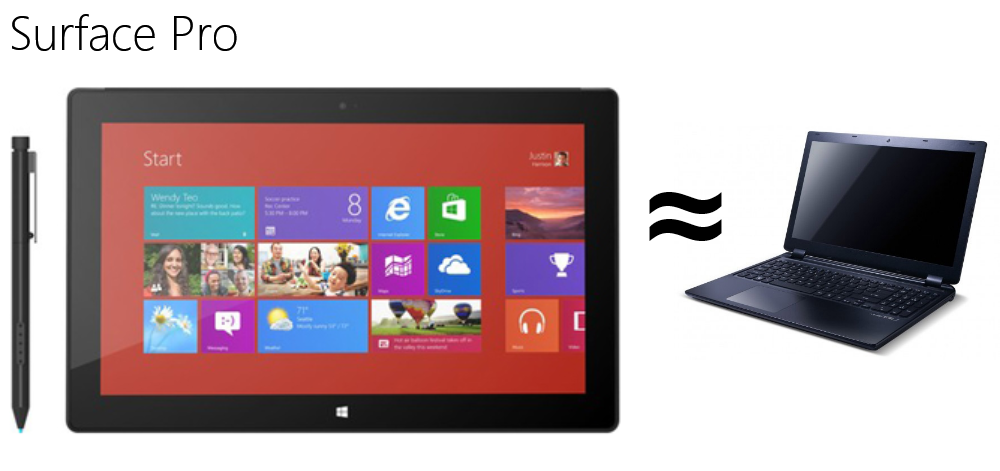
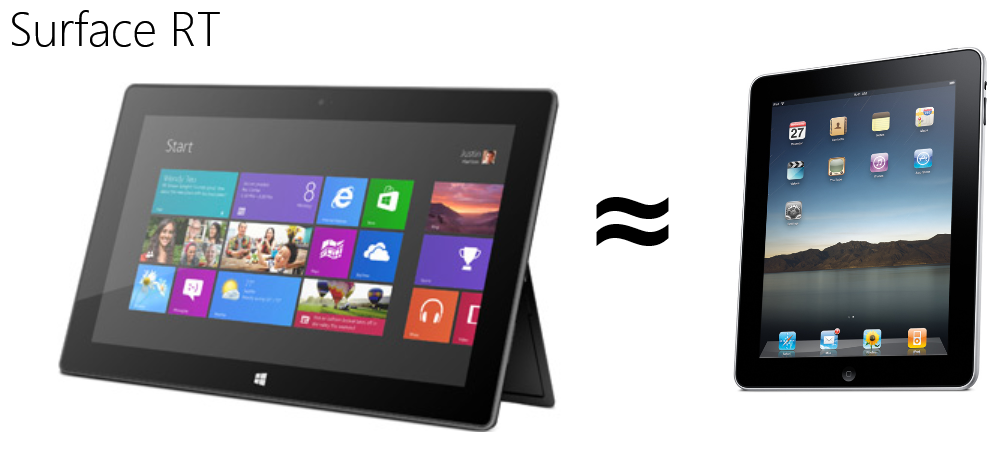
The very short version of this post is this ‘infographic’

pro2RT2

I used a mathematical symbol which means ‘is equivalent to’. That is something entirely different than “equals to”. Very important distinction. Keep that in mind. I will use a lot of ‘equivalents’ in this blog post rant.

When you think of a Surface RT – think of something that moves in the same space as an iPad. Long battery life, relatively cheap (don’t get me started on Apple pricing), light, ideal for use on your lap or in your hand, good content consumption device. Plus some extras. But let’s not confuse the picture alrimageeady.

When you think of a Surface Pro – think of an Ultrabook. Yes, a real computer. A real powerhouse too, ultra portable, and it runs the full Monty – I mean Windows 8 - but that comes at a price. It’s heavier, more expensive, burns more battery, and it gets hotter too. Of course it does. Look, it’s like saying “My wife has this cute Japanese car that does over 50 miles to the gallon when she’s doing 70 on the interstate but this other car burns much more fuel and generates a lot of exhaust” and then the car you use…

…is the car equivalent of something like this:image
Dude, I have some bad news for you. If there’s indeed the equivalent of an F22 Raptor sitting in your driveway when you just want to do some cruising, you might have paid some more attention to the brochure or might have asked some more questions at the dealer clerk before getting out the ole’ VISA card. This machine can carry more and heavier load than your wife’s car – and it can take it there very much faster. This machine is made for serious business. As is Surface Pro. Only with less pyrotechnics.

Now I will admit Microsoft has made life a little bit more complicated than my simple images and broad statements do justice. That’s because of a very a simple reason: the current state of affairs in electronics, as well as the radical design approach the Surface hardware engineering team took, made it possible that under the “Surface” flag now reside two very similar looking – but very dissimilar devices. It’s like the F22 and your wife’s Japanese car nearly look the same, have the same controls, and even share accessories – but one will be a very good car, the other will take off at supersonic speed and be halfway Some Place Where Bad People Live (and – admittedly – a place where those Bad People won’t probably be for very much longer) before your wife has even made it to the onramp of the interstate. Incidently, your wife may be in for a hell of surprise when one day she just wants to take the kids to school and takes the wrong key set ;-).

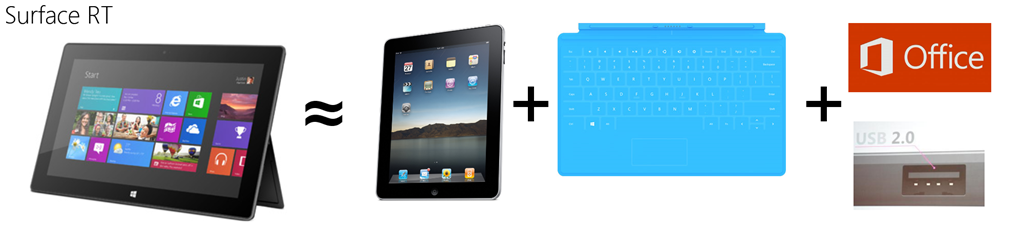
The funny thing is – radical as it’s design may be, Surface Pro is ‘just a PC’. As I showed in the ‘infographic’ above, it’s actually ‘just an Ultrabook’, in the same way an F22 is ‘just a jet airplane’. Surface Pro is the nth generation descendant of all the PC’s in the world, and it’s odd that it took a software company to let it see the light. Yet, the smaller, cheaper Surface RT is actually a much more remarkable and innovative design – it runs on total different hardware, that has an extremely long battery life, but still it runs Windows 8. Like I said, RT is more like a tablet. But, to make things more complicated, in a smart move to make their ‘tablet’ offering more attractive and not just another me-too, Microsoft have made it possible to attach a keyboard to Surface RT and ships you a fully licensed Home version of Office. You get the crown ‘desktop jewels’ for free. Office in a very portable box. So in stead of only a consumption device, Surface RT is also a content creation device. You can make Word documents, Excel sheets, PowerPoint presentations just like on any other PC. Using a traditional desktop program. You can even attach a mouse to it using it’s USB port. So your tablet can act like a PC to an extent. And here my infographic breaks down, and my F22 versus the wife’s car analogy as well. It’s like your wife’s car has this extra set of controls that can be used to fly short distances at limited height as well - wouldn’t she want have that to overcome traffic jams and red lights ;).

So a more accurate way to position RT next to the competition is like this:

RT3

There is this other funny side effect too – because Surface RT runs on different hardware, the ‘foundation’ of it’s Windows needed to be changed too. You can hardly see that on the outside, but it has profound effects, one of them being that Windows RT – the Windows version that runs on Surface RT - is completely impervious to viruses. It’s like trying infect a fish with the human common cold – DNA does not match, the organs that are needed for infection are simply not there.

So it comes down to this:

  • Surface Pro is a PC – it may look like a tablet and it can be used as a tablet, but it’s not its primary intended use. It’s a bit heavy for that and has this other characteristics that doesn’t make it the ideal tablet. Just like an F22 can be used on the highway – but it’s better in the air. You are doing development? Heavy gaming? Heavy duty photo or movie editing? This is the machine for you.
  • Surface RT is primary a tablet but can also be used for some PC (Office) tasks that used to require a full PC. It’s like a car that can fly a little, but it cannot carry deadly loads with it. You are doing office, mail and some content/web browsing, casual games, maybe a bit of movie watching? A lot of it on the go, removed from any outlet?  Try this one.

And of course, you can also try any other kind of device, running either Windows RT or Windows Pro (i.e. being equivalent to Surface RT and Surface Pro) to find out what suits your need. I give you only one golden rule – whatever you buy, Surface or no Surface, RT of Pro – make sure it has a touch screen. With touch Windows 8 really shines.

PS: In case anyone wonders whether or not I am happy with my choice for Surface Pro as a portable development machine – let me just quote my fellow MVP Rob Miles on that one: “HELL YEAH!”

02 March 2013

Publishing games in the Brazilian Windows Phone store

Brazil, a strong developing economy, is the largest country is South America, and has the biggest population of South America as well. From a game developer’s standpoint, it’s unfortunately also one of the ‘restricted’ countries. In short, this means you cannot submit a game – any game - to the Brazilian Windows Phone store without it being rated first. Since most developers outside of Brazil think this is a complicated and expensive procedure, and don’t speak Portuguese anyway – they tend to uncheck the Brazilian store and thereby leaving the Brazilians stranded, and denying themselves the opportunity to branch out in South America.

Now this is no longer necessary. A Brazilian guy named Guilherme S. Manso contacted me on twitter about a month ago claiming he made a write-up describing how to get your game rated for the Brazilian store. This got me about half-way, and the rest was explained to me in a Skype session by my fellow Phone Development MVP Rodolpho Marques Do Carmo. With Guilherme’s permission I reworked both explanations to one blog post, making it easy for every game developer to enter the Brazilian store. And the procedure is free, too.

If the game already has an ESRB or PEGI game rating
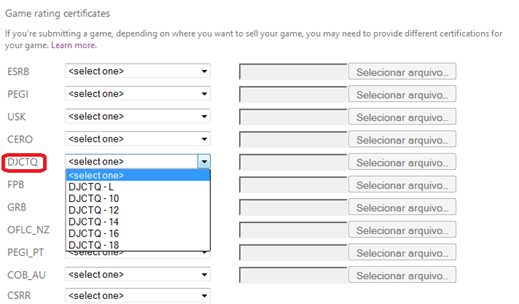
imageRecently, the government of Brazil started accepting the indicative international PEGI and ESRB ratings as a prerequisite for a “national auto rating”. That is, if a game has been rated by any of these institutions, all you need to do is to select one of the age groups from the DJCTQ (the Brazilian government rating) and attach the document that proves that the game has the PEGI or ESRB rating when you submit the game in the Windows Phone Development center. You must choose an age range that matches as closely as possible to the age received by indicative classification PEGI or ESRB. L is for all ages, the others show the age groups – 10 years, 12 and so on. If you already have a rating like this you probably know all about rating and probably don’t need this blog post anyway. I did not follow this track – my game had no rating at all.

If you don’t have any rating yet and want a Brazilian specific rating
First of all, you will need this document. It’s mostly English so it should be intelligible for almost everyone able to read this blog post ;-). It’s a Word document, and it mostly contains check boxes. I ticked check boxes by right-clicking them, selecting “Properties” and then clicking “Selected” under “default value”. You have to fill in some other stuff and then you have to hand-sign it. It’s rather straightforward. You can then print the result, sign it and scan it, or – as I did - sign it with the a pen on a tablet and save the result as PDF. The word document as I used it – minus my signature – can be seen here and used as an example.

Second, you will need to write a synopsis of the game – and provide game itself. I did this the easy way and combined these points: I made another Word document that described the game, provided a global store link to the game, a link to the game in the USA store, and I made a video of the game play that I made available for download. The document I used can be found here. They have a lot of games to process, so make the work of the raters as easy as possible. Another tip: make sure there is a trial version of the game available. If the game needs to be bought first, it will take much longer to get certified.

Third – optionally – you will need to provide a bill of rights for the game. This is only necessary when the Rating Requester Name is different from the Publisher Name (or when it’s not clear that it comes from the same producer). It is a simple statement signed by hand as well, saying that you are the copyright owner of the game or that the holder is aware that you are asking for the classification. Since that did not apply to me, I have no example of that.

E-mailing the rating request
You will need to e-mail the rating request document (the thing with all the checkboxes), the synopsis and optionally the bill of rights to classificacaoindicativa@mj.gov.br.
The title of the mail needs to be: "Jogo para Classificação - <your game name>" (this is the only part that needs to be Portuguese).
I simply e-mailed:
"Dear Sir, Madam,
I hereby request certification of my game Catch’em birds for release in Brazil according to the attached documentation.

Highest regards

Joost van Schaik
Amersfoort
The Netherlands

Obtainingimage the game certificate
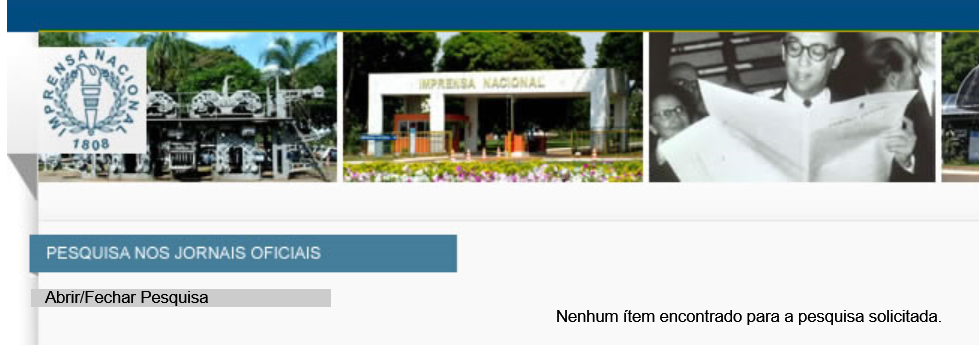
Here things get a little odd: certification will take about ten days, but you will not be informed about the progress or the result. You will need to go to this page regularly to check if your app has passed certification. It shows itself like showed to the left. You simply enter the name or part of the name of your game, click ‘consulta’, and with any luck it will show a result. There is a catch: it will only displayed on this page for a pretty short time. If you miss it, you will get this page, which basically means ‘not found’

image
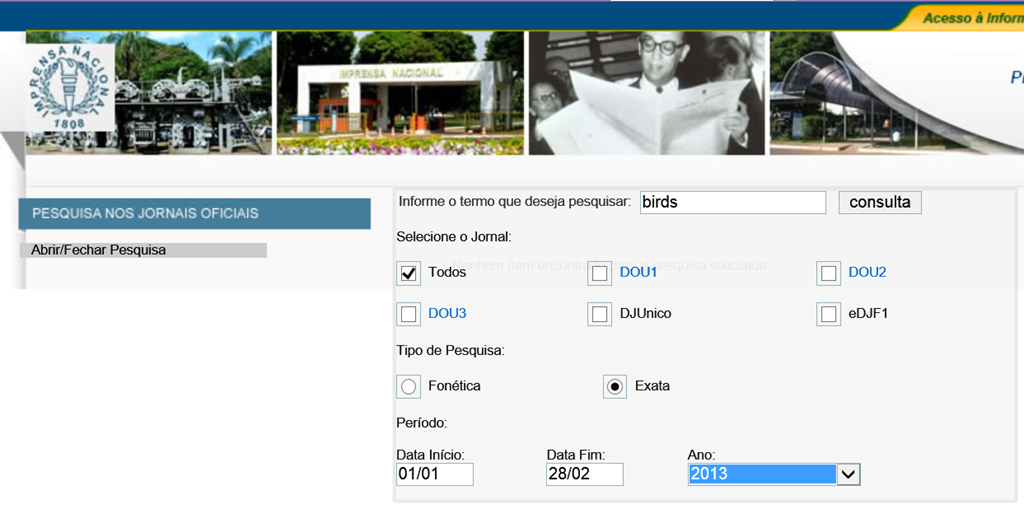
But, if you hit the grey bar at the left bottom that says “Abrir/Fechar Pesquisa” you get an extended search form that allows you to enter dates and stuff:image
So here I ask the ‘find everything (todos) that contains the word ‘birds’ and was approved between January 1st and February 28th 2013 and now if you hit ‘consulta’…

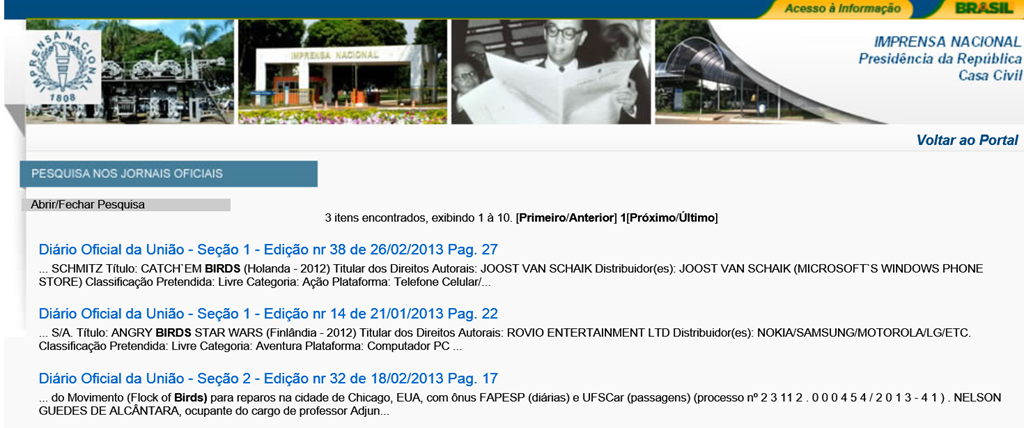
image
Bingo! Click the blue header (in my case “Diário Oficial da União - Seção 1 - Edição nr 38 de 26/02/2013 Pag. 27”) and this will download a file called “INPDFViewer.pdf”. That’s basically a page of a Brazilian law book saying your game is permitted for the given classification. There’s a bunch of games on that page, but near the end of the page it says:
Título: CATCH`EM BIRDS (Holanda - 2012)
Titular dos Direitos Autorais: JOOST VAN SCHAIK
Distribuidor(es): JOOST VAN SCHAIK (MICROSOFT`S WINDOWS PHONE STORE)
Classificação Pretendida: Livre
Categoria: Ação
Plataforma: Telefone Celular/Smartphone
Tipo de Análise: Sinopse e Vídeo
Classificação: Livre
Processo: 08017.004064/2013-35
Requerente: JOOST VAN SCHAIK

And that’s it. Now you can tick the ‘Brazil’ checkbox in the Windows Phone dev center, select a category according to your classification, and upload the INPDFViewer.pdf as proof. I have tried this procedure to the end, and my game is now in the Brazilian store. And so, my friends, can be yours. The road to Brazil is now wide open for game developers, thanks to Guilherme and Rodolpho, so let’s go to Brazil!

BTW, I haven’t tried this but I assume publishing Windows 8 Store apps can be done following the same procedure.