21 May 2014

Windows Phone emulator–“Unable to create a route between the waypoints”

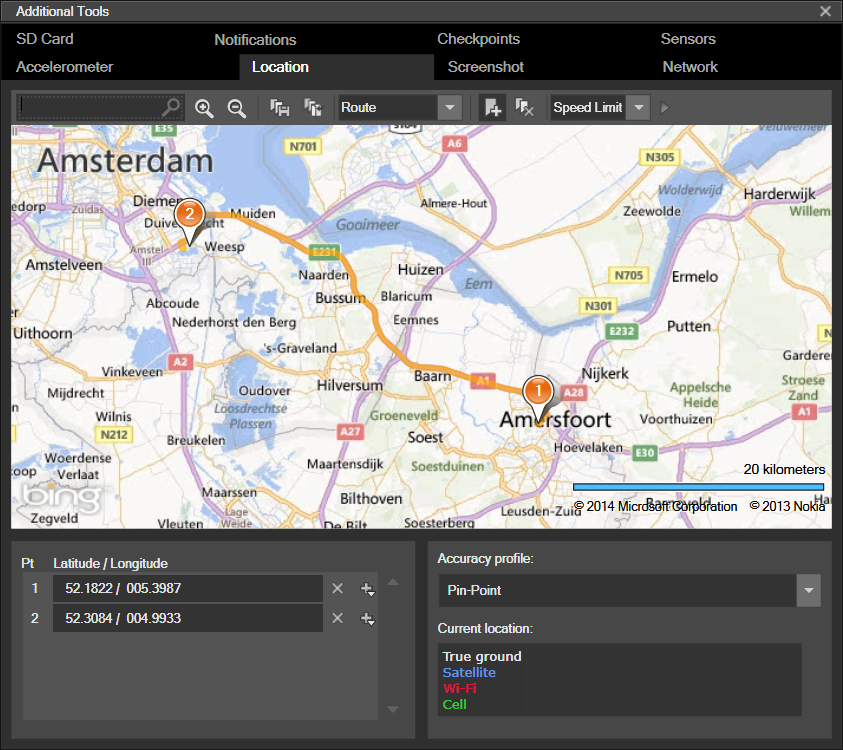
The Windows Phone 8.1 emulator has a beautiful new option: if you want to simulate a route you don’t have to put in a gazillion points anymore, you just input two (or some more if you want specific waypoint), the emulator automatically calculates a route and off you go, in this case from my home to some location near Amsterdam:

image

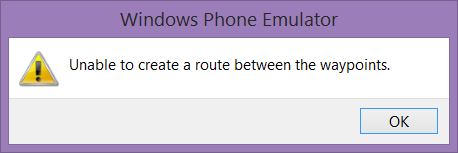
Only for some people it does not work out so well. I have seen some reports of people getting this popup, whatever two points they entered, even if those two were very close together with an obvious route:

image 

Today my friend Matteo Pagani ran into the same problem – and using a remote access tool I was able to have a look at his computer and determine once and for all the root cause of this. And it’s very simple – Matteo had set his computer to English like me, but still had the European decimal number setting. For those who are not familiar with that – when an European wants to write “a hundred thousand and a half” he writes “100.000,5” where an American typically writes “100,000.5”. Decimal point and comma are reversed. Whoever thought up this reversal, well let’s stay civilized here but I don’t have very warm feelings toward him or her, let’s put it that way. For some reason, in Geographical Information Systems territory, this is a fairly common problem. I have set my computer to the American number style for longer than I care to remember so I never ran into it.

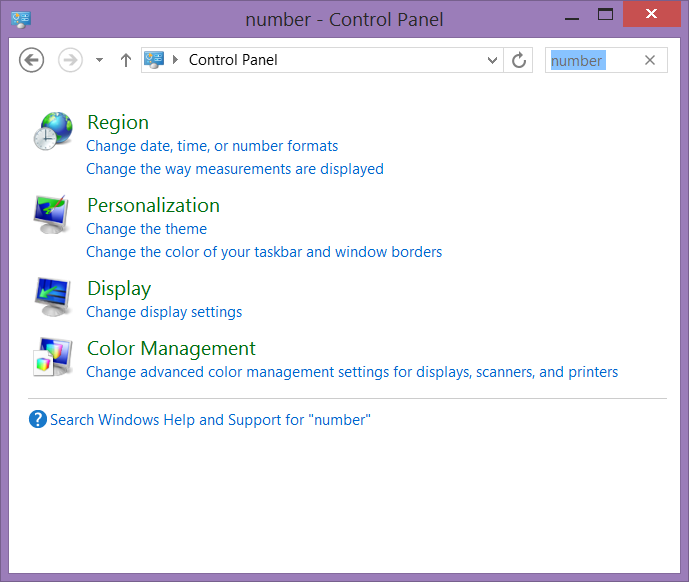
To fix this, you have to adopt the American style of numbers in Windows. Go to your Control Panel, search for number and select “Change date, time or number formats”

image

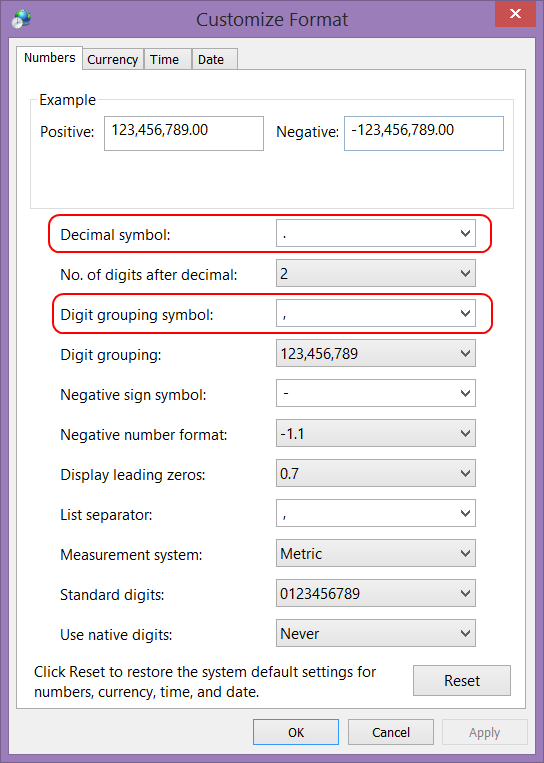
Then in the next dialog

image

“Decimal symbol” should be set to . (dot) and “Digit grouping symbol” to , (comma). For extra fun, the difference is hard to spot. Close Visual Studio and the emulator, restart Visual Studio, bring up the emulator again, and presto.

I know – this affects all programs in Windows so now your Excel sheets will show up in American style. Don’t shoot the messenger, I am just reporting the problem and a work-around. It’s not the end of the world. I don’t think much people will spend days and days simulating routes ;-)

06 May 2014

Writing behaviors in PCL for Windows Phone 8.1 and Windows 8.1

This article was updated after a tip from Daniel Plaisted – see comments

I was happily adding Windows Phone 8.1 support to WpWinNl – or actually support for Universal Windows Apps - when I noticed that basically all I was doing was linking files from the Windows 8.1 project – without any changes. Convergence FTW! Although that made adding the support as such pretty simple, I also envisioned a maintenance nightmare coming towards me as would not only need to maintain links between Windows 8.1 and Windows Phone 8.0, but also between Windows 8.1 and Windows Phone 8.1. Maybe it was time to go PCL. That went pretty well, until I hit a major roadblock.

This roadblock, my friends, is very simple: the behaviors SDK, and thus everything in Microsoft.Xaml.Interactivity, is not available to PCL. This has probably to do with the fact that the behaviors SDK for Windows 8 is a separate entity, not part of the core framework, that was added later. This same characteristic has moved over to Windows Phone 8.1. It basically boils down to this: every behavior must implement Microsoft.Xaml.Interactivity.IBehavior and this is sitting in two separate assemblies – one for Windows, one for Windows Phone. On my Surface Pro they are sitting in C:\Program Files (x86)\Microsoft SDKs\Windows\v8.1\ExtensionSDKs\BehaviorsXamlSDKManaged\12.0\ for Windows 8.1 and in C:\Program Files (x86)\Microsoft SDKs\WindowsPhoneApp\v8.1\ExtensionSDKs\BehaviorsXamlSDKManaged\12.0\ for Windows Phone 8.1

Now what?

Of course, like I wrote before, you can moan and complain about this and send venomous tweets to Joe Belfiore, Cliff Simpkins or just the first Windows Phone MVP you can find – or you can pause and think if there’s a way around it. This is the thing I love to do – explore, thinker, invent – and come to a solution. Because as it turns out, my friends, there is one.

imageThe key to the solution is this pretty odd article that, believe it or not, was sent to a closed mailing list of Windows Phone MVPs to collect opinions on – by none other than Matthijs Hoekstra, just the day before I wrote this. Then I thought it was a crazy idea - today I find it an invaluable clue. Talking about coincidences. It’s like basic research – you never know where the next life saving idea will be coming from ;-) .

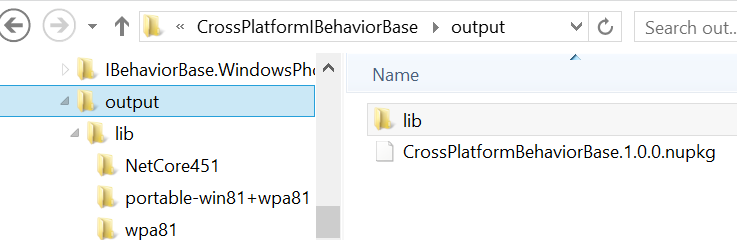
It’s called the “Bait and switch PCL trick” and it basically makes use of a very odd NuGet trick – it will always prefer a native platform library over a PCL. If you make a NuGet package that contains both a PCL and a native version, the PCL is then only used at compile time. So what I did was create this crazy NuGet package called CrossPlatformBehaviorBase (I think I am going to change that later) that basically has three projects in it: once PCL, one Windows Phone 8.1, and one Windows 8.1.

The key thing is that the implementation for Windows Phone and Windows are the same (in fact, the Windows Phone 8.1 implementation is linked from the Windows implementation, but the PCL is slightly different. The PCL version is a copy of the normal IBehavior interface, namespace and all:

using Windows.UI.Xaml;

namespace Microsoft.Xaml.Interactivity
{
  public interface IBehavior
  {
    DependencyObject AssociatedObject { get; }

    void Attach(DependencyObject associatedObject);

    void Detach();
  }
}

Whereas the Windows Phone and Windows implementations look like this:

[assembly: System.Runtime.CompilerServices.TypeForwardedTo(
typeof(Microsoft.Xaml.Interactivity.IBehavior))]

Indeed, that is all. A type forwarding statement to convince the compiler to look for the right IBehavior at runtime. I did not know this trick, but Daniel Plaisted alerted me in the comments.

imageIf you build for release this will create three projects neatly conforming to NuGet naming specifications and finally run a little command file that creates a NuGet package in the output folder directly under the solution folder.

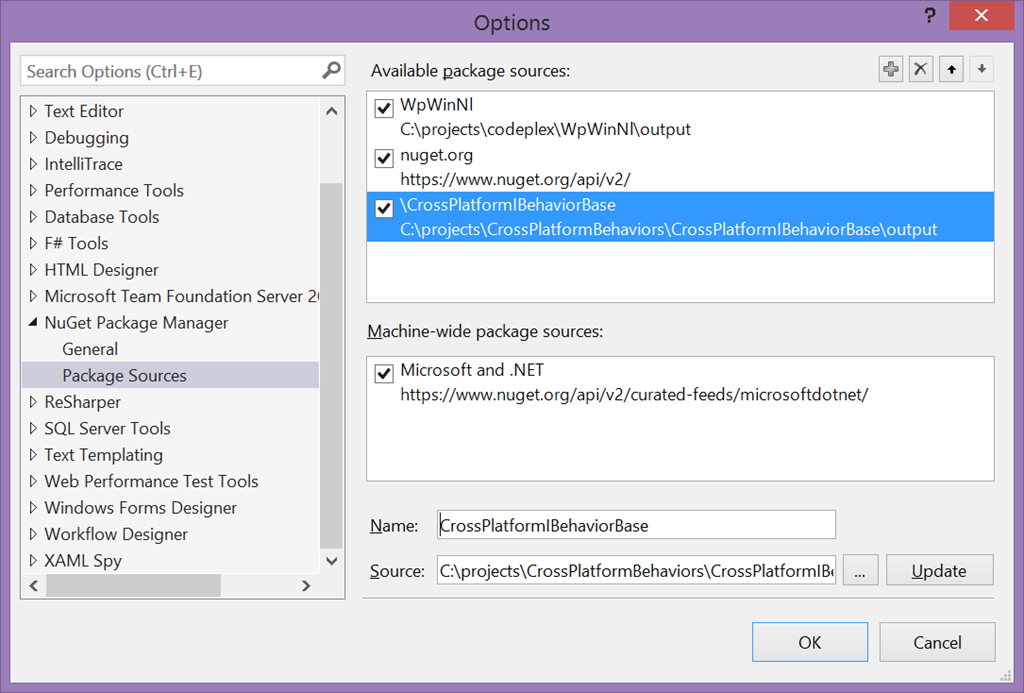
To be able to install the package, you need to specify that folder as a NuGet source:

image

imageMind you, in the future this will all be on NuGet so you won’t have to put up with this. For now,  am just explaining how it’s done.

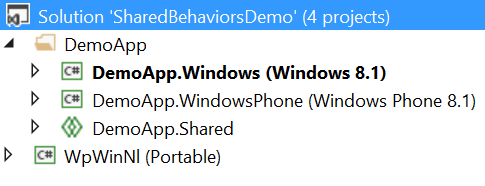
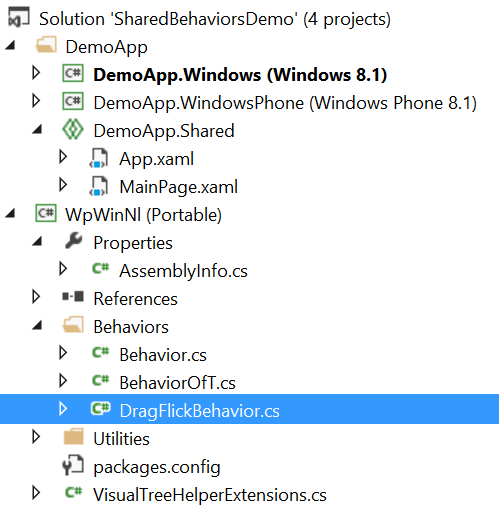
Anyway, I went ahead and created an Universal Windows App DemoApp, and added a Windows Phone 8.1/Windows 8.1 PCL “WpWinNl” to the solution.

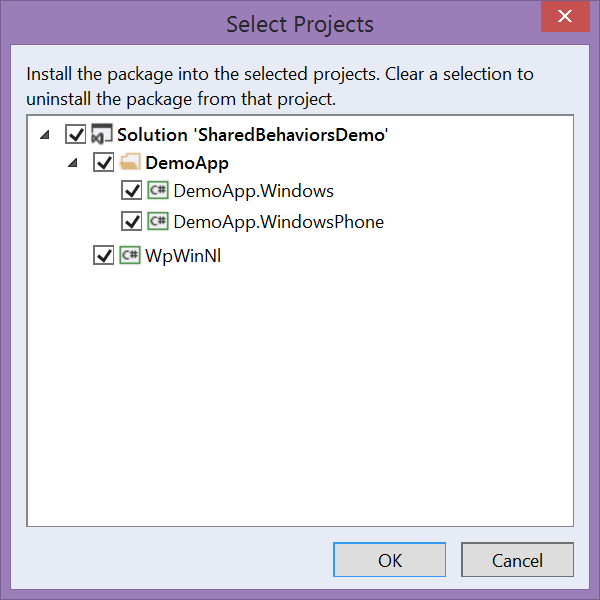
The newly created NuGet package needs to be installed in all three projects: 

imageAnd then I started in copying stuff from WpWinNl,starting with the Behavior base class that I created to maintain compatibility with ‘Silverlight style’ behaviors:

using Windows.UI.Xaml;

namespace WpWinNl.Behaviors
{
  public abstract class Behavior : DependencyObject, IBehavior
  {
    public DependencyObject AssociatedObject { get; set; }

    public virtual void Attach(DependencyObject associatedObject)
    {
      AssociatedObject = associatedObject;
    }

    public virtual void Detach()
    {
    }
  }
}

This will compile fine, now I have the replacement IBehavior in the PCL version. We continue with the Behavior<T> which of course compiles as well:

namespace WpWinNl.Behaviors
{
  public abstract class Behavior<T> : Behavior where T: DependencyObject
  {
    [System.ComponentModel.EditorBrowsable(
       System.ComponentModel.EditorBrowsableState.Never)]
    public new T AssociatedObject { get; set; }

    public override void Attach(DependencyObject associatedObject)
    {
      base.Attach(associatedObject);
      this.AssociatedObject = (T)associatedObject;
      OnAttached();
    }

    public override  void Detach()
    {
      base.Detach();
      OnDetaching();
    }

    protected virtual void OnAttached()
    {
    }

    protected virtual void OnDetaching()
    {
    }
  }
}

imageWhich basically comes over from the existing WpWinNl implementation unchanged. For kickers, I then put my infamous DragFlickBehavior, and all my animation code that has been featured on this blog multiple times on top of it and lo and behold – with a minor addition it just works. And I was able to delete all #ifdef statements for Windows Phone out, leaving only the former ‘just windows’ code. All in PCL. And all usable both on Windows Phone and Windows.

image
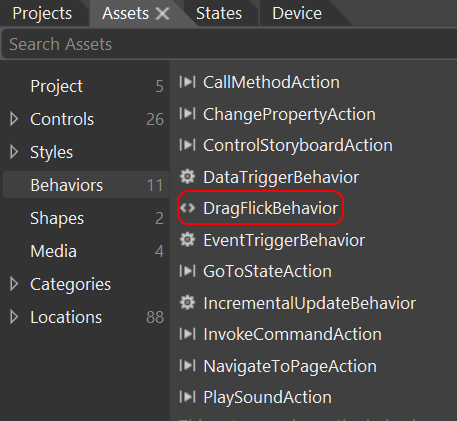
As coupe de grace I put the whole of MainPage.xaml in the shared portion, opened Blend and sure enough – there was my DragFlickBehavior:

So I dropped a date picker, a text box and a button on the screen and dragged my PCL-DragFlickBehavior on top on all three:

<Page
    xmlns="http://schemas.microsoft.com/winfx/2006/xaml/presentation"
    xmlns:x="http://schemas.microsoft.com/winfx/2006/xaml"
    xmlns:d="http://schemas.microsoft.com/expression/blend/2008"
    xmlns:mc="http://schemas.openxmlformats.org/markup-compatibility/2006"
    
    xmlns:Interactivity="using:Microsoft.Xaml.Interactivity"
    xmlns:behaviors="using:WpWinNl.Behaviors"

    x:Class="DemoApp.MainPage"
    mc:Ignorable="d">

  <Grid Background="{ThemeResource ApplicationPageBackgroundThemeBrush}">
    <Button Content="Button" HorizontalAlignment="Left" Height="37" 
      Margin="101,114,0,0" VerticalAlignment="Top" Width="108">
      <Interactivity:Interaction.Behaviors>
        <behaviors:DragFlickBehavior/>
      </Interactivity:Interaction.Behaviors>
    </Button>
    <DatePicker HorizontalAlignment="Left" Margin="48,230,0,0"
VerticalAlignment="Top"> <Interactivity:Interaction.Behaviors> <behaviors:DragFlickBehavior/> </Interactivity:Interaction.Behaviors> </DatePicker> <TextBlock HorizontalAlignment="Left" Height="42" Margin="132,310,0,0" TextWrapping="Wrap" Text="Blabla" VerticalAlignment="Top" Width="121"> <Interactivity:Interaction.Behaviors> <behaviors:DragFlickBehavior/> </Interactivity:Interaction.Behaviors> </TextBlock > </Grid> </Page>

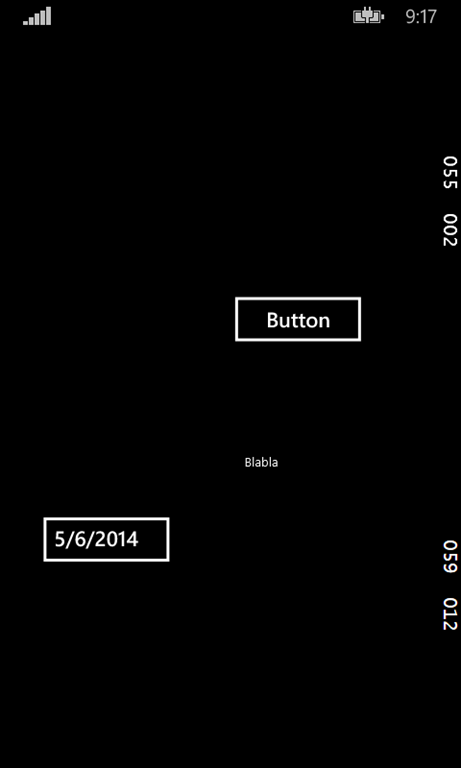
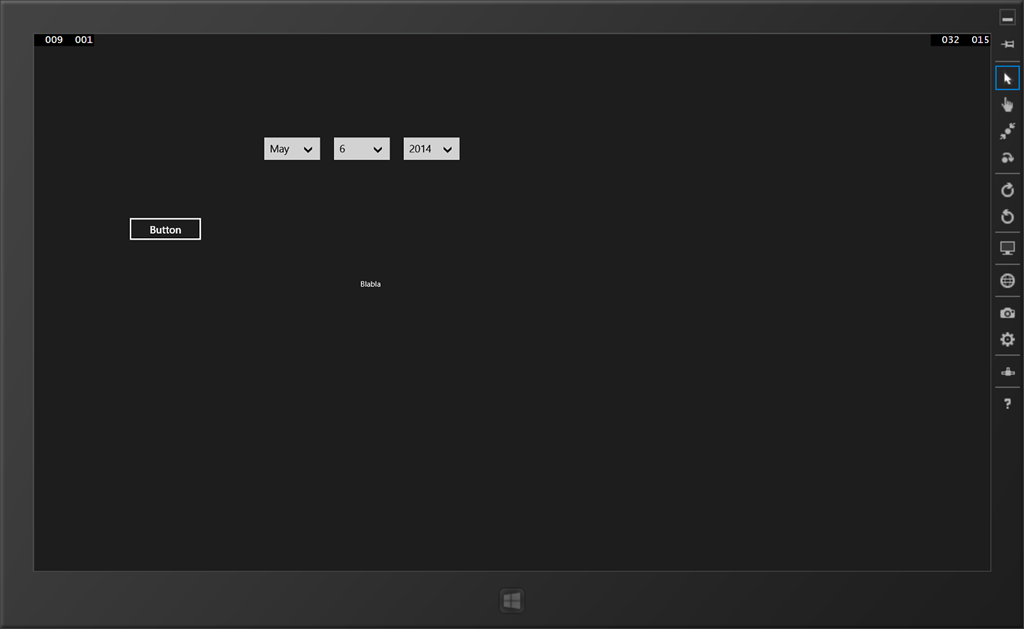
And sure enough:imageimage


The screen shows up and you can happily drag the items along, although dragging a Windows Phone date picker is quite a challenge.

So there you have it – behaviors completely defined in PCL, courtesy of a little NuGet trick. Could the Windows Phone and/or Windows Team have done this themselves? Possibly – but don’t forget I just sailed past anything that is not managed, like C++. And if there ain’t any challenges for MVPs to meet, fat lot of use we would be, eh? ;-)

A zip file with both the NuGet package and the Universal Windows App can be found here. For now it’s a kind of proof of concept, soon I will be putting this NuGet package out on NuGet itself and use it for the new version of WpWinNl. After some rigorous testing ;).

Update – after some thinking I decided to call this IBehaviorPortable and have uploaded it to NuGet with that name.

MovedCheeseException–where is StorageFolder.TryGetItemAsync in Windows Phone 8.1?

A quickie this time: when I finally started porting WpWinNl over to Windows Phone 8.1 (sorry, I was busy testing, preparing a talk and the Windows Phone Code Battle, so something had to give) and was getting into the nuts and bolts of some of my code I noticed something peculiar. Somewhere in my code the StorageHelper class, that sports this little method.

private async Task<StorageFile> GetDataFile()
{
  var result = 
    await ApplicationData.Current.LocalFolder.TryGetItemAsync(GetDataFileName(typeof(T)));
  return result as StorageFile;
}

got a compiler error on the TryGetItemsAsync method. So although Microsoft works hard on convergence for Windows Phone and Windows, apparently for some reason this method did not make the cut. In a Windows Phone / Windows 8.1 PCL it is not available either.

Now of course you can cry foul and say that once again Microsoft is pulling the rug out from under you, the loyal developer, or something to that effect – or you can just solve the problem. Either you change the line that does not compile to something that does compile on all platforms, for instance

var files = await ApplicationData.Current.LocalFolder.GetFilesAsync();
var result = files.FirstOrDefault(p => p.Name == name);

Or if you are a really lazy bastard  - like me – and just want to leave existing code intact, you can just make an extension method that you tuck in a library like this:

using System;
using System.Linq;
using System.Threading.Tasks;
using Windows.Storage;

namespace WpWinNl.Utilities
{
  /// <summary>
  /// Replaces the missing TryGetItemAsync method in Windows Phone 8.1
  /// </summary>
  public static class StorageFolderExtensions
  {
    public static async Task<IStorageItem> TryGetItemAsync(this StorageFolder folder, 
                                                           string name)
    {
      var files = await folder.GetItemsAsync().AsTask().ConfigureAwait(false);
      return files.FirstOrDefault(p => p.Name == name);
    }
  }
}

And we’re  done here. Sometimes your cheese moves a little. Deal with it, that’s what it takes to be a developer ;-). As this article basically talks about two lines of code, I will dispense with the sample solution this time if you don’t mind.

Thanks to Dave Smits for pointing out on Twitter that I should add AsTask().ConfigureAwait(false), which I did. As I am writing a library, I should not interfere with the developer's way of handling thread safety. Here is explained why.

30 April 2014

A screen-size independent scroll-into-view pane for Windows Phone and Windows Store apps

In this article I introduced MoveObjectBehavior and a way to use it to make Facebook-app like scroll-into-view panes. All very nice, but with a minor drawback – it basically needs a fixed screen size. That’s OK under Windows Phone 8 (albeit it does not look so good on a Lumia 1520) but still – you got away with it.

That is no longer the case in Windows Phone 8.1, and it never was the case in Windows 8. You have to take multiple screen sizes into account now, and in the case of Windows 8 the screen size can change while the app is running – as the user can arbitrarily change the horizontal space an app is using while it’s running.

Like this:

Scroll-into-view pane for Windows 8

Now MoveObjectBehavior has an ActivatedXValue Property and of course I could try, in stead of setting a fixed value, to bind that to the value of ActualWidth of the Page. Unfortunately that is not a Dependecy Property, so although it works initially, changes to it’s value are not populated. Yet, as you can see above, it can be done, and with a pretty animation as well.

This, of course, is were a second behavior comes in handy. Meet SizeListenerBehavior:

using Windows.UI.Xaml;

namespace WpWinNl.Behaviors
{

  /// <summary>
  /// This behavior listens to a size change of the attached object
  /// and puts the resulting size into two bindable dependecy properties
  /// </summary>
  public class SizeListenerBehavior : SafeBehavior<FrameworkElement>
  {
    protected override void OnSetup()
    {
      AssociatedObject.SizeChanged += AssociatedObjectSizeChanged;
      base.OnSetup();
      PropagateSizes();
    }

    protected override void OnCleanup()
    {
      AssociatedObject.SizeChanged -= AssociatedObjectSizeChanged;
      base.OnCleanup();
    }

    void AssociatedObjectSizeChanged(object sender, SizeChangedEventArgs e)
    {
      PropagateSizes();
    }

    private void PropagateSizes()
    {
      WatchedObjectHeight = AssociatedObject.ActualHeight;
      WatchedObjectWidth = AssociatedObject.ActualWidth;
    }
  }
}

It is very simple - it listens to the SizeChanged event that does get triggered on any size change, then populates that to two dependency properties. And those are bindable. I omitted both properties from the code above as they are fairly standard. So if you give the behavior a name you can use Element binding to bind this properties to MoveObjectBehavior.

Which is done like this:

<Page
    x:Class="SizeListener.MainPage"
    xmlns="http://schemas.microsoft.com/winfx/2006/xaml/presentation"
    xmlns:x="http://schemas.microsoft.com/winfx/2006/xaml"
  xmlns:d="http://schemas.microsoft.com/expression/blend/2008"
    xmlns:mc="http://schemas.openxmlformats.org/markup-compatibility/2006"
    xmlns:interactivity="using:Microsoft.Xaml.Interactivity"
    xmlns:behaviors="using:WpWinNl.Behaviors"
    mc:Ignorable="d" 
DataContext="{Binding Source={StaticResource DemoViewModelDataSource}}"> <Page.BottomAppBar > <CommandBar x:Name="BottomBar"> <AppBarButton Icon="Help" Command="{Binding MyCommand}"> </AppBarButton> </CommandBar> </Page.BottomAppBar > <interactivity:Interaction.Behaviors> <behaviors:SizeListenerBehavior x:Name="pageRootSizeListener"/> </interactivity:Interaction.Behaviors> <Grid Background="{ThemeResource ApplicationPageBackgroundThemeBrush}" > <Grid> <interactivity:Interaction.Behaviors> <behaviors:MoveObjectBehavior Activated="{Binding ShowSettings}" Duration="1000" ActivatedXValue="{Binding WatchedObjectWidth, ElementName=pageRootSizeListener}"/> </interactivity:Interaction.Behaviors> <Grid Background="Green"> <Grid Margin="50"> <TextBlock FontSize="50">THIS IS MY MAIN PAGE</TextBlock> </Grid> </Grid> <Grid RenderTransformOrigin="0,0.5" Background="Blue"> <Grid.RenderTransform> <CompositeTransform ScaleX="-1"/> </Grid.RenderTransform> <Grid> <Grid RenderTransformOrigin="0.5,0.5" Margin="50" > <Grid.RenderTransform> <CompositeTransform ScaleX="-1"/> </Grid.RenderTransform> <TextBlock FontSize="50">THIS IS MY MESSAGE PAGE</TextBlock> </Grid> </Grid> </Grid> </Grid> </Grid> </Page>

You see the parts that are actually do the work underlined, red and bold (so I hope that this is clear for everyone, even color blind people).

The trick with the mirroring grids to put stuff to the left (and the right) of your screen is described in my article, Aligning XAML elements outside the screen using scaling (for a Facebook-like GUI), so I won’t repeat that here.

The demo solution can be found here. If you are looking for the source in the code, you can keep looking, as it’s been sitting in my WpWinNl library on CodePlex for a while – but I just did not have the time to blog about it. If you want just the behavior’s source, that’s here.

20 April 2014

Windows Phone 8.1–moving your cursor. Don’t panic!

No code today, but a simple how-to. I was caught off-guard by this, a lot of people – including people who I concern to be power users, are pretty much confused by the way you move your cursor around in Windows Phone 8.1. It used to be

  • Long press text
  • Wait for a cursor to pop up above the text
  • Then swipe a little down and move the cursor to the place where you actually want it to be.

Help! Long press does not show the floating cursor anymore. Your cheese has been moved! Now what? Here’s my advice

Keep calm and tap twice

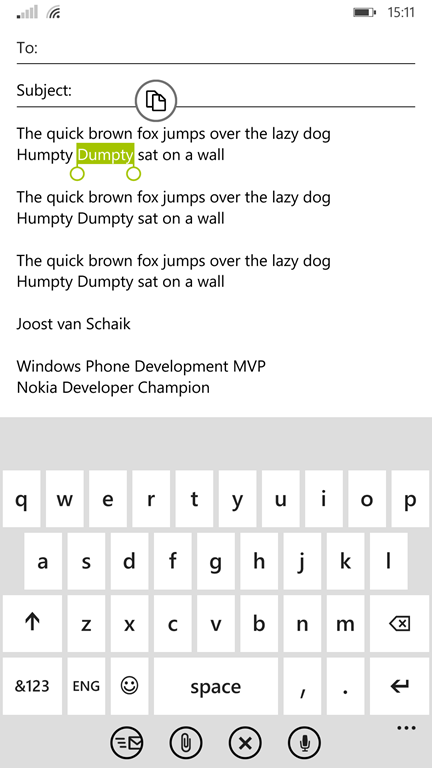
  • Tap a word. That will select it, and show the well-known selection handles – two dots that you can grab and move to increase or decrease the selection
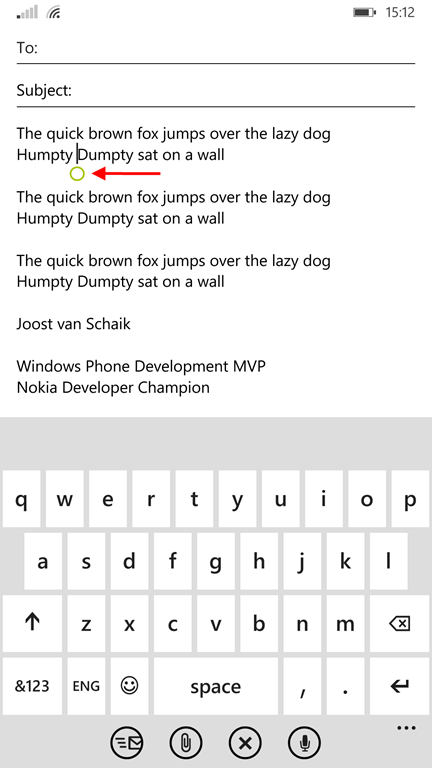
  • Tap the word again. This will deselect it again, place the cursor in front of it, with a single dot-handle below it.
  • Now tap on that dot and move your finger around. The cursor will follow your finger – even up and down.

See below. Left - after one tap, right – after the second tap. I added the red arrow to indicate the dot that I mean

wp_ss_20140420_0001wp_ss_20140420_0002

It’s displayed in your phone’s accent color – mine is currently set to lime green. I find that kind of fitting with spring, don’t you think? ;-). Once you are used to it, it’s really easy. Double-tap, move the cursor. No more long pressing and swiping down.

For those who rather see it explained on video: see below.

How to move your cursor.

02 April 2014

Code sharing strategies between Windows Phone 8.1 and Windows 8.1 with the new Universal Windows apps

With the announcement of the new SDK for Windows Phone Microsoft now really starts to stress the companionship of Windows and Windows Phone, and makes it a lot easier to build apps that run on both platforms. Windows Phone apps now reside under ‘Store Apps’ and although you can still write Windows Phone only apps, it’s pretty clear to me what the preferred way to go for new Windows Phone apps is

image

Two new kinds of Windows Phone apps

Let me make one thing clear: no-one is going to push you. Windows Phone 8.1, like it’s predecessor, will run 8.0 apps fine. You can go on re-using the skillset you have acquired, still using the XAML style you are used to. In fact, Microsoft stresses this point even more by including Windows Phone Silverlight 8.1 apps, which are a bit of a halfway station: your XAML largely stays the same, but it gives you access to the new APIs. Yet I feel the crown jewel of the new SDK is the new Universal Windows app and, in it’s slipstream, the enhanced PCL capabilities. But once again – no-one is forcing you this way. Microsoft are very much about going forward, but also about protecting your existing skills and assets.

One solution, two apps

One thing up front: ‘one app that runs everywhere’ is a station that we still have not reached. You are still making two apps – one for Windows Phone, one for Windows. In this sense, it’s basically the same approach as before where you used code sharing with linked files. That was quite a hassle, and now Visual Studio supports a formal way to share files between projects. This makes maintaining oversight dramatically easier, and it gets rid of the confounded “This document is opened by another project’ dialog too. Plus – and that’s a very big plus – the code you can use on both platforms has become a lot more similar.

Going universal

imageOne warning in advance – if you going for the Universal Windows app, you’re going all the way. It means that for your Windows Phone app in most cases you are basically writing a Windows 8 app - using XAML and APIs that are familiar for Windows Store apps programmers, but not necessarily for Windows Phone developers. If you already have some experience writing Windows Store this won’t be a problem. If you have never done that before, some things may look a bit different.

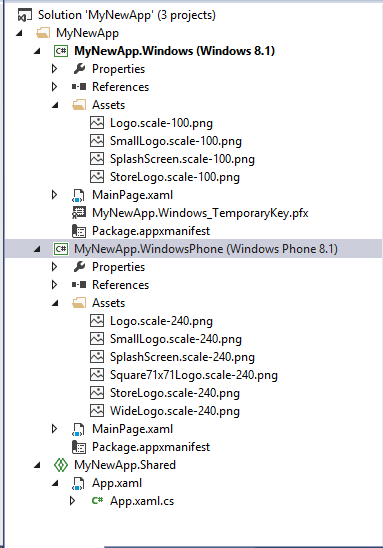
So, I have created a new blank Universal Windows app and it shows like displayed on the right:

Initially, it only shows the App.Xaml.cs as shared. This has one great advantage already – you can go in and disable the frame rate counter for both apps in one stroke :-):

        protected override void OnLaunched(LaunchActivatedEventArgs e)
        {
#if DEBUG
            if (System.Diagnostics.Debugger.IsAttached)
            {
                //this.DebugSettings.EnableFrameRateCounter = true;
            }
#endif

Switching contexts

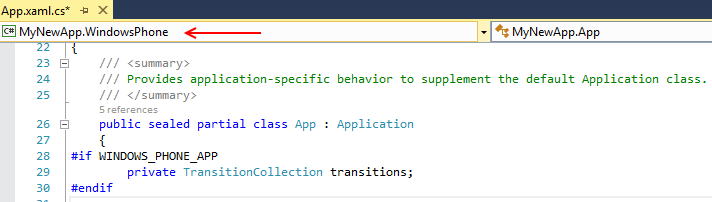
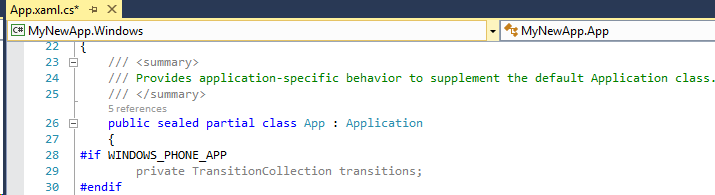
If you go through the shared App.Xaml.cs you will notice a few more things: at several places in the file it says #if WINDOWS_PHONE_APP, and I also want to point out this little thing on top, the context switcher.

image

You can set the context switcher to ‘MyNewApp.Windows and you will see the Windows app code greyed out. This way, you can very quickly see which code is executed in which version and which not

image

Sharing code – sharing XAML

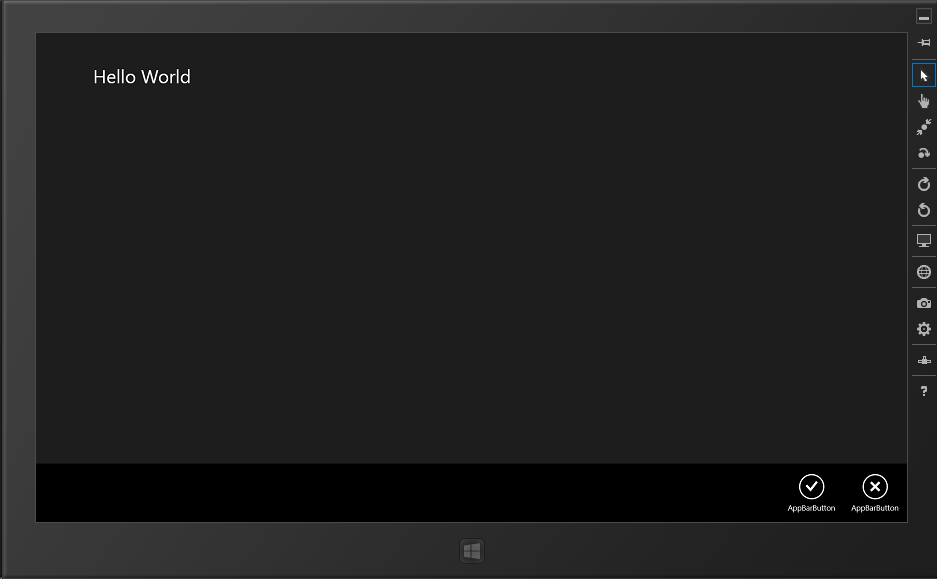
So I went to the Windows Store app, opened Blend, added some text and two tool bar buttons:

<Page
    x:Class="MyNewApp.MainPage"
    xmlns="http://schemas.microsoft.com/winfx/2006/xaml/presentation"
    xmlns:x="http://schemas.microsoft.com/winfx/2006/xaml"
    xmlns:local="using:MyNewApp"
    xmlns:d="http://schemas.microsoft.com/expression/blend/2008"
    xmlns:mc="http://schemas.openxmlformats.org/markup-compatibility/2006"
    mc:Ignorable="d">
  <Page.BottomAppBar>
    <CommandBar>
      <AppBarButton Icon="Accept" Label="AppBarButton" Click="AppBarButton_Click"/>
      <AppBarButton Icon="Cancel" Label="AppBarButton"/>
    </CommandBar>
  </Page.BottomAppBar>

    <Grid Background="{ThemeResource ApplicationPageBackgroundThemeBrush}">
      <TextBlock HorizontalAlignment="Left" 
                 Height="37" Margin="90,53,0,0" TextWrapping="Wrap" 
                 Text="Hello World" 
                 VerticalAlignment="Top" Width="383" FontSize="29.333"/>

    </Grid>
</Page>

And added some code behind.

private async void AppBarButton_Click(object sender, RoutedEventArgs e)
{
  var m = new MessageDialog("Hello world");
  await m.ShowAsync();
}

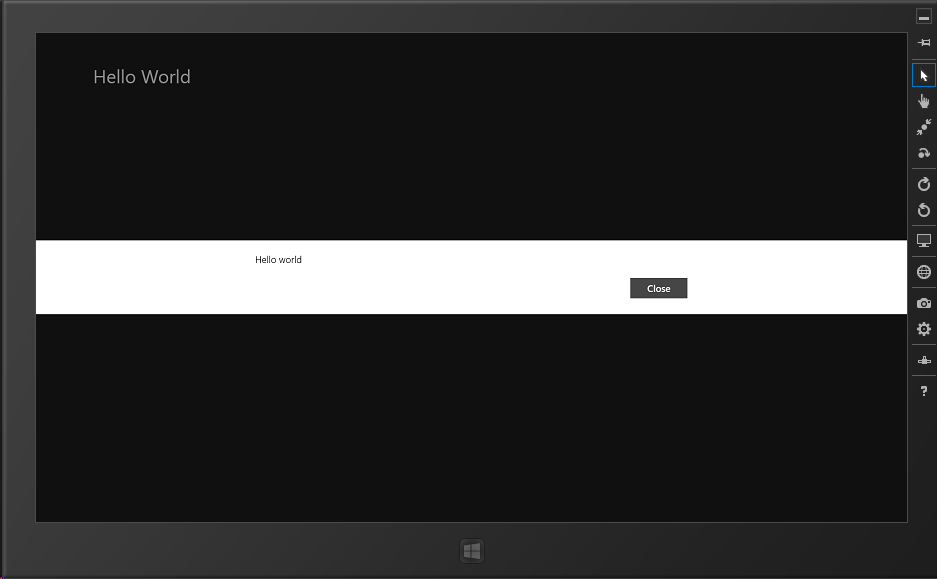
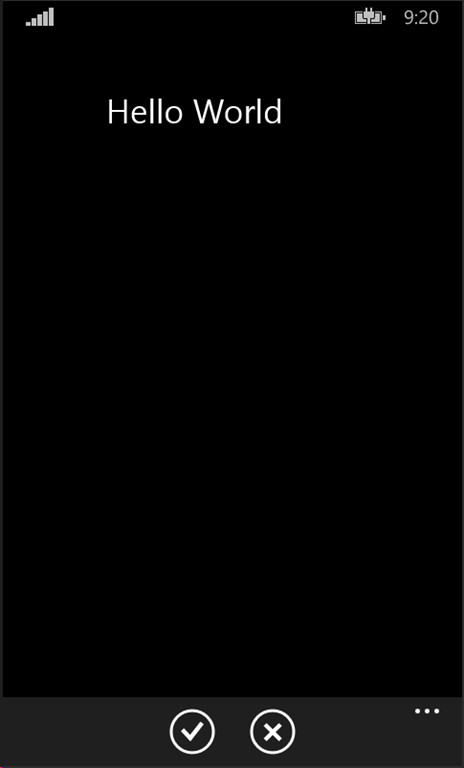
Now this won’t make for a spectacular app. If you run it, it will basically show:

imageimage

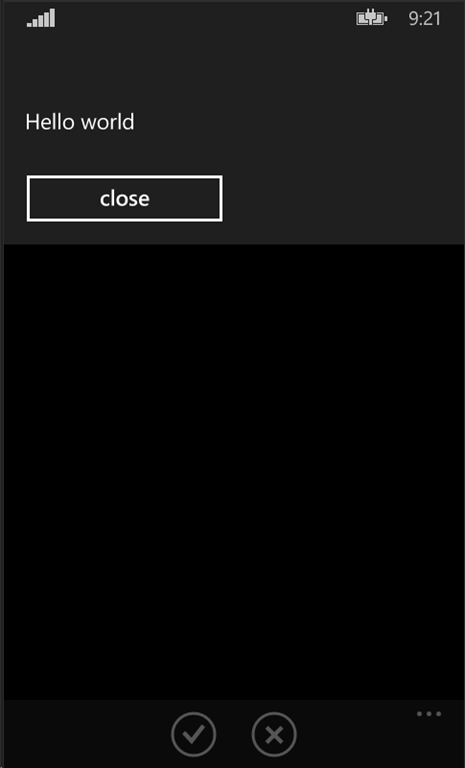
It amaaaaazing, right ;-)? But then I went a bit overboard – I imagemoved MainPage.xaml and imageMainPage.xaml.cs to the Shared project, and removed it from the Windows Phone 8.1 project. Run the Windows Store App again – still works. Run the Windows Phone 8.1 app, and sure enough…

Now this may seem pretty cool – and in fact it is - but it would not be something I would recommend using just like that. Windows Phone is a different beast, the way people use a phone app differs from how they use a Store app on a tablet, and usually you have to think different about how the layout works on a tablet. Case in point – the app bar. Windows Phone has only room for four buttons. The Secondary Commands show up as menu items, not as buttons. The Top bar does not show up at all. So blindly copying a UI from Windows Phone to Windows Store and back is not a smart thing to do. But the fact that it works, is in itself pretty cool.

Sharing code – in a more practical way

In practice, I have found you almost never share whole pages between phone apps and store apps, for a number of reasons:

  • Phone design does not always translate easily to tablet design and vice versa (as pointed out above).
  • For phone, space is a premium, and you don’t want to drag along all kinds of stuff that’s only used on a tablet - think super-high-res stuff, or all kinds of elaborate XAML constructions to accommodate that
  • If you use controls on one platform that simply are not present on the other, or if you use native controls (for example, maps)

To maximize code sharing, you can for instance use partial classes. That works like this: in your code behind MainPage.Xaml.cs you declare the class “partial”.

namespace MyNewApp
{
  /// <summary>
  /// An empty page that can be used on its own or navigated to within a Frame.
  /// </summary>
  public sealed partial class MainPage : Page
  {
    public MainPage()
    {
      this.InitializeComponent();
    }
  }
}
And then in the shared project you create a new file MainPage.Xaml.cs (or MainPage.cs), with just this:
namespace MyNewApp
{
  /// <summary>
  /// An empty page that can be used on its own or navigated to within a Frame.
  /// </summary>
  public sealed partial class MainPage : Page
  {
    public MainPage()
    {
      this.InitializeComponent();
    }
  }
}

And this still gives the same result. Partial classes in shared projects can be pretty powerful. From the partial class in shared code you can call for instance back to methods in the non-shared portion, provided that those called methods are present in both the non-shared portions of the class (so both the MainPage.Xaml.cs). You can even call methods in referenced PCLs. Just keep in mind that in the background it just works like shared files and you can do a lot to minimize duplication.

More ways of sharing

Another way of sharing code is putting most of it in the shared portion – even stuff that’s not present on both platforms – but then using the #ifdef WINDOWS_PHONE_APP and #ifdef WINDOWS_APP directives. This is largely a matter of preference. For smaller classes with little differences I tend to choose this route, for larger classes or code behind files I tend to go for partial classes.When I am working on stuff that is particularly phone-related, I don’t want my code cluttered by Windows code, and vice versa.

A third way of sharing pieces of UI would be creating user controls in shared code. They can be reused within pages that are in itself not shared.

Finally – don’t forget that everything can be shared in the shared images. Apart from XAML and code this includes, for instance:

  • Images
  • Resource files (styles, templates, localization, etc)
  • Data files

And PCL?

In the past, I have never been a fan of PCL, because of their limitations. This has been greatly improved by the new model and I actually start to like it. If you make a PCL for use in Windows 8.1 and Windows Phone 8.1 you can put almost everything in it that can be stuffed in a shared project, including user controls – although of course you can’t do elaborate partial classes callback tricks into non-shared code. This is because a PCL needs to stand on itself. So only everything that is available in both platforms fits in, so for instance almost everything map-related is out (with a few notable and very important exceptions: Geolocation (GPS tracking) and Geofencing (that is now available on Windows Phone too!).

Still – PCL is only useful if you are building stuff that

  • Needs to be reusable over multiple different apps
  • Needs to be usable on both Windows Phone and Windows Store

With this respect, there is not much difference in building platform-specific libraries and distributing them vi NuGet. This is more for the advanced programmer who is starting to build his own toolkit. This means you, by the time you are working on your third app :-)

Code sharing recap

  • Code, XAML or assets that can be shared within one app for both platform can go into a shared project. For code that does not fit entirely you can use
    • Partial classes
    • #ifdef directives
  • Code, XAML or assets that can be shared over multiple apps for both platform can go into a PCL

Conclusion

Build for Both has become a lot easier. You still have to deliver two apps, but making them as one has become a lot easier. Making clever use of the of partial classes and #ifdef makes it easier too, although this requires some thinking. Still, you have to take into account how both platforms behave differently.

A new exiting story for Windows Phone and Windows developers has begun.

The ‘demo solution’, which is hardly worth it’s name in this case, can be downloaded here.

26 February 2014

Drawing circles on Windows Phone Here Maps and Windows Store Bing Maps

One of the areas where the mapping systems for Windows Phone and Windows 8 are lacking, is the ability to draw circles. In particular in Windows Store apps, where you have the ability to use geofences, it would come in pretty handy to be able to draw the outline of a geofence (typically a circle, as this is the only supported type right now) on the map – if only for testing purposes.

To this end I have created a set of extension methods, both for Windows Phone 8 and for Windows Store apps. In the first case, they cannot be used to display the location of a geofence as there are no geofences in Windows Phone 8, but well – drawing circles may come in handy anyway.

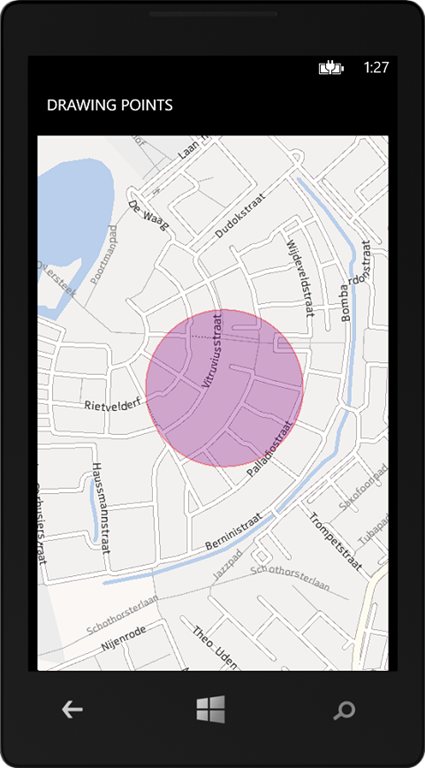
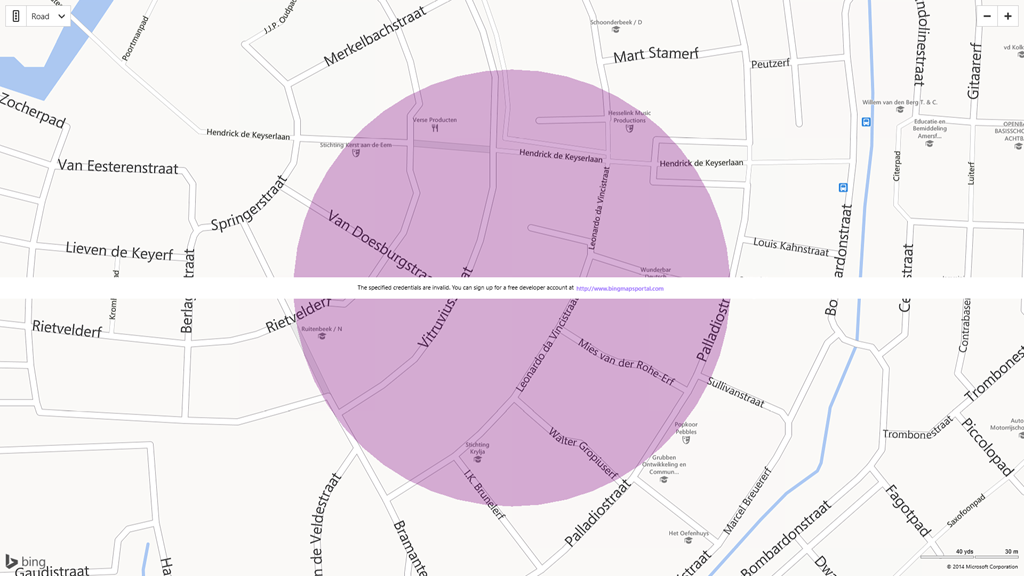
The results look something like this

imageScreenshot (16)

These are not circles – they look like circles. Basically they are just normal polygons, but their points are drawn in a form to resemble a circle. Would you zoom in very far, you would actually be able to see this. Would you calculate it’s surface area, you would actually find it  fraction smaller than a real circle area. But what the heck – it serves the purpose.

I have created a few extension methods to get this done. I will start with Windows Phone code - hey, I am not a Windows Phone MVP for nothing, right? ;-) -which starts off with this piece of math:

using System;
using System.Collections.Generic;
using System.Device.Location;

namespace WpWinNl.Utilities
{
  public static class GeoCoordinateExtensions
  {
    public static GeoCoordinate GetAtDistanceBearing(this GeoCoordinate point, 
                                                     double distance, double bearing)
    {
      const double degreesToRadian = Math.PI / 180.0;
      const double radianToDegrees = 180.0 / Math.PI;
      const double earthRadius = 6378137.0;

      var latA = point.Latitude * degreesToRadian;
      var lonA = point.Longitude * degreesToRadian;
      var angularDistance = distance / earthRadius;
      var trueCourse = bearing * degreesToRadian;

      var lat = Math.Asin(
          Math.Sin(latA) * Math.Cos(angularDistance) +
          Math.Cos(latA) * Math.Sin(angularDistance) * Math.Cos(trueCourse));

      var dlon = Math.Atan2(
          Math.Sin(trueCourse) * Math.Sin(angularDistance) * Math.Cos(latA),
          Math.Cos(angularDistance) - Math.Sin(latA) * Math.Sin(lat));

      var lon = ((lonA + dlon + Math.PI) % (Math.PI * 2)) - Math.PI;

      var result = new GeoCoordinate(lat * radianToDegrees, lon * radianToDegrees);

      return result;
    }
  }
}

This is a method that, given a coordinate, a distance in meters, and a bearing (in degrees) gives you another point. So a entering 50 for distance and 180 for bearing would give you a point 50 meters south of your original point. An impressive piece of math, if I may say so. Which I totally stole from here - as I am into maps, not so much into math. Having this, it’s pretty easy to add a second extension method:

public static IList<GeoCoordinate> GetCirclePoints(this GeoCoordinate center, 
                                   double radius, int nrOfPoints = 50)
{
  var angle = 360.0 / nrOfPoints;
  var locations = new List<GeoCoordinate>();
  for (var i = 0; i <= nrOfPoints; i++)
  {
    locations.Add(center.GetAtDistanceBearing(radius, angle * i));
  }
  return locations;
}

It divides the circle of 360 degrees in the number of points you want, and then simply adds points to the shape at the same distance but at every 360/points degrees. The higher the number of points, the more the shape will look like a real circle. Drawing the circle on a Windows Phone map is child’s play now:

void MainPageLoaded(object sender, RoutedEventArgs e)
{
  var location = new GeoCoordinate(52.181427, 5.399780);
  MyMap.Center = location;
  MyMap.ZoomLevel = 16;

  var fill = Colors.Purple;
  var stroke = Colors.Red;
  fill.A = 80;
  stroke.A = 80;
  var circle = new MapPolygon
  {
    StrokeThickness = 2,
    FillColor = fill,
    StrokeColor = stroke,
    StrokeDashed = false,
  };

  foreach( var p in location.GetCirclePoints(150))
  {
    circle.Path.Add(p);
  }

  MyMap.MapElements.Add(circle);
}

This draws a circle of 150 meters around my house. 

For Windows Store, the story is nearly the same. The differences are:

  1. You will need to install the Bing Maps SDK for Windows 8.1 Store apps
  2. The Bing Maps SDK does not understand System.Device.Location.GeoCoordinate you will need to make the extension method on Bing.Maps.Location

It’s very unfortunate that the mapping APIs for Windows Phone and Windows Store lack convergence even at the point of something as basic the naming of location types. I hope this will get more attention in the future, as mapping is something that I really care about - in case you had not noticed that from this blog ;-).

However, clever use of C# aliasing brings this convergence a bit closer. I changed the top of this file to

using System;
using System.Collections.Generic;
#if WINDOWS_PHONE
using GeoCoordinate = System.Device.Location.GeoCoordinate;
#else
using GeoCoordinate=Bing.Maps.Location;
#endif

et voilá, this file compiles under both Windows Phone and Windows Store (provided you have the Map SDK installed). You can forget about PCLs, but sharing code is definitely a possibility now as far as this little method goes.

Drawing a shape in the Windows Store app is now nearly the same:

void MainPageLoaded(object sender, RoutedEventArgs e)
{
  var location = new Location(52.181427, 5.399780);
  MyMap.Center = location;
  MyMap.ZoomLevel = 18;
  var fill = Colors.Purple;
  fill.A = 80;
  var circle = new MapPolygon
  {
   FillColor = fill,
  };

  foreach (var p in location.GetCirclePoints(150))
  {
    circle.Locations.Add(p);
  }

  var layer = new MapShapeLayer();
  layer.Shapes.Add(circle);

  MyMap.ShapeLayers.Add(layer);
}

Although attentive readers might notice there is no stroke color defined (as MapPolygon in Windows Store does not feature a separate outer shape border) and adding shapes to a map regrettably also works a bit differently. The API of both mapping systems definitely could benefit from some attention here. But anyway – it get’s the job done now at this point.

Full demo solution is downloadable here. One more time – to be able to compile this you will need to install the Bing Maps SDK for Windows 8.1 Store apps first!