


Intro
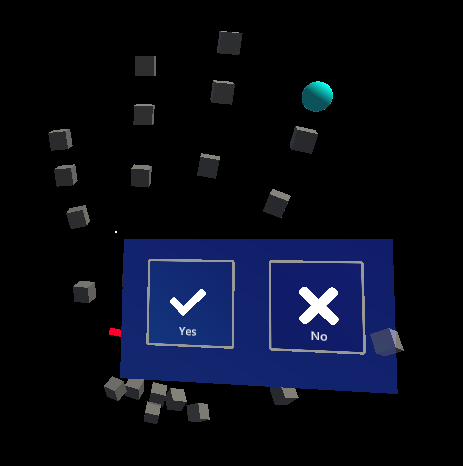
In all modesty I think I pretty much nailed making simple 'user interfaces' for HoloLens 1 - simple dialogs and stuff. Clients told me 'even a moron can understand how to operate this' so I think I did allright. But stuff floating in thin air wasn't always ideal. And now with HoloLens 2, we can actually let stick stuff to hands, in stead of just the gaze. So I decide to check if I could make a menu that stuck in the palm of your hand. Turned out I could.
And it's ridiculously easy to boot.
Creating a hand palm menu
This was actually just built from the UX components in the MRKT2.
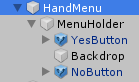
These are literally only two "PressableButtonHoloLens2" prefabs floating about 2cm before a quad that has this material:

Then I added a Solver Handler to the HandMenu
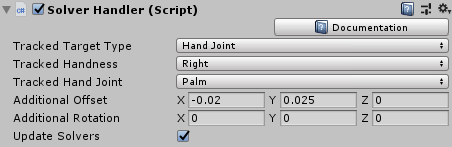
I had to fiddle a bit with the settings, especially the additional offset - to determine where exactly the menu is going to appear in relation to the palm. How these parameters exactly work is a bit unclear with me, so I used the scientific method: I started to change the numbers till things happened the way I liked ;)
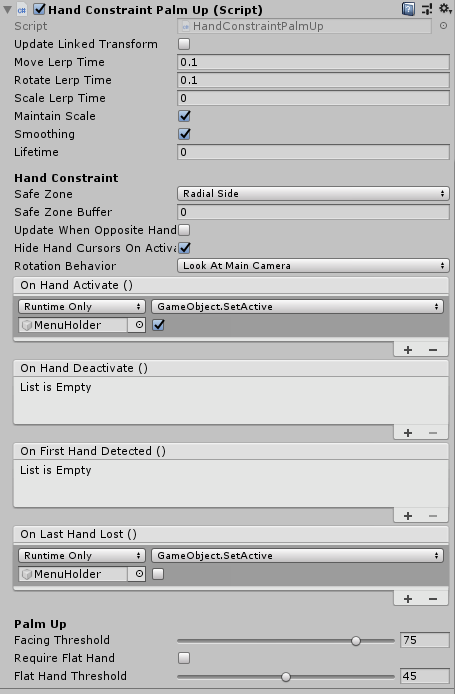
And finally I added a Hand Constraint Palm Up with these settings
And this is basically all you have to do to have the menu appear.
Some configuration settings
Although this works with the 'normal' simulated hand setting as well, it's best viewed with the 'flat' hand palm. To get this, starting with
- The Mixed Reality Toolkit Profile (Cloned from DefaultHoloLens2ConfigurationProfile)
- The Input System Profile
- The Input Simulation Profile
Then you have to expand the "Input Simulation Service" section, scroll all the way down to "Hand Gesture Settings" and change the settings there as follows:
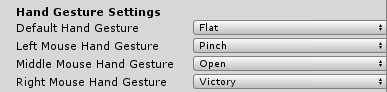
These are my default settings - but for this demo actually only the top setting is important (Default Hand Gesture to "Flat")
Testing the menu
I think it's safe to say that most of the people reading this - including me - don't have a HoloLens 2. Fortunately you can test this quite easily in the editor. To get to the point shown in the first picture in this post, simply do the following:
- Start play mode
- Move the mouse cursor inside the game window
- Press the Space bar and keep it down- the right hand should now appear
- While keeping the space bar pressed down, also press the left control key on your keyboard and keep it down
- With your other hand, slowly move the mouse to the left. The hand should now start to rotate in stead of move
- When you have rotated the hand just past the 90° angle, the menu should appear.
Making it actually do something
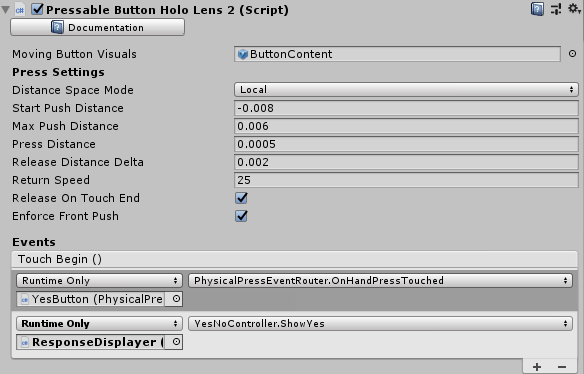
You might have noticed the buttons don't do anything at this stage. So I created a little helper behaviour that shows "Yes" or "No" depending on which button you press. It's not very sophisticated:
- It simply follows the actual hand menu around
- It has a public method "ShowYes" and "ShowNo" that can be hooked up to the buttons to show something when they are pressed.
It sits in a "ResponseHelper" game object and the hookup to the button is therefore simple, as the YesButton shows:
The actual working is displayed in this little video:
The trick to make the right hand stay while you operate the left hand is:
- Press Y once the right hand is in the desired position and rotation
- Release space bar and control key (right hand stays where it is, you are just longer controlling it)
- Press the left shift key - the left hand should now appear
- While keeping the left shift key pressed, you can move the left hand with the mouse. To move it forward and backward like in the movie, rotate the mouse wheel. This way you can actually make the index finger touch the buttons
Conclusion
Building a hand palm menu is really easy and basically requires no code. How this will work on a real HoloLens 2 - only time will tell. In the mean time you can find the demo project here.
No comments:
Post a Comment