12 July 2017

Building a dynamic floating clickable menu for HoloLens/Windows MR

Intro

In the various XAML-based platforms (WPF, UWP, Xamarin) that were created by or are now part of Microsoft we have the great capability to perform databinding and templating - essentially saying to for instance a list 'this is my data, this is how a single item should look, good luck with it' and the UI kind of creates itself. This we don't quite have in Unity projects for Windows Mixed Reality. But still I gave it my best shot when I created a dynamic floating menu for my app Walk the World (only the first few seconds are relevant, the rest is just showing off a view of Machu Picchu)

Starting point

We actually start using the end result of my previous post, as I don't really like to do things twice. So copy that project to another folder, or make a branch, whatever. I called the renamed folder FloatingDynamicMenuDemo. Then proceed as follows:

  • Delete FloatingScreenDemo.* from the project's root
  • Empty the App sub folder - just leave the .gitignore
  • Open the project in Unity
  • Open the Build Settings window (CTRL+B)
  • Hit the "Player Settings..." button
  • Change "FloatingScreenDemo" in "FloatingDynamicMenuDemo" whereever you see it. Initially you will see only one place, but please expand the "Icon" and "Publishing Settings" panels as well, there are more boxes to fill in.
  • Rename the HelpHolder to MenuHolder
  • Remove the Help Text Controller from the HelpHolder.
  • Change the text in the 3DTextPrefab from the Lorum ipsum to "Select a place too see"
  • Change the text's Y position from 0.84 to 0.23 so it will end up at the top of the 'screen'

So now we have a workspace with most of the stuff we need already in it. Time to fill in the gaps.

Building a Menu Item part 1 - graphics
imageSo, think templating. We first need to have a template before we can instantiate it. But the only thing I can instantiate are game objects. So... we need to make one... a combination of graphics and code. That sounds like - a prefab indeed!

First, we will make a material for the menu items, as this will be easier for debugging. Go to the App/Materials folder, find HelpScreenMaterial, hit CTRL-D, and rename HelpScreenMaterial 1 to MenuItemMaterial. Then, change its color to a kind of green, for instance 00B476FF. Also, change the rendering mode to "Opaque". This is so we can easily see the plane.

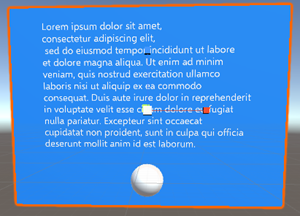
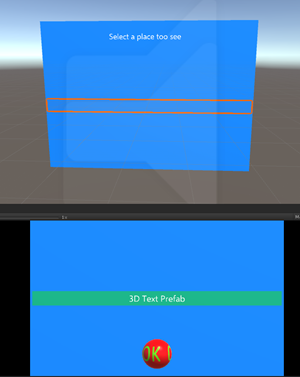
Inside the MenuHolder we make a new empty game object. I called it - d'oh - MenuItem. Inside that MenuItem, we first make a 3DTextPrefab, then a Plane. The plane will be of course humongous again, and very white. So first drag the green MenuItemMaterial on it. Then change it's X Rotation to 270 so it will be upright again. Then you have to experiment a little with the X and Z scale until it is more or less the same width as your blue Plane, and a little over 1 line of text height, as showed to the left.The values I got were X = 0.065 and Z = 0.004 but this depends of course on the font size you take. Make sure there is some extra padding between the left and right edges of the green Plane and the blue Plane.

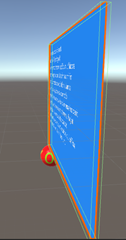
imageAs you can see in the top panel, the text and the menu pane are invisible - they are only visible when looked upon dead right from the camera in the game view. This is because they basically are at the same distance as the screen. So we need to set -0.02 to the Z of the green Plane - so it appears in front of the blue screen - and -0.04 to the Z of the 3DTextPrefab so it will appear in front of the green Plane, and you will see the effect in the Scene pane as well now.

Since this is a Menu, we want the text to appear from the left. The Anchor is now middle center and it's Alignment Center, and that is not desirable. So we have to set Alignment to Left and Anchor to Middle Left, and then we drag the text prefab to the left till the edge of the green plane. I found an X position value of -0.32.

Now create a folder "Prefabs" in your App folder in the Assets pane, and drag the MenuItem object from there. This will create a Prefab. The text MenuItem in the Hierarchy will turn blue.

image

You can now safely delete the MenuItem from the Hierarchy. Mind you, the Hierarchy. Make sure it stays in Prefabs.

Building a Menu Item part 2 - code

Our 'menu' needs some general data structure helper. So we start with an interface for that:

public interface IMenuItemData
{
    object SelectMessageObject { get; set; }

    string Title { get; set; }

    int MenuId { get; set; }
}

And a default implementation:

public class MenuItemData : IMenuItemData
{
    public object SelectMessageObject { get; set; }

    public string Title { get; set; }

    public int MenuId { get; set; }
}

The SelectedMessageObject is the payload - the actual data. The Title contains the text we want to have displayed on the menu, and the MenuId we need so we can distinguish select events coming from multiple menus, should your application have such. For the distribution of events we once again use the Messenger that I introduced before (and have used extensively ever since).

To send a selected object around we need a message class:

public class MenuSelectedMessage
{
    public IMenuItemData MenuItem { get; set; }
}

And then we only need to add this simple MenuItemController, a behaviour that handles when the MenuItem is tapped:

using HoloToolkit.Unity.InputModule;
using HoloToolkitExtensions.Messaging;
using UnityEngine;

public class MenuItemController : MonoBehaviour, IInputClickHandler
{
    private TextMesh _textMesh;
    private IMenuItemData _menuItemData;

    public IMenuItemData MenuItemData
    {
        get { return _menuItemData; }
        set
        {
            if (_menuItemData == value)
            {
                return;
            }
            _menuItemData = value;
            _textMesh = GetComponentInChildren<TextMesh>();
            if (_menuItemData != null && _textMesh != null)
            {
                _textMesh.text = _menuItemData.Title;
            }
        }
    }

    public void OnInputClicked(InputClickedEventData eventData)
    {
        if (MenuItemData != null)
        {
            Messenger.Instance.Broadcast(
new MenuSelectedMessage {MenuItem = MenuItemData}); PlayConfirmationSound(); } } private AudioSource _audioSource; private void PlayConfirmationSound() { if (_audioSource == null) { _audioSource = GetComponent<AudioSource>(); } if (_audioSource != null) { _audioSource.Play(); } } }

There is a property MenuItemData that accepts an IMenuItemData. If you set it, it will retain the value in a private field but also shows the value of Title in a TextMesh component. This behaviour is also an IInputClickHandler, so if the user taps this, the OnInputClicked method is called. Essentially all it does, is sending off it's MenuItemData object - that was used to fill the text with a value - to the Messenger. And it tries to play a sound. You should decide for yourself if you want that.

So all we have to to is add this behaviour MenuItem prefab, as this is the thing we are going to click on. That way, if you click next to the text but at the correct height (the menu 'row'), it's still selected. So select MenuItem, hit the "Add Component" button and add the Menu Item Controller.

image

Now if you like, you can add an with AudioSource with a special sound that signifies the selection of a menu. As I have stated before, immediate (audio) feedback is very important in immersive applications. I have done not so. I usually let the receiver of a MenuSelectedMessage do the notification sound.

Building the menu itself

This is done by a surprisingly small and simple behavior. All it does is instantiate a number of game object on a certain positions.

using System.Collections.Generic;
using System.Linq;
using UnityEngine;public class MenuBuilder :MonoBehaviour
{
    public float MaxNumber = 10;

    public float TopMargin = 0.1f;

    public float MenuItemSize = 0.1f;

    private List<GameObject> _createdMenuItems = new List<GameObject>();
    public MenuBuilder()
    {
        _menuItems = new List<IMenuItemData>();
    }
    public GameObject MenuItem;

    private IList<IMenuItemData> _menuItems;

    public IList<IMenuItemData> MenuItems
    {
        get { return _menuItems; }
        set
        {
            _menuItems = value;
            BuildMenuItems();
        }
    }

    private void BuildMenuItems()
    {
        foreach (var menuItem in _createdMenuItems)
        {
            DestroyImmediate(menuItem);
        }
        if (_menuItems == null || !_menuItems.Any())
        {
            return;
        }
        for (var index = 0; index < MenuItems.Count; index++)
        {
            var newMenuItem = MenuItems[index];
            var newGameObject = Instantiate(MenuItem, gameObject.transform);
            newGameObject.transform.localPosition -= 
                new Vector3(0,(MenuItemSize * index) - TopMargin, 0);

            var controller = newGameObject.GetComponent<MenuItemController>();
            controller.MenuItemData = newMenuItem;
            _createdMenuItems.Add(newGameObject);
        }
    }
}

All the important work happens in BuildMenuItems. Any existing items are destroyed first, then we simply loop through the list of menu items - these are IMenuItemData objects. Then a game object provided in MenuItem is instantiated inside the current game object, and it's vertical position is calculated and set. Then it gets the MenuItemController from the instantiated game object - it just assumes it must be there - and puts the newMenuItem in it - so the MenuItem will show the associated text.

So now add the MenuBuilder to the HelpHolder. Then, from prefabs, drag the MenuItem prefab onto the Menu Item property. Net result:

image

Now let's add an initialization behaviour to actually make stuff appear in the menu. This behavior has some hard coded data in it, but you can imagine this coming from some Azure data source

using System.Collections.Generic;
using UnityEngine;

public class VistaMenuController : MonoBehaviour
{
    void Start()
    {
        var builder = GetComponent<MenuBuilder>();

        IList<IMenuItemData> list = new List<IMenuItemData>();
        list.Add(new MenuItemData
        {
            Title = "Mount Everest, Nepal",
            MenuId = 1,
            SelectMessageObject = new WorldCoordinate(27.91282f, 86.94221f)
        });
        list.Add(new MenuItemData
        {
            Title = "Kilomanjaro, Tanzania",
            MenuId = 1,
            SelectMessageObject = new WorldCoordinate(-3.21508f, 37.37316f)
        });
        list.Add(new MenuItemData
        {
            Title = "Mount Rainier, Washington, USA",
            MenuId = 1,
            SelectMessageObject = new WorldCoordinate(46.76566f, -121.7554f)
        });
        list.Add(new MenuItemData
        {
            Title = "Niagra falls (from Canada)",
            MenuId = 1,
            SelectMessageObject = new WorldCoordinate(43.07306f, -79.07561f)
        });
        list.Add(new MenuItemData
        {
            Title = "Mount Robson, British Columbia, Canada",
            MenuId = 1,
            SelectMessageObject = new WorldCoordinate(53.061809f, -119.168358f)
        });
        list.Add(new MenuItemData
        {
            Title = "Athabasca Glacier, Alberta, Canada",
            MenuId = 1,
            SelectMessageObject = new WorldCoordinate(52.18406f, -117.257f)
        });
        list.Add(new MenuItemData
        {
            Title = "Etna, Sicily, Italy",
            MenuId = 1,
            SelectMessageObject = new WorldCoordinate(37.67865f, 14.9964f)
        });

        builder.MenuItems = list;
    }
}

This comes straight from Walk the World - these 7 of it's 10 vistas with a location to look from it. Add this behaviour to the Help Holder as well. Now it's time to run the code and see our menu for the very first time!
imageSome tweaking and fiddling

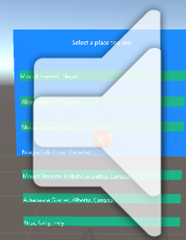
If you press the play button in Unity, you will get something like displayed to the left. A former British colleague would say something among the lines of "It's not quite what I had in mind". But we can fix this, fortunately.

In the Menu Item Builder that you have added to HelpHolder, there's two more properties:

image

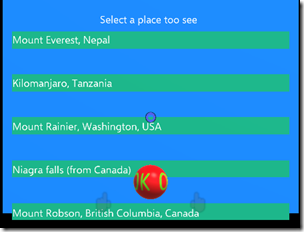
The first one is the relative location where the first item should appear, and the second the size allotted for each menu. Clearly the first MenuItem is placed too low. The only way to really get this done is by trial an error. The higher you make Top Margin, the higher up the first item moves. A value of 0.18 gives about this and that seems about right:
image

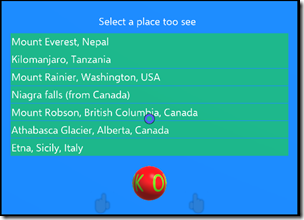
And 0.041 for Menu Item Size gives this:
image

Which is just what you want - a tiny little space between the menu items. Like I said, just trial and error.

Testing if its works

Once again, a bit lame: a simple behaviour to listen to the menu selection messages:

using HoloToolkitExtensions.Messaging;

public class MenuListener : MonoBehaviour
{
    // Use this for initialization
    void Start()
    {
        Messenger.Instance.AddListener<MenuSelectedMessage>(ProcessMenuMessage);
    }

    private void ProcessMenuMessage(MenuSelectedMessage msg)
    {
        if (msg.MenuItem.MenuId == 1 )
        {
            Debug.Log("Taking you to " + msg.MenuItem.Title);
            Debug.Log(msg.MenuItem.SelectMessageObject.ToString());
        }
    }
}

Add this behaviour to the Managers object, click play, and sure enough if you click menu items, you will see in Unity's debug console:

image

Yes, I know, that's a lame demo - you connect something to the message that actually does something. Speak out the name. Have a dancing popup. The point is that it works and the messages get out when you click :)

Some final look & feel bits

Yah! We have a more or less working menu but it looks kind of ugly and not everything works - the close button, for instance. Let's fix the look & feel first. We needed the greenish background of the menu item to properly space and align the items, but now we do not need it anymore. So go to the MenuItemMaterial. Select a new imageshader: under HoloToolkit, you will find "Vertex Lit Configurable Transparent".

Then go all the way down, to "Other" and set "Cull" to front. That way, the front part of the plane - the green strips will be invisible - but still hittable.

If you press play, the menu should now look like this:

image

Getting the button to work

As stated above, the button is not working - and for a very simple reason: in my previous post I showed that it looks for a component in it's parent that is a BaseTextScreenController (or a child class of that). There are none.

So let's go back to the VistaMenuController again. The top says

public class VistaMenuController : MonoBehaviour

Let's change that into

public class VistaMenuController : BaseTextScreenController

You will need to add "using HoloToolkitExtensions.Animation;" to top to get this to work. You will also need to change

void Start()
{

into

public override void Start()
{
base.Start();

If you now hit "Play" in Unity you will end up with this
image

Right. Nothing at all :). This is because the base Start method (which is the Start method of BaseTextScreenController) actually hides the menu, on the premises that you don't want to see the menu initially. So we have to have a way to make it visible. Fortunately, that's very easy. We will just re-use the ShowHelpMessage from the previous post again to make this work. Go back one more time to the VistaMenuController "Start" method, and add one more statement:

public override void Start()
{
base.Start();
Messenger.Instance.AddListener<ShowHelpMessage>(m => Show());

If you now press play, you will still see nothing. But if you yell "Show help" to your computer (or press "0" - zero) the menu pops up and comes into view. With, I might add, the for my apps now iconic "pling" sound. And if you click the button, the menu will disappear with the equally iconic "clonk" .

Some concluding remarks

Of course, this is still pretty primitive. With the current font size and menu item size, stuff will be happily rendered outside of the actual menu screen if your texts are too long or you have more than 7 menu items. That is because the screen is just a floating backdrop. Scrolling for more items? Nope. Dynamic or manual resizing? Nope. But it is a start, and I have used it with great success.

Let me know if this was valuable to you, and what you used it for. Full demo project at GitHub, as always.

01 July 2017

Building a floating HoloLens 'info screen' - 2: adding the C# behaviours

Intro

In the first installment of this 2-part blog post we have created the UI of the info screen, now we are going to build the dynamics.

  • First we will make the app recognize a speech command
  • Then we will add the dynamics to make the screen appear and disappear when we want.
  • Then we will make the close button work
  • As a finishing touch we will add some spatial sound.

Adding a speech command – the newest new way

For the second or maybe even the third time since I have started using the HoloToolkit, the was the way speech commands are supposed to work has changed. The keyword manager is now obsolete, you now have to use SpeechInputSource and SpeechInputHandler.

First, we add a Messenger, as already described in this blog post, to the Managers game object. It sits in Assets/HoloToolkitExtensions/Scripts/Messaging.

Then, since we are good boy scouts that like to keep things organized, a create a folder “Scripts” under “Assets/App”. In “Scripts” we add a “Messages” folder, and in that we create the following highly complicated message class ;)

public class ShowHelpMessage
{
}

In Scripts we create the SpeechCommandExectutor, which is simply this:

using HoloToolkitExtensions.Messaging;
using UnityEngine;

public class SpeechCommandExecutor : MonoBehaviour
{
    public void OpenHelpScreen()
    {
        Messenger.Instance.Broadcast(new ShowHelpMessage());
    }
}

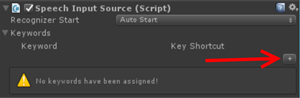
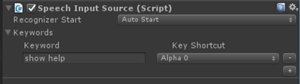
Add this SpeechCommandExecutor to the Managers game object. Also add a SpeechInputSource script from the HoloToolkit, click they tiny plus-button on the right and add “show help” as keyword:

imageimage


Also, select a key in “key shortcut”. Although they Unity3D editor supports voice commands, you can now also use a code to test the flow. And believe me – your colleagues will thank you for that. Although lots of my colleagues are now quite used to me talking to devices and gesturing in empty air, repeatedly shouting at a computer because it was not possible to determine if there’s a bug in the code or the computer just did not hear you… is still kind of frowned upon.

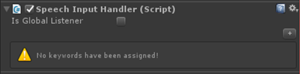
Anyway. To connect the SpeechCommandExecutor to the SpeechInputSource we need a SpeechInputHandler. That is also in the HoloToolkit. So drag it out of there into the Managers objects. Once again you have to click a very tiny plus-button:

image

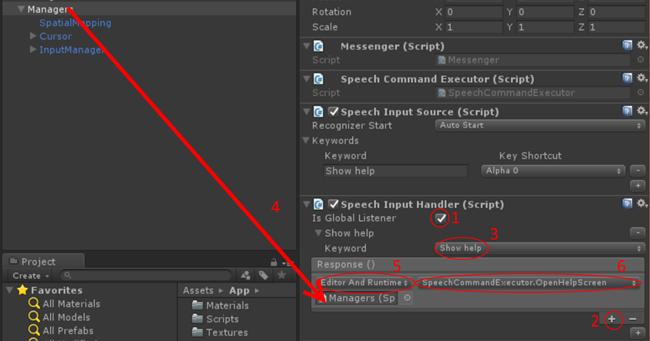
And then the work flow is a follows

image

  1. Check the “Is Global Listener” checkbox (that is there because of a pull request by Yours Truly)
  2. Select the plus-button under “Responses”
  3. Select “Show help” from the keyword drop down
  4. Drag the Managers object from the Hierachy to the box under “Runtime only”
  5. Change “Runtime only” to “Editor and Runtime”
  6. Select “SpeechCommandExecutor” and then “OpenHelpScreen” from the right dropdown.

To test you have done everything ok:

In Assets/App/Scripts, double-click SpeechCommandExecutor.

image

This will open Visual Studio, on the SpeechCommandExecutor. Set a breakpoint on

Messenger.Instance.Broadcast(new ShowHelpMessage());

Hit F5, and return to Unity3D. Click the play button, and press “0”, or shout “Show help” if you think that’s funny (on my machine, speech recognition in the editor does not work on most occasions, thus I am very happy with the keys options).

If you have wired up everything correctly, the breakpoint should be hit. Stop Visual Studio and leave Unity Play Mode again. This part is done.

Making the screen follow your gaze

Another script from my HoloToolkitExtensions, that I already mentioned in some form, is MoveByGaze. It looks like this:

using UnityEngine;
using HoloToolkit.Unity.InputModule;
using HoloToolkitExtensions.SpatialMapping;
using HoloToolkitExtensions.Utilities;

namespace HoloToolkitExtensions.Animation
{
    public class MoveByGaze : MonoBehaviour
    {
        public float MaxDistance = 2f;

        public float DistanceTrigger = 0.2f;

        public float Speed = 1.0f;

        private float _startTime;
        private float _delay = 0.5f;

        private bool _isJustEnabled;

        private Vector3 _lastMoveToLocation;

        public BaseRayStabilizer Stabilizer = null;

        public BaseSpatialMappingCollisionDetector CollisonDetector;

        // Use this for initialization
        void Start()
        {
            _startTime = Time.time + _delay;
            _isJustEnabled = true;
            if (CollisonDetector == null)
            {
                CollisonDetector = new DefaultMappingCollisionDetector();
            }
        }

        void OnEnable()
        {
            _isJustEnabled = true;
        }

        // Update is called once per frame
        void Update()
        {
            if ( _isBusy || _startTime > Time.time)
                return;

            var newPos = LookingDirectionHelpers.GetPostionInLookingDirection(2.0f, 
                GazeManager.Instance.Stabilizer);
            if ((newPos - _lastMoveToLocation).magnitude > DistanceTrigger || _isJustEnabled)
            {
                _isJustEnabled = false;
                var maxDelta = CollisonDetector.GetMaxDelta(newPos - transform.position);
                if (maxDelta != Vector3.zero)
                {
                    _isBusy = true;
                    newPos = transform.position + maxDelta;
                    LeanTween.moveLocal(gameObject, transform.position + maxDelta, 
                        2.0f * maxDelta.magnitude / Speed).setEaseInOutSine().setOnComplete(MovingDone);
                    _lastMoveToLocation = newPos;
                }
            }
        }

        private void MovingDone()
        {
            _isBusy = false;
        }

        private bool _isBusy;

    }
}

This is an updated, LeanTween (in stead of iTween) based version of a thing I already described before in this post so I won’t go over it in detail. You will find it in the Animation folder of the HoloToolkitExtensions in the demo project. It uses helper classes BaseSpatialMappingCollisionDetector, DefaultMappingCollisionDetector and SpatialMappingCollisionDetector that are also described in the same post – these are in the HoloToolkitExtensions/SpatialMapping folder of the demo project.

The short workflow, for if you don’t want to go back to that article:

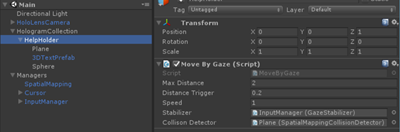
  • Add a SpatialMappingCollisionDetector to the Plane in the HelpHolder
  • Add a MoveByGaze to the HelpHolder itself
  • Drag the InputManager on top of the “Stabilizer” field in the MoveByGaze script
  • Drag the Plane on top of the “Collision Detector” field

The result should look like this

image

I would suggest updating “Speed” to 2.5 because although the screen moves nice and fluid, the default value is a bit slow for my taste. If you now press the Play Button in Unity, you will see the screen already following the gaze cursor if you move around with the mouse or the keyboard.

The only thing is, it is not always aligned to the camera. For that, we have the LookAtCamera script I already wrote about in October in part 3 of the HoloLens airplane tracker app, but I will show it here anyway:

using UnityEngine;

namespace HoloToolkitExtensions.Animation
{
    public class LookatCamera : MonoBehaviour
    {
        public float RotateAngle = 180f;

        void Update()
        {
            gameObject.transform.LookAt(Camera.main.transform);
            gameObject.transform.Rotate(Vector3.up, RotateAngle);
        }
    }
}

because it’s so small. The only change between this and the earlier version is that you know can set the the rotate angle in the editor ;). Drag it on top of the HelpHolder now the screen will always face the user after moving to a place right in front of it.

Fading in/out the help screen

In the first video you can see the screen fades nicely in on the voice command, and out when it’s clicked. The actual fading is done by no less than three classes, two of whom are inside the HoloToolkitExtensions. First is this simple FadeInOutController, that is actually usable all by itself:

using UnityEngine;

namespace HoloToolkitExtensions.Animation
{
    public class FadeInOutController : MonoBehaviour
    {
        public float FadeTime = 0.5f;

        protected bool IsVisible { get; private set; }
private bool _isBusy; public virtual void Start() { Fade(false, 0); } private void Fade(bool fadeIn, float time) { if (!_isBusy) { _isBusy = true; LeanTween.alpha(gameObject, fadeIn ? 1 : 0, time).setOnComplete(() => _isBusy = false); } } public virtual void Show() { IsVisible = true; Fade(true, FadeTime); } public virtual void Hide() { IsVisible = false; Fade(false, FadeTime); } } }

So this is a pretty simple behaviour that fades the current gameobject in or out, in a configurable timespan, and it makes sure it will not get interrupted while doing the fade. Also – notice it initially fades the gamobject out in zero time, so initially any gameobject with this behavior will be invisible

Next up is BaseTextScreenController, that is a child class of FadeInOutController:

using UnityEngine;
using System.Collections;
using System.Collections.Generic;
using System.Linq;

namespace HoloToolkitExtensions.Animation
{
    public class BaseTextScreenController : FadeInOutController
    {
        private List<MonoBehaviour> _allOtherBehaviours;

        // Use this for initialization
        public override void Start()
        {
            base.Start();
            _allOtherBehaviours = GetAllOtherBehaviours();
            SetComponentStatus(false);
        }

        public override void Show()
        {
            if (IsVisible)
            {
                return;
            }
            SetComponentStatus(true);
            var a = GetComponent<AudioSource>();
            if (a != null)
            {
                a.Play();
            }
            base.Show();
        }

        public override void Hide()
        {
            if (!IsVisible)
            {
                return;
            }
            base.Hide();
            StartCoroutine(WaitAndDeactivate());
        }

        IEnumerator WaitAndDeactivate()
        {
            yield return new WaitForSeconds(0.5f);
            SetComponentStatus(false);
        }
    }
}

So this override, on start, gathers all other behaviors, then de-activates components (this will be explained below). When Show is called, it first activates the the components, then tries to play a sound, then calls the base Show to unfade the control. If Hide is called, it first calls the base fade, then after a short wait starts to de-activate all components again.

So what is the deal with this? The other two missing routines are like this:

private List<MonoBehaviour> GetAllOtherBehaviours()
{
    var result = new List<Component>();
    GetComponents(result);
    var behaviors = result.OfType<MonoBehaviour>().Where(p => p != this).ToList();
    GetComponentsInChildren(result);
    behaviors.AddRange(result.OfType<MonoBehaviour>());
    return behaviors;
}

private void SetComponentStatus(bool active)
{
    foreach (var c in _allOtherBehaviours)
    {
        c.enabled = active;
    }
    for (var i = 0; i < transform.childCount; i++)
    {
        transform.GetChild(i).transform.gameObject.SetActive(active);
    }
}

As you can see, the first method simply finds all behaviors in the gameobject – the screen - and its immediate children, except for this behavior. If you supply “false” for “active”, it will first disable all behaviours (except the current one), and then it will set all child gameobjects to inactive. The point of this is that we have a lot of things happening in this screen. It’s following your gaze, checking for collisions, it’s spinning a button, and it’s waiting for clicks – all in vain as the screen is invisible. So this setup makes the whole screen dormant, disables all behaviors except the current one – and also can bring it back ‘to life’ again by supplying ‘true’. The important part is to do the right order (first the behaviours, then the gameobjects). It’s also important to gather the behaviours at the start, because once gameobjects are deactivated, you can’t get to their behaviors anymore.

The final class does nearly nothing – but this is the only app-specific class

using HoloToolkitExtensions.Animation;
using HoloToolkitExtensions.Messaging;

public class HelpTextController : BaseTextScreenController
{
    public override void Start()
    {
        base.Start();
        Messenger.Instance.AddListener<ShowHelpMessage>(ShowHelp);
    }

    private void ShowHelp(ShowHelpMessage arg1)
    {
        Show();
    }
}

Basically the only thing this does is make sure the Show method is called when a ShowHelpMessage is received. If you drag this HelpTextController on top of the HelpHolder and press the Unity play button, you see an empty screen in stead of the help screen. But if you press 0 or yell “show help” the screen will pop up.

Closing the screen by a button tap

So now the screen is initially invisible, it appears on a speech command – now how do we get rid of it again? With this very simple script the circle is closed:

using HoloToolkit.Unity.InputModule;
using UnityEngine;

namespace HoloToolkitExtensions.Animation
{
    public class CloseButton : MonoBehaviour, IInputClickHandler
    {
        private void Start()
        { }

        void Awake()
        {
            gameObject.SetActive(true);
        }

        public void OnInputClicked(InputClickedEventData eventData)
        {
            var h = gameObject.GetComponentInParent<BaseTextScreenController>();
            if (h != null)
            {
                h.Hide();
                var a = gameObject.GetComponent<AudioSource>();
                if (a != null)
                {
                    a.Play();
                }
            }
        }
    }
}

This a standard HoloToolkit IInputClickHandler – when the user clicks, it tries to find a BaseTextScreenController in the parent and calls the Hide method, effectively fading out the screen. And it tries to play a sound, too.

Some finishing audio touches

Two behaviours – the CloseButton and the BaseTextScreenController – try to play sound when they are activated. As I have stated multiple times before, having immediate audio feedback when a HoloLens image‘understands’ a user initiated action is vital, especially when that action’s execution may take some time. At no point you want the user to have a ‘huh it’s not doing anything’ feeling.

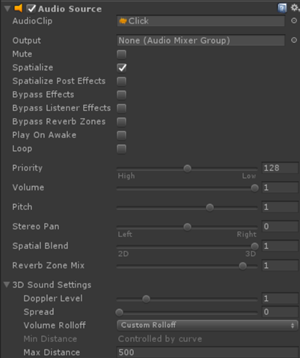
In the demo project I have included two audio files I use quite a lot – “Click” and “Ready”. “Click” should be added to the Sphere in HelpHolder. That is easily done by dragging it onto the Sphere from App/Scripts/Audio onto the Sphere. That will automatically create an AudioSource.

Important are the following settings:

  • Check the “Spatialize” checkbox
  • Uncheck the “Play on awake checkbox
  • Move the “Spatial Blend” slider all the way to the right
  • In the 3D sound settings section, set “Volume Roloff” to “Custom Rolloff”

Finally, drag “Ready” on top of the HelpHolder itself, where it will be picked up by the HelpTextController (which is a child class of BaseTextScreenController ) and apply the same settings. Although you might consider not using spatial sound here, because it’s not a sound that is particularly attached to a location – it’s a general confirmation sound

Conclusion

To be honest, a 2d-ish help screen feels a bit like a stopgap. You can also try to have a kind of video of audio message showing/telling the user about the options that are available. Ultimately you can think of an intelligent virtual assistant that teach you the intricacies of an immersive app. With the advent of ‘intelligent’ bots and stuff like LUIS it might actually become possible to have an app help you through it’s own functionality by having a simple questions-and-answers like conversation with it. I had quite an interesting discussion about this subject at Unity Unite Europe last Wednesday. But then again, since Roman times we have pointed people in right directions or conveyed commercial messages by using traffic signs and street signs – essentially 2D signs in a 3D world as well. Sometimes we used painted murals, or even statue like things. KISS sometimes just works.

The completed demo project can be downloaded here.

27 June 2017

A HoloLens helper class to get a position dead ahead of the user–on a physical object or at a max distance

This is a little tidbit I use in a lot of apps, for instance in the CubeBouncer and for floating info screens in my other apps. Basically I want to know a position dead ahead of the user, at a certain maximum distance, or closer by if the user is looking at a physical object that is closer by. Think of an invisible ray coming out of the HoloLens – I want to have a point where it strikes a physical object – and if there is no such thing within a certain maximum distance, I want a point along that ray at a maximum distance.

I made a little helper class for that, and it’s called LookingDirectionHelpers

using HoloToolkit.Unity.InputModule;
using HoloToolkit.Unity.SpatialMapping;
using UnityEngine;

namespace HoloToolkitExtensions.Utilities
{
    public static class LookingDirectionHelpers
    {
        public static Vector3 GetPostionInLookingDirection(float maxDistance = 2, 
            BaseRayStabilizer stabilizer = null )
        {
            RaycastHit hitInfo;
            var headReady = stabilizer != null
                ? stabilizer.StableRay
                : new Ray(Camera.main.transform.position, Camera.main.transform.forward);

            if (SpatialMappingManager.Instance != null &&
                Physics.Raycast(headReady, out hitInfo, maxDistance,
SpatialMappingManager.Instance.LayerMask)) { return hitInfo.point; } return CalculatePositionDeadAhead(maxDistance); } public static Vector3 CalculatePositionDeadAhead(float distance = 2, BaseRayStabilizer stabilizer = null) { return (stabilizer != null ? stabilizer.StableRay.origin + stabilizer.StableRay.direction : Camera.main.transform.position + Camera.main.transform.forward) .normalized * distance; } } }

Although it’s a small thing, it actually does quite a lot. If you call GetPostionInLookingDirection

  • It first tries to determine a so-called head ray. This can either come from the stabilizer or be directly calculated from the location and angle of the camera (that is, your head). I would recommend feeding it a stabilizer, as that makes for getting a much more reliable location.
  • If it actually finds a hit, it returns that point
  • If it does not, it uses CalculatePositionDeadAhead to, well, calculate a position dead ahead. It takes once again either the stabilizer head ray or calculates one from the camera, then normalizes it (i.e. makes it’s length 1) and then multiplies it with the desired distance. This effectively gives a point distance meters right before the user’s eyes.

This script requires the presence of a SpatialMappingManager prefab, for that’s the only way to find out which Unity layer contains the spatial mesh. If you want to call this script using a stabilizer (and I think you should), the InputManager should be present as well, as that will create a GazeManager singleton, which contains the stabilizer. So you can call this helper class like this:

var pos = LookingDirectionHelpers.GetPostionInLookingDirection(2.0f, GazeManager.Instance.Stabilizer);

And that will return you a point at either a Spatial Mesh, or at 2 meters distance from the user.

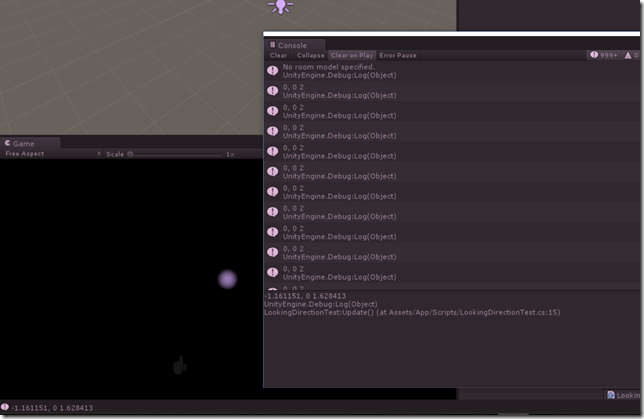
Although and the code involved is not very voluminous, I have gone all the way and made and – albeit pretty lame – minimalist demo for it that you can download here. This is based upon a HoloToolkit based setup as described here. All it does it, when you move around, is print the location onto the debug log. So this will only work in the Unity editor, on the HoloLens emulator, or on an app running in debug mode on an actual HoloLens – but you won’t see much happening on the device itself, just in debug windows on your screen.

image

But it shows how it works and can be used, and that is the point. Later in this blog we will see a better application for this.

26 June 2017

Building a floating HoloLens 'info screen' - 1: making the Unity assets

Intro

Those who have seen my HoloLens apps (most notably Walk the World) have noticed I tend to use floating "info screens", especially for help screens. My apps are mostly voice command driven as I don't like to have floating controls that are in view all of the time. They stress the fact that you are in an virtual environment, and that degrades the actual immersive experience, IMHO. So I go as much for gestures and voice as possible.

But where there are no visual clues for functionality, there's also lack of discoverability. So I tend to include a voice command "help" or "show help" that brings up a simple floating screen that shows what the app can do.

A few important things that you might not see right away:

  • The screen follows your gaze
  • The screen tries to move away from you to be readable, but will stop moving if it get's pushed against an obstacle. So it won't disappear into another hologram or a physical object, like the wall or a floor. Or at least it tries to. I must admit it does not always works perfectly.
  • Notice that at first it will appears like 1 meter before you and move into view, next time it will appears where you last left it and then move into view.

In a two-part post I will describe how I have created such a screen.

  • The first part will handle building the actual visual structure in Unity (and one little behaviour)
  • The second part describes the code for all other Unity behaviours.

I am going to assume you know a bit about Unity but not too much, so there's going to be lot of images.

Setting up a base project

imageThat's easy, as I described that in my previous blog post. Just make sure you download a HoloToolkit from June 16, 2017, or later. This includes this pull request by yours truly that we will need in this app. And while you are importing stuff, also import LeanTween from the Unity Asset Store (hit CTRL-9 to open it immediately without having to hunt it down in the menu). When doing so, make sure you deselect everything but the Plugisn checkbox.

The basic setup of an info screen

My info screens basically exist out of three simple components:

So let's build those!

Background plane

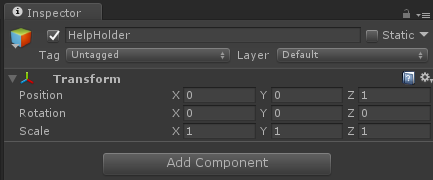
Inside the HologramCollection that we inherited from my previous post we will first make an empty game object that I called "HelpHolder" as this will be a help screen, but you can call it anything you like. To make designing a little easier, set it's Z position to 1, else it will be sitting over the camera, which is always on 0,0,0 in a HoloLens app. That kind of obscures the view.

image

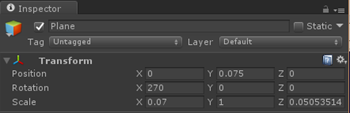
Inside that HelpHolder we first make a common Plane. This gives the standard, way too big 10x10m horizontal square. Change it's rotation to 270 and change X and Z scale to 0.07m (changing the Y scale makes no sense as a Plane essentially has no Y dimension).

image

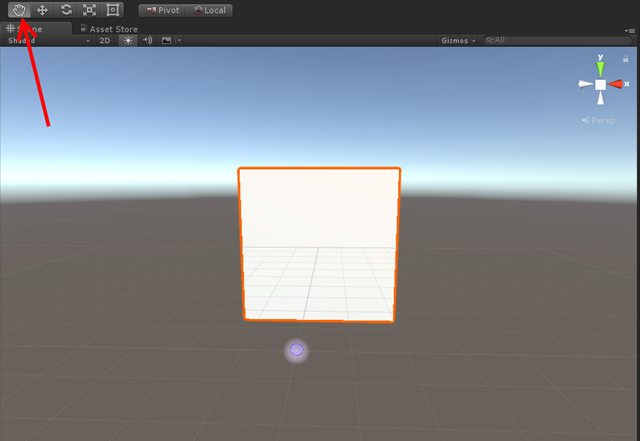
Double click the Plane in the HelpHolder - this will make your scene zoom in. Now use that hand button and left top the scene screen and the CTRL key to rotate around to you get to see the white side of the Plane (the other side is translucent). Notice the HoloLens cursor ;)

image

Now a white background for a text doesn't look good for me, I find it too bright. So we are going to make a material to make it look better.

To keep things organized, we first create an "App" folder in "Assets", and within that a "Materials" folder. In that Materials folder we create a HelpScreenMaterial Material

image

Setting some color and reflection

Now over on the right side:

  • Set "Shader" to "HoloToolkit/StandardFast"
  • Set "Rendering Mode" to "Transparent"
  • Set "Color" to a background color you fancy, I took a kind of sky blue (#0080FFFF)
  • Move the "Smoothness" slider all the way to the left - we don't want any reflections or stuff from this 'screen'

image

Now you only have to drag the material on your plane and it will turn blueish.

image

Rather standard Unity stuff this, but I thought it nice to point it out for beginners.

Changing the collider

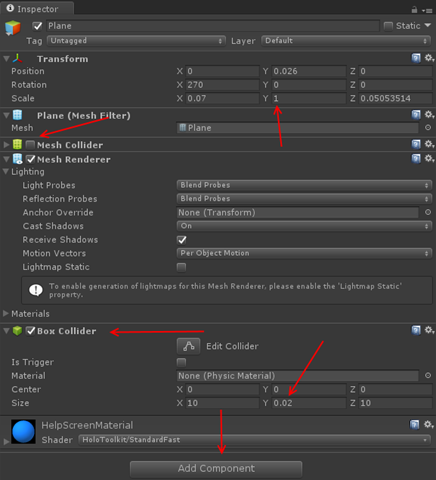
A Collider is a component that determines how a game object collides with other objects. When you use primitive objects, those are of the same type as actual shape you use, although the names are not always the same. So a Sphere typically has a Sphere Collider, but a Cube has a Box Collider. There is no Plane collider, as a Plane is a generic Mesh - so it uses a Mesh Collider. And here we run into an issue, because a Plane typically has one side and it looks the Mesh Collider has that as well - and if not, it does not prevent the help window from getting pushed though the floor or a wall. As I found out  making this demo :D.

So select the Plane, hit the Add Component button at the bottom and add a Box Collider.

Then

  • Unselect the checkmark next to "Mesh Collider". This will disable the old Mesh Collider. A game object may have only one active Collider so we want to get rid of this. You can also delete it if you want using the dropdown that appears if you click the gear icon all the way to the right.
  • Put "0.02" in the Y filed in the "Size" Section. This will make the Collider as big as the blue plane, and 2 cm thick.

imageWhat may seem confusing is that the Collider claims it's 10 x10 meters in size. That is true, but it is also scaled to 0.07 in X direction, and 0.050535134 in Z direction. If you remember the default size of a Plane is 10x10, this makes the screen about 70 cm wide and 50 cm height, which looks like the size you saw on the video. A Plane has no thickness, so if the scale of Y is set to 1, the colliders width will be the actual size in the Y field.


imageIf you look at the screen on edge, you can see the green indicator lines showing the outline of the Collider:


Adding text

Find the 3DTextPrefab and drag it onto the HelpHolder:

image

It should end up under the Plane. Zoom a little in on the plane to see the text clearly.

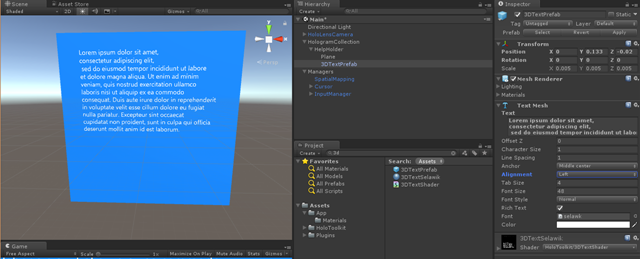
Now change the text into the help text you want (I took some Lorum Ipsum) and change some of the text settings:

image

  • Change Y to 0.133 (this will move the text towards the top of the 'screen', making room for the button later on).
  • Change Z to -0.02 (this will move the text to 2cm before the 'screen', this will prevent rendering issues later on
  • Change "Alignment" to left

I wish to stress the Y value hugely depends on the size of your text, the the font size, and the size of your  'help screen'. To get it right, it requires some fiddling around (as we will see later on).

Building the button - part 1

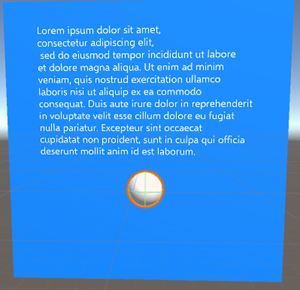
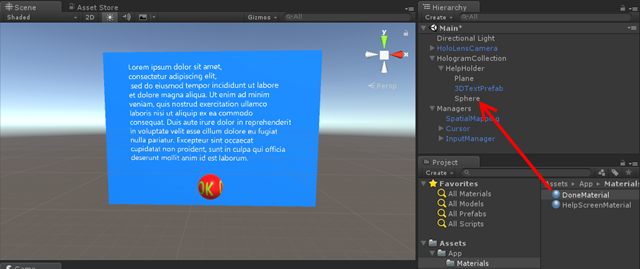
imageRight click the HelpHolder and add a Sphere. This will - like almost everything is initially - way too large. To change it's scale to 0.08 in all three dimensions. Then change it's Z-value to -0.045 (this will put the button in front of the 'screen' and also change the Z value to -0.01

This results in the following and now you can see where the fiddling starts, because that screen is too big for the text and the button it not quite where we want it

image

Some in-between fiddling around

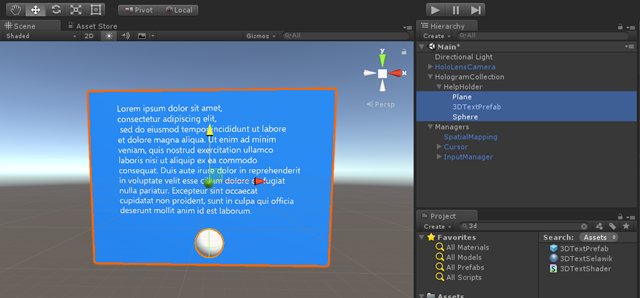
imageWith these two buttons you can very easily move (left) or resize (right) objects. Select the Plane, then select the desired function.


imageimage

By dragging the blue block in the left image you can change the screen size in vertical direction, the red block will do so in horizontal. With the yellow arrow (right image) you can move the plane upward until it is where you like it.

In my Inspector pane on the right it said this when I was done:

image

But... now all of or stuff is quite off center as far as the HelpHolder, the root object, is concerned. It's center point is pretty low on our screen, which means the screen it too high.

image

This can be fixed by selecting all three denizens of HelpHolder (using the CTRL button), select the Move button again, grab the yellow arrow and move the whole combination downward until the read arrow is more or less on the horizon.

image

It does not have to be a super precise hit, as long as it's not so much off center as it first was.

Building the button - part 2

A white sphere is not a button, so add some that makes sure you can click it. I think a real designer might have to say something about it, but I have found that a red texture with a large OK text on it works - in the sense that I never had to explain to anyone that it's something you can air tap and that will act like something of a button. So I created this awesome :D picture, created a "Texture" folder under app and put it there

imageimage

It's odd shape will become clear soon.

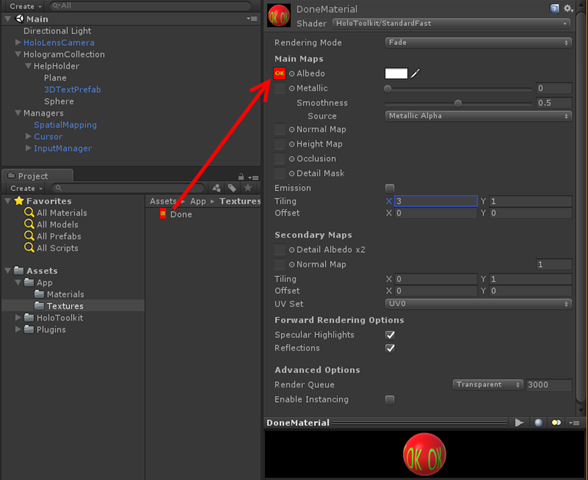
First, create a "DoneMaterial" in Materials. Then:

  • Set "Shader" once again to "HoloToolkit/StandardFast"
  • Set "Rending Mode" to "Fade" (not Transparent)
  • Select the "Textures" folder in the App/Assets folder, and drag the "Done" texture on top of the little square left of the "Albedo" text
  • Change the X value of "Emissions/Tiling" to 3. This will morph three images on the Sphere, repeating them horizontally.

image

If you have done everything correct, you will see the material looks like above.

Now drag the DoneMaterial from the Materials folder onto the Sphere in the Hierarchy

image

And the button on the screen looks already familiar :). I left the default Shader settings as it's a bit smooth, so it looks like it reflects a little light adding to it's 3D appearance.

Turn off shadows

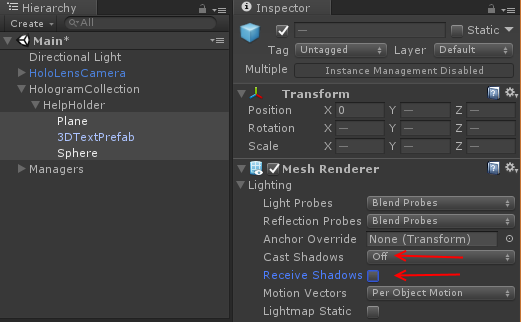
This is a thing trick I learned from Dennis Vroegop, long time Microsoft MVP, my unofficial MVP 'mentor' who learned me to deal with suddenly being a Microsoft MVP too way back in 201,1 and long time expert on Natural User Interface. The trick is this: unless your app really really uses them for some reasons, turn off "receive shadows" and "cast shadows" for the renderers of all three objects. As you can see the actual real light sources in your room through HoloLens, shadows will appear on the wrong places anyway and only give cause for confusion at best - at worse they will 'break the spell'. As a bonus, the Unity engine won't need to calculate the shadows so you will save some performance as well.

So select all three objects (use the CTRL key for that like in any other normal Windows program) and turn this off in one go:

image

A little code for dessert

This is part of my HoloToolkitExtensions libary, that I one day will publish in full, but, well, time. It is called HorizontalSpinner, and basically is the grandchild of the SimpleRotator that briefly passed by (without explaination) in my post about a generic toggle component for HoloLens. It uses LeanTween and looks like this:

using UnityEngine;

namespace HoloToolkitExtensions.Animation
{
    public class HorizontalSpinner: MonoBehaviour
    {
        public float SpinTime = 2.5f;

        public bool AbsoluteAxis = false;

        private void Start()
        {
            if (AbsoluteAxis)
            {
                LeanTween.rotateAround(gameObject, Vector3.up, 360 / 3.0f, 
                   SpinTime / 3.0f).setLoopClamp();
            }
            else
            {
                var rotation = Quaternion.AngleAxis(360f / 3.0f, Vector3.up).eulerAngles;
                LeanTween.rotateLocal(gameObject, rotation, SpinTime / 3.0f).setLoopClamp();
            }
        }

        private void OnEnable()
        {
            LeanTween.resume(gameObject);
        }

        private void OnDisable()
        {
            LeanTween.pause(gameObject);
        }
    }
}


Default this spins an object around for 120° in local space. Since our the tiling of our 'button' is 3 in X direction, this will look like the button spins around in 2.5 seconds, while in reality, it will jump back to it's original position. But as you can see if you press the Unity Play button, it looks like the button is rotating around endlessly. LeanTween is doing most of the work: it rotates the game object around and the setLoopClamp at the end makes it a loop. No need for coroutines, lerps, and heaven knows what.

I am using local space because I want the button to perpendicular to the user's view at any given moment, but since the screen moves around with the user's gaze and gaze angle, it needs to be in the local space of the HelpHolder.

The HorizontalSpinner is in HoloToolkitExtensions/Scripts/Animations. Simply drag it on top of the Sphere, then change values as you like, although I would recommend not changing the Absolute Axis setting.

Conclusion

We have built the visual parts of a help screen but with very little functionality or interaction. It's actually not hard to do, if you know what you are doing. I hope I have helped you getting a bit more feeling for that.

In the next installment, which will hardly contain images, we will see WAY more code.

The project so far can be found at GitHub, as always.
14 June 2017

Setting up a HoloLens project with the HoloToolkit - June 2017 edition

Preface with lame apologies

My apologies for the longest blogging hiatus in the history of this blog, I was very busy with things both HoloLens and not-HoloLens related. Chief culprit though was my HoloLens app "Walk the World", whose development completely captured and absorbed me. Passion for tech sometimes does that with me ;). Then came some work-related issues, but now I finally am up to speed again.

Intro

A consequence of the hiatus is a lot of change (the only thing that changes faster than your average JavaScript-framework-of-the-month is the HoloToolkit) so any HoloLens how-to blog post I'd start with I would have to start with 'how to set up a project'. So I make a little separate post of that subject, thus I can refer to it often. Until the HoloToolkit changes again ;)

File/new project and Getting what you need

First, start a new Unity Project. I have called mine June2017HoloLensSetup.

Then, you open a browser and go to Rafael Rivera's  HoloToolkit download site and you click the top HoloToolkit-somenumber-unitypackage. At the time of this writing the top looks like this:

image. 

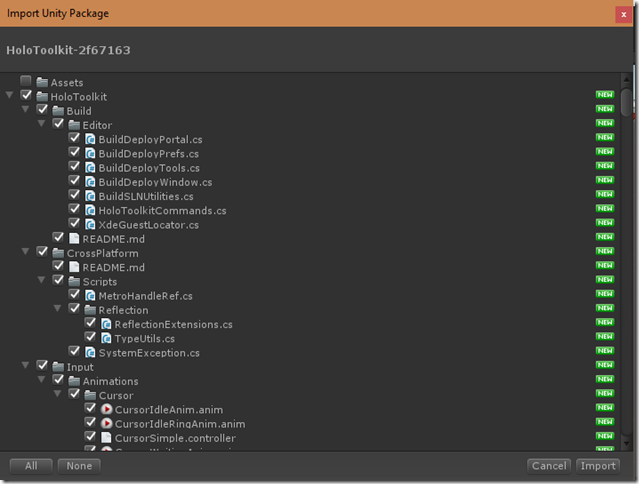
Downlaod and double click the resulting .unitypackage file - Unity will automatically import it into your project. This will give you a window with a lot of checkboxes:

image

This looks a bit intimidating, but just collapse the HoloToolkit node in the list, that will reveal another node "HoloToolkit-test" that you don't need, and you can de-select itimage

And then hit the Import-button. Then very soon, Unity will show a popup:

image

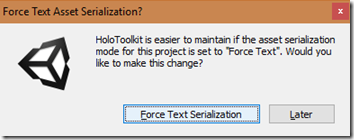
Select "Force Text Serialization". This is very important if you want to be able to easily upgrade the HoloToolkit and be able to check it in into your source control of choice.

The HoloToolkit will now be imported. Well, that was not so hard, wasn't it? This is time to get some coffee as Unity will churn a little on this.
Setting up the camera

HoloLens apps need some settings applied to the camera, and the HoloToolkit folks have taken care of that. So first of all, you delete the Main Camera from your Hierarchy - just select it and delete it.

image

Then, find the HoloLensCamera by entering "Camera" into the search box indicated with a red ellipse, and drag the new Camera into your hierarchy

image 

This is also a good moment to save your scene. Hit CTRL+S (or click File/Save Scenes), enter an name for your scene (I usually take "Main") and you are done with the this part.

Setting a whole lot of properties - the easy way

Now you may not have noticed it, but after importing the HoloToolkit you got an extra extra menu options.

image

This was added because you have to set a whole lot of properties necessary for or beneficial to a HoloLens projects -  scattered all over Unity, and good luck to you determining what you forgot if something doesn't work and where you have to correct that. Those were the bad old days (like a year ago ;) ). Now it's easy.

Clicking "Apply HoloLens Scene Settings" gives you this popup. Make sure everything is selected, then hit Apply. Always hit apply!

image

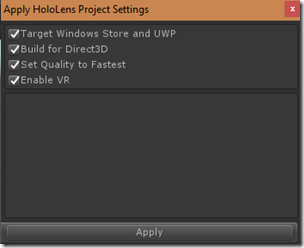
Next up is "Apply HoloLens Project Settings"

image

Same procedure: make sure everything is selected, hit apply. Unity asks if you want to reload the project - click Yes and wait for the project to reload. Finally, "Apply HoloLens Capability Settings"

image

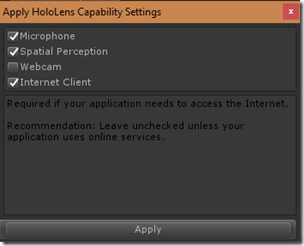
This is what I always select - my HoloLens apps all tend to use voice commands, all use Spatial Perception (that is, after all, HoloLens' biggest USP) and most of them download some data from the internet. I never use the camera. Make your selections according to your necessary capabilities and hit apply.

Sound should be Spatial!

For some reason this is not part of these nice HoloToolkit setup screens - but if you use spatial sound in your apps (and you should!) there is an extra step. You select "Edit/Project Settings/Audio" like this

image

"Project settings is almost all the way down in a long Edit menu. Now on the right side of the editor, all the way on the top, a new menu has appeared:

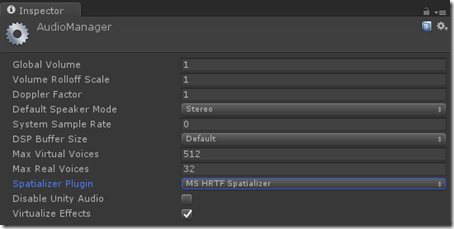
image

The Spatializer Plugin is default set to "none", which will give you the default Unity stereo sound - nice, but that's sub-optimal usage of a $3K (or $5K) HoloLens - we want real spatial sound. So set it to MS HRTF Spatializer. This is, by the way, a very important and often overlooked part of immersive experiences. Human beings are 3D aware not only by vision, but also by sound. Think for instance of how you move around in a city, you hear cars coming to you even if they are outside of your vision (and that has more than once saved my life). In your house, there is the hum of the air conditioner, the bubbling of the fish tank filter, the voice of your partner - you don't have to see any one of those, but still you can tell where they are. It all contributes to your 3D awareness - and so does spatial sound contribute heavily to an immersive holographic experience.

So far for this soapbox moment ;).

Some organizing

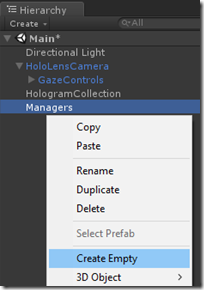
It tend to create two empty gameobjects - HologramCollection and Managers. The HologramCollection will actually hold Holograms that are part of the application, the Managers object is like a container for global functions, object and standard stuff.

image

Some standard stuff to always add

What (I think) you will always need is an InputManager (the thing that acts as a kind of hub for all input, be it gestures, speech or whatever), SpatialMapping (duh) and some kind of cursor. I usually take the object that is just called "Cursor", there's also "DefaultCursor" and "CursorWithFeedback".

image

The easiest way to find them is once again entering their name in the search box. Now this can sometimes give cause for some confusion. For instance, if you enter "Cursor" in the search box you will get a lot of hits.

image

Only choose the so-called prefabs, the things that get the simple sky blue cube next to it. The same goes, by the way, for InputManager and SpatialMapping. Always take the prefabs.

When you are done adding SpatialMapping, find the property "Surface Material" and change it to "Occlusion" by clicking the little circle button behind it. Then, select it from the "Select Material" window that pops up

image

Finally some stubbornness

The current settings make that stuff is clipped when you are within 85cm of a Hologram. There are good technical and performance reasons for it, yet I am a stubborn *** ** * ***** so I tend to make this 15 cm. image

Simply because I think it's cool to get that close to a Hologram.

A final word on source control

Assuming you use Git, making a good .gitignore is pretty hard. Especially the HoloToolkit contains stuff you would expect not to reside in a source repository, there's all kinds of dlls in it and folders called x86 and x64, typically folders that are part of a build path and should usually be ignored. I've been bitten so many times by just that little piece of the HoloToolkit, especially when upgrading. Therefore a hard-won piece of advice: if you value your sanity, put a .gitignore file in Assets\HoloToolkit containing just these lines:

!*.*
!*

That should always add everything, I think.

You can download the (empty) project for reference, with my .gitignore files (there are no less than three) here.