17 November 2019

Migrating to MRKT2 - making a 'hand palm' menu

Intro

In all modesty I think I pretty much nailed making simple 'user interfaces' for HoloLens 1 - simple dialogs and stuff. Clients told me 'even a moron can understand how to operate this' so I think I did allright. But stuff floating in thin air wasn't always ideal. And now with HoloLens 2, we can actually let stick stuff to hands, in stead of just the gaze. So I decide to check if I could make a menu that stuck in the palm of your hand. Turned out I could.

And it's ridiculously easy to boot.

Creating a hand palm menu
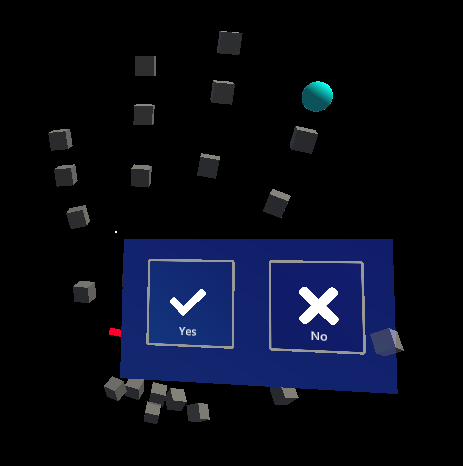
This was actually just built from the UX components in the MRKT2.
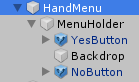
These are literally only two "PressableButtonHoloLens2" prefabs floating about 2cm before a quad that has this material:

Then I added a Solver Handler to the HandMenu
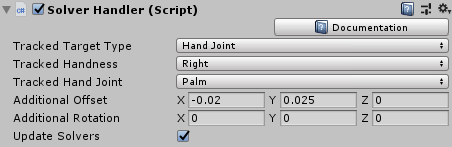
I had to fiddle a bit with the settings, especially the additional offset - to determine where exactly the menu is going to appear in relation to the palm. How these parameters exactly work is a bit unclear with me, so I used the scientific method: I started to change the numbers till things happened the way I liked ;)

And finally I added a Hand Constraint Palm Up with these settings
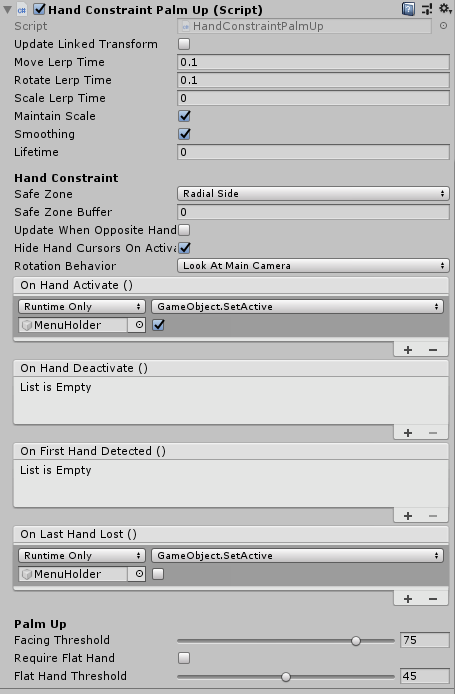
And this is basically all you have to do to have the menu appear.

Some configuration settings

Although this works with the 'normal' simulated hand setting as well, it's best viewed with the 'flat' hand palm. To get this, starting with

  • The Mixed Reality Toolkit Profile (Cloned from DefaultHoloLens2ConfigurationProfile)
  • The Input System Profile
  • The Input Simulation Profile

Then you have to expand the "Input Simulation Service" section, scroll all the way down to "Hand Gesture Settings" and change the settings there as follows:
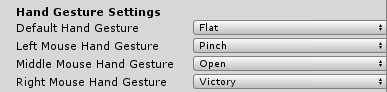
These are my default settings - but for this demo actually only the top setting is important (Default Hand Gesture to "Flat")

Testing the menu

I think it's safe to say that most of the people reading this - including me - don't have a HoloLens 2. Fortunately you can test this quite easily in the editor. To get to the point shown in the first picture in this post, simply do the following:

  1. Start play mode
  2. Move the mouse cursor inside the game window
  3. Press the Space bar and keep it down- the right hand should now appear
  4. While keeping the space bar pressed down, also press the left control key on your keyboard and keep it down
  5. With your other hand, slowly move the mouse to the left. The hand should now start to rotate in stead of move
  6. When you have rotated the hand just past the 90° angle, the menu should appear.

Making it actually do something

You might have noticed the buttons don't do anything at this stage. So I created a little helper behaviour that shows "Yes" or "No" depending on which button you press. It's not very sophisticated:

  • It simply follows the actual hand menu around
  • It has a public method "ShowYes" and "ShowNo" that can be hooked up to the buttons to show something when they are pressed.

It sits in a "ResponseHelper" game object and the hookup to the button is therefore simple, as the YesButton shows:
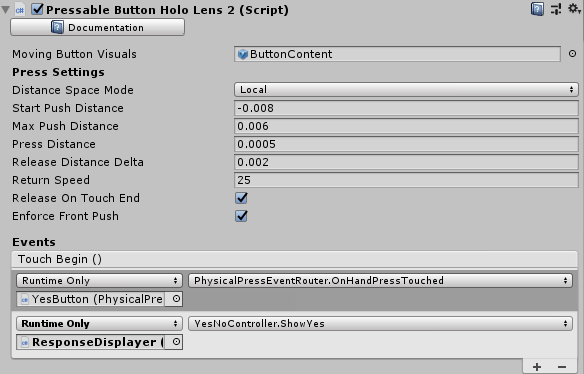
The actual working is displayed in this little video:

The trick to make the right hand stay while you operate the left hand is:

  • Press Y once the right hand is in the desired position and rotation
  • Release space bar and control key (right hand stays where it is, you are just longer controlling it)
  • Press the left shift key - the left hand should now appear
  • While keeping the left shift key pressed, you can move the left hand with the mouse. To move it forward and backward like in the movie, rotate the mouse wheel. This way you can actually make the index finger touch the buttons

Conclusion

Building a hand palm menu is really easy and basically requires no code. How this will work on a real HoloLens 2 - only time will tell. In the mean time you can find the demo project here.

26 September 2019

Migrating to MRTK2 - setting up and understanding Eye Tracking

Intro

One of the exiting features HoloLens 2 brings us, is Eye Tracking. On HoloLens 1, you had to move your whole head to move the gaze cursor. and while that works well enough for a lot of applications and it seems most people pretty quickly got used to it, mother Nature has equipped us with roving eyes. HoloLens 2, when calibrated for Eye Tracking, can actually track what your are looking at, not merely where your head is pointed at.

Although there is a nice demo in the Mixed Reality Toolkit 2, it took me a while to find out how all the events actually work and need to be hooked up to get it to work consistently. So I made a little demo that works like this:

Events and tracking them

The little blue globe is the target, is equipped with and EyeTrackingTarget script from the MRTK2 that supports five events, which you can see going off as the red spheres turns green

  • LS: On Look At Start
  • WL: While Looking At Target
  • LA: On Look Away
  • DW: On Dwell
  • S: On Selected

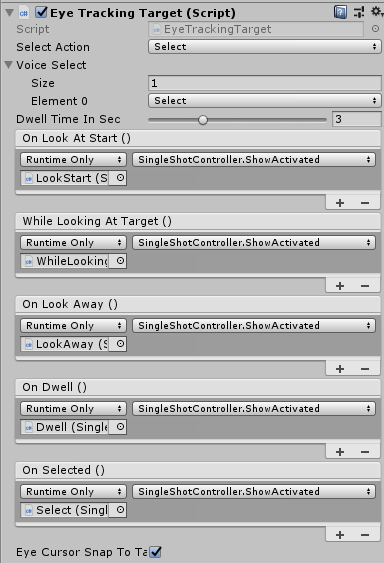
The EyeTrackingTarget is configured as follows:

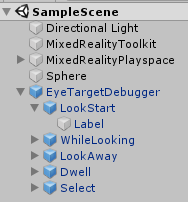
In the scene, the whole thing showing the images (the five little red-turning-green globes with labels) is one prefab containing 5 little spheres with a label above it - each a prefab on its own. Every sphere has a "Single Shot Controller" script that turns it's sphere green for 0.5 seconds when an event is called.
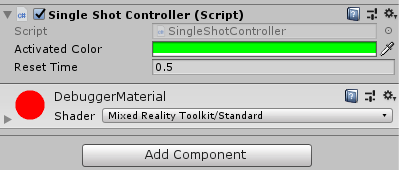
It's a super simple script, the interesting part is even shorter:

public void ShowActivated()
{
    _timeActivated = Time.time;
}

void Update()
{
    var desiredColor = Time.time - _timeActivated > _resetTime ? 
        _originalColor : _activatedColor;
    if (_material.color != desiredColor)
    {
        _material.color = desiredColor;
    }
}

When ShowActivated is called, the _timeActivated field is set to now. The Update loop then checks every 60th of a second whether it should set the color to red or green, depending on the fact if the latest call to ShowActivated is already half a second ago.

What happens when

The event names are pretty straightforward, and things happen more or less than you expect, although

What is actually happening:

  • When the user first looks at the eye tracked object, "On Look Start" is fired once
  • While the user keeps looking, "While Looking At Target" keeps being called. Thus, the green sphere stays green. The calling seems to at the same instant - or nearly the same instant - as the previous event
  • As soon as the user stops looking at the sphere, "On Look Away" is called and "While Looking At Target" is stopped being called
  • "On Dwell" is being called after the time defined in the "Dwell Time in Sec" slider has passed has the user is still looking at the object. I took the ridiculously user-unfriendly time of three seconds to make sure this event was easily distinguishable from the other events. Here's the thing though - it's being called once. That kind of confused me.
  • "On Selected" is being called when then object being looked at and you say "Select". This is one of the predefined commands in the default speech commands profile (DefaultMixedRealitySpeechCommandsProfile)

Setting up and configuring eye tracking in profiles

Coming from the default profile, you will need to configure at least profiles, and better still three.

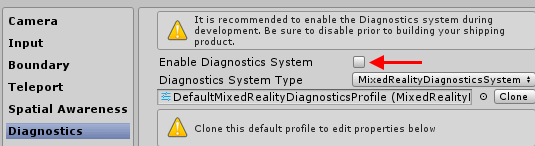
First, you will need to clone the Default Toolkit profile itself. First thing I do, while still in the early phases, is disabling the diagnostics system as I don't want that profiler in my face the whole time:

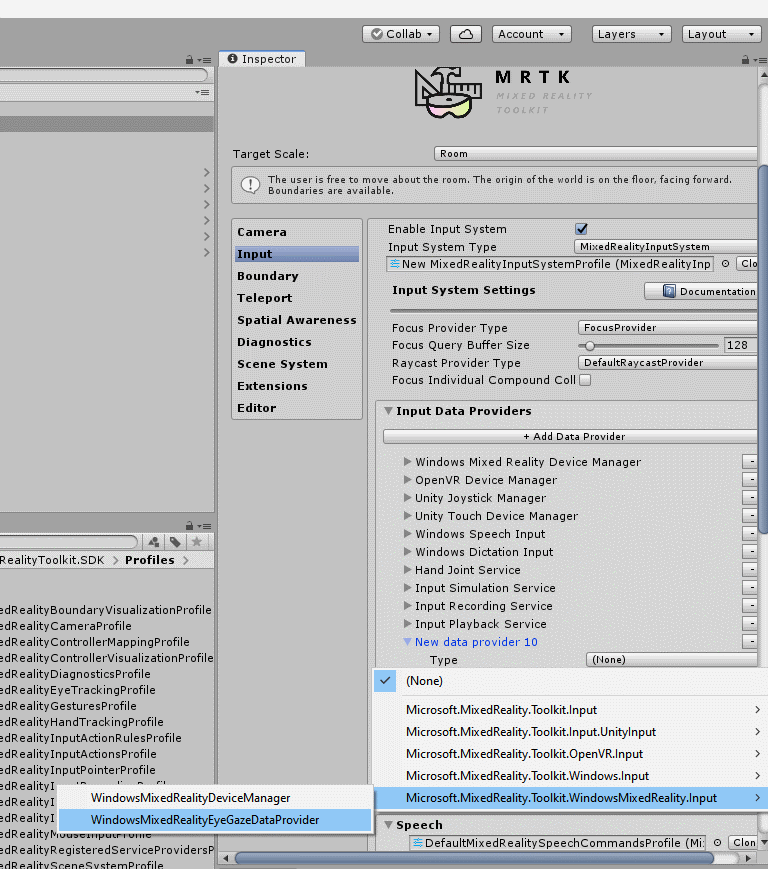
Next, you will have to clone the Input System Profile and add a Windows Mixed Reality Eye Gaze Provider"

As you can see, this sits in namespace "Microsoft.MixedReality.Toolkit.WindowsMixedReality.Input"

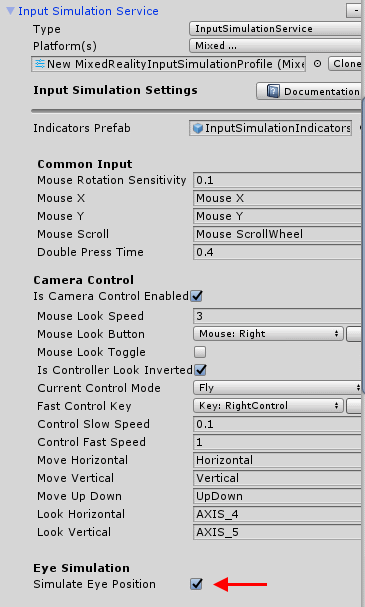
And then finally, and optionally, if you want this to work in the editor too, you will have to configure the Input Simulation Service. You do that by cloning the default input system profile and check the "Simulate Eye Position" checkbox

One more thing: setting capabilities

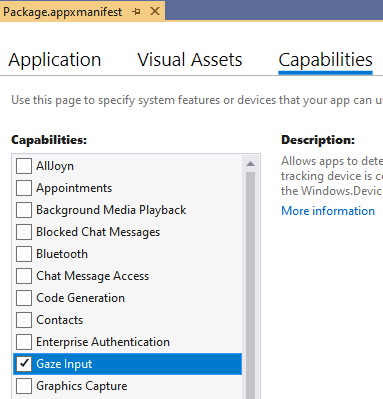
You will notice now the Gaze cursor turning up in the editor so you might thing you are done. Well, almost. There's the small matter of capabilities. C++ or not, the result is still a UWP app, and Gaze Input is a capability that you need to ask consent for. This, unfortunately, is not yet implemented in Unity. So after you generated the C++ app, you will need to open it in Visual Studio, select the Package.appmanifest file, and select there the Gaze Input capability.
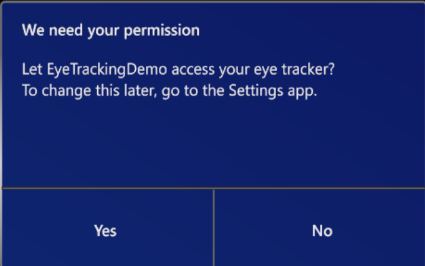
 If you deploy the resulting solution to an emulator (or, if you are one of the lucky ones out there, an actual HoloLens 2) and it asks for your consent, you did it right.
Conclusion and final words

Setting up Eye Tracking is not that hard, but it takes a few steps. Mind you the MRTK2 comes with a few profiles that make settings things up easier - I just wrote down the steps from scratch. The demo project shows this in all it's glory ;) and allows you to play with it yourself without having to set it up. Notice there's hardly any code outside of the MRKT2 itself involved - there's only one custom script (my SingleShotController) and that's very simple.

By the way - in my own (so far single) HoloLens 2 app I only use the On While Looking event. This seems to be the most trustworthy. I previous iterations of the MRTK2 and/or the HoloLens emulator the other events did not go off reliably enough (IMHO) to use them for real. Of course, this may all be different now, and most likely is completely different (better) on a real device. We are still waiting for that.

On a final note – leaving the eye cursor visible can be confusing and/or annoying, or so I have been told. So under normal circumstances, it should be turned off – the object being looked should give some indication it is notices being looked at. I have found a way to do this myself, but that’s pretty complex, and just as I was about to blog about that, Julia Schwarz herself added a (better) sample to turn off pointers by code to the main MRTK2 repo.

05 September 2019

Migrating to MRTK2–submitting a HoloLens 2 app to the Microsoft Store

Intro

On Monday September 2 version 4.0.19 of my first HoloLens Store app, AMS HoloATC, became available in the Microsoft Store. This version has been completely rebuilt using the Mixed Reality Toolkit 2, and includes some HoloLens 2–only functionality: you can actually touch the airplanes now, and using gaze tracking it will show you a picture of the actual aircraft, if available.

Hoops to jump

As you might recall from earlier posts, things have changed quite a bit when it comes to actually deploying apps on HoloLens. Now, we will need compiling and submitting a Unity-generated C++ solution to the store. Although the process looks very much like we used to do for Unity apps running on the .NET backend, there are three things you might run into:

  1. Your WACK test will most likely fail
  2. If you have submitted your app as a bundle before, make sure you submit it as a bundle again. A Unity generated C++ solution does not have this as a default setting
  3. If you create (like me) an app that is supposed to run on Desktop (in immersive head sets), HoloLens 1 and HoloLens 2 you may find out your app cannot be downloaded by a HoloLens 1 anymore – or the HoloLens 2 emulator, for what matters

Fixing the WACK fail

Before you actually submit an app to the Store, you do the Windows Application Certification test first, to prevent embarrassing easy-to-prevent fails, right. (right?). And if you do so, you will see it fail. It will spout quite some errors at you.

  • The Windows security features test will complain about:
    • HolographicAppRemoting.dll has failed the AppContainerCheck check.
    • PerceptionDevice.dll has failed the AppContainerCheck check.
    • UnityRemotingWMR.dll has failed the AppContainerCheck check.
  • The Supported API test will list 10 errors concerning UnityRemotingWMR calling unsupported APIs
  • The Debug configuration test will tell youUnity RemotingWMR is only built in debug mode
  • And if you try to build for x86 or ARM, the Package sanity test will tell you HolographicAppRemoting.dll, PerceptionDevice.dll and UnityRemotingWMR.dll are only available for x64.

The solution is bit weird, but can be found in this Unity forum post, and involves manually hacking the “Unity Data.vcxitems” file that is inside your store projects. Open in it in a text editor, and search for “HolographicAppRemoting”. This will show this piece of XML:

<None Include="$(MSBuildThisFileDirectory)HolographicAppRemoting.dll">
  <DeploymentContent>true</DeploymentContent>
  <ExcludeFromResourceIndex>true</ExcludeFromResourceIndex>
</None>

Now simply change the value “true” inside the DeploymentContent to false:

<None Include="$(MSBuildThisFileDirectory)HolographicAppRemoting.dll">
  <DeploymentContent>false</DeploymentContent>
  <ExcludeFromResourceIndex>true</ExcludeFromResourceIndex>
</None>

Repeat this for PerceptionDevice and UnityRemotingWMR. Rebuild your app, generated packages again and presto, your WACK test will pass. That is literally all that’s needed to get rid of this multitude of errors.

Bundling your app

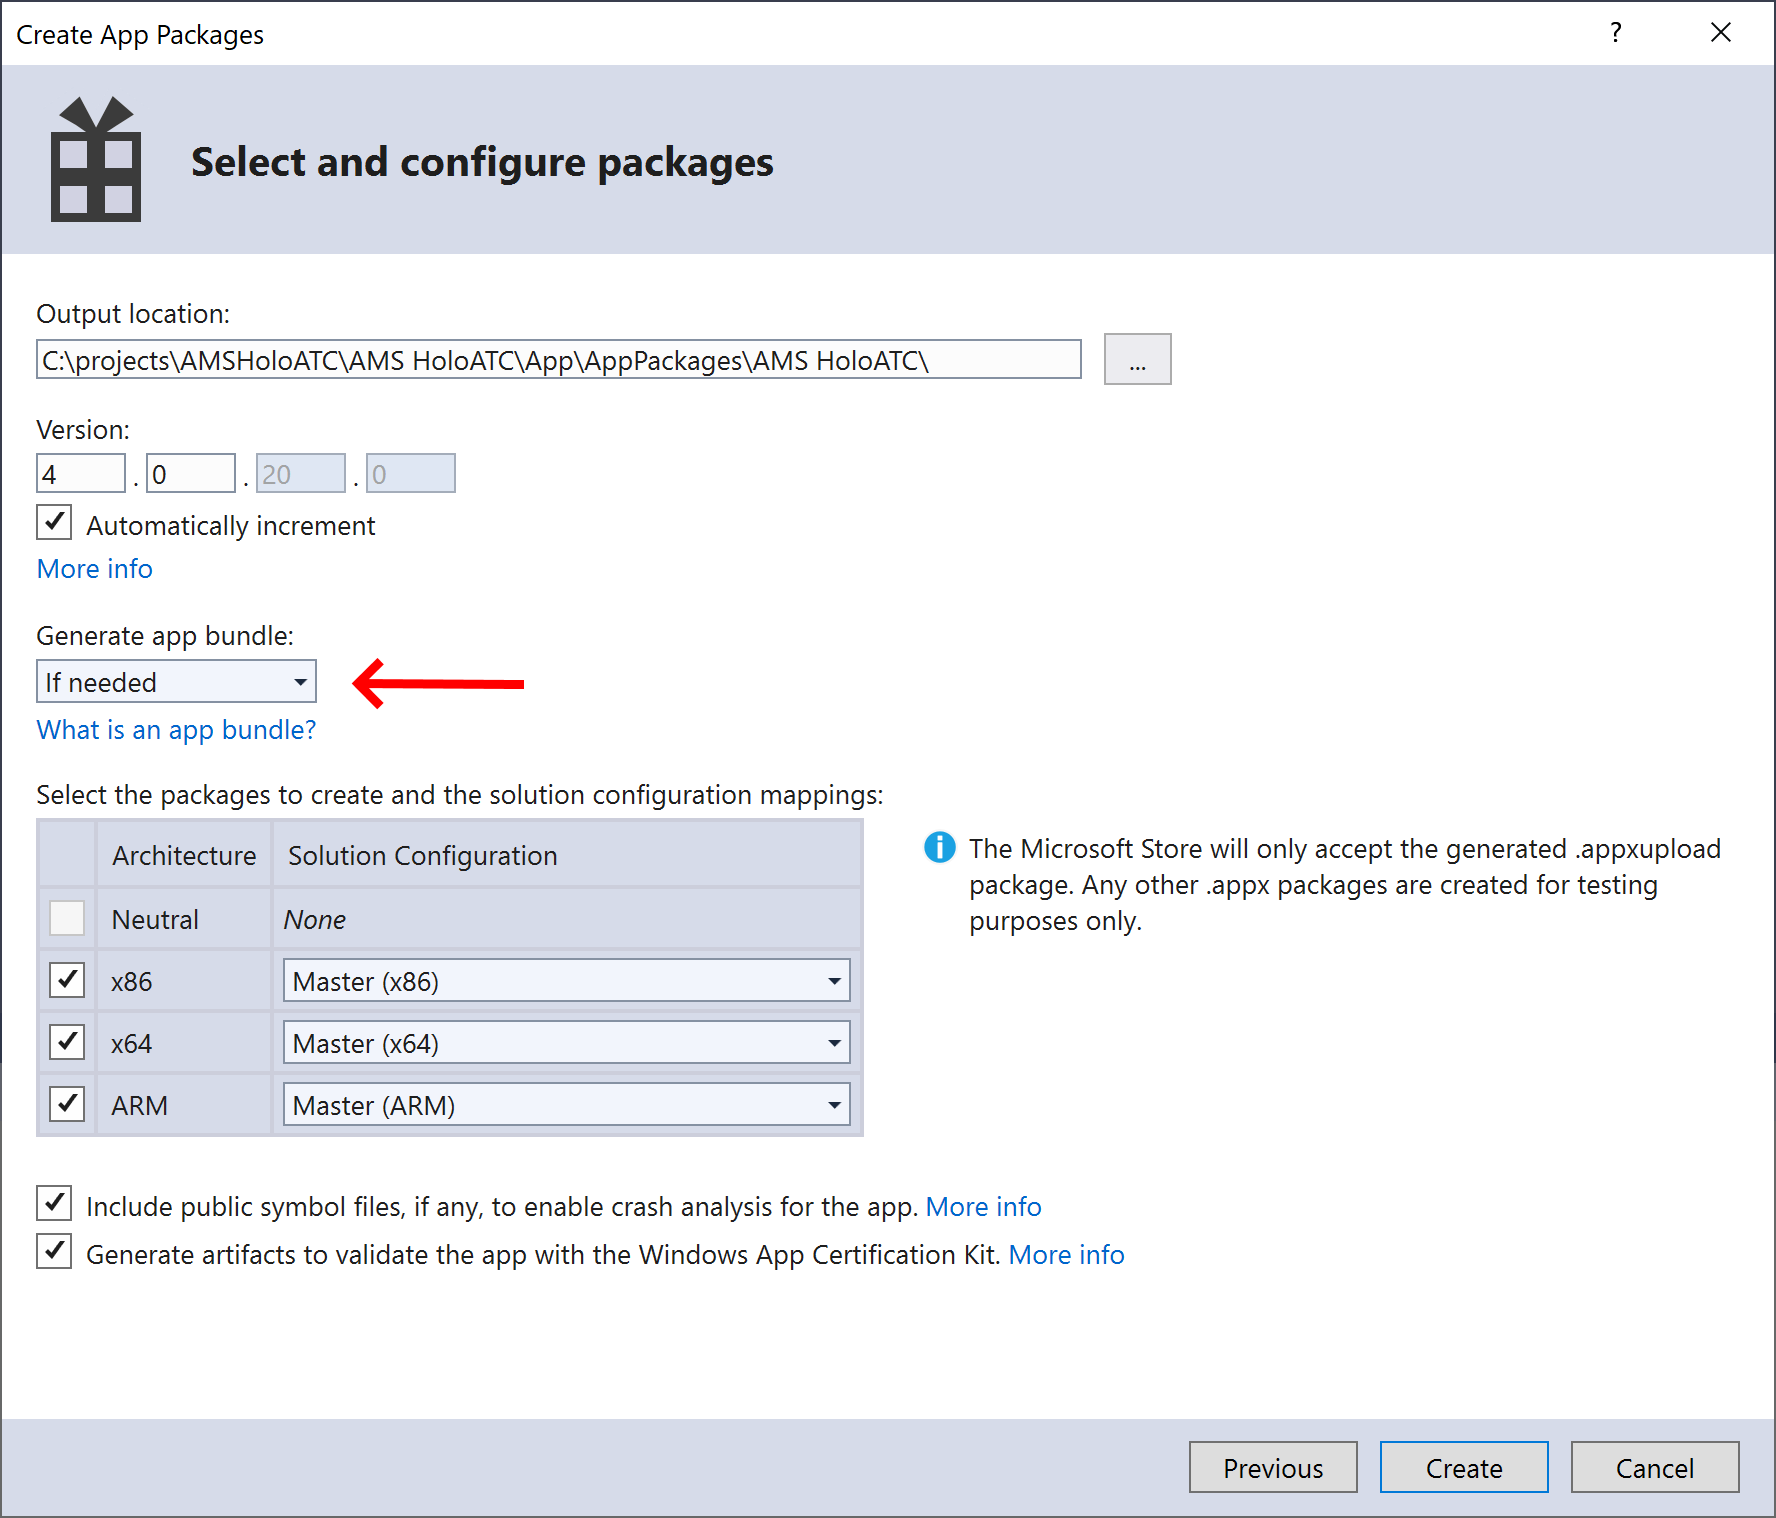
I don’t know exactly what changed, but all my HoloLens apps that I created with previous Unity versions were uploaded as bundles. To be honest, I never did pay much attention to it. But the default setting of the generated C++ setting is this:

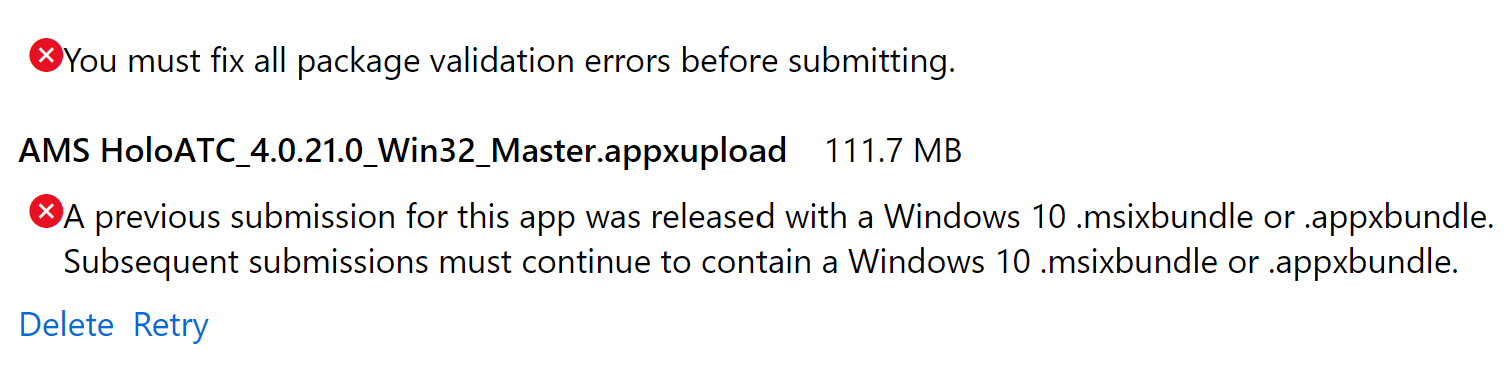
which generates an appx per platform (in my case three: one for x64, one for x86 and one for ARM for, in the same order, WMR immersive headsets, HoloLens 1 and HoloLens 2). If you try to upload those files as updates to an app that was previously submitted as a bundle you will be greeted with:

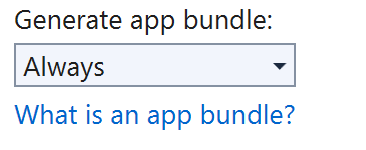
And this can simply be fixed by changing the setting “Generate app bundle” from “If needed” to “Always”

Make your app (still) downloadable for HoloLens 1

To be honest, 4.0.19 was not the first HoloLens 2 enabled version I submitted. That was 4.0.17. It got certified – as one of the first if not the very first indie HoloLens 2 app. I was very happy about this – for about 25 seconds. And then I got a very unpleasant surprise: I could not download it anymore on a HoloLens 1. Sure enough, you could find it in the store, but the “Install” button was greyed out (well, light blue in stead of dark blue, but in any case unoperational). Curiously enough, a HoloLens that had it already installed did get the updated version though.

The reason for this behavior can be found down in this post in the Unity forums. Basically, Unity dropped support for anything lower than DirectX 10 and this is listed now in the app’s store manifest. Unfortunately, when the Store on the HoloLens 1 (and the HoloLens 2 emulator, incidentally) checks for DirectX 10, the device apparently reports “don’t have that” and the Store consequently blocks download.

Now I think this will be fixed shortly, but in the mean time here’s a workaround for if you need do to a submission right now:

First, open the Package.AppManifest.xml file in a text editor. Find these lines:

<TargetDeviceFamily Name="Windows.Desktop" MinVersion="10.0.16299.0" MaxVersionTested="10.0.18362.0" />
<TargetDeviceFamily Name="Windows.Holographic" MinVersion="10.0.16299.0" MaxVersionTested="10.0.18362.0" /

Comment out the second line. Then proceed to build a bundle, but for x64 only.

Go back to Package.AppManifest.xml, uncomment the first line, and re-activate the second. Now find the StoreManifest.xml file – open it in a text editor. It should look like this:

<?xml version="1.0" encoding="utf-8"?>
<StoreManifest xmlns="http://schemas.microsoft.com/appx/2015/StoreManifest">
    <Dependencies>
        <DirectXDependency Name="D3D11_HWFL_10_0" />
    </Dependencies>
</StoreManifest>

Simply remove the line <DirectXDependency Name="D3D11_HWFL_10_0" />

Now build a package for x86 and ARM. I am not sure if this is essential, but I made sure the x86/ARM bundle was had a one release number one point higher than the x64.

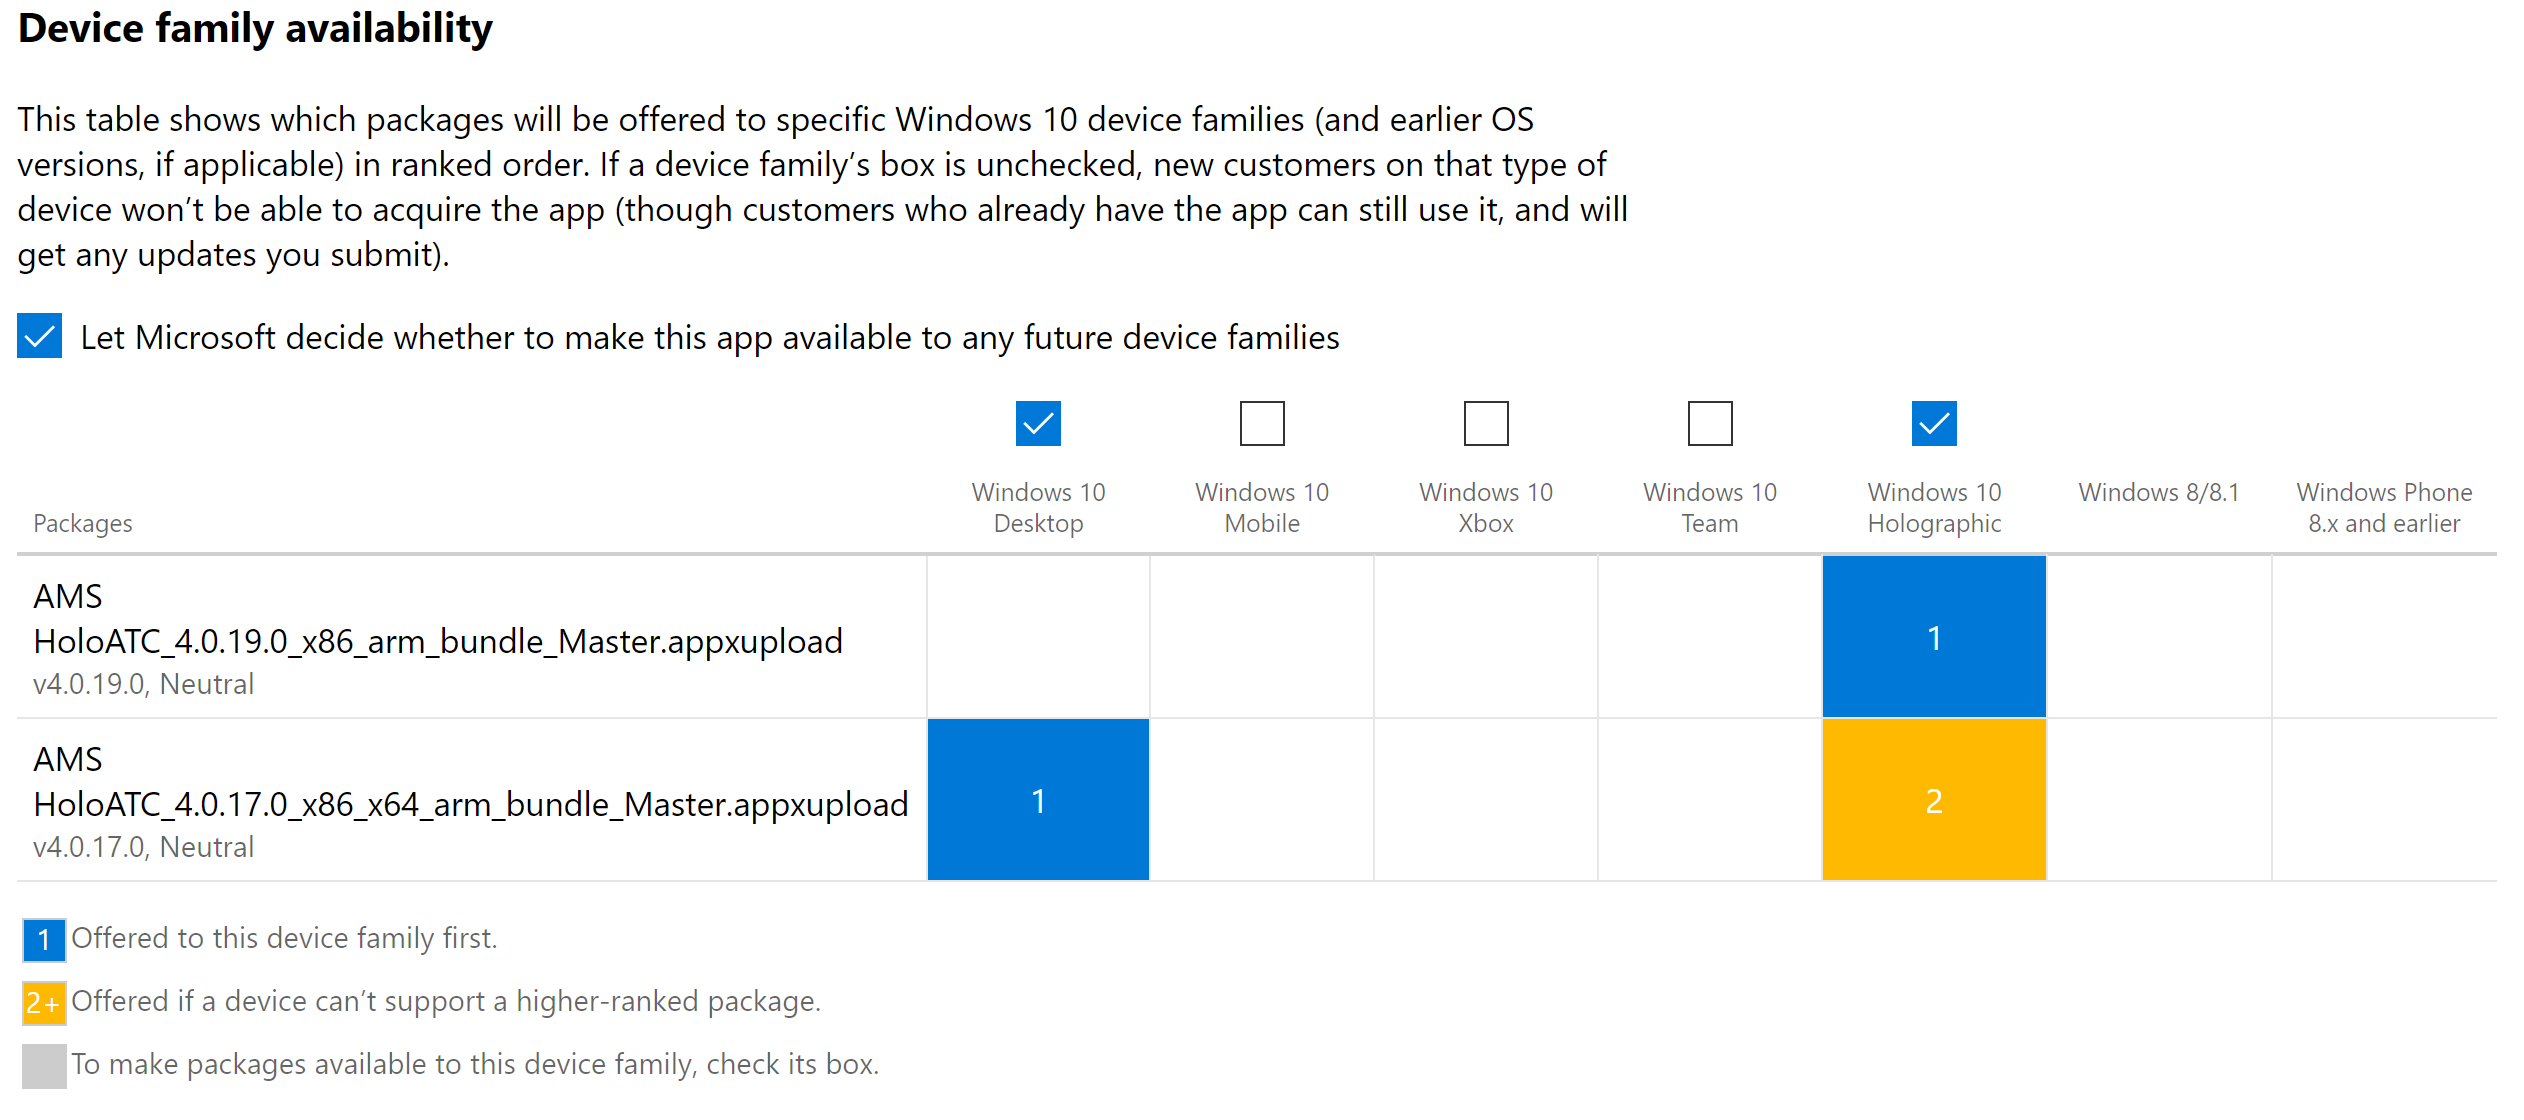
Now proceed to upload both bundles into a submission and set check boxes as needed. In my store submissions it looks like this:

Now as you can see version 4.0.17 still contains all platforms, but that is not necessary. But because the 4.0.19 has a higher version number, it will be offered first to HoloLens 1 and 2.

Anyway, now your app, once certified, should be downloadable for all devices. On x64 the DirectX 10 check will be still in place, for other devices it’s disabled.

Conclusion

It’s early days for HoloLens 2 (I built my app without having direct access to it) but I think it’s pretty cool to have an app armed and ready for it. It takes some fiddling around with xml files to get it right, but I am sure things will be better soon and these work arounds won’t be necessary anymore.

Enjoy building the next generation Mixed Reality apps!

13 August 2019

Migrating to MRTK2–interacting with the Spatial Map

Intro

One of the HoloLens’ great features is the ability to interact with real physical objects. This allows apps to place holograms on or adjacent to real objects, enables occlusion (the ability to let holograms appear to be hidden because they disappear behind physical objects), etc. This is all done using the Spatial Map, a graphical representation of whatever the HoloLens has observed to be present in the physical reality. Interacting with the Spatial map used to be easy – and it actually still isn't that hard, it’s just that - as with most of the things in the MRTK2 - quite some cheese has been moved

This blog post handles a common and a not so common scenario for interacting with the Spatial Map:

  1. Placing objects on the Spatial Map
  2. Programmatically enabling and disabling/clearing the Spatial Map

I have included a demo project that allows you to place cylinders on the Spatial Map by air tapping - and you can turn the Spatial Map on and off using a floating button.

Placing objects on the Spatial Map, MRKT2 style

I wrote about this already in November 2017 in my article about finding the floor using a HoloLens. In MRTK2, that process is a bit much different. Create a raycast from the Camera along the camera viewing angle and try to hit the Spatial Map. For this, you need the Spatial Map Layer mask. In the HoloToolkit you could simply access.

SpatialMappingManager.Instance.LayerMask

to get to that layer mask. Finding that now is a wee bit more complicated. You see, first, you need to extract the configuration from the Spatial Awareness System service like this:

var spatialMappingConfig =
CoreServices.SpatialAwarenessSystem.ConfigurationProfile as
     MixedRealitySpatialAwarenessMeshObserverProfile;

The spatial mapping config contains a property called ObserverConfigurations containing a list of of configurations (apparently taking provisions there might actually be more than one configuration). For each configuration you can take the profile from it's ObserverProfile property - that you have to cast to MixedRealitySpatialAwarenessMeshObserverProfile. Then you find the layer used by this config in it's MeshPhysicsLayer property.

I repeat - you can find the layer.

That is not the layer mask. It took me quite some time debugging to find out what was going on here - because if you feed that layer number into the raycast, it won't 'see' the Spatial Map. I have no idea why this was changed. Anyway, to get the layer mask, as required by raycast methods, you have to bit shift the actual layer number, like this

1 << observerProfile.MeshPhysicsLayer

So what used to be a single property, now requires this method:

private static int GetSpatialMeshMask()
{
    if (_meshPhysicsLayer == 0)
    {
        var spatialMappingConfig = 
          CoreServices.SpatialAwarenessSystem.ConfigurationProfile as
            MixedRealitySpatialAwarenessSystemProfile;
        if (spatialMappingConfig != null)
        {
            foreach (var config in spatialMappingConfig.ObserverConfigurations)
            {
                var observerProfile = config.ObserverProfile
                    as MixedRealitySpatialAwarenessMeshObserverProfile;
                if (observerProfile != null)
                {
                    _meshPhysicsLayer |= (1 << observerProfile.MeshPhysicsLayer);
                }
            }
        }
    }

    return _meshPhysicsLayer;
}

private static int _meshPhysicsLayer = 0;

And I added a static backing variable to speed up this process, otherwise this whole loop will be run 60 times a second in my TapToPlaceController, as well as every time you air tap to place a cylinder.

The method to find a point on the Spatial Map simply is then simply this:

public static Vector3? GetPositionOnSpatialMap(float maxDistance = 2)
{
    RaycastHit hitInfo;
    var transform = CameraCache.Main.transform;
    var headRay = new Ray(transform.position, transform.forward);
    if (Physics.Raycast(headRay, out hitInfo, maxDistance, GetSpatialMeshMask()))
    {
        return hitInfo.point;
    }
    return null;
}

This sits in the updated LookingDirectionHelpers class. In the demo project you can see how it is actually used.

In the TapToPlaceController, the Update method will flip the text from “Please look at the spatial map max 2m ahead of you" to "Tap to select a location" when the gaze strikes the Spatial Map (and the Spatial Map ONLY, not another hologram).

protected override void Update()
{
    _instructionTextMesh.text =
         LookingDirectionHelpers.GetPositionOnSpatialMap(_maxDistance) != null ?
         "Tap to select a location" : _lookAtSurfaceText;
}

If you then air tap, it will place a squatted cylinder on the spatial map at the place you are looking to. This is done in the OnPointerDown method - using the same call to LookingDirectionHelpers.GetPositionOnSpatialMap to get a point to place the cylinder.

You will notice a floating cube as well. You can't place a cylinder on the cube - it only finds the Spatial Map. Demonstrating that you can't place a cylinder on it, is the cube's sole purpose ;). What might happen is that you place a cylinder behind the cube on the Spatial Map, if your opposite wall is closer than 2 meters. It requires additional logic to handle that situation, but that is beyond the scope of this blog post.

Starting, stopping and clearing the Spatial map

For some apps, most notably my AMS HoloATC app, the Spatial Map is used to help getting an initial place to put an object but then it needs to go away, as to not get the view blocked by occlusion. Making the Spatial Map transparent sometimes helps, but then still the walls get in the way of selecting objects as they block the gaze and other cursors. Long story short – it is sometimes desirable to be able to turn the Spatial map on and off. And this is actually pretty simple:

public void ToggleSpatialMap()
{
     if( CoreServices.SpatialAwarenessSystem != null)
     {
         if( IsObserverRunning )
         {
             CoreServices.SpatialAwarenessSystem.SuspendObservers();
             CoreServices.SpatialAwarenessSystem.ClearObservations();
         }
         else
         {
             CoreServices.SpatialAwarenessSystem.ResumeObservers();
         }
     }
}

Note that “ClearObservations” is necessary, as merely calling Suspend only stops the updating of the Spatial Map – the graphic representation still stays active. This was actually added after feedback from yours truly ;)

As to checking whether or not the observer is / observers are actually running I have devised this little trick

private bool IsObserverRunning
{
     get
     {
         var providers =
           ((IMixedRealityDataProviderAccess)CoreServices.SpatialAwarenessSystem)
             .GetDataProviders<IMixedRealitySpatialAwarenessObserver>();
         return providers.FirstOrDefault()?.IsRunning == true;
     }
}

I check if there’s an observer and assume that if the first one is running, so is probably the rest. Although in practice, on a HoloLens, there will be only one observer running anyway.
You can activate and de-activate the Spatial Map by pressing the floating button, where the SpatialMapToggler behaviour is attached to.

Conclusion

If you run and deploy the demo project you will find a button floating before you (in the direction that you looked when the app started) that you can use to toggle the Spatial Map, and to the right a little cube. In addition, a text floating in your vision instructs you either to look at the spatial map or air tap when you actually do – and then a cylinder will appear. Like this in this little video:

30 July 2019

Fixing error Failed to locate “CL.exe” or MSB8020 when deploying IL2CPP solution

Symptom

You have created a Unity project to create an app using MRTK2, and you want to use the new IL2CPP backend. You open the solution in Visual Studio 2019, you try to deploy it by using Build/Deploy and all the way at the end the compiler complains about “CL.exe” missing.

Alternatively, you might get the slightly more verbose error:

error MSB8020: The build tools for Visual Studio 2017 (Platform Toolset = 'v141') cannot be found. To build using the v141 build tools, please install Visual Studio 2017 build tools.  Alternatively, you may upgrade to the current Visual Studio tools by selecting the Project menu or right-click the solution, and then selecting "Retarget solution".

Cause

You have most likely used the the recommended Unity version (2018.4.2f1) to create the project. This version – the name gives it away – was released before Visual Studio 2019, and therefore assumes the presence of Visual Studio 2017 and it’s accompanying C++ tools set, ‘V141’. So Unity generated a C++ solution referencing that tool set.

But now it’s 2019, you have kissed Visual Studio 2017 goodbye, installed Visual Studio 2019. And that comes with tool set V142.

Solution

Either you install V141 using the Visual Studio Installer, or you tell the generated solution to use V142. I personally prefer the last one, because newer is always better right ;)

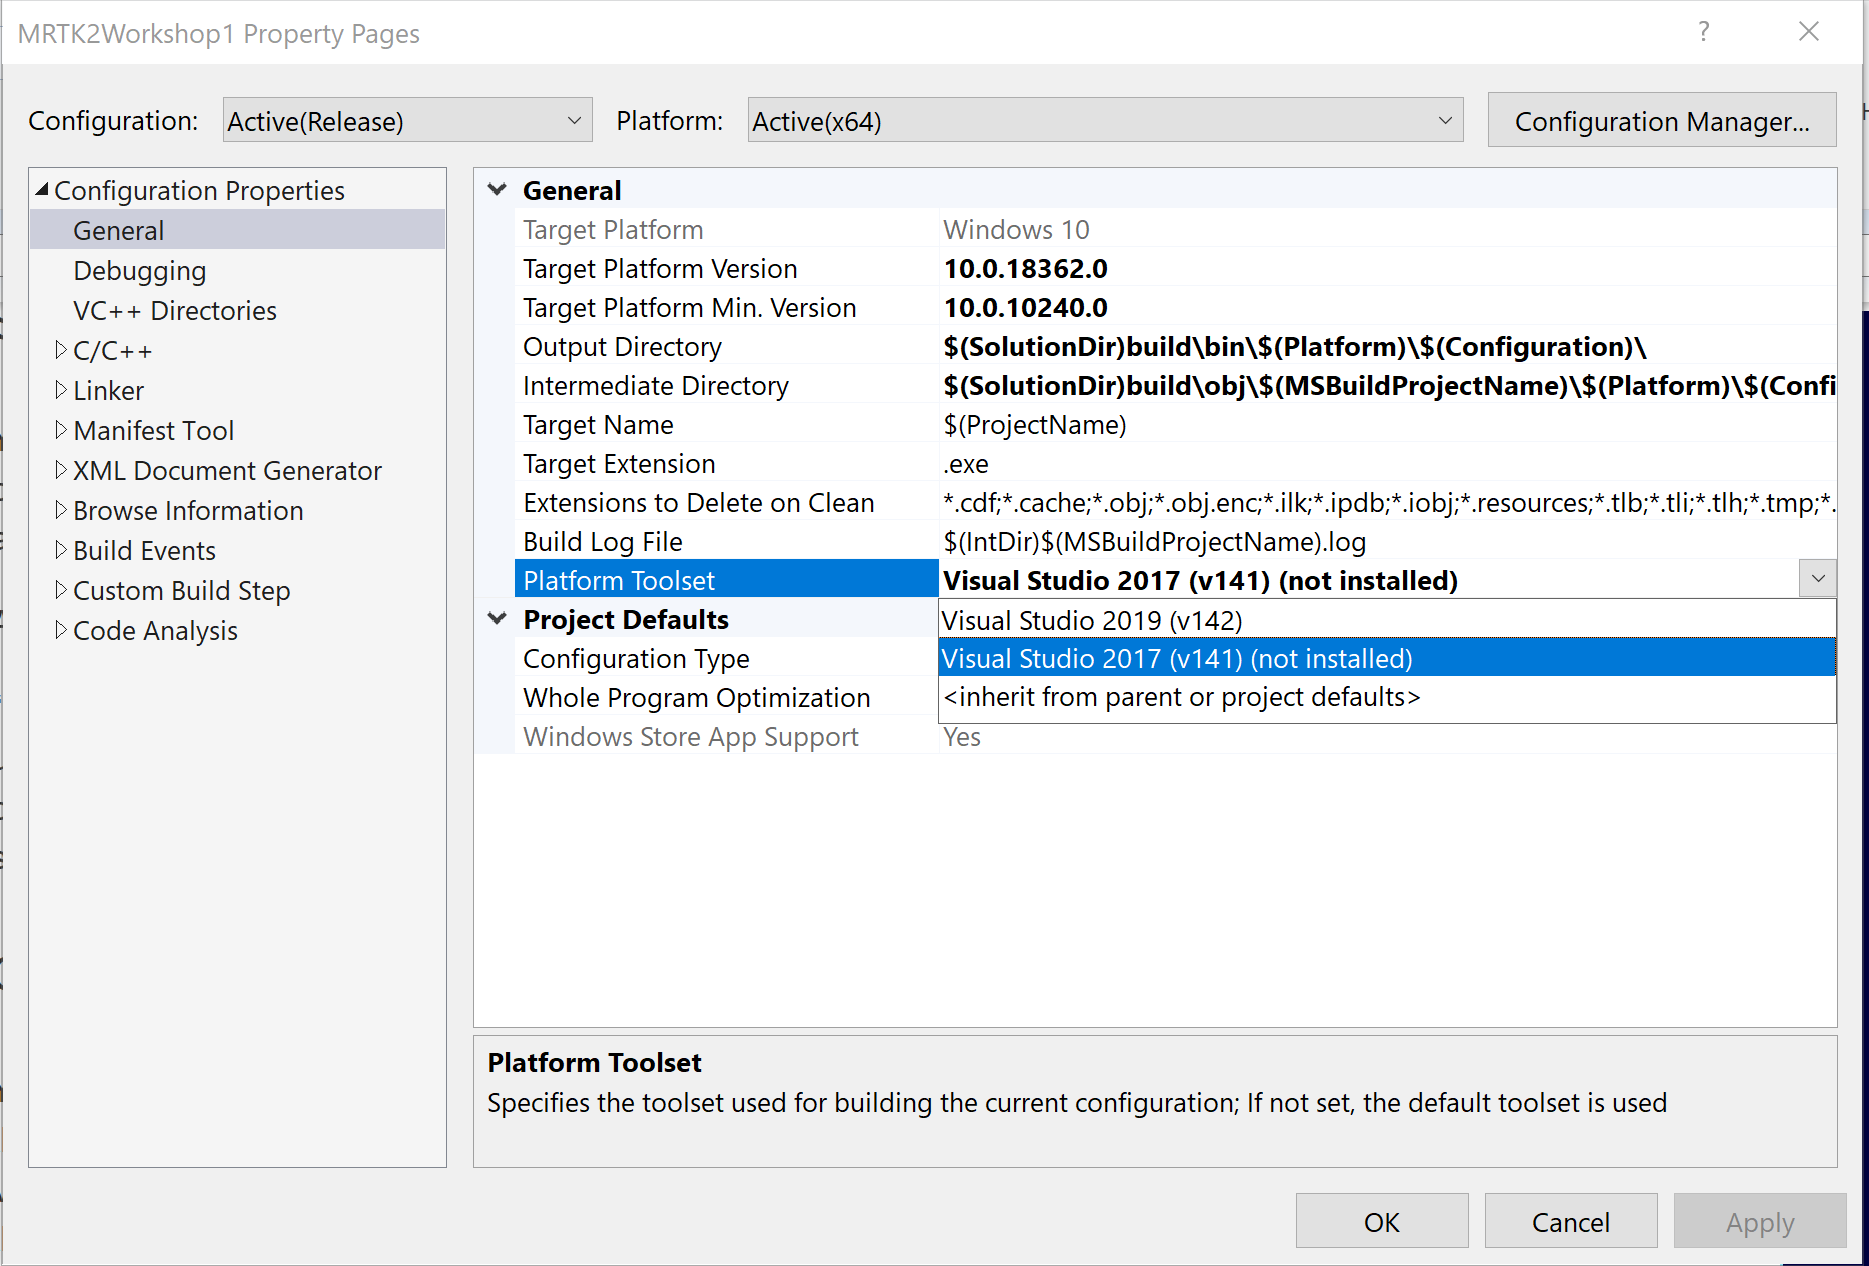
Simply right-click the project in the solution that has “(Universal Windows)” behind it’s name, select properties, tab general and then the problem is already pretty evident:

Simply select Visual Studio 2019 (142) for Project Toolset and you are good to go. This setting will stay as long as you don’t delete the generated project – Unity will simply change what needs to be changed, and leave as much as it can (to speed up the generation process).

Conclusion

Simple fix, but can be hard to find. Hence a simple blog about it

29 July 2019

Minimal required software for MRTK2 development for HoloLens 2 and Immersive headsets

Intro

A short one this time – and codeless to. You see, next Saturday I will be giving an workshop for MixUG Netherlands about development with the Mixed Reality Toolkit 2 for Immersive headsets, together with my colleague, partner in crime and fellow MVP Alexander Meijers. One of the things that came up preparing for this workshop was what you would actually need to develop with the Mixed Reality Toolkit 2. Since ye olden days of the HoloToolkit, quite a few things have changed – Unity, the minimal OS version, and there’s even a new version of Visual Studio. So I set out to complete a minimal shopping list with a few optional items. Fortunately, our friends over at Microsoft Azure make it quite simple to spin up a totally pristine machine so you don’t run into the typical developer machine issues – multiple versions of Visual Studio with different workloads and a myriad of Unity versions – which makes it hard to tell sometimes what is required for what app.

OS version

Easy one. Windows 10, 1809 or (recommended) 1903. Everything I tested, I tested on Windows 10 Pro

Visual Studio

You will need Visual Studio 2019 community edition. 2017 will work too, but is much slower. Download Visual Studio 2019 community from this link and choose the following work loads:

  • UWP development with optional components USB connectivity and C++ (V142) UWP tools checked
  • Game development with Unity with the optional component 2018.3 64-bit editor unchecked

In images:

Make sure you install Visual Studio before Unity.

Offline installer

A fun trick – if you want to make an offline installer for the community edition for these particular workloads, open a command prompt after downloading the installer, and type (on one line):

vs_community.exe --layout c:\vsinstaller
--add Microsoft.VisualStudio.Workload.ManagedGame
--add Microsoft.VisualStudio.Workload.Universal
--add Microsoft.VisualStudio.Component.Windows10SDK.IpOverUsb
--add Microsoft.VisualStudio.ComponentGroup.UWP.VC --lang en-US

In c:\vsinstaller you will then find a complete install ‘layout’ for all the necessary components. Might be useful if you want to prepare multiple computers.

Unity

2018.4.2f1, taken from ProjectSettings/ProjectVersion.txt in the mrtk_development branch. This particular version can be downloaded directly from this link.

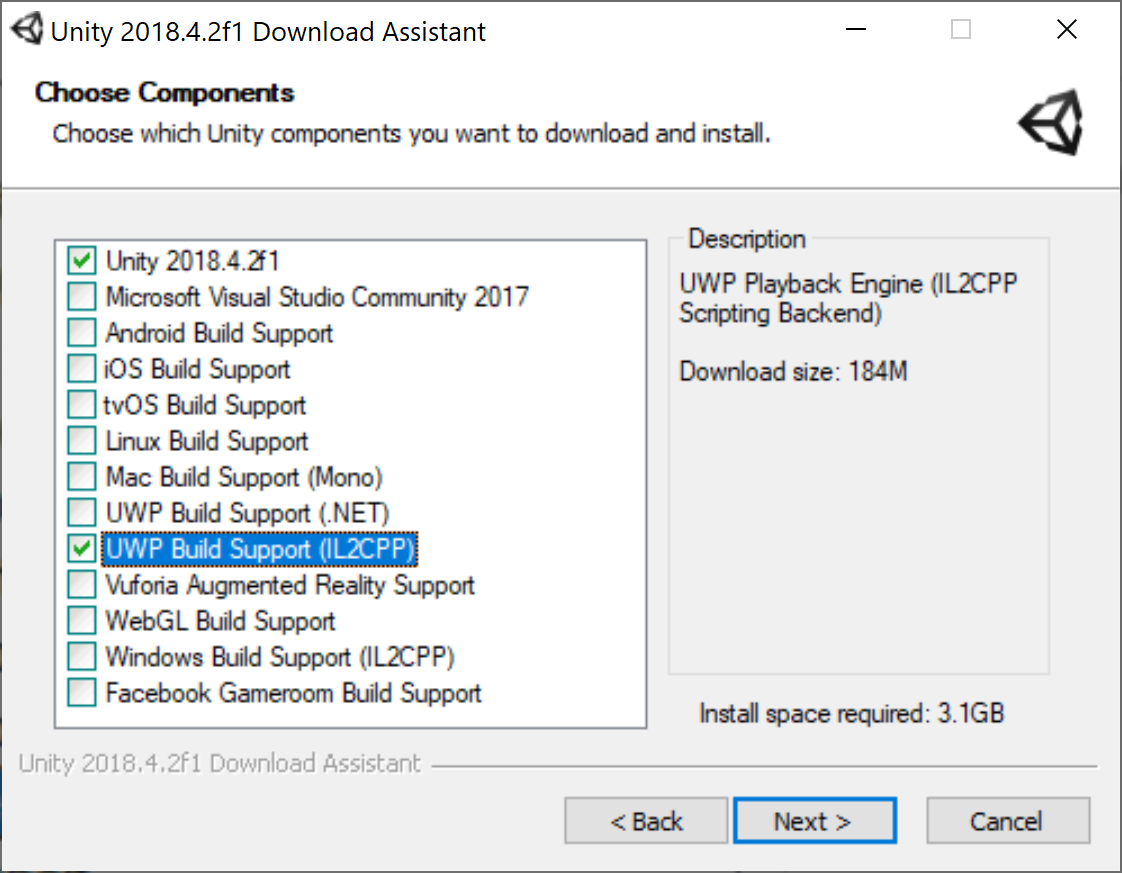
Choose as minimal components

  • Unity 2018.4.2f1
  • UWP Build Support

Mind you – this sets you op for HoloLens 2 and Windows Mixed Reality Immersive headsets only.

Optional – HoloLens 2 emulator

I have already written extensively about it. You can get it here. Be aware that it requires Hyper-V being installed. If you have installed Windows 10 1903, it will run right away. On 1809 you will need some trickery.

Conclusion

It’s not that hard to get up and running for MRTK2 development for HoloLens 2 and Windows Mixed Reality Immersive headsets. And now you have a nice complete ‘shopping list’ for when you want to prepare your PC.

14 July 2019

Migrating to MRTK2–manipulating holograms by grabbing

Intro

To be honest, the title of this blog post is a bit weird, because in Mixed Reality Toolkit 1 the concept of grabbing was unknown, as HoloLens 1 does not support this kind of gestures. But nevertheless, as I am on this quest of documenting all the gems I discover while migrating an existing app to Mixed Reality Toolkit 2, this is one of the things I came across so I am shoehorning it in this blog post series – the 8th installment of it already. And the fun thing about this one if that although there is a demo project available, I am going to write no code at all. The whole concept of manipulation by grabbing can be done by simply dragging MRTK2 components on top of a game object.

'Far manipulation'

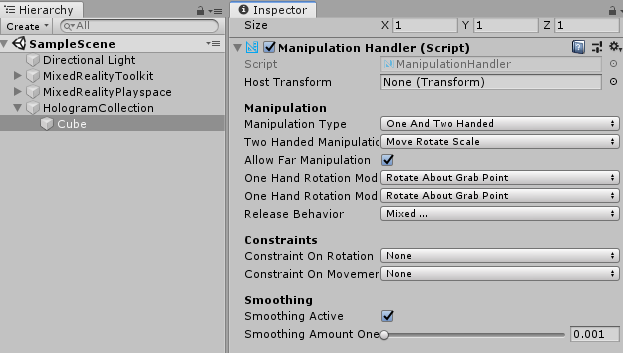
This is really extremely simple. If I want to make a cube draggable in the 'classic' sense - that is, point a cursor to it, pinch and move my hand, and then the cube follows, all you have to do is add a ManipulationHandler to the cube, with default settings:

And then you simply point the 'hand ray' to it, pinch and move:

But as you could see, I can only drag it. I can't move it anymore - or rotate - as my hand comes closer, like at the end of the movie. I fact, I can't do anything anymore.

Allow grabbing and moving

For that, we will need to add another script: Near Interaction Grabbable.

And now, if the hand comes close to the cube, you can do all kinds of crazy stuff with it

Some settings to consider

  • If you don't want to allow 'far manipulation' (the first type) but only want to allow the manipulation by grapping, you can uncheck the "Allow Far Manipulation" on the ManipulationHandler.
  • If you want to see where the actual grab connection point is, check the "Show Tether When Manipulating" checkbox on Near Interaction Grabbable. This will look like this:

I bet there are more settings to consider, but I haven't tried those yet (or felt the need to do so).

Conclusion

The code of this completely code-less sample can be found here. I can't wait to add code like this to real-world HoloLens 2 projects. But alas, we still need to wait for the device :)