22 March 2018

Windows 10 on ARM and devices–hang on to your continuum dock!

Drumroll

I have been asked to evaluate a prototype Windows 10 on ARM PC. You might have seen people talk about it earlier, like my friend Lance who wrote about his one day developer experience, Daren May has something to say about remote debugging with these devices, and wouldn’t you know - on the first day of spring, one sprung up at to Paul Thurrott’s site. I am not sure if that’s exactly the same model as I have – it looks pretty similar, but that’s actually not important. As far as Windows goes, the platform and what it can do is more interesting to me than the actual underlying hardware. Windows goes ARM – yet again, one might say.

Wait, haven’t we seen this before?

Windows has been running on ARM before, both on tablets, phones and IoT devices like a Raspberry PI. Windows RT was an Windows 8 variant, Windows Mobile made it actually to Windows 10, IoT devices run a super compact version of Windows 10 and UWP apps. In all cases, apps on Windows versions that run on ARM devices could only be native (ARM) apps. For a number of use cases, the backward compatibility with the vast library of Windows apps that have been created over the years posed a bit of a challenge. And that’s where some brand new tech comes in. The new Windows 10 on ARM runs actual x86 code, made for the ‘conventional’ Intel chips - converting it on the fly. It uses a technology that’s called CHPE (pronounced “chip-pee”) to work the magic. Lance’s article has a nice in-depth explanation of it. I talked to people working on that CHPE during the last MVP Summit. Modest and quiet people they are, but by golly, I felt like a Neanderthal getting a quantum physics 101 lecture by the late professor Hawking when they casually talked about a few of the things they had to overcome. Really impressive.

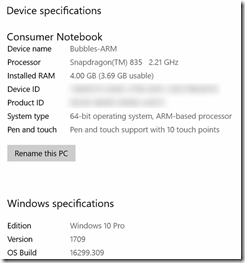
imageI installed some x86 programs on the PC, downloaded from various sources and some Desktop Bridge programs from the Windows Store. It’s very much a case of Your Mileage May Vary, but let’s just put it this way – I put a resource hog like Chrome on it – the x86 version – and it ran just fine, even the first time, when it’s supposed to be slower while CHPE works it’s magic. I still prefer Edge, as I like to keep my memory and battery power for other things than just web pages – but it runs Chrome just fine. I also tried TeamViewer – also just works fine – case in point, I made the screenshots on this blogpost using that. For all intents and purposes, this is just Windows. So much so, that you actually have to dig to see there’s another heart beating beneath it’s metal. The most obvious is the File Explorer – see image on the right side:


And of course, there’s this.

image

Also, fun fact: because my good old Map Mania app still has an ARM package, intended for phones, it gets the native ARM package from the store, and runs very fast on the device. So pay attention kids, but by all means, submit an ARM package when you put your app in the Windows Store. .

So if this is just Windows… how about devices?

One of the most awesome things I like about Windows is that whatever device you plug into it, it works, and nearly instantly. If it does not, you actually have a better chance of having a defective device than Windows not at least eking the basic functionality out of it. I have had… let’s say, other and utterly frustrating experiences with other operating systems. However, the device I have has just one port – an USB-C port. It charges fine with the accompanying charger, but what about other devices?

See the source imageThis is where the fun starts. As a former Windows Phone MVP, I went all the way to the Lumia 950XL, scoring a free Continuum Dock with the phone. Remember this one? Connect a keyboard,a mouse and a monitor to it, plug the other end in your Lumia, and you basically had a kind of PC-from-your-pocket. Turns out Microsoft did not use some proprietary tricks, but apparently just some standard protocol.

I plugged the dock into the device, power in the other end:

Score one – it charged. Then I went a bit …. overboard…
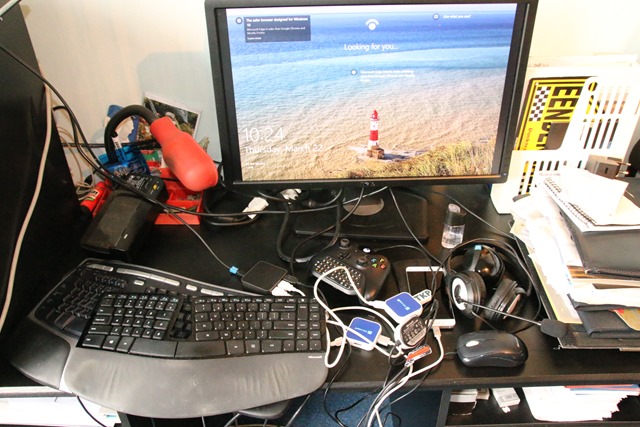
IMG_6803

I connected this entire pile of hardware to it. And all of it worked. What you see here, connected simultaneously:

  • A Dell monitor connected via DisplayPort (tried the HMDI port too – worked as well)
  • Two USB hubs, because I have 3 only USB ports on the dock ;)
  • A generic USB key
  • A Microsoft Basic Mouse V2
  • A Microsoft Natural Ergonomic Keyboard 4000 v1
  • An Xiaomi MI 5 Android Phone
  • A Microsoft LifeChat LX-3000 headset
  • A Microsoft XBox One controller
  • A Microsoft Sculpt ergonomic keyboard and accompanying mouse set (via a wireless dongle)

Not on this picture, but successfully tried:

  • A HoloLens – it got set up, but I could not connect to the portal via localhost:10080. I have to look into that a little bit more. Also other things work but that’s outside the scope of this article.
  • A fairly new Canon DSLR, but I needed that one to take the picture so it’s obviously not in it ;)

I also found the PC actually wants to charge from a Lizone QC series battery, that I originally bought to extend my Surface Pro 4’s battery life on long transatlantic flights. The Windows 10 on ARM PC itself is missing from the picture – that’s because it’s a pre-release device and I don’t want pictures of it to roam around the internet.

Did I find stuff that did not work? In fact, I did:

  • I could not get a fingerprint reader that I got for free to work. This is some pre-release device that I got on the summit from a fellow MVP – 1.5 or maybe 2.5 years ago. Although it is set up and recognized, I cannot activate it in the settings screen. Maybe this has something to do with the built-in Windows-Hello-compatible camera of the PC getting priority.
  • A wireless dongle for XBox One controllers. Remember the original XBox One controllers did not have Bluetooth in it? This gadget allows you to connect it to PCs anyway. It connects, but nothing is set up. It’s not a big deal, as a controller plugged in via an USB cable works just fine. I suppose this dongle was not sold in large volumes, and probably not at all anymore, as all newer XBox One controllers can be connected via Bluetooth. Only people hanging on to old hardware (guilty as charged) would run into this.

General conclusion

I feel like a broken record, because I keep getting back to this simple fact - it’s just Windows, it will run your apps pretty nicely, it will connect to nearly all of your hardware, and give you a very long battery life. Although, I can imagine battery life might degrade a little if you add this much devices to it’s USB port. But then again, if you need this many devices connected to your PC you might want to rethink what kind of PC you want to buy anyway ;). The point is, you can, and everything but very obscure devices will work.

Now if you would excuse me, I have to clean up an enormous pile of stuff – my study looks like a minor explosion took place in the miscellaneous hardware box.

17 March 2018

Loading remote video stored in Azure blob storage into a floating gaze activated video player in a Mixed Reality app

Intro

The title of this blog post kind of gives away that this is actually two blog post in one:

  • How to prepare and load videos into Azure
  • How to load these videos back from Azure, and show these in a floating video player that is activated upon looked at.

The basic idea

The UI to demo loading and playing the video is a simple plane that gets a ‘MovieTexture’ applied to it. When you look at the plane (i.e. the gaze strikes the Plane), MovieTexture’s “Play” method is called, and the video starts playing. When you don’t look at it for like three seconds, the MovieTexture’s “Pause” method is called. It’s not rocket science.

Two post ago, I introduced a BaseMediaLoader a as simple base class for downloading media. We are going to re-use that in this post, as loading video – as you will see – is not that different from loading audio.

Prepare and upload the video

If you have read my post about loading audio you might have guessed – you can’t just upload an MP4 file to a blob storage, download and play it. Unity seems to have a preference for off-center open source formats. You will need to convert you movie to the OggTheora and you can do this with the command line tool “ffmpeg”. The documentation on it is not very clear, and default conversion yields a very low quality movie (think early years YouTube). I have found the following parameters give a quite reasonable conversion result:

ffmpeg.exe -i .\Fireworks.mp4 -q:v 8 fireworks.ogv

-q:v 8 gives a nice video quality. Also, the original 121605 kb movie is compressed to about 40000 kb. The resulting ogv need to be uploaded to an Azure blob storage. I used the Storage Explorer for that. That also makes it easy to get a shared access signature url.

Video player components

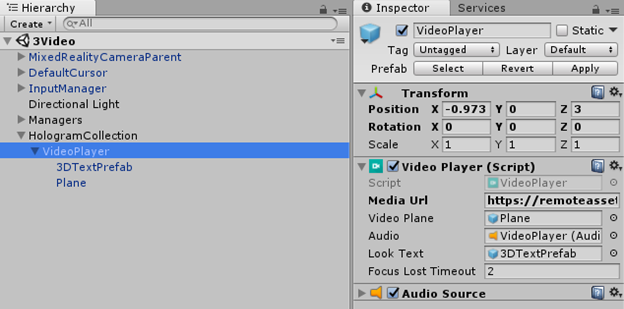
The video player itself is pretty simple – a Plane to display the movie on, a Text to tell the user to start playing it by looking at the Plane, and an AudioSource you can just about see in this image blow, depicted by a very vague loudspeaker icon

image

image

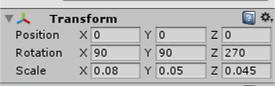
imageNote the video player is about 3 meters from the user, and a bit off-center to the left – preventing it from auto starting immediately, which it would do if it would appear right ahead. The video plane is rotated 90/90/270° to make it appear upright with the right direction to the user.

The VideoPlayer script

The  VideoPlayer script is actually doing all the work – downloading the video, playing it when gaze hits, and pausing the playback after a timeout of 2 seconds (‘Focus Lost Timeout’). It start pretty simple:

using System.Collections;
using HoloToolkit.Unity.InputModule;
using UnityEngine;
using UnityEngine.Networking;

public class VideoPlayer : BaseMediaLoader, IFocusable
{
    public GameObject VideoPlane;

    public AudioSource Audio;

    public GameObject LookText;

    public float FocusLostTimeout = 2f;

    private MovieTexture _movieTexture;

    private bool _isFocusExit;

    protected void Start()
    {
        VideoPlane.SetActive(false);
        LookText.SetActive(false);
    }
}

Notice all components are explicitly defined, that is – although they are within one prefab, you still have to drag the Plane, the Text and the AudioSource into the script’s fields. Initially it turns off everything – if there’s nothing downloaded (yet), show nothing. If you are on a slow network, you will see the player disappear for a while, then reappear.

The most important part of this script consist out of this two methods:

protected override IEnumerator StartLoadMedia()
{
    VideoPlane.SetActive(false);
    LookText.SetActive(false);
    yield return LoadMediaFromUrl(MediaUrl);
}

private IEnumerator LoadMediaFromUrl(string url)
{
    var handler = new DownloadHandlerMovieTexture();

    yield return ExecuteRequest(url, handler);

    _movieTexture = handler.movieTexture;
    _movieTexture.loop = true;
    Audio.loop = true;

    VideoPlane.GetComponent<Renderer>().material.mainTexture = _movieTexture;
    Audio.clip = handler.movieTexture.audioClip;
    VideoPlane.SetActive(true);
    LookText.SetActive(true);
}

Remember, from BaseMediaLoader, that StartLoadMedia is called as soon as MediaUrl changes. That turns off the UI again (in case it was already turned on because a different file was loaded previously). Then we need an DownloadHandlerMovieTexture. I think the person who came up with the DownloaderScheme should be awarded for an originality award ;)

Then we set both the loop property for both the movie texture and the AudioSource to true, and after that we apply the movie texture to the Videoplane's Renderer material texture so it will indeed show the movie.  Since that will only play a silent movie, we need to extract the movie texture's audioClip property value and put that in our audio source, and both make the plane and the text visible, inviting the user to have a look

Then we have these two simple methods to actually start and pause playing. Notice you have to start call the movie texture's Play method and the AudioSource's Play method, but for pausing it's enough to call just the movieTexture's Play. One of those weird Unity idiosyncrasies.

private void StartPlaying()
{
    if (_movieTexture == null)
    {
        return;
    }
    _isFocusExit = false;
    if (!_movieTexture.isPlaying)
    {
        LookText.SetActive(false);
        _movieTexture.Play();
        Audio.Play();
    }
}

private void PausePlaying()
{
    if (_movieTexture == null)
    {
        return;
    }
    LookText.SetActive(true);
    _movieTexture.Pause();
}

Notice the setting of _onFocusExit to false when the StartPlaying. We need that later. Finally, the methods that actually are fired when you are looking at or away from the plane, as defined by IFocusable

public void OnFocusEnter()
{
   StartPlaying();
}

public void OnFocusExit()
{
    _isFocusExit = true;
    StartCoroutine(PausePlayingAfterTimeout());
}

IEnumerator PausePlayingAfterTimeout()
{
    yield return new WaitForSeconds(FocusLostTimeout);
    if (_isFocusExit)
    {
        PausePlaying();
    }
}

If the user stops looking at the plane, _onFocusExit is sets to true and a coroutine starts that first waits for the defined time. If that time has passed and the user still does not look at the plane, the video play will actually be paused. This way you prevent small head movements, that make the gaze cursor wander off the plane for a short period of time, will make the movie stop and start repeatedly - which is a bad user experience.

No controls?

The floating audio player I described earlier has a fancy slider that showed progress and made it possible to jump to any piece of the audio. Unfortunately, a movie texture does not support a time property that you can get and set to random access parts of the movie, and jump to a specific point. You can only move forward, and only by setting the loop property to true you actually end up at the start again, because moving to start does not work either. I don't know why this is, but that's the way it seems to be.

Conclusion

Showing video is almost a easy as playing audio, and in many ways are similar. The default Unity capabilities allow only for a bit limited control, but it's a nice way to - for instance - show instructional videos. Be aware playing videos in a resource-constricted device (read: HoloLens) might ask for a lot of resources. Consider smaller low-res videos is this case. Testing is always key.

Demo project, containing more stuff by the way, can be found here

07 February 2018

Building a floating audio player in Mixed Reality

Intro

imageAs I promised in my previous blog post, I would write about how I created the floating audio player designed to easily demonstrate how to download and play audio files in Mixed Reality (or actually, just Unity, because the code is not MR specific). I kind of skipped over the UI side. In this post I am going to talk a little more about the floating audio player itself. This code is using the Mixed Reality Toolkit and so actually is Mixed Reality specific.

Dissecting the AudioPlayer prefab

The main game object

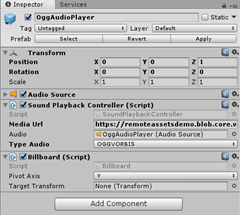
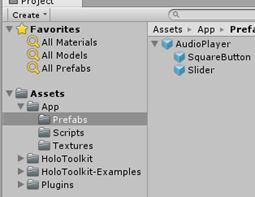
imageThe AudioPlayer consists out of two other prefabs, a SquareButton and a Slider. I have talked about this button before, so I won’t go over that one in detail again. The main game object of the AudioPlayer has an AudioSource and two extra scripts. The simple version of the Sound Playback Controller was already described in the previous blog post, and will be handled in great detail here. The other script is a standard Billboard script from the Mixed Reality toolkit. It essentially keeps the object rotated towards the camera, so you will never see it from the side of the backside where it’s hard to read and operate. Note I have restricted pivot axis to Y, so it only rotates over a vertical axis.

The button

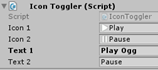
imageIt’s a fairly standard SquareButton, and I have set the text and icon as I described here. Now that button only shows in the editor, the runtime text and the icon are set by a simple script that toggles icon and text, so that the button cycles between being a “Play” and a “Pause” button. That script is pretty easy:

using HoloToolkit.Unity.InputModule;
using UnityEngine;

public class IconToggler : MonoBehaviour, IInputClickHandler
{
    public Texture2D Icon1;

    public Texture2D Icon2;

    public string Text1;

    public string Text2;

    private TextMesh _textMesh;

    private GameObject _buttonFace;

    void Awake ()
    {
        _buttonFace = gameObject.transform.
           Find("UIButtonSquare/UIButtonSquareIcon").gameObject;
        var text = gameObject.transform.Find("UIButtonSquare/Text").gameObject;
        _textMesh = text.GetComponent<TextMesh>();
        SetBaseState();
    }

    public void SetBaseState()
    {
       _textMesh.text = Text1;
       _buttonFace.GetComponent<Renderer>().sharedMaterial.mainTexture = Icon1;
    }

    private float _lastClick;

    public void OnInputClicked(InputClickedEventData eventData)
    {
        if (Time.time - _lastClick > 0.1)
        {
            _lastClick = Time.time;
            Toggle();
        }
    }

    public void Toggle()
    {
        var material = _buttonFace.GetComponent<Renderer>().sharedMaterial;
        material.mainTexture = material.mainTexture == Icon1 ? Icon2 : Icon1;
       _textMesh.text = _textMesh.text == Text1 ? Text2 : Text1;
    }
}

It has four public properties, as already is visible in the image: Image1 and Text1 for the default image and text (“Play”), Image 2 and Text 2 for the alternate image and text (“Pause”). The Awake method grabs some objects within the button itself, then sets the base state – which is, the default icon and text.

It also implements IInputClickHandler, so the user can tap it. In OnInputClicked it calls the Toggle method. That then toggles both text and image. Notice there’s simple time based guard OnInputClicked. This is to prevent the button from sending a burst of click events. In the Unity editor, I mostly get two clicks every time I press the XBox controller A button, and then nothing happens. Annoying, but easily mitigated this way.

The Slider

I can be short about that one. I did not create that, but simply nicked it from the Mixed Reality Toolkit Examples. It sits in HoloToolkit-Examples\UX\Prefabs. I like making stuff, but I like stealing reusing stuff even better.

The extended Sound Playback Controller

Let’s start at Start ;). Note: the BaseMediaLoader was handled in the previous blog post,

public class SoundPlaybackController : BaseMediaLoader
{
    public AudioSource Audio;

    public GameObject Slider;

    public GameObject Button;

    private SliderGestureControl _sliderControl;

    private IconToggler _iconToggler;

    public AudioType TypeAudio = AudioType.OGGVORBIS;

    void Start()
    {
        _sliderControl = Slider.GetComponent<SliderGestureControl>();
        _sliderControl.OnUpdateEvent.AddListener(ValueUpdated);
        Slider.SetActive(false);
        Button.SetActive(false);
        _iconToggler = Button.GetComponent<IconToggler>();
    }
}

In the Start method, we first grab a bunch of stuff. Note the fact that we not only turn off the slider control but also actually attach an event handler to that.

We continue with StartLoadMedia and LoadMediaFromUrl

protected override IEnumerator StartLoadMedia()
{
    Slider.SetActive(false);
    Button.SetActive(false);
    yield return LoadMediaFromUrl(MediaUrl);
}
private IEnumerator LoadMediaFromUrl(string url) { var handler = new DownloadHandlerAudioClip(url, TypeAudio); yield return ExecuteRequest(url, handler); if (handler.audioClip.length > 0) { Audio.clip = handler.audioClip; _sliderControl.SetSpan(0, Audio.clip.length); Slider.SetActive(true); Button.SetActive(true); _iconToggler.SetBaseState(); } }

The override from StartLoadMedia in this version turns off the whole UI while we are actually loading data, and turns it on when we are done loading. Since that fails when we load MP3, the MP3 player in the demo project disappears and on startup. The others one disappear too, in fact, but immediately appear again since we are loading small clips. This goes so fast you can’t even see it.

LoadMediaFromUrl not only executes the request and sets the downloaded clip to the Audio Souce, as we saw before, but we also set the span of the Slider Control between 0 and the length of the AudioClip in seconds. Easy, right?

Now the Update method, which as you know is called 60 times per second, is the trick to keeping the slider equal to the the current time of the clips that’s now playing:

protected override void Update()
{
    base.Update();
    if (Audio.isPlaying)
    {
        _sliderControl.SetSliderValue(Audio.time);
    }
    if (Mathf.Abs(Audio.time - _sliderControl.MaxSliderValue) < 0.1f)
    {
        Audio.Stop();
        Audio.time = 0;
        _iconToggler.SetBaseState();
        _sliderControl.SetSliderValue(0);
    }
}

Thus if the audio clip plays, the slider moves along. It’s not quite rocket science. If the clip has nearly finished playing, it is stopped and everything is set to the base state: the icon, the time of the audio clip, and the slider is set to 0 again.

And finally – remember that event handler we added to the OnValueUpdated event of the slider? Guess what:

private void ValueUpdated()
{
    Audio.time = _sliderControl.SliderValue;
}

It’s the opposite of the third line of Update – now we set the Audio time to the Slider value.

Conclusion

And that’s it. You can simply use some out-of-the-box components in the Mixed Reality Toolkit and/or it’s examples to build a simple but effective control to play audio. You can grab the demo project (it’s still the same) from here.

04 February 2018

Downloading audio files from Azure blob storage and playing them in Mixed Reality apps

Intro

All but the most trivial apps have some kind of back end. In the past, I have written about accessing all kinds of services from HoloLens and Mixed Reality apps, But apart from mere data, you can download all kind of media from external sources and use those in you Mixed Reality apps. This is highly useful if you want to change used media, use different files for like instructions depending on some factor. Or heck, some random background music. In fact, what I will be describing is not even Mixed Reality specific – the principle can be used in any Unity app, although the code that sits around to demonstrate the workings definitely only works for Mixed Reality.

Oh, and by the way – for us Microsoft geeks “back end” equals to “Microsoft Azure” – if it’s not for the competitive pricing, then for the way Microsoft makes it easy for developers to get going (heaven knows this was quite different in the early days). But to be clear: this will work with any backend that hosts files.

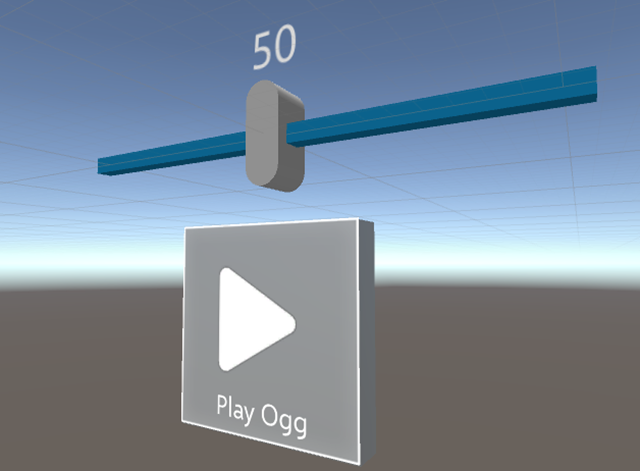
This post will be 2-part: the first part concentrates on the actual technique of downloading and playing audio files, the second part will explain the ‘floating audio player’ I built to make this easily demonstrable. The floating part in ‘floating player’ should be taken in the most literal way possible:

image

imageYou can find it in the demo project. You can just jump to there if you want to skip all my mumbling.

Global overview

If you open the project in Unity, you will not see one but three floating players, next to each other. They will all attempt to play on of my ringtones – an excerpt from the Doctor Who theme song (one is a nerd or one is not). But it will attempt to use one of three different audio formats – the well-known MP3, Ogg Vorbis, and WAVE audio format (aka ye good ole’ WAV).

image

To hear them, either build the app or just hit the play button. If you choose the second option, you will need to attach an XBox One controller to you PC, to steer the cursor and click on the buttons. You will notice the Ogg and the WAV file playing nicely. The mp3 one won’t. In fact, the player just disappears before you even can get to it. We will get to that later.

Using UnityWebRequest

In previous posts I have shown you either how to use the Unity WWW class, or how to resort to pure UWP code and use HttpClient/HttpRequestMessage. It seems like the WWW class is being deprecated, although I have no official information on that. However,the new (third) kid on the block seems to be UnityWebRequest.

This is a bit on an oddball. It uses a handler. Generally, a UnityWebRequest looks like this:

var request = UnityWebRequest.Get(url);
request.downloadHandler = handler;
yield return request.SendWebRequest();

The second line is optional – if the you don’t set the handler, it’s the default DownloadHandler class, which sports a “text” property you can query. This is very useful for accessing data services like an API app on Azure App Service. If you want to download audio files, you will need a DownloadHandlerAudioClip handler.

Putting it in code

To make this all work easily, I have created the following base class for download loading media:

using System.Collections;
using UnityEngine;
using UnityEngine.Networking;

public abstract class BaseMediaLoader : MonoBehaviour
{
    public string MediaUrl;

    private string _currentMediaUrl;

    protected virtual void Update()
    {
        if (_currentMediaUrl != MediaUrl)
        {
            _currentMediaUrl = MediaUrl;
            StartCoroutine(StartLoadMedia());
        }
    }

    protected abstract IEnumerator StartLoadMedia();

    protected IEnumerator ExecuteRequest(string url, DownloadHandler handler)
    {
        var request = UnityWebRequest.Get(url);
        request.downloadHandler = handler;
        yield return request.SendWebRequest();
    }
}

MediaUrl is an url that points to a place where the actual audio file can be downloaded – in this case, as SAS link to a file in my own Azure blob storage. Every time Update is called, it checks if the MediaUrl has been changed, and if so, it starts the StartLoadMedia in the background. ExecuteRequest is a helper method that can be used from a StartLoadMedia. Like this:

using System.Collections;
using UnityEngine;
using UnityEngine.Networking;

public class SoundPlaybackController : BaseMediaLoader
{
    public AudioSource Audio;

    public AudioType TypeAudio = AudioType.OGGVORBIS;

    protected override IEnumerator StartLoadMedia()
    {
        yield return LoadMediaFromUrl(MediaUrl);
    }

    private IEnumerator LoadMediaFromUrl(string url)
    {
        var handler = new DownloadHandlerAudioClip(url, TypeAudio);
        yield return ExecuteRequest(url, handler);
        if (handler.audioClip.length > 0)
        {
            Audio.clip = handler.audioClip;
        }
    }
}

This is a very reduced version of the SoundPlaybackController that is in the demo project, concentrating only on the actual downloading and playing of the data.

The override of StartLoadMedia simply calls StartLoadMedia, which proceeds to create a DownloadHandlerAudioClip handler. Now the odd thing is, this handler wants and url as well as the request. Why this is so, I have no idea. Also notice the fact you need to supply the handler with the type of audio you are going to download – there’s a AudioType enumeration for that.

If the audio has been downloaded successfully, you only have to set the “clip” property of an AudioSource to the handler’s “audioClip” property, and call the Audiosource’s “Play” method. And you are good to go.

Audio types are important

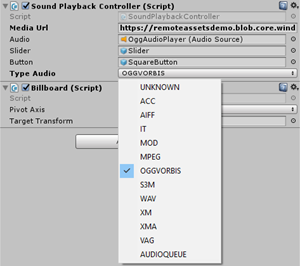
Since the TypeAudio property is public, the Unity editor makes a nice dropdown for us to select the type of audio:

image

I’ll be the first one to admit I haven’t heard of most of these file types, let alone know them. Actually, before I started, I only knew MP3 and WAV. I learned to know Ogg Vorbis. And for a good reason too. I already mentioned the fact the left (mp3) player disappears when you start the code. The SoundPlaybackController that I actually created (not the simple version above) hides the UI of the whole player while actually downloading the audio file. You might have noticed an error in the Unity status bar when you run the code. That actually says:

Streaming of 'mp3?st=2018-02-02t15%3a51%3a00z&se=2020-02-03t17%3a51%3a00z&sp=rl&sv=2017-04-17&sr=b&sig=kymvql5q1yyr%2bqilcxhfc3popwo56vd0ejibennldzw%3d' on this platform is not supported
UnityEngine.Networking.DownloadHandlerAudioClip:get_audioClip()
<LoadMediaFromUrl>c__Iterator0:MoveNext() (at Assets/App/Scripts/SoundPlaybackController.cs:34)
UnityEngine.SetupCoroutine:InvokeMoveNext(IEnumerator, IntPtr)

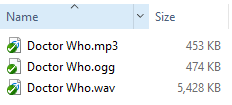
imageThe code in that player crashes, and never gets to showing the UI again. Well, that’s a bummer. Unity simply does not seem to support MP3 on ‘this platform’, which is apparently UWP. You can convert it to WAV, but unless you like to burn a lot of battery downloading stuff, you must be pretty much out of your mind doing so – Ogg Voribs is a much better option, as this simple list of files shows.

And Audacity, that good old workhorse of audio-artists and podcasters all around the globe makes conversion easy, so why not use it, right.

image

Conclusion

The very short version of this blog post: use UnityWebRequest and DownloadHandlerAudioClip to download an audio clip from Azure blob storage, and if you value your users’ bandwidth, their devices’ battery life, and your own sanity – use Ogg Vorbis audio files.

I have not tried all the other audio files types, simply because I did not have to do so – Ogg Vorbis works fine. WAV too, but is absurdly big compared to MP3 and Ogg Vorbis. In addition, I have no idea what those audio types are, how I should create/convert them, and why I should use them. To paraphrase Star Trek’s TOS medical officer Dr. Leonard “Bones” McCoy – I am a developer, not an audio engineer. 

Next time, I will explain the workings of the floating audio player around this code.

29 January 2018

Fantastic buttons and where to find them–in the Mixed Reality Toolkit

imageIntro

When I started making Mixed Reality apps (or better, HoloLens apps, as Mixed Reality as we learned to know only became available with the Fall Creators Update) I had the nerve to create my own ‘buttons’, as I assumed simple 3D ‘switches’ were too skeuomorphic. I assumed a kind of 3D variant of “that-what-not-should-be-called-Metro” would appear, and I took a shot at it myself with a red rotating spherical OK button. Let’s say the responses have been less then enthusiastic, especially from real designers.

Fast forward half a year, the Mixed Reality Toolkit now contains a number of standard UI components, and also have started to incorporate some elements of then Mixed Reality Design Labs project (that apparently has been abandoned, as its last commits are now 7 months old, and that’s only a README update – the code has not been touched for longer).

What’s in there?

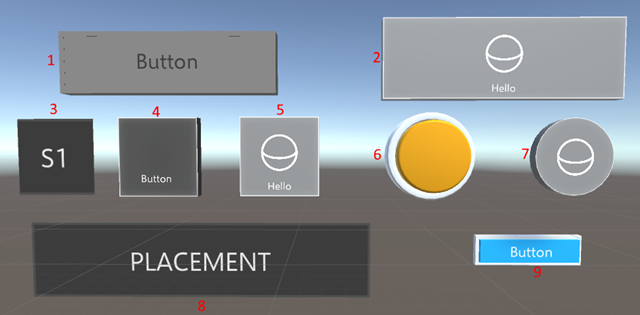
If you copy the Mixed Reality Toolkit Samples UI elements into your project next to the Mixed Reality Toolkit itself (as I described here) you will find no less than 9 different push buttons that I think are usable

image

For your and my convenience, I labeled them with numbers.

  1. Prefab “Button”,  from HoloToolkit-Examples/Ux/Prefabs
  2. Prefab “RectangleButton” fromHoloToolkit/Ux/Prefabs/Buttons
  3. Prefab “MiniButton”, from HoloToolkit-Examples/Prototyping/Prefabs
  4. Prefab “ButtonHolographic”, from HoloToolkit-Examples/Ux/Prefabs
  5. Prefab “SquareButton”, fromHoloToolkit/Ux/Prefabs/Buttons
  6. Prefab “ButtonPush”, from HoloToolkit-Examples/Ux/Prefabs
  7. Prefab “CircleButton”, from HoloToolkit/Ux/Prefabs/Buttons
  8. Prefab “BasicButton”, from HoloToolkit-Examples/Prototyping/Prefabs
  9. Prefab “ButtonTraditional”, from HoloToolkit-Examples/Ux/Prefabs

There is some more stuff, but I don’t think they are very usable compared to these.

Interactive or not interactive, that’s the question

Some buttons (but not all) have an “Interactive” script component attached. Only the Button (1), the MiniButton(3) and the BasicButton (8) have this script attached. For the other 6 buttons, it’s simply a matter of dragging it onto the button from HoloToolkit-Examples/Ux/Scripts.

To see how that works, I have made a little script, that shows game object for about 1/10th of a second when the method “Click”  is called. It’s not quite rocket science

using System.Collections;
using UnityEngine;

public class Clicker : MonoBehaviour
{

    public GameObject ObjectToShow;

    private void Awake()
    {
        ObjectToShow.SetActive(false);
    }

    public void Click()
    {
        ObjectToShow.SetActive(true);
        StartCoroutine(HideAfterTimeout());
    }

    IEnumerator HideAfterTimeout()
    {
        yield return new WaitForSeconds(0.1f);
        ObjectToShow.SetActive(false);
    }
}

Then I add a 3DTextPrefab to the scene (let’s call that ClickText), attach the script about it, and then drag the ClickText object on top of the “ObjectToShow” field

image

Now if we want the MiniButton (3) to actually respond to these events…

image

…we have to click the + button under “On Select Events()”, select “Editor and Runtime”, drag the ClickText on the object box, and then select “Clicker.Click” from the dropdown (first select “Clicker”, then “Click” – it’s a menu with a submenu). Now if you have done everything right, the text “Click!” will briefly flash when you tap the MiniButton.

You can use this trick for all the buttons – if they don’t have the Interactive script by default, just drag it on them, and go from there. In the sample project, all buttons make the text appear.

Feedback sounds

In Mixed Reality environments, most users are new, so giving feedback that the actually selected something is key. This may happen trough sound. You are lazy (like me):  RectangleButton (2), MiniButton (3), ButtonHolographic (4) and CircleButton actually have these built-in. When you press those, they will make a click sound.

Visual feedback

Basically, there are two types of feedback involved with buttons. First, you want to make sure the user understand something is actually selectable. A nice way is to have the button light up in some way when the gaze cursor hits it. And guess what, apart from the BasicButton, they all have that built-in for free.

  • RectangleButton (2), MiniButton(3), SquareButton (5), ButtonPush (6) and CircleButton(7) become brighter if the gaze cursor strikes them.
  • ButtonHolographic (4) does not only become brighter, but text and icon on the button move a bit ‘forward’ when the gaze cursor strikes it. A pretty cool sight to see.
  • Button (1) and ButtonTraditional (9) not only become brighter, but also animate part of themselves outward in an animation that makes it very clear this can be clicked upon. They very much resemble real physical buttons, in that way.

When it comes to actually clicking the button:

  • RectangleButton (2), MiniButton(3),SquareButton (5), and CircleButton(7) flicker briefly when they are actually clicked
  • ButtonHolographic (4) does not flicker, but the text and it’s icon move slightly backward into the button. Note: default the ButtonHolographic only shows text, more on that later.
  • Button (1), ButtonPush (6) and ButtonTraditional (9) animate backwards and change color slightly when pushed, really mimicking the behavior of a physical button.

Setting Icons – the tricky way

SquareButton, RectangularButton and CircleButton

These at least show a default icon, called ObjectCollectionSphere

image

The UI suggests you can use select from a number of predefined icons using a dropdown. Now that is technically correct, but unfortunately that does not have any effect – the dropdown always jumps back to “ObjectCollectionSphere” and the icon never changes. Fortunately there’s another way to change the Icon.

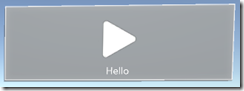
imageFirst of all, we need an icon to use. I took this one as displayed to the right: I want to make this into a kind of “Play” button, as if to start music. First copy the image (play.png) into your project (be aware – the background is not black, but transparent). I typically make a folder “Textures” for these kind of images. Then simply select “Override Icon” and drag the Icon in “Icon Override”

image

And lo and behold:

image

One icon with button. The same procedure can be followed for SquareButton and CircleButton

HolographicButton

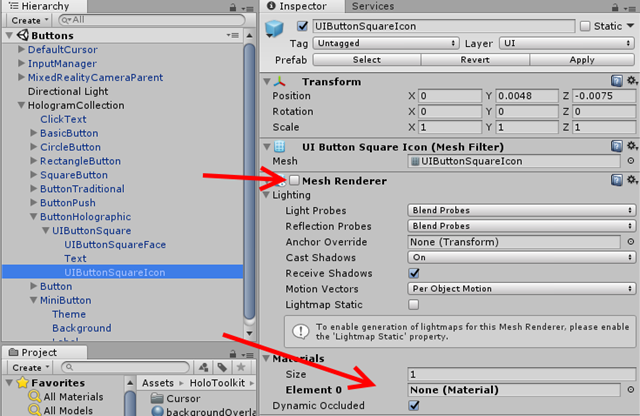
This is a bit harder, but not much. In theory, you should be able to using the same UI as with the previous buttons, but unless I miss something, I can’t get it to work. So I dived a little deeper, and found the sub prefab UIButtonSquareIcon. That has a Mesh renderer, but that’s turned off, and has no materials defined either

image

imageIf you just fix enable the Mesh Render, you just get an ugly magenta square – the color Unity typically uses when something is wrong.

So how do we this thing to display an icon on this button? suppose we want to make this a “play” button, with an icon like before. Make a new Material (I always use a folder “Materials” for that). After that,you only need to select the Fast Configurable shaded, set Rendering mode to transparent, and drag the Play image on top of the square I indicated.

image

And then it’s simply a matter of dragging the material in the first entry of the Materials list

image

imageAnd boom – a button with an Icon.Maybe I am doing it wrong, and am I not following the ideas of the developer of this button. However, this works, and that’s what counts.


Audio feedback

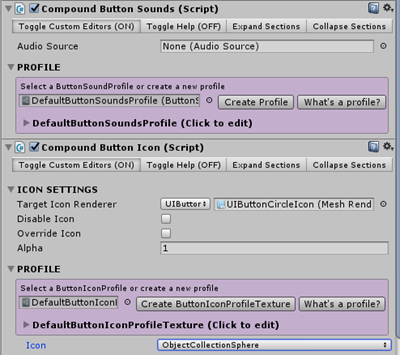
I have found out people also very much like audio feedback – since all computers have sounds and HoloLens even has the awesome Spatial Sound, so why not use it? RectangleButton (2), ButtonHolographic (4), SquareButton (5) and CircleButton (6) have a built-in click sound. It’s quite subtle, so maybe you want to replace it with a louder or different sound. You can change the click sound, and assign a lot more sounds to other events in these buttons, by finding the “Compound Button Sounds” script and setting a whole lot of other sounds. I would like to advise modesty: I don’t think Mixed Reality sounding like a pinball machine will be particularly convincing to business stakeholders – but there’s at least the possibility to tinker with sound on events:

image

Some bits, pieces and observations

  • Although all buttons work, I see no reason to use BasicButton (8) because it has no built-in feedback at all. I just mentioned it for the sake of completeness.
  • In some cases, I have noticed the click sounds not always works, or stops working halfway in the app. I have not yet been able to track down when and why this is happening.
  • Using older versions of Unity and/or of the Mixed Reality Toolkit I have observed the icons or texts disappear under some viewing angles. In the demo app, I have not been able to observe that. Maybe the newer version of Unity (I used 2017.3.0f3 this time) fixed it
  • The TraditionalButton has a bit of weird origin. If you select the button, you can see it’s origin is a bit above, a bit before, and quite a bit to the right of the actual graphics. This makes aligning it a bit of a challenge, but once you know that, it’s not a real problem

image

Conclusion

There’s quite a bit more of fun UI elements in the Mixed Reality Toolkit and it’s examples, and I intend to explore these a little bit more soon. Finally, I have to thank my colleague Edwin van Manen for coming up with the blog post title when I was describing it’s contents this morning. For those who don’t recognize it, it’s a reference to the movie “Fantastic Beast and Where To Find Them” that’s set in the Harry Potter ‘Universe’. Given the fact Mixed Reality in general and HoloLens in particular still feels like magic, it’s an awesome title indeed :D.

Code (although there is hardly any) can be found here.

27 December 2017

Centralized reusable audio feedback mechanisms for Mixed Reality apps

Intro – feedback is key

Although speech recognition in Mixed Reality apps is very good, sometimes the best recognition fails, or you slightly mispronounced something. Or the command you just said is recognized, but not applicable in the current state. Silence,  nothing happens and you wonder - did the app just not understand me, is the response slow or what? The result is always undesirable – users wait for something to happen and nothing does. They start to repeat the command and halfway the app executes the first command after all, or even worse – they start start shouting, which makes for a quite embarrassing situation (both for user and bystanders). Believe me, I’ve been there. So – it’s super important to inform your Mixed Reality app’s user  that a voice command has been understood and is being processed right away. And if you can’t process it, inform the user of that as well.

What kind of feedback?

Well, that’s basically up to you. I usually choose a simple audio feedback sound – if you have been following my blog or downloading my apps you are by now very familiar with the ‘pringggg’ sound I use in every app, be it an app in the Windows Store or one of my many sample apps on GitHub. If someone uses a voice command that’s not appropriate in the current context or state of the app, I tend to give some spoken feedback, telling the user that although the app has understood the command, can’t be executed now and if possible for what reason. Or prompt for some additional action. For both mechanisms I use a kind of centralized mechanism that uses my Messenger behaviour, that already has played a role in multiple samples.

Project setup overview

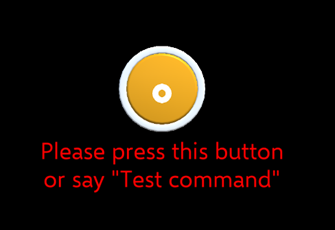
The hierarchy of the project is as displayed below, and all is does is showing the user interface on the right:

imageimage

If you say “Test command”, you will hear the “pringggg” sound I already described, and if you push the button the spoken feedback “Thank you for pressing this button”. Now this is rather trivial, but it only serves to show the principle. Notice, by the way, the button comes from the Mixed Reality Toolkit examples – I described before how to extract those samples and use them in your app. 

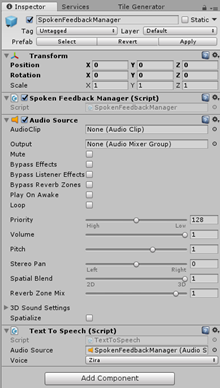
The Audio Feedback Manager and Spoken Feedback Manager look like this:

imageimage

The Audio Feedback Manager contains an Audio Source that just contains the confirmation sound, and a little script “Confirm Sound Ringer” by yours truly, which will be explained below. This sound is intentionally not spatialized, as it’s a global confirmation sound. If it was spatialized, it would also be localized, and the user would be able to walk away from confirmation sounds or spoken feedback, which is not what we want.

The Spoken Feedback Manager contains an empty Audio Source (also not spatialized), a Text To Speech Script from the Mixed Reality Toolkit, and a the “Spoken Feedback Manager’ script also by me.

ConfirmSoundRinger

using HoloToolkitExtensions.Messaging;
using UnityEngine;

namespace HoloToolkitExtensions.Audio
{
    public class ConfirmSoundRinger : MonoBehaviour
    {
        void Start()
        {
            Messenger.Instance.AddListener<ConfirmSoundMessage>(ProcessMessage);
        }

        private void ProcessMessage(ConfirmSoundMessage arg1)
        {
            PlayConfirmationSound();
        }

        private AudioSource _audioSource;
        private void PlayConfirmationSound()
        {
            if (_audioSource == null)
            {
                _audioSource = GetComponent<AudioSource>();
            }
            if (_audioSource != null)
            {
                _audioSource.Play();
            }
        }
    }
}

Not quite rocket science. If a message of type ConfirmSoundMessage arrives, try to find an Audio Source. If found, play the sound. ConfirmSoundMessage  is just an empty class with not properties or methods whatsoever – it’s a bare signal class.

SpokenFeedbackManager

Marginally more complex, but not a lot:

using HoloToolkit.Unity;
using HoloToolkitExtensions.Messaging;
using System.Collections.Generic;
using UnityEngine;

namespace HoloToolkitExtensions.Audio
{
    public class SpokenFeedbackManager : MonoBehaviour
    {
        private Queue<string> _messages = new Queue<string>();
        private void Start()
        {
            Messenger.Instance.AddListener<SpokenFeedbackMessage>(AddTextToQueue);
            _ttsManager = GetComponent<TextToSpeech>();
        }

        private void AddTextToQueue(SpokenFeedbackMessage msg)
        {
            _messages.Enqueue(msg.Message);
        }

        private TextToSpeech _ttsManager;

        private void Update()
        {
            SpeakText();
        }

        private void SpeakText()
        {
            if (_ttsManager != null && _messages.Count > 0)
            {
                if(!(_ttsManager.SpeechTextInQueue() || _ttsManager.IsSpeaking()))
                {
                    _ttsManager.StartSpeaking(_messages.Dequeue());
                }
            }
        }
    }
}

If a SpokenFeedbackMessage comes in, it’s added to the queue. In the Update method, SpeakText is called, which first checks if there are any messages to process, then checks if the TextToSpeech is available – and if so, it pops the message out of the queue and actually speaks it. The queue has two functions. First, the message may come from a background thread, and by having SpeakText called from Update, it’s automatically transferred to the main loop. Second, it prevents messages being ‘overwritten’ before they are even spoken.

The trade-off of course is that you might stack up messages if the user quickly repeats an action, resulting in the user getting a lot of talk while the action is already over.

On the Count > 0 in stead of any – apparently you are to refrain from using LINQ extensively in Unity apps, as this is deemed inefficient. It hurts my eyes to see it used this way, but when in Rome…

Wiring it up

There is a script SpeechCommandExecuter sitting in Managers, next to a Speech Input Source and a Speech Input Handler, that is being called by the Speech Input Handler when you say “Test Command”. This is not quite rocket science, to put it mildly:

public class SpeechCommandExecuter : MonoBehaviour
{
    public void ExecuteTestCommand()
    {
        Messenger.Instance.Broadcast(new ConfirmSoundMessage());
    }
}

As is the ButtonClick script, that’s attached to the ButtonPush:

using HoloToolkit.Unity.InputModule;
using HoloToolkitExtensions.Audio;
using HoloToolkitExtensions.Messaging;
using UnityEngine;

public class ButtonClick : MonoBehaviour, IInputClickHandler
{
    public void OnInputClicked(InputClickedEventData eventData)
    {
        Messenger.Instance.Broadcast(
            new SpokenFeedbackMessage { Message = "Thank you for pressing this button"});
    }
}

The point of doing it like this

Anywhere you now have to give confirmation or feedback, you now just need to send a message – and you don’t have to worry about setting up an Audio Source, a Text To Speech and wiring that up correctly. Two reusable components take care of that. Typically, you would not send the conformation directly from the pushed button or the speech command – you would first validate if the command can be processed in the component that holds the logic, and then give confirmation or feedback from there.

Conclusion

I hope to have convinced you of the importance of feedback, and I showed you a simple and reusable way of implementing that. You can find the sample code, as always, on GitHub.

26 December 2017

Short tip: using the UI components from the Mixed Reality Toolkit examples

The Mixed Reality Toolkit is the foundation for nearly all apps built for HoloLens and Windows Mixed Reality immersive head sets. It has a lot of indispensable components that make building these apps not so much a breeze, but al least a lot less tedious. It’s a bit sparse as far as actual UI components is concerned. They are now in the process of merging the awesome UI stuff from the Mixed Reality Design Labs project in it. This process is not ready by far, so far there’s only some simple buttons in it.

But if you look into this part of the code in the Mixed Reality Toolkit on GitHub , you will notice there being three folders:

image

The last one contains the actual Mixed Reality Toolkit, the 2nd the Unit Test which are not very interesting for us right now, but the first contains a whole lot of examples. And in those examples, a whole lot of nice UI controls like a host of buttons, a slider, a check box, toggles, toolbars, a very cool loader animation, helpers to draw lines and curves and probably a lot I have not noticed yet. There’s also a lot of demo scenes to show them off. But the Examples folder contains 114 MB of assets, almost doubling the size of already hefty MRKT itself.

Extracting only the UI elements is pretty simple:

  • Clone the project from Github
  • Copy the whole HoloToolkit-Examples into your projects Assets folder, next to the HoloToolkit
  • Delete everything but the these two folders:
    • HoloToolkit-Examples\UX
    • HoloToolkit-Examples\Prototyping
  • [optional] remove the “Scenes” subfolder from both the UX and the Prototyping folder. But maybe you should have look around first.

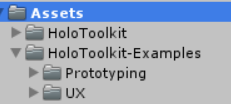
So you will end up with the following asset folder structure:

image

And then you can use cool stuff like this, as shown in the InteractiveButtonComponents scene:

image

Or these holographic buttons as you can find in ObjectCollectionExample scene (amongst a lot of other stuff)

image

And these samples of how to draw lines in the ‘air’ in the LineExamples scene

image

So far I have only used the icon buttons, but those are pretty cool in itself because they quite resemble the buttons in the Holographic shell, so your app’s user should immediately recognize what they are for.

No separate code this time, as all the code is in the MRTK repo itself. I do encourage your to root around through it, there’s quite some cool surprises in there.